Transcript
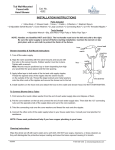
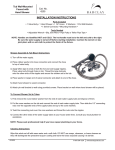
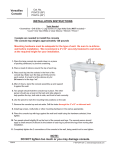
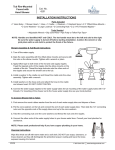
Undercounter
Basins
INSTALLATION INSTRUCTIONS
Tools Needed
• Pencil • Tape Measure • Jigsaw • Wrench • Hammer • Screwdriver • Drill •
Materials Needed
• Sink • Faucet • Drain Assembly • Supply Pipe & Fittings • Drain Pipe, Trap & Fittings • Silicone Sealant •
• Sink Clips (NOT Provided) •
• If possible, attach the drain to the lavatory before installation.
• Install the water supplies and drain piping according to the manufacturer.
• Verify cabinet clearance beneath the countertop to accommodate lavatory basin,
faucet valving, and drain piping.
• Cut out the template where indicated for the countertop opening.
• Cut along the inside of the cutting line.
• Position the template on the countertop to ensure clearance between the lavatory, faucet,
and backsplash.
• Trace around the template on the countertop with a pencil.
• Mark the faucet hole centerline on the countertop.
• Cut out the countertop opening by carefully following the pencil line traced from the template.
• Position the lavatory in the cut-out and verify the fit.
For Wood Countertops:
Be sure to waterproof any exposed areas of wood.
1.
2.
3.
4.
If the countertop has not been installed, install it at this time.
Drill the faucet holes according to the faucet installation instructions.
Install the faucet and drain according to the manufacturer’s instructions.
Apply a continuous bead of quality sealant to the top surface of the lavatory
rim where it will contact the countertop.
5. Install the lavatory to the countertop with sink clips (not provided).
6. Position the lavatory squarely under the cut-out before tightening the clamps.
7. Draw the lavatory rim up against the countertop until it is snug. Do not overtighten.
8. Immediately wipe away any excess sealant and fill any voids as needed.
9. Allow the sealant to set for 30 minutes before proceeding.
10. Connect and tighten the trap to the drain, and complete the water supply
connections to the faucet according to the faucet instructions.
11. Run water into the lavatory and check for leaks.
NOTE:
DO NOT tighten too much or you may damage bowl.
9/16/08
P 847•244•1234
www.barclayproducts.com