1
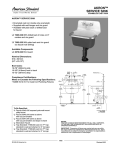
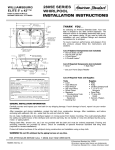
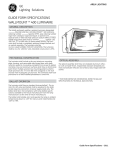
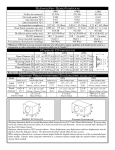
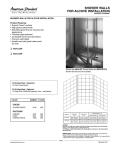
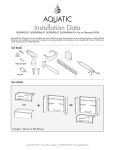
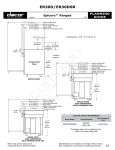
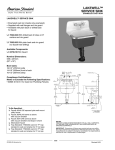
Installation
Instructions
ACRYLIC SHOWER BASE
MODELS: 3232.ST, 3636.ST, 4242.ST, 4832.ST, 4834.ST, 6032.STLH,
6032.STRH, 6034.ST, 3636 NEO, 3838.NEO, 4242.NEO
Thank you for selecting American Standard...the benchmark of fine quality for over 100 years.
To ensure that your installation proceeds smoothly--please read these instructions carefully
before you begin.
Certified to comply with ANSI Z124.2.
Observe local plumbing and building codes.
For alcove (.ST models) installation only:
The opening dimensions should be 1/8" larger than dimensions shown.
7 5 18 17- 10 0 R ev. R
NOTE: Read instructions completely before proceeding with installation.
3636.NEO
4242.NEO
3838.NEO
17-7/8"
(454mm)
19-7/8"
(505mm)
24"
(610mm)
656mm
(25-13/16")
25-3/4"
(654mm)
918mm
(36-1/8")
25-5/8"
(651mm)
42-1/8"
(1070mm)
38-1/16"
(967mm)
454mm
(17-7/8")
318mm
(12-1/2")
19-7/8"
(505mm)
12-1/2"
(318mm)
318mm
(12-1/2")
12-1/2"
(318mm)
921mm
(36-1/4")
12-1/2"
(318mm)
38-1/8"
(968mm)
4834.ST
FRONT
3232.ST
24"
(610mm)
12-1/2"
(318mm)
32"
(813mm)
42-1/4"
(1073mm)
6034.ST
FRONT
34-1/8"
(867mm)
34-1/4"
(870mm)
16-3/4"
(425mm)
15-3/8"
(391mm)
FRONT
16-3/4"
(425mm)
24-1/16"
(611mm)
16"
(406mm)
32"
(813mm)
30"
(762mm)
60-1/8"
1527mm
48-1/8"
(1222mm)
1
FRONT
4832.ST
3636.ST
4242.ST
FRONT
FRONT
32"
(813mm)
42-1/8"
(1070mm)
36-3/16"
(919mm)
16"
(406mm)
20-3/4"
(527mm)
17-3/4"
(451mm)
24"
(610mm)
48"
(1219mm)
21"
(533mm)
18"
(457mm)
42-1/8"
(1070mm)
36"
(914mm)
FRONT
32"
(813mm)
SPECIFICATIONS:
Product No.
Size:
3232.ST
3636.ST
4242.ST
6032.STLH
32" x 32"
(813 x 813mm)
36" x 36-3/16"
(914 x 919mm)
42-1/8" x 42-1/8"
(1070 x 1070mm)
60" x 32"
(1524 x 813mm)
Product No.
Size:
4834.ST
6034.ST
3636.NEO
6032.STRH
48-1/8" x 34-1/4"
(1222 x 870mm)
60-1/8" x 34-1/8"
(1527 x 867mm)
36-1/4" x 36-1/8"
(921 x 918mm)
60" x 32"
(1524 x 813mm)
Product No.
Size:
3838.NEO
4242.NEO
4832.ST
38-1/8" x 38-1/16"
(968 x 967mm)
42-1/4" x 42-1/8"
(1073 x 1070mm)
48" x 32"
(1219 x 813mm)
6032.STLH
6032.STRH
16"
(406mm)
32"
(813mm)
16"
(406mm)
8"
(203mm)
60"
(1524mm)
1
Insure the floor and stud walls are square and plumb. Provide a 5" x 5" (127mm x
127mm) opening in the floor for the drain (see Figs. A & B). The drain plug
accom-modates a 2" (51mm) PVC waste pipe. The waste pipe should extend above
the surface of the sub-floor, refer to chart on page 2 for the required dimensions.
See product drawings on this page for the specified drain locations.
3636.NEO, 3838.NEO, 4242.NEO
C/L
90°
6-5/8
A
3232.ST, 3636.ST, 4242ST, 6034.ST, 4834.ST, 4832.ST
C/L
After the bedding material has been poured and
before it sets, lower the shower base into position
with the drain assembly sliding over the waste pipe
as shown in Fig. E. It will be necessary to "rock" the
shower base until the top of the tile flange aligns
with the lines drawn in Step 3 on the stud walls.
Make certain the apron is contacting the rough floor
along the entire length of the shower base. Insure
that the base is level in two directions (see Fig. F).
Snap strainer back into place and check for proper
drainage.
90°
6-5/8
6-5/8
51 mm (2)
PVC Waste Pipe
4
127mmx127mm
(5x5) Opening
51 mm (2)
PVC Waste Pipe
B
(See Product Chart for Drain Location)
127mmx127mm
C/L
(5x5) Opening
(See Product Chart for Drain Location)
SHOWER BASE
3636.NEO
3838.NEO
4242.NEO
3232.ST
4834.ST
6034.ST
3636.ST
4242.ST
4832.ST
6032.STRH/LH*
Note: Variations in
levelness of the subfloor
may require adjustment
of waste pipe height.
* For 6032.STRH and
6032.STLH, see drawing
for proper location of
5" x 5" drain cut-out.
2
90°
90°
DRAIN
ASSEMBLY
Before installing drain into
the shower base, remove
strainer (see Fig. C). This
will be installed after
shower base is in its final
position. Install the drain to
the shower base as shown
in Fig. D. Use silicone
sealant between drain
body and shower base.
WASTE PIPE HEIGHT
5/16" ± 1/16"
3/8" ± 1/16"
5/16" ± 1/16"
3/8" ± 1/16"
1/4" ± 1/16"
1/4" ± 1/16"
1/4" ± 1/16"
5/16" ± 1/16"
1/2" ± 1/16"
1/2" ± 1/16"
Strainer
Rubber
Caulking
Gasket
Level
F
Level
Level base in two directions.
Note: Allow the bedding material to completely
harden before applying weight to the bottom of
the shower base.
5
Tape over the strainer to protect the finish
and prevent construction debris from
entering the drain.
Finish installation as shown in Figure H.
Drain
Body
Silicone
Sealant
Tile
Shower
Base
Caulk
Rubber
Gasket
Waterproof
Drywall
Tile
Adhesive
Fiber
Gasket
Locking
Nut
C
Stud
Waterproof
Drywall
13mm (1/2")
minimum
No Bedding
Under
Apron
3 mm
(1/8)
H
Bedding Material Area
Shower
Base
Splash
Lip Flange
CLEANING AND MAINTENANCE
159mm
(6-5/8)
Bedding
Material
D
3
51 mm (2)
PVC Pipe
51x102 mm
(2x4) Stud Wall
127 mm (5)
Draw a line 6-5/8" (159mm) from the sub-floor
on to the studs at each side of the opening.
Using this line and a level, mark the remaining
studs. (See Figs. A & B.) This will be the
installed height of the shower base. Mix the
low-shrink bedding material (grout, mortar,
plaster, etc.). Concrete is not
recommended. Apply enough bedding
material to support the entire bottom of the
shower base. The bedding material must
not be used under the apron (front edge).
E
Your American Standard shower base is designed
to last indefinitely with reasonable care and
maintenance.
The high-gloss acrylic surface is resistant to impact
and retains its luster with proper care and
maintenance. An integral, slip-resistant surface is
incorporated for user safety.
General Cleaning: Do not use abrasive cleaners; a
mixture of warm water and a mild liquid detergent is
adequate for most cleaning. Strong detergents
formulated for use on tile or porcelain-enamel
surfaces should be avoided.
Caution: Do not allow liquid detergent containers to
remain on base surfaces for more than a few
moments. Do not use Lestoil, Windex, Mr. Clean, Dow
Disinfectant (spray or concentrate), or Lysol Basin, Tub
and Tile Cleaner. Do not allow nail polish remover, dry
cleaning fluid, acetone, paint remover, or other
solvents to contact acrylic surface.
Lift and lower base over center
of drain pipe and set into place
FOR AFTER-SALES SERVICE CALL 1 (800) 442-1902.
©
A S A m e r i c a , I n c . 2 010
751817-100 Rev. R