1
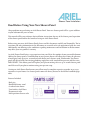
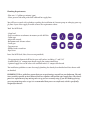
9000 SERIES SHOWER PANEL INSTALLATION
Shower Panel Installation
Read Before Using Your New Shower Panel
Congratulations on purchasing an Ariel Shower Panel. Your new shower panel will be a great addition
to your bathroom for years to come.
This manual will be your reference for installation, instructions for care of the shower panel, operation
of the shower panel and for the benefits of using an Ariel Shower Panel.
Before using your new Ariel Shower Panel, please read this document carefully and thoroughly. The instructions and safety information in this document are essential to the safe operation of your new unit.
Additionally, not adhering to the conditions regarding maintenance and installation in this document
may affect your new product’s warranty.
An Ariel Shower Panel brings a spa experience into your life in the comfort of your personal bathroom.
Adding the shower panel as a modification to your present shower will allow you to enjoy the pleasures
of massaging body spray jets, an overhead rain shower and a shower wand. Furthermore, the shower
panel will operate with your existing plumbing supply lines with standard line pressure and flow rates.
IMPORTANT: This shower panel will replace your present mixing valve set up. A retrofit shower panel
would be used if you plan to continue using your present setup.
Owning an Ariel Shower Panel means you will not need to complete expensive upgrades to get a spa
experience in your home. Our shower panels come with luxury features in the form of standard equipment.
Features Included:
-Body jets
-Handheld shower wand
-Overhead rain shower
-Two Stainless Steel Hoses
-Thermostatic valve
-Multi-position diverter valve
Instructions for Installation
Carefully read and follow the instructions in the following guidelines. If you fail to follow these recommended instructions and techniques for installation, you risk affecting the warranty claims for your product and causing damage to the unit and the surrounding area.
IMPORTANT: In order to install this shower panel, simple understanding of plumbing techniques will
be necessary. Please contact your dealer or a professional plumber if you are unfamiliar with plumbing
techniques or have questions.
While determining the installation location for your new unit, we recommend you take into account the
guidelines below. All installations are unique and these guidelines are general:
1.
This shower panel is designed for indoor use ONLY. It is not intended for outdoor use or other uses.
2.
We have provided flexible supply hoses. It is recommended that you consider installing individual cut off valves for the cold and hot water supplies.
Prior to installation, make sure to check your unit for the following:
1.
2.
Look over all of the unit’s components. Check for damaged and broken components and sections.
Contact your dealer or the manufacturer if you find damaged sections.
Vacuum Break
The risk of backflow, which can contaminate the drinking water supply, is reduced
by a vacuum break. A vacuum break, pictured here, is a backflow preventer. The vacuum break will emit a small amount of water when the shower is turned on (when
the hand shower is above the level of the vacuum break) and/or when the shower
control valves are opened and closed. The presence or absence of water pressure in
the supply line causes the seating and unseating of the diaphragm.
Plumbing Requirements:
-Flow rate: 2.5 gallons per minute (gpm)
-Water pressure: 60 to 80 psi for both cold and hot supply lines
You will have to speak with a plumber regarding the installation of a booster pump or enlarging your supply lines if your water supply in unable to meet the requirements above.
Tools You Will Need:
-3 foot level
-Drill, screwdriver attachments & masonry or tile drill bits
-Teflon tape
-Adjustable wrench
-Bathroom rated silicone sealant
-Caulk gun
-Tape measure
-Phillips head screwdriver
-Pipe cutter
Items You Will Need (Note, these are not provided):
-The appropriate diameter drill bits for your wall surface, including ¼” and 5/16”
-Standard male 3/8” compression threads supply line connection fittings
-Optional supply line cut off valves with standard male 3/8” compression threads
The installation guidelines assume that rough plumbing has already been finished and that shower walls
are finished.
IMPORTANT: These guidelines assume that you are performing a remodel on your bathroom. The only
items needed to operate an Ariel Shower Panel are separate cold and hot water supply lines. The shower
panel is a replacement of any mixing valve set up you are currently using. If you are thinking of using
your current mixing valve set up, it is recommended that you use a retrofit unit, which is specifically
designed for that use.
WARNING: You must turn off the cold and hot water supply to the location of installation before
starting the installation.
Connecting to the Supply Lines
-Note, the connection to the cold and hot supply lines is not provided. Two flexible hoses, which are provided with the shower panel unit, make the connection between the supply lines and the shower panel.
-Standard female 3/8” compression threads with appropriate washers for connections are used for the
hoses.
-Separating the cut off valves for the cold and hot water supply lines will assist in any future service performed to the unit. It is recommended that you do this, although it is not required.
-Purchase the appropriate valves and fitting for your installation that will provide male 3/8” compression
threads for attachment to the flexible hoses.
-Before continuing your installation, the supply connections must be completed.
Mounting Your Showerhead
-Install the rubber washer onto the showerhead and install onto the shower arm.
Mounting the Brackets of the Shower Panel
While mounting the brackets of your new shower panel, the following will influence your decision on
which height to mount the unit at:
-It is recommended that the shower panel be mounted at a height that will make the unit accessible to
people of varying heights. That way, various people in the home can enjoy the shower panel.
-A comparison between the height of the overhead rain shower to the body jets and the height of all of the
people who will be using the shower panel.
-Whether or not the height you choose will allow the shower panel to completely cover up the connection
points for the cold and hot water supplies.
In order to determine your installation location of the shower panel, you will require the use of a tape measure
and pencil (or some type of marking tool).
IMPORTANT: A second person may be needed to assist you in holding up the unit while another person makes
the measurements used during the installation.
Steps for Mounting the Shower Panel
1.
First, locate the package including the wall anchors, mounting brackets and screws. These will be used in the following process.
2.
Mark where the center of the shower panel will be placed with a center line. (This is usually at the center of the plumbing supply lines.)
3.
Make marks on the bottom and center of the shower panel while holding it at your desired height and location on the center line. This will act as a reference point for the measurements of the bottom of the shower panel and the other measurements for placing the mounting brackets.
4.
Lay the unit on the ground with its back facing up. Find the two built-in hanging straps of the unit.
5.
The following guidelines will assist you in placing the mounting brackets:
a.
b.
c.
d.
e.
f.
g.
Four mounting brackets are used in units with two single bar straps. (Two will go on the top strap and two will go on the bottom strap.)
Determine the distance between the top and bottom strap. This is measurement “X.” Measure from the top to top or bottom to bottom of the straps.
Determine the distance between the most outside measurement from the bottom of the top strap to the bottom of the shower panel. Measure this and it will be measurement “Y.”
Starting from the reference mark (which was made when the shower panel was on the wall), mea
sure up the distance “Y” to the bottom outside of the shower panel and mark this. (“Y” was the distance from the bottom of the top strap to the bottom outside of the shower panel.) Mark this.
Place a second mark a few inches to one side of the mark you just made. This second mark should be at the same height. Make a horizontal line through these two marks with the use of a level.
The two mounting brackets need to be equally spaced about the centerline (and two mounting brackets are required on each strap). (Tip: Dividing the width of the shower panel by two is a good rule of thumb for determining the distance between the two brackets.) Divide the distance between the two brackets to determine the distance between each bracket and the center line.
-Example: If the width of the shower panel is 12 inches, the distance between the brackets is 6 inches (12/2=6). Thus, the distance between the center line and each bracket is 3 inches (6/2=3).
Mark the distance for the two mounting brackets.
Hold one mounting bracket flat against the wall with the mounting holes over the mark indicat
ing the bracket’s location from the center line. The mounting holes must point towards the bottom of the shower.
h. You will have to line up this mounting bracket so that the bend in the bracket is on the horizontal line you drew earlier. Meanwhile, make sure the mounting holes are still centered on the mark you made for the bracket’s location.
i. Mark both of the mounting holes in the mounting bracket.
j. Repeat this process for the other mounting bracket and you will have successfully marked the loca
tions for both the top brackets.
k. Use the location of one of the top mounting brackets as a reference for the next measurement. Measure the distance “X” straight down from the top mounting hole and make a mark. (“X” is the distance between the two mounting straps.)
l. Repeat this process with the location of the other top mounting bracket.
m. Use one of the last two marks you made to place the third mounting bracket. Center the top mounting hole of the bracket within the mark. Make sure the mounting bracket is vertical and mark both of the mounting holes.
n. Repeat the last step with the fourth and last mounting bracket.
o. Drill each hole location. Use a 5/16” diameter drill bit with the appropriate drill bit for your wall surface.
TIP: Pilot drill with a smaller drill bit before stepping up to the final size if your wall surface is prone to
chipping and cracking.
p. Place the plastic wall anchors into the holes you have drilled.
q. With a Phillips screwdriver, or a drill with a Phillips bit, attach the mounting brackets to the wall surface with the use of the provided screws.
Connect Your Shower Panel to Your Water Supply
After installing the mounting brackets for your shower panel, the final water connections will be made.
1.
You will find the input cold and hot water connections on the back of the thermostatic valve on the shower panel unit. The cold connection is labeled with a blue sticker and the hot connection is labeled with a red sticker.
2.
Connect each of the flexible hoses to the thermostatic valve. Then connect each hose to the corre
sponding cold and hot water supplies. Secure both hoses.
IMPORTANT: Use the rubber washer included in your purchase.
3.
Turn on each of the valves if you installed cut off valves on your supply line. Check for leaks in both the cold and hot water supply. If there are no leaks, you may move on to the next process in the installation.
Hanging your Ariel Shower Panel
You can hang your shower panel on the mounting brackets you installed when you are done checking for leaks.
To hang the shower panel:
1.
2.
3.
4.
5.
Put your shower panel on the wall surface with the mounting straps above the corresponding mounting brackets while making sure that the flexible supply lines are in the shower panel enclosure.
Slide the shower panel down. Stop when it rests on the mounting brackets you installed.
The shower panel must be seated onto the mounting brackets by pulling down on the shower panel. You will have seated the unit on the mounting brackets properly after you feel a slight movement down
ward and the shower panel stops moving.
Seal the shower panel with a caulk gun using a bathroom rated caulk or sealant. Run sealant where the unit contacts the wall surface, using a bead of caulk.
Use excess caulk to fill in any cracks or spaces in the joint, and wipe away the excess caulk.
The Shower Wand and Hose Installation
1.
2.
3.
There are two tapered ends to the shower wand. One end has an O-ring around the outside. Install the end with the O-ring onto the shower wand. Before screwing the hose and the wand together, install the rubber gasket that came with your unit.
The other end of the hose (without the O-ring) will be installed onto the outlet spout for the shower wand. A rubber gasket must be placed between the outlet spout and the hose.
The shower wand goes into the wand holder with the O-ring holding it in place.
Operating Your Ariel Shower Panel
IMPORTANT: You must read and understand all of the safety statements and warnings in this document
before operating your shower panel unit. Failure to do so may risk the warranty of your product. If you do not
understand this document, we ask that you contact the manufacturer or your dealer for assistance.
Diverter Valve
The flow of water to the overhead shower, shower wand, body jets and the ON/OFF position is controlled by
the diverter valve.
The diverter valve is operated by rotating it to one of the devices above depending on which one you want to
use. After rotating it to a device you will feel a click for each device.
IMPORTANT: The diverter can only operate one device at one time. Only one device can be operated at one
time because of current water conservation requirements and typical residential flow rates and water pressure. For example, the body jets and overhead shower will not work at the same time.
Thermostatic Faucet
The thermostatic faucet sets the mixture between the cold and hot water in the unit. The unit will
not change the water temperature beyond the temperature of the hot water heater in your home; the
markings for temperature are only for reference.
The unit will operate at the same temperature unless you change the setting of the thermostatic faucet. Set the thermostatic faucet to the temperature you prefer.
Press the release button in order to operate the faucet and turn the faucet to your preferred temperature.
Showerhead
1.
2.
3.
Set the diverter valve to the showerhead setting and the water will start.
Designate the temperature you want with the thermostatic valve.
Turn the diverter valve to “off ” when you are done.
Body Jets
1.
2.
3.
Set the diverter valve to the body spray jet setting and the water will start.
Designate the temperature you want with the thermostatic valve.
Turn the diverter valve to “off ” when you are done.
Shower Wand
4.
5.
6.
Set the diverter valve to the shower wand setting and the water will start.
Designate the temperature you want with the thermostatic valve.
Turn the diverter valve to “off ” when you are done.
Troubleshooting
Care and Maintenance of Your Ariel Shower Panel
Follow these guidelines to ensure that your luxury shower panel lasts a long time and to keep
your warranty intact. The proper maintenance of the product is crucial. If you do not adhere
to the following guidelines, the resulting damage will not be covered by the warranty from the
manufacturer. It is important that you follow these guidelines so that your shower panel unit’s
life will last longer.
If you follow the guidelines for care and maintenance, the finish and look of the shower panel
will last. The shower panel is made of high quality acrylic that requires proper care.
IMPORTANT: Abrasive cleaners should never be used on the shower panel unit. Do NOT use
Ajax or Comet for cleaning the acrylic unit; it will result in dulling the finish on the unit and
scratching the acrylic surface. Do NOT use MEK, acetone, mineral spirits or any solvent based
cleaner for cleaning the shower panel.
Mild, non-abrasive cleaners should be used to clean the shower panel unit. Appropriate cleaners include Soft Scrub or cleaning products that are specifically designed for use on an acrylic
surface.
The finish, luster and shine of your shower panel unit can be maintained by buffing and polishing the acrylic surface. This can be accomplished using appropriate products, such as Maguire’s
#10 Mirror glaze, automotive polishing paste, toothpaste or a good polishing compound.
If you do find minor, small scratches on the acrylic surface of the shower panel, you can gently
buff them using 600# grit wet sand paper. Also, the luster and shine of the surface can be restored using a surface polish.
An acrylic repair kit can be purchased for fixing chips in the acrylic surface or scratches. Acrylic
repair kits can be found at home centers and hardware stores. Follow the instructions and guidelines that come with the acrylic repair kit.
Showerhead and Body Jets
The showerhead and body jets may need to be cleaned because of hard water or the build-up of
calcium, rust or lime, depending upon the chemistry of your water.
To clean the showerhead and/or the body jets, you first need to remove the piece from the shower panel by screwing it off. It can be cleaned with a solution of water and mild vinegar (50/50).
You can also soak the piece in the solution before cleaning it. Alternatively, you may use CLR or
another hard water cleaner.
500 West Warner Ave, Santa Ana, CA 92707
arielbath.com | atlasusa.net
Email: [email protected] | Phone: 1-714-622-1565