1
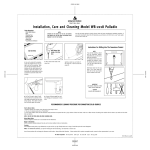
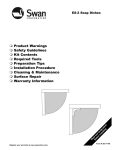
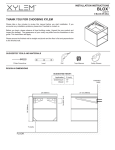
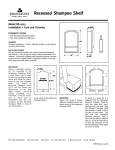
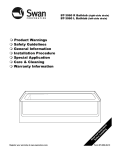
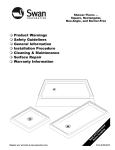
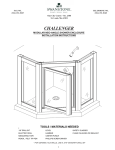
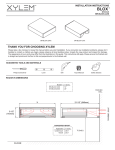
Tools required:
1
•
•
•
•
•
•
•
•
Ruler/Tape Measure
Drill
Masking Tape
Safety Glasses
Screwdriver
Saber Saw
1 -1/4”" Hole Saw
Caulk/Silicone Adhesive
Mineral Based Stains
Cleaners designed to remove iron or rust
should not harm Swanstone.
Marks Or Discoloration
WHITE automotive rubbing compound
may be used to remove stubborn marks
or discoloration.
Scratches
Use sandpaper, starting with coarsest grit
and going to finest grit until scratch disappears - blend area in with abrasive finishing pad.
4b
Apply
silicone
here
3
4a
2. Drill a starter hole inside of the cutout
line.
Apply
silicone
here
3. Using a saber saw, cut inside of the
cutout line. Trial fit to check for proper fit.
4a. Vessel Bowl Mount
Apply a silicone sealer around the base
flange and set bowl into place. Install
faucet, supply lines and drain per manufacturer’s instructions.
Hard To Remove Stains
1. Abrasive cleaners such as Ajax, Comet,
Bon Ami or Bar Keeper’s Friend.
2. The use of an abrasive pad such
as “Scotch-Brite.”
3. For the most stubborn stains, fill the
Swanstone vanity bowl about onequarter full with a 50/50
solution of bleach and water. After ten
or fifteen minutes of soaking, drain
solution from the bowl as you wash
and rinse both sides and bottom.
NOTE: DO NOT USE STEEL WOOL OR
METAL SCOURING PADS
1. Select the bowl template that applies to
the installation that you desire. Cut out the
inside of the template. Locate the template
front to rear and right to left on the countertop. Make sure that the bowl location will
not interfere with the cabinet below or the
plumbing. Attach the template to the countertop with masking tape and draw a pencil
line around the inside of the template.
2
RECOMMENDED CLEANING
PROCEDURE FOR SWANSTONE
SOLID SURFACE
4b. Drop-In Mount
Apply a bead of silicone sealer to the underside of the sink flange and position into
countertop opening. Install faucet, supply
lines and drain per manufacturer’s instructions.
NOTE: FOR SWANSTONE GRANITES,
Use #9 Fine Finishing Film for Final
blending. Use Paste Wax to Restore Color.
Use of these products will not damage
the Swanstone solid surface. Always follow label directions. If these methods fail
to produce acceptable results, contact the
Swan representative in your area.
Drop-in
Vessel Bowl Mount
Vessel Mount and Drop-In Template
Installation, Care & Cleaning
Model TRI-1815-IS Islandia
and Model TRI-1815-HL Halo
RECOMMENDED UNDERMOUNT INSTALLATION OF A SWANSTONE SOLID SURFACE HALO & ISLANDIA BOWL
Installation, Care & Cleaning Model TRI-1815-IS Islandia and Model TRI-1815-HL Halo
Prior to installation, inspect all product
for damage. Do not install damaged
material.
A Swanstone bowl can be mounted to a
countertop surface other than Swanstone
with 100% silicone adhesive only.
Mounting the Swanstone solid surface
bowl to any solid surface other than
Swanstone with a hard seam will void
the SWANSTONE warranty.
Supplied by Swan
• Vanity bowl
• Sink clips and screws
UNDERMOUNT REVEAL
UNDERMOUNT OVERLAP
Material Required
• 100% silicone
• Mineral spirits
• Contact cement
• Denatured alcohol
• 3/4" plywood cut to 3" wide strips
Working from the bottom of the countertop
3
4
desired overhang.
2. Position the template onto countertop at
the desired location. Bowl position will be
determined by cabinet size, cabinet supporting members and deck mounted fittings.
3. Cut bowl hole into countertop per manufacturer’s recommendations. Finish sink
hole as desired with tools compatible with
FRONT
FRONT
the manufacturer of the countertop.
1. Set the bowl into position being careful
2. Apply a continuous bead of 100 percent
3. Using the sink clamps and screws provid-
4. A sink clip should be positioned as illus-
that the overhang is uniform and aligned to
the cutout.
silicone around the bowl flange and set it
into place.
ed by Swan (1P3115-10), secure the
Swanstone bowl into place.
trated.
Cut 3" wide strips of 3/4" thick plywood and
trial fit around the perimeter of the
Swanstone bowl (except where faucet holes
will be located). It is suggested that a 1/4"
space exist between the plywood strips and
the bowl flange.
Join the plywood strips to the countertop
surface with contact cement.
Remove the Swanstone bowl and clean both
the countertop and sink flange with denatured alcohol.
Undermount Reveal
2
1
Undermount Overlap
Working from the top
of the countertop
1. Select the template that will provide the
APPROX. 1/4"
APPROX. 1/4"
Lightly tighten screws so sink position can
be verified.
RECOMMENDED CLEANING PROCEDURE FOR SWANSTONE SOLID SURFACE
Hard To Remove Stains
1. Abrasive cleaners such as Ajax, Comet, Bon Ami or Bar Keeper’s Friend.
2. The use of an abrasive pad such as “Scotch-Brite.”
3. For the most stubborn stains, fill the Swanstone vanity bowl about one-quarter full with a
50/50 solution of bleach and water. After ten or fifteen minutes of soaking, drain solution
from the bowl as you wash and rinse both sides and bottom.
NOTE: DO NOT USE STEEL WOOL OR METAL SCOURING PADS
Mineral Based Stains
Cleaners designed to remove iron or rust should not harm Swanstone.
Marks Or Discoloration
WHITE automotive rubbing compound may be used to remove stubborn marks or
discoloration.
Scratches
Use sandpaper, starting with coarsest grit and going to finest grit until scratch disappears blend area in with abrasive finishing pad.
Tighten screws securely. If desired, additional temporary clamps (not provided) can
be used to pull the sink flange tightly to
counter.
Use mineral spirits and a soft cloth to
remove excess silicone that has been
squeezed out by the mounting procedure.
Be sure that there is a consistent seal along
the interior perimeter of the bowl.
NOTE: FOR SWANSTONE GRANITES,
Use #9 Fine Finishing Film for Final blending. Use Paste Wax to Restore Color.
Use of these products will not damage the Swanstone solid surface. Always follow label directions. If these methods fail to produce acceptable results, contact the Swan representative in
your area.
Form 850-4-04-00M