Transcript
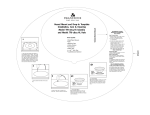
Drain installation instructions
Rubber
washer
Nut
Threaded
tailpipe
Installation with a JSG Oceana vessel:
Drill a hole in countertop slightly larger than the
width of your drain. (no less than 1 3/8” and no
larger than 1 1/2”).
Place a rubber washer and/or apply a thin bead of
caulking between vessel and countertop as a buffer.
Apply thin layer of plumber’s putty under rim of
drain and place into sink. Drain will go through
vessel and hole in countertop.
Hand tighten drain underneath countertop.
DO NOT OVERTIGHTEN.
Rubber washer
Nut
Threaded
tailpipe
Installation with a JSG Oceana drop-in or undermount lavatory:
Prior to installing the JSG Oceana drain,
have a professional install your drop-in
or undermount sink to the countertop.
JSG Oceana drains have no overflow hole so they
cannot be used with a sink with an overflow.
Apply thin layer of plumber’s putty under rim of
drain and place into sink.
Place rubber washer (included) between the sink and
the nut.
Hand tighten drain underneath sink.
DO NOT OVERTIGHTEN.
Rubber washer
Nut
Threaded
tailpipe
Care and Cleaning Instructions
After use, wipe your drain dry with a clean soft cloth. To clean, wipe with a damp
cloth and dry with a soft cloth. If necessary, regular Windex can be used. Do not use
harsh alkali or acid based detergents, abrasive polishes, or scouring cleansers when
cleaning JSG Oceana drains. S.O.S. pads and Scotch Brite Pads are not permitted as
they will scratch our decorative finishes. Do not leave coffee or vinegar laying in the
bottom of the sink basin or on any products.
215 North 4th Street, Jeannette, PA 15644 ph:724.523.5567 fax:724.523.0123 www.jsgoceana.com
Made in the U.S.A.