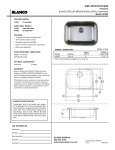
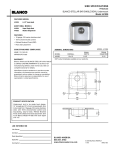
1
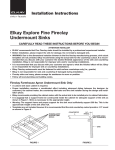
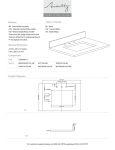
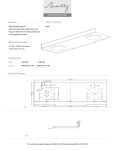
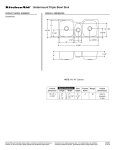
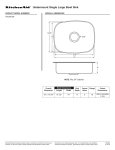
Undermount Sinks
INSTALLATION INSTRUCTIONS
These instructions are for installing Frigidaire undermount stainless steel sinks.
Undermount sinks are sinks that are installed below the countertop. If you are
installing another type of sink, such as a drop-in sink which is installed on top of
the counter, please refer to instructions specifically for those sinks.
Templates are supplied only as a guide. Use of the actual sink will ensure a more
accurate cutout.
The instructions that follow are for installing an Frigidaire undermount stainless steel sink in a solid surface
countertop only. Minimum thickness of the actual countertop material is one half-inch. In addition, a one-inch
build up around the sink is preferred. Frigidaire recommends that undermount sinks and routering of your solid
surface material should be performed by a professional installer for best results.
Requirements vary for installation in a granite, marble, stone, or butcher block countertop. Please contact your
fabricator for specific details.
Before installing, inspect the sink for damage. Do not install a damaged unit.
Remember, it is your responsibility to follow all local plumbing and building codes.
The warranty will be voided if these installation instructions are not followed.
STEP 1
Create a template.
Using a framing square, draw a line from front to back on the
bottom of the countertop, indicating the location of the center
of the sink.
Draw a line parallel to the front edge of the countertop,
indicating how far back the sink should be located. Typically the
setback is 2” to 2-1/2” from the front of the counter, depending
on the countertop overhang, the type of sink bowl and the size
of the sink deck.
To create a template, turn the sink upside down on the piece of
plywood and trace around it. Or place template transfer paper
or cardboard template on plywood. NOTE: paper and cardboard
templates are supplied only as a guide. Using the actual sink
ensures a more accurate cutout.
Mark the centerpoint of the sink on the template.
If you are using a 5/8” template guide on your router, draw
another line 1/16” outside the sink outline (this allows for the
5/8” template guide). If you are using other cutting methods,
adjust accordingly.
CAUTION: Be sure to cut on the inside of the template line to
obtain your desired reveal.
Adjust the template size to allow for the type of reveal.
Cut the plywood template, paying particular attention to the
corner radius.
TOOLS AND MATERIALS YOU WILL NEED
❚ Eye protection (safety glasses/goggles)
strongly recommended
❚ Ear protection strongly recommended
❚ Supplied undermount template and clips
❚ 3/8” thick plywood sheet for cutting
a template
❚ Two 6” bar clamps
❚ Framing square
❚ Pencil (not permanent marker)
❚ Silicone adhesive sealant
❚ 6 oz Ball-peen hammer
❚ File
❚ Slotted screwdriver
❚ Tape measure
❚ Drill and drill bit
❚ Stop block
❚ Router
❚ 5/8” template guide with straight
fluted router bit
❚ Rags
❚ Denatured alcohol
❚ Wood braces
Undermount Sinks
INSTALLATION INSTRUCTIONS continued
STEP 2
Make the sink cutout.
Find the center of the sink template and align it with
the center mark drawn on the countertop. Place the
template with the front edge along the front edge line
drawn on the countertop.
Secure the plywood template to the countertop using
6” bar clamps. Place the router over the plywood
template and cut around it, making sure the router
follows the edge of the template. This creates the sink
cutout.
Finish the inside of the sink cutout according to the
recommendation of the countertop material supplier.
STEP 3
Attach the undermount clips.
Position bowl so that reveal is centered. Then on
underside of countertop, drill holes for brass inserts for
undermount clips. Use a drill bit with stop block to avoid
drilling through the top. For 1/2” countertop material,
drill 3/8” deep holes.
Use three clips on the long sides of the sink, and two clips
on the short sides of the sink, or follow the locations on
the template that comes with the sink. Drill the holes 1”
back from the cutout edge.
NOTE: the undermount clips is 3/4” wide and 2-3/4” in
length. The clip may be too long for some installations.
If this is the case, make a brace out of wood or solid
surfacing, butt it up against the sink, and, on site, screw it
into the cabinet wall. Measure the thickness of the brace
and the cabinet wall so the screw does not go through to
the other side of the cabinet.
STEP 4
Install the sink.
Clean the bottom of the countertop and the top flange
(or lip) of the sink with denatured alcohol. Apply a bead
of silicone adhesive sealant to the top edge of the bowl
flange and position the bowl in the countertop.
STEP 5
Tighten the clips.
Tap the brass inserts (anchors) for clips into the pre-drilled
holes with the slotted ends first.
Thread a wingnut onto a screw, near the head. With
washer and slotted clip in place, tighten the screw to
anchor the brass clip into the countertop material. Repeat
for each clip.
Hand tighten the wing nuts to secure the sink bowl.
NOTE: do not fully tighten each clip when installed.
Partially tighten a clip, then partially tighten the clip
across from it. After each clip is partially tightened, repeat
the process, fully tightening each clip. This ensures a
secure installation and avoids damage to the sink.
Remove excess sealant from the inside lip of the bowl
using appropriate cleaner on a clean rag.