1
ATTN: INSTALLER
DO NOT OVER TORQUE (TIGHTEN) HINGE MOUNTING SCREWS. MANUALLY SCREW IN WITH PHILLIPS SCREW DRIVER
UNTIL THE SCREW FEELS SECURE IN THE RIVET. IF USING A POWER DRILL, SET MAXIMUM TORQUE SETTING TO #5.
OVERTIGHTENING THE SCREWS MAY/WILL CAUSE THE RIVET NUT TO LOOSEN FROM THE UNDERSIDE.
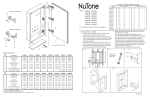
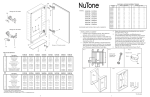
INSTALLATION of DOORS
1. Remove hinges and screws from hardware
bag. Mount hinge unit on door as shown in
Fig. 6 and Fig. 7 securing with screws provided.
2. Install the door by inserting door side of the
hinge into the bracket on the body as shown;
A) 125 degree hinge
Insert door side of clip hinge as shown
in Fig. 8
B) 170 degree hinge
Insert door side of clip hinge as shown
in Fig. 9
3. Check door for proper alignment. If the door
needs to be adjusted please refer to the
adjustment procedures in Fig. 10 and Fig. 11.
Door edges should be aligned with to the face
of the body.
4. 125 degree hinge only:
Snap on hinge cover plate. (Fig. 12)
170 degree hinge only:
Snap on the black limit clip. (Fig.13)
FAMILIARIZE YOURSELF WITH HINGE PRIOR TO MOUNTING.
125 Degree Hinge
bottom
view
The bar on
the bottom
of the hinge
slides into
the slot on
the bracket.
170 Degree Hinge
bottom
view
Press
down to
snap into
place.
INSTALACION de ESTANTES Y TAPONES
Fig. 14
Nota: Revise detenidamente la ubicacion deseada
para el estante. Los tapones de los hoyos son
dificiles de quitar una vez metidos, es importante
localizar la ubicacion del estante antes de instalar los
tapones.
1. Seleccione el lugar deseado de los estantes.
2. Ponga dos (2) soportes a cada lado de la ubicacion
deseada. (Fig. 14)
3. Ponga los estantes sobre los soportes, presione
y asi quedara el estante fijo en su lugar.
(Fig.14)
4. Saque los tapones de la bolsa y
coloquelos en los agujeros
restantes. (Fig. 15)
•
•
5.
Fig. 6
•
TO REMOVE HINGE
Press in
lever, then
lift up on
clip to
release
hinge.
125 Degree Hinge
Mounted to Door
•
•
Fig. 13
Fig. 9
170
Degree
Hinge
Limit Clip
Fig. 7
170 Degree Hinge
Mounted to Door
Fig. 8
125 Degree Hinge
mounted to Cabinet
170 Degree Hinge
Mounted to Cabinet
This screw for
up and down
adjustments
Fig. 11
Hook bottom of
hinge into place
on the bracket
Fig. 15
CUIDADO DEL ESPEJO
Utilice solamente agua tibia y un trapo limpio,
suave y sin pelusa.
No utilize limpiadores con solucion a base de
ammoniaco, vinagre o cloro.
No utilize limpiadores en polvo o fibras de
acero.
Nunca rocie el limpiador directamente en el
espejo, especialmente en los bordes y la
cubierta el la parte posterior. Aplique el
limpiador al trapo y limpie. Seque a fondo.
Mantenga el espejo seco. Un bano bien
ventilado es importante.
Hook bottom of
hinge into place
on the bracket
Press down
on hinge until it
clips in place
Press down
on hinge until
it clips in place
Fig. 10
This screw for
up and down
adjustment
Fig. 12
170 Degree Hinge
125 Degree Hinge
This screw
for depth
adjustments
This screw
for depth
adjustment
This screw
for left and right
adjustments
This screw
for left and right
adjustment
Hinge Cover
2
7