1
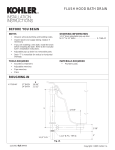
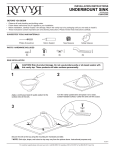
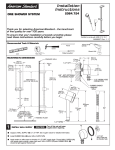
ASSEMBLY & INSTALLATION
INSTRUCTIONS
804380
INTRODUCTION
Thank you for selecting our BELLATERRA HOME product .To ensure that your installation proceeds smoothly ,
read these instructions carefully before you begin . also , review the recommended tools and
materials section . carefully unpack and examine your new plumbing fixture .
ALL INSTALLATION PROCEDURES MUST COMPLY IN STRICT ACCORDANCE WITH
APPLICABLE LOCAL PLUMBING AND BUILDING CODES
Tools and materials Required
Most of the procedures require
the use of availabie from hard
ware and piumbing , supply stores
it is essential that the tools and
matenals be on hand before work
is begun .
Adjustable wrench
Roughing - in Dimensions
Saber Saw
Basin Wrench
Plumbers ' Putty or
Caulking
Channel Locks
Putty Knife
Pipe Wre n ch
Tape
Measure
Tubing Cutter
915mm
36
Drill
Hacksaw
Regular Screwdriver
Phillips Screwdriver
Level
* Dimensions shown for location of supplies and " P " trap are suggested .
-1-
804380
Step One:Use the track level bar,tape measure and pencil to mark holes in desired location.Having established the
position,use drill to make holes.Use the hammer to insert anchors into the hole and screw in the screws.Finally put the
mirror in place.
Step Two:Place the vanity in position.Level vanity ensuring it is level with water outlets and piping.If the doors are out of
alignment they can be fixed by adjusting the hinges.
Step Three:Fix the vanity to the wall through the back rail of the cabinet (for wall hung units).The fixings should be placed
on a wall stud.Werecommend that you use a toggle or toggle type system if you can't located a strong solid surface.
Step Four:(For undermount sink unit) Glue the undermount sink to the Stone Top in suitable place, put them on the
cabinet after the glue is dry. Make sure the sink and stone stick to each other strong enough.
(For semi recessed basin unit) Put the basin on the cabinet in suitable place. Glue the basin to the cabinet if
necessary.
(For above counter basin unit) Put the stone top on the cabinet and place the basin on stone in suitable place.
Step Five: (If has board shelf) Use the track level bar,tape measure and pencil to mark holes in desired location.Having
established the position,use drill to make holes.Use the hammer to insert anchors into the hole and screw in the
screws.Finally put the board shelf in place.
2
-2-
2
804380
Install faucet and drain in accordance with
manufacturer ' s instructions . Ensure all water supply
and drain connections are tightened . Turn on water
supply valves and water - test installation .
A
B
Typical Drain Assembly
Connect the trap to the drain assembly hand tight to check
alignment . It may be necessary to cut off part of the tailpiece
( area " A " ) or part horizontal leg of the trap ( area " B " ) .
Trap joints for watertight assembly .
Connect hot and cold supply lines to the shut off valves . Tighten
-3-
804380