1
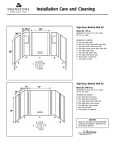
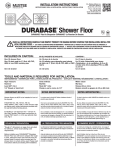
MODEL NO.
TI-7236/BC-7236
TI-7248/BC-7248
TI-7260/BC-7260
OWNER’S
MANUAL
Installation procedure for
FIBERGLASS SHOWERWAL KIT
MODEL TI-7236/BC-7236
Areas 31 to 36 deep
Areas 29⁄Ω¢ to 39‹Ω¢ wide
MODEL TI-7248/BC-7248
Areas 31 to 36 deep
Areas 41⁄Ω¢ to 51‹Ω¢ wide
MODEL TI-7260/BC-7260
Areas 31 to 36 deep
Areas 53⁄Ω¢ to 63‹Ω¢ wide
CAUTION:
Read ALL instructions
carefully BEFORE
starting your installation.
Save this manual for
future reference
INSTALLATION • CARE AND CLEANING • REPAIR PARTS
STEP-BY-STEP INSTALLATION INSTRUCTIONS
MODEL TI-7236/BC-7236; TI-7248/BC-7248; TI-7260/BC-7260
FIBERGLASS SHOWERWAL
INCLUDED IN CARTON:
A Two side panels
B Two corner panels
C One back panel with soap dish
D Adhesive:
Four tubes TI-7236/BC-7236
and TI-7248/BC-7248
Five tubes TI-7260/BC-7260
E One tube of color coordinated caulk
TOOLS REQUIRED TO INSTALL
CORNER PANELS
The only tools needed are a saber saw or drill, ruler, caulking
gun, and whatever tools are needed to remove faucet handles.
Panels mount to the wall with supplied adhesive. Panels come
with factory applied pressure sensitive tape affixed permanently
to the outside edges.
Sides of corner panels are different widths. One side is 5
wide, the other is 7 wide.
If shower is 34 or less deep the 7 side goes against the back
wall–figure #1. If side wall is over 34 the 5 side of the corner
panel goes against the back wall–figure #2. The location of the
7 corner dimension will affect the dimensional flexibility of
these units on the back wall. Measure your shower alcove
area before you start and consult the following chart for proper
corner panel location.
DO NOT NAIL PANELS TO SUBWALLS
INSTALLATION PROCEDURE:
Allow panels to adjust to room temperature (65° to 90°) for at
least 6 hours.
Next, turn off hot and cold water supply, remove faucet
handles, escutcheons, and any fittings mounted to wall to be
covered including towel bars, soap dishes, etc.
Use hammer and chisel to remove objects cemented to walls.
Old ceramic tiles, if adhered solidly to walls may be covered
with this kit and need not be removed.
Loose tiles must be removed (sand sub walls smooth).
Front edge tiles may be reset for appearance only. Remove
soap film and dirt from wall surface using detergent. Wipe dry;
wall surface must be dry before panels can be applied.
Measure the width of the back wall. If it measures less than
30⁄Ω™ or more than 63‹Ω¢, you cannot use this unit. Likewise, if
your shower area is less than 31 deep or more than 36 deep
this unit is not suitable for your installation.
BE SURE TO READ THE ENTIRE INSTALLATION SHEET
BEFORE STARTING.
SIDE PANELS
The side panels are interchangeable from right to left.
However, for proper fit the 2 Bull Nose (see product drawing
on this page) must face to the outside of the shower.
Corner panel with 7 dimension on BACK WALL (figure #1)
Side Panel Fits
31 to 34
Wall Area
All Models
Back Panel
Wall Area
TI-7236/BC-7236 TI-7248/BC-7248 TI-7260/BC-7260
29⁄Ω¢ to 39‹Ω¢
41⁄Ω¢ to 51‹Ω¢
53⁄Ω¢ to 63‹Ω¢
Corner panel with 5 dimension on BACK WALL (figure #2)
Side Panel Fits
31 to 36
Wall Area
All Models
Back Panel
Wall Area
TI-7236/BC-7236 TI-7248/BC-7248 TI-7260/BC-7260
29⁄Ω¢ to 35‹Ω¢
41⁄Ω¢ to 47‹Ω¢
53⁄Ω¢ to 59‹Ω¢
We recommend that whenever possible, position corner panel as in figure #1.
WALL SURFACE PREPARATION RECOMMENDATIONS
FOR FIBERGLASS TUBWAL AND SHOWERWAL UNITS
When installing over SHEETROCK/GREENBOARD/WOOD:
A) Surface must be dry, smooth and free of any dust, soap
scum or any other contaminants. Wipe wall surface with a
damp cloth.
B) For maximum adhesion, the area where the double-faced
tape adheres to the wall surface should be sealed with a
primer (Bin-Seal or all purpose enamel paint).
C) After primer/sealer is completely dry, complete the installation following the installation instruction sheet.
When installing over PLASTER:
A) Surface must be dry, smooth and free of any dust, soap
scum or any other contaminants. Wipe wall surface with a
damp cloth.
B) The area where the double-faced tape adheres to the wall
surface (textured/swirled finish must be sanded smooth)
should be sealed with a primer (Bin-Seal or all purpose
enamel paint).
C) After primer/sealer is completely dry, complete the installation following the installation instruction sheet.
When installing over CEMENT/CONCRETE:
A) Surface must be dry, smooth and free of any dust, soap
scum or any other contaminants. Wipe wall surface with a
damp cloth.
B) The complete area should be sealed with two coats of
primer (Bin-Seal or all purpose enamel paint).
C) After primer/sealer is completely dry, complete the installation following the installation instruction sheet.
When installing over OLD TILE:
A) Surface must be dry, smooth and free of any dust, soap
scum or any other contaminants. Wipe wall surface with a
damp cloth.
NOTE: CERAMIC: LOOSE TILE MUST BE REMOVED.
PLASTIC: ALL TILE MUST BE REMOVED.
B) Complete the installation following the installation instruction sheet.
When installing over WALLPAPER:
A) All wallpaper must be removed from the area to be
covered by unit. Surface must be dry, smooth and free of
any dust, soap scum or any other contaminants. Wipe wall
surface with a damp cloth.
B) For maximum adhesion, the complete wall surface area to
be covered by unit should be sealed with two coats of
primer (Bin-Seal or all purpose enamel paint).
C) After primer/sealer is completely dry, complete the installation following the installation instruction sheet.
When installing over MASONITE:
A) Surface must be dry, smooth and free of any dust, soap
scum or any other contaminants. Wipe wall surface with a
damp cloth.
B) Complete installation following the installation instruction
sheet.
4a
1. CORNER PANELS
TRIAL FIT: For a professional installation,
and proper grout line
alignment it will be necessary to shim between
the corner panel and
shower floor ledge.
Select either corner
panel. Apply adhesive to
back side of the panel.
A dot or “glob” of adhesive should be applied
as indicated in illustration. Keep the adhesive
at least one inch from
tape and panel edges.
2. FINAL FIT
Remove backing from pressure
sensitive tape and carefully position corner panel. Press firmly
making sure all areas make firm
contact to wall. Repeat for installation of other corner.
3. BACK PANEL
TRIAL FIT: Carefully center back panel, allow the right
and left top edges to evenly overlap corner panels.
Make a light pencil mark on corner panel where back
panel will be positioned. Apply the adhesive as noted.
Globs of adhesive should be “piled” approximately ⁄Ω™
high and 1 in diameter.
NOTE: Special attention should be given to pressing the
center of the panels firmly against the wall to insure adequate contact of the tape and adhesive.
4. IMPORTANT
Grout lines and top edge of back
panel should be aligned with grout
lines and top edge of corner
panels (4a).
If shower floor has settled or is out
of plumb a gap between bottom
edge of wall and shower floor
ledge may exist. This gap can be
filled in with caulking (see
CAULKING next page).
After removing backing from pressure sensitive tape, position back
panel to evenly overlap corner
panels. Firmly press the entire
panel from top to bottom making
sure of solid contact.
5. SIDE PANELS
NOTE: Side panels “A” are interchangeable BUT the 2 Bull Nose
must face to the outside of the
shower for proper installation.
Measure location of plumbing outlets from a line straight up from
front edge of shower floor and
height above top ledge of the
shower floor. We suggest you
make a template from cardboard
to help position your side panel
over plumbing outlets.
Transfer measurements to panel
making sure (before you drill) that
you have selected the correct
panel.
6. Use a drill and hole cutting bit,
or a hole saw, to cut your holes
⁄Ω™ larger than the diameter of the
pipes. Drill or cut from the finished side of panel. For best
results, place a scrap of wood
beneath hole to be cut. This gives
you a clean opening. Trial fit
before proceeding.
7. Apply the adhesive as noted.
Globs of adhesive should be
“piled” approximately ⁄Ω™ high
and 1 in diameter. Add adhesive
around drilled holes.
Remove backing from factory
applied pressure sensitive tape.
2 Bull Nose—Must Face To
Outside of Shower
NOTE: Special attention should
be given to pressing the center
of the panels firmly against the
wall to insure adequate contact
of the tape and adhesive.
8. Carefully line up front edge of
panel with front edge of shower
floor and overlap corner panel.
8A. IMPORTANT
Grout lines and top edge of side
panel should be aligned with grout
lines and top edge of corner panels.
If floor has settled or is out of
plumb a gap between bottom edge
of wall and shower floor ledge
may exist. This gap can be filled
in with caulking (see CAULKING
below).
Press firmly starting from bottom
and continuing up to insure solid
wall contact.
Repeat steps #7 and #8 for other
side panel.
CAULKING
Following instructions on the caulking tube…apply a bead of
caulk along the gap between bottom edge of Showerwal and
shower floor ledge. It is also suggested that a thin bead of
caulking be applied to overlap between back panel, side panels,
and corner panels. Caulking should also be applied along front
and top edges of wall installation.
Please allow unit to be installed 24 hours before using. This will
allow proper curing of adhesive and caulking material.
PRESSED FIBERGLASS PRODUCTS CARE
AND CLEANING
All Panels in this kit are made of fiberglass reinforced polyester.
Finish is stain and abrasion resistant, however, the finish
requires reasonable care.
Wash regularly with warm water, use soft cloth with mild liquid
detergent such as Handy Andy, Mr. Clean, or Lestoil.
Scouring pads made of nylon, saran, or polyethylene may be
used but NEVER USE ABRASIVE SCOURING POWDERS,
CLEANSERS OR PADS…THEY DULL FINISH.
CAUTION
Dry cleaning agents and solvents will damage the surface.
Burning cigarettes will damage and discolor surface.
NOTE: To promote contact until adhesive sets, it is suggested
that you use temporary bracing and allow adhesive to cure
overnight. Temporary bracing may be constructed and wedged
into position as illustrated by using lengths of 1 x 2s, 2 x 2s,
1 x 3s. Lumber should be cut as needed. To insure adhesion of
the panel corners to the installation surface, position the
temporary bracing as illustrated above.
POSITIVELY NO HAMMERING OR NAILING IS TO BE DONE.
FORM #803-4-91-5M