1
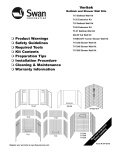
Installation Care and Cleaning
High-Gloss Bathtub Wall Kit
Model No. TW-32
Designed for areas 57” to 62” wide,
29” to 32” deep
B
A
C
INCLUDED IN CARTON:
A. One left side panel
B. One left corner panel with soap dish
C. One back panel with soap dish
D. One right corner panel with soap dish
E. One right side panel
F. One left side apron strip
G. One right side apron strip
H. Three tubes of adhesive
I. One tube of caulk
D
E
H
I
G
F
High-Gloss Bathtub Wall Kit
Model No. WW-6000
Designed for areas 58” to 72” wide,
29” to 48” deep
INCLUDED IN CARTON:
A. One left-hand end panel
B. One right-hand end panel
C. One back panel with soap dish
D. One right-hand corner panel
E. One left-hand corner panel
F. One tube of caulk
G. Three tubes of adhesive
C
E
D
CAUTION
A
B
F
G
Read ALL instructions carefully BEFORE
starting your installation. Save this manual for future reference.
Bathtub Wall Panel Kits
WALL SURFACE PREPARATION RECOMMENDATIONS FOR BATHTUB WALL UNITS
NOTE:
When installing over SHEETROCK/GREENBOARD/WOOD:
A. Surface must be dry, smooth and free of any dust, soap scum or any other contaminants. Wipe wall surface with a damp cloth.
B. For proper adhesion, the wall surface must be sealed with a primer (Bin-Seal or
other primer/sealer).
C. After primer/sealer is completely dry, complete the installation following the
installation sheet.
When installing over PLASTER:
A. Surface must be dry, smooth and free of any dust, soap scum or any other contaminants. Wipe wall surface with a damp cloth.
B. The wall surface (textured/swirled finish must be sanded smooth) must be
sealed with a primer (Bin-Seal or other primer/sealer).
C. After primer/sealer is completely dry, complete the installation following the
installation sheet.
When installing over CEMENT/CONCRETE:
A. Surface must be dry, smooth and free of any dust, soap scum or any other contaminants. Wipe wall surface with a damp cloth.
B. The complete area must be sealed with two coats of primer. (Bin-Seal or other
primer/sealer).
C. After primer/sealer is completely dry, complete the installation following the
installation sheet.
CERAMIC: LOOSE TILE MUST BE REMOVED.
PLASTIC: ALL TILES MUST BE REMOVED.
When installing over OLD TILE:
A. Rough up the glossy tile surface by belt sanding the wall area with 60-grit sandpaper.
B. Surface must be dry, smooth and free of any dust, or any other contaminants.
Wipe wall surface with a damp cloth.
C. For proper adhesion, the wall surface must be sealed with a primer (Bin-Seal or
other primer sealer).
D. After primer/sealer is completely dry, complete the installation following the
installation sheet.
When installing over WALL PAPER:
A. All wallpaper must be removed from the area to be covered. Surface must be
dry, smooth and free of any dust, soap scum or any other contaminants. Wipe
wall surface with a damp cloth.
B. The complete wall surface area to be covered by unit must be sealed with two
coats of primer (Bin-Seal or other primer sealer).
C. After primer/sealer is completely dry, complete the installation following the
installation sheet.
When installing over MASONITE:
A. Surface must be dry, smooth and free of any dust, soap scum or any other contaminants. Wipe wall surface with a damp cloth.
B. For proper adhesion, the wall surface must be sealed with a primer (Bin-Seal or
other primer sealer).
C. Complete the installation following the installation sheet.
TOOLS NEEDED TO INSTALL
FILLER BOARD
Saber saw, drill, ruler, caulking gun and tools needed for faucet work.
Measure the height of the tiles from
the tub ledge upward. If the tiles
measure less than 58”, it is necessary
to install a filler board. The filler
board must equal the thickness of the
tile. Usually, 1/4” masonite or similar
material is adequate.
For best results, extend the filler board
from the top tile edge to the ceiling.
Panels mount directly to walls with furnished adhesive. Panels come with factory
applied pressure sensitive tape affixed to the outside edges.
DO NOT NAIL PANELS TO SUBWALLS.
THE HOLES IN THE CORNER PANELS ARE FOR MANUFACTURING PURPOSES ONLY!
MEASURE BEFORE YOU START
For best
results, extend
filler board
to the ceiling
Tub
Wall
Panels
Old Tiles
Model TW-32
Measuring the sidewalls: If the depth of the sidewalls is less than 29", you cannot
use Model TW-32. If the depth of the sidewall is over 32", extension panels will
be necessary.
Measuring the back wall: Measure the width of the back wall. If it measures
less than 57", you cannot use Model TW-32. If over 62", extension panels
are available.
Model WW-6000
Measuring the sidewalls: If the depth of the sidewalls is less than 29" you cannot
use Model WW-6000. If the depth of the sidewall is over 48", extension panels
will be necessary.
Measure the back wall: If it measures less than 58", you cannot use Model
WW-6000. If over 72", extension panels are available.
IMPORTANT TRIAL FITTING PROCEDURE WW-6000
The back and sidewalls of the WW-6000 are designed to overlap the corner panels.
However, to achieve proper fit the overlap of the back or side panel over the corner panels cannot exceed three (3") inches. Therefore, it is likely that some cutting of the corner panels will be required. We recommend that all cuts be performed with a saber saw from the facing side of the corner panel.
The following chart contains the most common back and sidewall dimensions.
Measure and trial fit corner panel before and after cutting.
Width of
Back Wall
Cut from Short
End of Corner Panel
Depth of
Side Wall
Cut from Long
End of Corner Panel
72”
0
48
0
66
3”
46”
2”
60”
6”
42”
6”
36”
12”
32”
16”
Accessories
WINDOW TRIM KIT
Model WTK-1
(not part of TW-32 or WW-6000 TUB WALL KIT – available
through your dealer) This high-gloss Window Trim Kit is
designed to eliminate unsightly sills, decorate and make
waterproof the left and right jambs, plus provide a waterproof-natural draining sill.
READ ALL INSTALLATION INSTRUCTIONS BEFORE STARTING. TRIAL FIT PANELS PRIOR TO FINAL INSTALLATION.
INSTALLATION PROCEDURE:
Allow panels to adjust to room temperatures (65º to 90º) for at least 6 hours.
Turn off hot and cold water supply, remove faucet handles, escutcheons, filler spouts and any fittings mounted to the wall that will be covered i.e. towel bars,
soap dishes, etc.
Use hammer and chisel to remove objects cemented to walls. Old ceramic tiles, if solidly adhered to walls, may be covered with this kit and need not be removed.
Loose ceramic tiles must be removed and sub walls sanded smooth.
Front edge ceramic tiles may be reset for appearance only. See “wall surface preparation recommendations” on previous page..
1. Corner Panels
2.
3. Back Panel
For final fit, remove the backing from
the pressure sensitive tape and carefully position corner panel. Press firmly
to wall…moving hand pressure up and
down and side to side, making sure all
areas make firm contact to wall.
Repeat steps 1 and 2 for installation of
the other corner panel.
4.
If the tub has settled, or walls are out
of plumb, it may be necessary to file
the bottom edge of a given panel to
achieve a good fit across the top.
Back panel is slightly taller than the
two corner panels, allowing for overlap
of the top edge. Trial fit, then apply
adhesive following pattern in illustration and add an extra circle around
soap dish.
Remove the backing from the pressure
sensitive tape and carefully center
panel with the bottom edge resting on
the top edge of the tub. Firmly press
the entire panel from top to bottom,
making sure of a solid contact.
Select either left or right corner panel
(to identify the TW-32 right or left,
place the soap dish against the back
wall). Apply the adhesive to the back
of the panel, keeping the adhesive at
least one inch from the tape and panel
edges.
5. Apron Strips
TW-32 Only
6A. Side Panels
TW-32 Only
6B. Side Panels
WW-6000 Only
7. Trial fit before
proceeding.
If the distance from back wall to front
edge of apron is more than 31-1/2",
the apron strips will not line up with
the side wall, and must be cut down or
discarded if a straight line from floor to
top of the side panel is desired.
Note: Side panels for Model TW-32, A
and E, are not interchangeable. Check
backs for markings left and right.
Measure location of plumbing outlets
from the front edge of the tub (A) and
up from the top of the tub (B). We
suggest you make a template from
cardboard to help position your side
panel over plumbing outlets.
Use a drill and a hole-cutting bit, or a
hole saw, to cut your holes 1/2" larger
than the diameter of the pipes. Drill or
cut from the finished side of panel.
For best results, place a scrap of wood
beneath hole to be cut. This gives you
a clean opening.
Measure location of plumbing outlets
from a line straight up from front edge
of apron strips (or tub, if strips are not
used) and height above top ledge of
the tub. We suggest you make a template from cardboard to help position
your side panel over plumbing outlets.
Transfer measurements to panel making sure (before you drill) that you
have selected the correct panel.
Transfer measurements to panel making sure (before you drill) that you
have selected the correct panel.
8.
9.
CARE AND CLEANING
Apply adhesive to proper side panel
with pattern suggested. Keep adhesive
1" away from factory applied pressure
sensitive tape. Put an extra ring of
adhesive around drilled holes.
Carefully line up front edge of panel
with front edge of apron strip (or tub,
if strips are not used) with bottom
edge resting on the top ledge of the
tub. Press firmly starting from bottom
and continuing up to insure solid wall
contact.
The surface is stain and abrasion resistant, however it requires reasonable care.
Wash regularly with warm water; use soft cloth with mild liquid detergent such as
Handy Andy, Mr. Clean or Lestoil. Scouring pads made of nylon, saran or polyethylene may be used but NEVER USE ABRASIVE SCOURING POWDERS, CLEANERS OR
PADS…THEY DULL THE FINISH. Protect finish with any fiberglass wax or automotive
paste wax.
Remove the backing from the factory
applied pressure sensitive tape.
CAULKING
CAUTION:
Dry cleaning agents and solvent will damage the surface. Burning
cigarettes will damage and discolor surface.
Following instructions on the caulking
tube…apply a bead of caulking along
the bottom and top edge of the back
panel, side panels and corner panels.
The center panel’s two lapping edges
and the two overlapping edges of the
side panels may also be caulked, if
desired, however, it is NOT necessary.
The Swan Corporation
One City Centre
Suite 2300
St. Louis, MO 63101
p (800) 325-7008
f (314) 231-8165
FORM #875-10-03-5M