Transcript
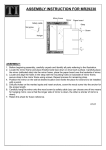
Model #8452 Chateau Mirror
MOUNTING INSTRUCTIONS FOR MIRRORS
Parts List:
• 1 Beveled Mirror with Mounting Bracket
• 12” Wall Mounting Clip
• 3 Plastic Wall Anchors
• 3 Screws
• 4 Flat End Caps
• 2 Round Decorative Tops
• 1 Disposable Level
Tools Needed:
Pencil and Eraser, Drill and 3/16” Drill Bit,
Screw Gun or Driver with Phillips Head,
Tape Measure, Hammer and Friend to help.
(Two People are required to mount this mirror).
WARNING: Always wear safety goggles and gloves when
handling glass. Handle mirror carefully. Do not bump mirror
against hard surfaces. Place on towel or soft surface such
as carpet when handling. READ INSTRUCTIONS CAREFULLY
BEFORE STARTING.
#1 Insert Rails into rail Holders (Fig. 1). By creating a soft surface with a towel on a leveled table or counter. Carefully stand the
mirror vertically on the surface. Make sure the Holders are unobstructed by the set screws. If so, untighten the set screws until they
are not seen in the shaft. Slide the rails into the holders until the rail stops at the soft surface. Now tighten the set screws. Do the
same to the other side. The rails are now evenly installed on the mirror.
#2 Using a tape measure, check the location where the mirror is to be installed. Be sure the mirror will fit in the desired location.
Approximately 26”W x 38”H is needed for the mirror to fit.
#3 Place the mirror on the wall in area chosen.
(Two people are needed for this task).
Position the mirror at the desired height in
the center of the location. With Pencil mark
a dot or line on the very top edge of the arch.
See (Fig.2) Set mirror aside In safe place.
Fig.1
Fig.2
Back of Mirror
Set
Screws
#4 From the dot made on the wall, using a
tape rule, measure down 10 1/4" and mark
the spot on the wall (Fig.3)
Towel
#5 From this spot, position the 12” Hanging Clip.
The top of the hanging clip should be centered
on the spot marked on the wall 10 1/4" from
the top of the mirror. Mark the locations for the
screw holes at the bottom of the clip, using the
level to make sure the clip is level and straight.
(Fig.4) Set the clip and level aside.
Fig.3
Fig.4
#6 Using the Drill and 3/16” Drill Bit-Pre Drill the
holes for the wall anchors. Lightly tap the
plastic wall anchors into place with hammer.
#7 Reposition the 12” Clip and secure to the wall
with the screws provided. Check the level again
to determine that the clip is straight and level.
(Fig.5)
#8 Carefully place the mirror with the mounting plate onto the
installed wall clip. Mirror can be adjusted side to side by
gently sliding the mirror along the clip. With mirror
centered installation is complete - you look marvelous.
Fig.5
Disposable
Level
#9 Two decorative hardware tops. Choose between contemporary flat or traditional round.