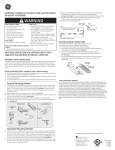
Transcript
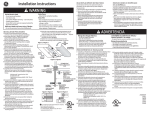
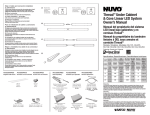
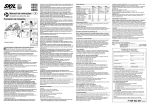
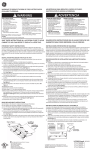
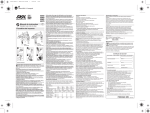
!
!
Risk of Electric Shock
- Do not use in wet locations.
- Use indoors only.
- Turn power off before servicing - see instructions
Risk of Burn
- Do not mount fixture vertically
- Allow bulb to cool before handling
!
ADVERTENCIA
Riesgo de choque eléctrico
- No use en lugares húmedos.
- Use sólo en interiores.
- Desconecte la alimentación antes de realizar
tareas de servicio - consulte las instrucciones.
!
WARNING
Riesgo de quemaduras
- No instale el artefacto verticalmente.
- Espere a que la bombilla se enfríe antes de manipularla.
Risk of Fire
- Not intended for surface installation inside built-in furnishings such as
kitchen cabinets, china cabinets, or trophy cases
- Do not conceal power supply cord inside a wall, ceiling, soffit, kitchen
cabinet, or similar permanent structure
- Do not run the power supply cord through holes in walls, ceilings, or floors
Risk of Fire
- No para instalación dentro de los mobiliarios incorporados en
la construcción, tal como los gabinetes de cocina o de
porcelana, o las vitrinas de trofeos.
- No oculte el cable de abastecimiento de potencia dentro de la
pared, cielorraso, sofitos, gabinetes de cocina o estructuras
permanentes parecidas.
- No pase el cable de abastecimiento de potencia por agujeros
en las paredes, cielorrasos o pisos.
La bombilla se puede hacer añicos y causar lesiones si se
rompe
- No ejerza fuerza excesiva cuando instale la bombilla.
Bulb may shatter and cause injury if broken
- Do not use excessive force when installing bulb.
Figure 1 / Illustration 1
Lens/diffuser
(front edge)
Diffuseuieur
Figure 2 /Illustration 2
Figure 1 / Illustration 1
Introducir el
destornillador
aquí para quitar
la lente/difusor
3,1
mm
Insert screwdriver
here to remove
lens/diffuser
3,1
mm
Figure 3 / Illustration 3
INSTRUCCIONES IMPORTANTES
DE SEGURIDAD
IMPORTANT SAFETY INSTRUCTIONS
This portable lamp has a polarized plug (one blade is wider than the
other) as a feature to reduce the risk of electric shock. This plug will
fit in a polarized outlet only one way. If the plug does not fit fully in
the outlet, reverse the plug. If it still does not fit, contact a qualified
electrician. Never use with an extension cord unless plug can be
fully inserted. Do not alter the plug.
INSTALLATION PROCEDURES
1) Consult a local licensed electrician or electrical contractor if you
are not sure about the installation.
2) DO NOT ATTEMPT TO INSTALL THE FIXTURE WHILE PLUGGED IN.
3) Select a suitable dry mounting location (for use indoors only).
Make sure the mounting surface is capable of supporting the
fixture.
4) Remove lens/diffuser carefully.
5) Remove the bulb by grasping the ends of the bulb and rotating
until the bulb becomes loose. Pull straight out from the lamp holder.
Be careful not to drop the bulb. See Figure 1.
6) Place the fixture in the location where it is to be mounted and
mark the position of the keyholes with a pencil. This fixture can only
be mounted horizontally. See Figure 4.
7) It is recommended that a 1/16" pilot hole be drilled in the
mounting surface.
8) Drive the screws provided in the mounting hardware into the
mounting surface until approximately 1/8" of space remains under
the head of the screw. See Figure 2.
9) Align the keyholes in the fixture with the two screws and slide
into place. See Figure 3.
10) Tighten the screws
11) Install the bulb and reinsert lens/diffuser.
12) Plug fixture into a 120VAC 60Hz outlet.
Figure 3 /Illustration 3
Figure 2 / Illustration 2
Lens/diffuser
Figure 4 / Illustration 4
Horizontal M ounting Only
M ontage horizontal seulement
BULB REPLACEMENT
INSTRUCTIONS
See the label on the fixture for replacement bulb type
information. Do not replace with any other wattage of
fluorescent bulb.
1) Turn the fixture off and allow bulb to cool before
handling.
2) Remove lens/diffuser carefully.
3) Remove the bulb by grasping the ends of the bulb
and rotating until the bulb becomes loose. Pull
straight out from the lamp holder. Be careful not to
drop the bulb. See Figure 1.
4) Grasp the replacement bulb in the same manner
and reinsert into the lamp socket, and turn tube until
it is securely held in place. Do not use excessive force
when installing bulb.
10185 UCF22/WW/CLM
10186 UCF22/BLB/CLM
10187 UCF22/GROW/CLM
Plastic Fluorescent Undercabinet
Fixtures w/ Polarized Plug
Esta lámpara portátil cuenta con un enchufe polarizado
(una pata es más ancha que la otra) como característica
para reducir el riesgo de choque eléctrico. Este enchufe
se puede enchufar en un tomacorriente polarizado en
un solo sentido. Si el enchufe no se puede insertar
completamente en el tomacorriente, invierta el enchufe.
Si aún así no puede insertarlo, comuníquese con un
electricista calificado. No lo use nunca con un cable
prolongador, a menos que el enchufe se pueda insertar
completamente. No modifique el enchufe.
PROCEDIMIENTOS DE INSTALACIÓN
1) Consulte a un electricista o contratista de servicios
eléctricos local matriculado si usted no está seguro
acerca de la instalación.
2) NO INTENTE INSTALAR EL ARTEFACTO MIENTRAS
ESTÁ ENCHUFADO.
3) Seleccione un lugar de montaje seco adecuado (sólo
para uso en interiores). Asegúrese de que la superficie
de montaje pueda soportar el artefacto.
4) Cuidadosamente remueva la lente/difusor.
5) Para retirar la bombilla, tómela de los extremos y hágala girar
hasta que se suelte. Retírela en forma recta del portalámparas.
Asegúrese de no dejar caer la bombilla. Vea la Figura 1.
6) Coloque el artefacto en el lugar donde lo montará y
marque la posición de los orificios de guía con un lápiz.
Este artefacto se puede montar solo horizontalmente.
Vea la Figura 4.
7) Se recomienda perforar un orificio piloto de 1,5 mm
en la superficie de montaje.
8) Inserte los tornillos provistos con los elementos de montaje en la
superficie de montaje hasta que quede un espacio de aproximadamente 3,1 mm debajo de la cabeza del tornillo. Vea la Figura 2.
9) Alinee los orificios de guía del artefacto con los dos tornillos y
deslícelo hasta que calce en su lugar. Vea la Figura 3.
10) Apriete los tornillos hasta que queden apretados en forma
segura.
11) Instale la bombilla y vuelva a colocar la lente/difusor.
12) Enchufe el artefacto en un tomacorriente de 120 VCA 60 Hz.
INSTRUCCIONES DE REEMPLAZO
DE LA BOMBILLA
Figure 4 / Illustration 4
Horizontal M ounting Only
M ontage horizontal seulement
Consulte en la etiqueta del artefacto la información
sobre el tipo de bombilla de reemplazo. No la
reemplace con una bombilla fluorescente de ningún
otro vataje.
1) Apague el artefacto y espere a que la bombilla se
enfríe antes de manipularla.
2) Cuidadosamente remueva la lente/difusor.
3) Para retirar la bombilla, tómela de los extremos
y hágala girar hasta que se suelte. Retírela en
forma recta del portalámparas. Asegúrese de
no dejar caer la bombilla. Vea la Figura 1.
4) Apriete el borde anterior de un lado y pon un
destornillador (con una hoja plana y pequeña) en el
vacío para quitar la lente/difusor. Gira el destorniliador se puede quitar la lente con facilidad. Vea figura
1.
is a trademark of the General Electric Company
and is used under license to
Jasco Products Company LLC,
311 N.W. 122nd Street,
Oklahoma City, OK 73114.
Questions? Call 1-800-654-8483
Or visit us at www.jascoproducts.com.
10185/10186/10187 IN-1
05/15/2006