1
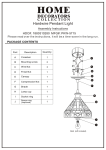
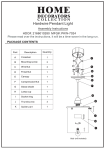
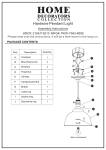
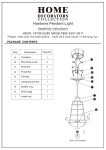
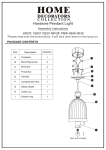
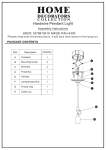
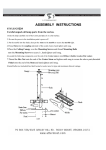
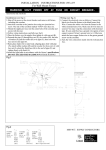
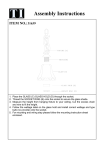
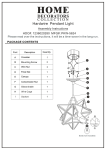
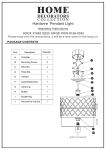
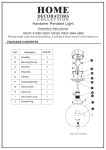
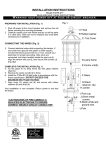
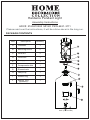
Hardwire Pendant Light
Assembly Instructions
HDC#: 2165810280 MFG#: PKW-6421-3111
Please read over the instructions, it will be a time-saver in the long run.
PACKAGE CONTENTS
Part
Description
Quantity
A
Crossbar
1
B
Mounting screw
2
C
Wire Nut
3
A
D
Finial Nut
1
B
E
Canopy
1
D
F
Compression Nut
1
G
Glass shade
1
H
Lamp cup
1
C
E
F
H
I
Socket ring
J
Spacer ring
(optional)
1
J
1
G
I
Bulb (not included)
IMPORTANT SAFETY INFORMATION
TURN POWER OFF AT THE MAIN POWER PANEL OR FUSE BOX BEFORE INSTALLING OR
REPLACING THE FIXTURE AND/OR WHEN REPLACING THE BULBS.
THIS PRODUCT MUST BE INSTALLED IN ACCORDANCE WITH ALL APPLICABLE
INSTALLATION CODES BY A PERSON FAMILIAR WITH THE CONSTRUCTION AND
OPERATION OF THE PRODUCT AND THE HAZARDS INVOLVED.
If you are not familiar with electrical wiring, it is recommended that you secure the
services of a qualified electrician show can assure that this installation meets local,
state, and national codes
The electrical system and the method of connecting this fixture to the system must be
in accordance with local, state, and national electrical codes
This fixture is to be connected to a 120-volt, 60Hz power source
Connecting to a different power source may create a hazard and will void the warranty
Do not use near or around flammable/combustible materials or liquids
The bulb and unit can get hot during use. Turn off the power and allow the unit to cool down for
at least 20 minutes before working on the unit.
Never use a bulb with a higher wattage than the stated maximum wattage allowed for the
fixture
Using a higher wattage bulb may cause a fire hazard and/ or cause damage to the unit.
If it becomes necessary to replace the glass, only use a tempered safety glass of equal
thickness.
Do not attempt to open the fixture housing, There are no serviceable parts inside.
All fixtures should be mounted to a ground junction box.
CEILING INSTALLATION
1. Pull out all wires(White, Black, and Ground) out of junction box.
2. Unscrew Compression Nut(F) from Canopy (E) and slide Canopy (E) down cord, Then
3.
4.
5.
6.
7.
8.
unscrew Finial Nut(D) from the Crossbar(A). and slide the Crossbar(A) to suitable place to
ease installation of Crossbar (A) to junction box.
Mount the Crossbar (A) to the junction box by using provided Mounting Screws (B) as shown
in the picture.
Using Wire Nuts (C) connect black wire from fixture to black wire from junction box. Connect
white wire from fixture to white wire from junction box. Connect green wire of fixture to green
or copper ground wire from the junction box. NOTE: Some junction boxes may not have a
ground wire. In this case, attach green wire from the fixture to the ground screw located on
Crossbar (A), as shown in the picture.
Tuck wires back into junction box.
Screw Finial Nut (D) onto Crossbar, Slide Canopy (E) back up cord and against the ceiling,
then use Compression Nut (F) to fix the Canopy (E), pls don't over tighten the Compression
Nut (F).
Attach Shade(G) to the Lamp Cup(H), add spacer ring(J) if necessary,and then screw on the
socket ring(I) clockwise until tight. Spacer ring(J) is only needed if Shade(G) is loose when
using just the socket ring(I).
Install bulb (not included).
WARNING: For some length adjustments it may be necessary to cut the cord. For this, turn off
all power at the main powr panel or fuse box then call a qualified electrician who can
assure that this modeifcation meets all safety and local regulations
2