1
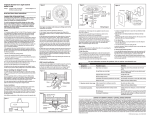
4 • Hanging and Wiring the Fan
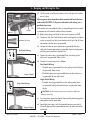
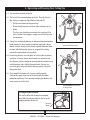
Tab
Handle
Step 3-1
Wire Nut
Dual Switch Wiring
Step 3-6 (Dual)
Single Switch Wiring
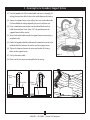
4-1. Lift the motor assembly and hook the three tabs over the handles,
one at a time.
All wiring must be in accordance with national and local electrical
codes and ANSI/NFPA 70. If you are unfamiliar with wiring, use a
qualified electrician.
Wall switches are not included. Select an acceptable general-use switch
in accordance with national and local electrical codes.
4-2. Before attempting installation, make sure the power is still off.
4-3. To connect the wires, hold the bare metal leads together and place
a wire nut over them, then twist clockwise until tight. For all these
connections use the wire nuts provided.
4-4. Connect the bare or green ground wire (grounded) from the
ceiling to the green ground wire (grounded) from the ceiling plate
and the green ground wire from the fan.
4-5. Connect the white wire (ungrounded) from the ceiling to the
white wire (ungrounded) from the fan.
4-6. Connect the remaining wires as follows:
Dual Switch Wiring:
• The black wire (ungrounded) from the ceiling to the black wire
(ungrounded) from the fan
• The black/white wire (ungrounded) from the fan to the wire
(ungrounded) for the wall switch
Single Switch Wiring:
• The black wire (ungrounded) from the ceiling to the black
(ungrounded) and the black/white wire (ungrounded) from
the fan
CAUTION: Be sure no bare wire or wire strands are visible after
making connections.
Step 3-6 (Single)
Hunter Fan Company
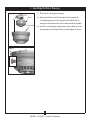
4-7. Turn the splices upward and push them carefully back through the
ceiling plate into the outlet box.
4-8. Spread the wires apart, with the grounded wires on one side of
the outlet box and the ungrounded wires on the other side of the
outlet box.
7
42845-01 • 01/23/08 • Hunter Fan Company
42826-01 • 3/10/07