Transcript
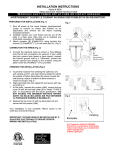
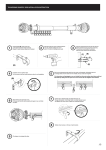
INSTALLATION INSTRUCTION FOR 4362-281
WARNING! SHUT POWER OFF AT FUSE OR CIRCUIT BREAKER
READ AND SAVE THESE INSTRUCTIONS
PREPARATION
1. Shut off power at the fuse box or circuit breaker
box. If necessary. Remove old fixture and all
mounting hardware from wall junction box.
2. Carefully unpack your new fixture and lay out all
the parts on a clear area. Take care not to loose
any small parts necessary for installation.
ASSEMBLING THE FIXTURE
3. Thread pipe (K) into the coupling (L), thread pipe
(J) into pipe (K), thread pipe (I) into pipe (J),
thread the pipe (H) onto the nipple (I). thread the
pipe (G) onto the nipple (H)
4. Thread the pipe (G) onto the coupling (F).
MOUNTING THE FIXTURE (FIG.1)
5. Thread the two mounting screws (A) part way into
the mounting bar (B). Secure the mounting bar (B)
to junction box (not provided) with the junction box
screws (C) through slotted holes in mounting bar
(B).
CONNECTING THE WIRES (Fig. 2)
6. Connect the fixture wires to the junction box wires
as shown in Fig. 2. Make sure all wire connectors
are secure and do not easily pull off with a slight
tug. If there is no Green Ground Wire from the
junction box, connect the Fixture Ground Wire to
the Circular Strap or the Mounting bar with the
Green Screw provided.
7. Tuck these wire connections neatly into the wall
junction box.
8. Raise the canopy (D) allowing for the mounting
screws (A) to protrude through the holes on the
canopy (D), then secure with the finials (E).
9. Attach the connection parts (O)to lamp body (M) by finial
FiG.1
J
C B
A
D
washers (S) to the nipples of the “U” shape steel pipe
(V), and then move the “U” shape steel pipe (V).Into the
joint (P) of the connection parts (O), screw the joint (P)
until the glass diffuser attached onto the connection
parts firmly
Return the power to the junction box and test the
fixture. Your installation is now complete.
© Minka Lighting, Inc.
This product is protected by United States Federal
and/or State Law, including Patent and/or Copyright
laws.
L
E
F
G
H
M
N
O
I
P
Q
R
S
T
(N). And then attach the lamp shade (Q) to lamp body
(M) by finial (R).
COMPLETING THE INSTALLATION
10. Install the proper light bulbs for your fixture.
DO NOT EXCEED THE SPECIFIED WATTAGE!
11.Place the plastic washers (U) Glass diffuser (T) plastic
K
U
V
Fig.2