1
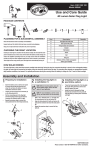
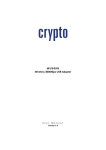
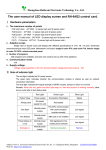
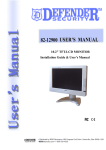
FREE TIME 200
USER MANUAL
CONTENTS
1 Safety Precautions..........................................................................................................................3
2 Specifications..................................................................................................................................3
2.1 Accessories ..........................................................................................................................3
2.2 Front Cover...........................................................................................................................4
2.3 Rear Cover ...........................................................................................................................5
2.4 Remote Control.....................................................................................................................6
3 Connection ....................................................................................................................................8
3.1 Coaxial Output ......................................................................................................................8
3.2 YUV Output...........................................................................................................................9
3.3 AV Output .............................................................................................................................9
3.4 HDMI Output....................................................................................................................... 10
3.5 Connect to Computer.......................................................................................................... 10
3.6 USB device (like USB disk, MP3, USB HDD etc.) Connection............................................. 11
3.7 SD/MMC device Connection ............................................................................................... 11
4 Function Instruction....................................................................................................................... 12
4.1 Home Menu ........................................................................................................................ 12
4.2 Device Menu....................................................................................................................... 12
4.3 Photo Menu ........................................................................................................................ 12
4.4 Music Menu ........................................................................................................................ 13
4.5 Video Menu......................................................................................................................... 14
4.6 Setup Menu ........................................................................................................................ 15
4.7 Files Menu .......................................................................................................................... 17
5 Specifications................................................................................................................................ 17
6 Optional assembling of internal hard disk...................................................................................... 18
2
1 Safety Precautions
1. To avoid Fire or Electric Shock, please do NOT expose it under the rain or wet condition.
2. Please do NOT put it near a place with high-temperature, dust or vibrating conditions.
3. Please make sure to use the original power adaptor provided by us. Other power adapter
may cause damage to the machine.
4. Hard disk inside is a very delicate device, slight shocking may cause damage to the machine.
5. Magnet devices may cause the loss of the datum inside the hard disk. Please keep the
machine away from the magnet devices.
6. Please do NOT use chemic solvent to clean the machine.
7. Please ask for help from professionals to repair after the machine has problems.
2 Specifications
2.1 Accessories
Accessories
Pcs
Remote Control(without Battery)
1
USB Cable
AV Output Cable
1
1
A/C Adaptor
User Manual
1
1
3
2.2 Front Cover
No.
A
Function
ENTER button:
Press to select options in menus.
B
RETURN Key
Press to return to the previous screen when navigating the menus
C
Navigational buttons
Press the arrow buttons to navigate the menus
D
PLAY button
Press to play playback
E
PAUSE button
Press to pause playback
4
2.3 Rear Cover
Α:
SD/MMC interface
B:
USB device interface (Connected to PC)
C:
AV Output
D:
YUV Video Output
E:
Coaxial Output
F:
HDMI interface
G:
USB host interface
I:
Power interface
5
2.4 Remote Control
No.
1
Function
MUTE button:
Press to mute audio output, and press again to resume.
2
POWER button:
Press to stand by on the AV HDD recorder.
3
Numeric buttons:
Press to enter channel numbers or numeric input when changing settings
10
RETURN button:
Press to return to the previous screen when navigating the menus.
11
Copy button
Press to copy the files from one disk to others
12
ZOOM button:
6
Press to ZOOM OUT the image.
13,15,18,34
NAVIGATION buttons:
Press the arrow buttons to navigate the menus.
14
OK/ENTER button
Press to select options in menus.
16
PREVIOUS buttons:
Press to go the previous chapter on HDD title
17
NEXT buttons:
Press to go the next chapter on HDD title.
19
Play button:
Press to playback selected video, audio or picture format file.
20, 38
FAST REWIND / FAST FORWARD buttons:
Press to fast rewind or fast forward the current playback.
Press repeatedly to select faster rewind or fast forward speeds..
21
PG. down button:
Press to go to the next page
22
PG. up button:
Press to go to the last page
23
AUDIO button:
Press to enter audio menu.
24
INFO button:
Press to show the information the video and photo
25
GOTO button:
Press to go to the select time you choose and play
26
SUBTITLE button:
Press to activate available subtitles on HDD disc or other disk
27
HOME button:
Press to view the home menu.
31
THUMBNAIL button:
press to review the photos in small pictures
32
BACK MUSIC button:
Press to choose open the background music when playing the photo
33
TV SYSTEM button:
7
Press to choose the TV System you want to select
35, 36
VOL + / - buttons:
Press to increase or decrease the volume.
37
PAUSE / STEP button:
Press to pause current playback.
Press again to step to the next frame.
Press
39
to resume playback.
Repeat A-B buttons:
Press A-B to set the beginning and end points of a section to repeat.
40
REPEAT buttons:
Press REPEAT 1 / ALL to set repeat option - Chapter, Title or Off.
41
Fullscreen button:
Press to make the videos and photos full screen
42
DEL button:
Press to delete some files
43
COPY button:
Press to start copy functions (from one Device to another)
44
GOTO button:
Press to go to the select time you want to play for the videos and music.
3 Connection
3.1 Coaxial Output
Follow the picture and Use Coaxial cable(optional)to connect TV
8
3.2 YUV Output
Follow the picture and Use YUV cable(optional)to connect TV:
3.3 AV Output
Follow the picture and use AV cable to connect TV:
9
3.4 HDMI Output
Follow the picture and use HDMI cable (not included) to connect TV:
3.5 Connect to Computer
Connect the unit to PC by USB cable when it power on, you can copy, stick, and delete files. Please
refer to the picture.
10
3.6 USB device (like USB disk, MP3, USB HDD etc.)
Connect the unit to USB device: you can play the files in it. Please refer to the picture.
3.7 SD/MMC device Connection
Connect the unit to SD/MMC device: you can play the files in it. Please refer to the picture.
11
4 Function Instruction
4.1 Home Menu
Power on the AV HDD system, you can see the start up page.
After a few second, the system will enter a guide menu. To enter this menu, press HOME KEY on the
remote control too. Home menu including 6 options: Device, Photo, Music, Video, Setup and files.
Enter the folder press
and
to select the file you want to view and press OK to play.
4.2 Device Menu
The Device menu allows you to select a device such as SD/MMC card, USB, HDD to browse.
To enter the menu, select Device from the Home menu.
Enter the file press
and
to select the device you want to view and press OK to play:
12
4.3 Photo Menu
The Photo menu allows you to browse photo files stored on a HDD or an external USB \Card
device. To enter the menu, select Photo from the Home menu.
Enter the file press
and
to select the file you want to view and press OK to play.
BUTTON
Playback
Stop
►||
■
Photo
FUNCTIONS
Screen width
Information
16:9/4:3
Display photo name, type, resolution, size and
zoom information
Zoom Adjusting Range:1x、2x、4x、8x、
Zoom
Rotation
1/4x、1/2x
Rotation: use Left, right, up, down button to
adjust. Adjusting Range:90 degree、180
degree、270 degree、360 degree
◄◄
►►
PG. up
PG. down
Repeat
BACK MUSIC
THUMBNAIL
specifications
JPEG
FAST REWIND
FAST FORWARD
repeat playing the photos
choose to open the background music when
playing the photo
to review the photos in small pictures
resolution
format options
6000X6000
Progressive JPEG
T
T
T
baseline
T
support area
T
resolution only
T
support 1024X768
support
13
(“ standard ”)
T
T
BMP.
T
baseline optimized
TT
T
Single color
16 colors
256 colors
16bit
24bit
32bit
6000X6000
support
support
support
support
support
support
support
4.4 Music Menu
The Music menu allows you to play music files stored on a HDD or an external USB \Card device. To
enter the menu, select Music from the Home menu.
Enter the folder press
and
to select the file you want to view and press OK to play.
BUTTON
Music
FUNCTIONS
►||
Playback
■
Stop
PG. up
PG. down
►►
◄◄
** Press
with symbol
T
T
Fast Forward
Fast Rewind
T
T
VOL+
VOl +1
VOL -
VOL -1
GOTO
Go to the time you choose and play
Repeat
Επανάληψη αναπαραγωγής
BACK MUSIC
To select files and go to BM Menu **
in the Music menu to select the music files you want to show. The files will be marked
.Then press BACK MUSIC button to enter the BM Menu:
14
Specifications
WMA
Sampling
8K-48KHz
Bit Rate
32K-320Kbps
Sound Channels
MP3
8K-48KHz
32K-320Kbps
Mono,Stereo
M4A(AAC)
16K-48KHz
32K-192Kbps
Mono,Stereo
Mono,Stereo
4.5 Video Menu
The Video Menu allows you play movie files stored on a HDD or an external USB \Card device.
To enter the menu, select Video from the Home menu.
Enter the folder press
and
to select the file you want to view and press OK to play.
BUTTON
►||
■
Screen width
Video
Info
Zoom
Subtitle
Repeat
◄◄
►►
FUNCTIONS
Playback
Stop
16:9/4:3
Display file name, type, resolution, frame rate, total time, current
time, audio track, subtitle and program information
Zoom Adjusting range: 1x, 2x, 4x, 8x, 1/4x, 1/2
show or not show the subtitle for the video
FAST REWIND
FAST FORWARD
VOL-
VOL+1
VOL-1
Goto
Go to the time you choose and play
VOL+
specifications
MPEG1
MPEG2
Supported suffix
Internal code
Bit rate
.DAT\.MPG
.MPG
\
\
\
Up to 9.8Mbps
15
MPEG4
.AVI
DIVX,XVID
Up to 9Mbps
H264
.MKV\.MOV
H.264
Up to 9Mbps
4.6 Setup Menu
The Setup Menu allows you to configure video and system settings.
To enter the menu, select Setup from the Main menu.
1. System Setup:
Language
Aspect Ratio
Choose TV format: NTSC/PAL
HDMI output
1080P/1080I/720P/576P
Preview
Use
and
Press Left and Right button for adjustment.
Adjusting range:16:9,4:3, full screen
TV FORMAT
SPDIF
Setup
Press Left and Right button to adjust language
Factory default
PCM
On/Off
All settings return to default
to select setting and use
and
to adjust each setting.
to select setting and use
and
to adjust each setting.
2. Video Setup
Use
and
16
Aspect Ratio
Subtitle Specific
Subtitle BG
Setup
Subtitle FontColor
StartResume
Sellect if you want to keep the aspect ratio of the video
file or not.
Choose subtitle size: Small, Normal, Big
Choose subtitle background color: Transparent, Grey,
Yellow Green, White
Choose between :Red, Blue, Green
Enable or Disable the resume function
3. Photo Setup:
SLIDE TIME
Setup
Choose the time between the slides, during the slide
show.
SLDE MODE
Choose the type of the transaction during the slideshow.
Aspect Ratio
Choose if you want to keep or not the aspect ratio of the
image.
4.7 Files Menu
The Files menu allows you browse text files stored on a HDD or an external USB \Card device. To
enter the menu, select Files from the Home menu.
Enter the folder press
and
to select the file you want to view and press ΟΚ to play.
5 Specifications
Power Supply
AC Input: 110-240V Output: 12V3A/5V2A
Power Consumption
About 30W
Weight
Approximately 1KG
Dimension (LxHxD)
28 x 10.5 x 22 cm
17
TV System
NTSC / PAL
Video
DAC: 96 kHz and 24bit
Output Level: 1.0 Vp-p (75 Ohm)
S/N Ratio: > 60 dB
DAC: 96 kHz and 24bit
Output Level (analogue): 1.4 Vrms (1 kHz, 0dB)
S/N Ratio: > 85 dB
Dynamic Range: > 80 dB
Frequency Range: 20 Hz - 20 kHz
Audio
Interfaces
Video: AV/ YUV / HDMI Audio: Stereo/ Coaxial
Others: USB 2.0 Host (High Speed), USB device,2-in-1 Card Reader , SATA 3.5’’ 40-1000G for
internal HDD, DC IN ,HDMI
File System
FAT32 (write/read) and NTFS (read only)
Subtitle
Formats
Supported:
.SRT/ SSA
Compatible
Operation System
Windows98SE/ME/2000/XP/7、Mac OSX
6 Optional assembling of internal hard disk (Hard disk is not
included).
1. Open the side cover, put the plastic hole to the correct place (hole to hole)
3
Lay the HDD to the correct place (hole to hole)
18
4 Connect the cables and whorl back the side cover
Technical support
For technical information and support contact with as:
Website: www.cryptoelectronics.gr
E-mail: [email protected]
CRYPTO
Address: V. Ipirou 45, 15125 Marousi, Greece
Telephone: +30 210 8098700
Fax: +30 210 6122512
19