1
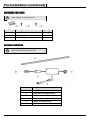
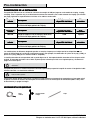
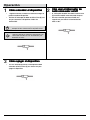
Item # 703-780 Model # S-LINCUS1-US-1-K1
Item # 733-410 Model # S-LINCUS1-US-2-K1
Item # 733-604 Model # S-LINCUS1-US-3-K1
USE AND CARE GUIDE
12 in./18 in./24 in. LED UNDERCABINET TASK AND
ACCENT LIGHT KIT
Questions, problems, missing parts? Before returning to the store,
call Commercial Electric Customer Service
8 a.m. - 6 p.m., EST, Monday - Friday
1-877877-527527-0313
HOMEDEPOT.COM
HOMEDEPOT .COM
THANK YOU
We appreciate the trust and confidence you have placed in Commercial Electric through the purchase of this LED
Under Cabinet Light. We strive to continually create quality products designed to enhance your home. Visit us online
to see our full line of products available for your home improvement needs. Thank you for choosing Commercial
Electric!
Table of Contents
Hardware Included..................................... 4
Package Contents ...................................... 4
Installation ........................................... 5
Operation ............................................. 6
Care and Cleaning ............................... 7
Troubleshooting .................................. 7
Table of Contents ................................. 2
Safety Information ................................ 2
Warranty ............................................... 2
Limited Warranty........................................ 2
Pre-Installation ..................................... 3
Planning Installation................................... 3
Tools Required ........................................... 3
Safety Information
When installing or using this under cabinet LED
lighting system, basic safety precautions should
always be taken including the following:
□
□
□
CAUTION: Do not install this product in a damp or
wet location.
CAUTION: Do not install this product an in
outdoor location.
Read all instructions before installing this
lighting system.
Save these instructions and refer to them
when connecting additional fixtures to
prevent overloading the LED power supply.
The length of the included power cord
(from plug to LED power supply) should not
exceed 36 in.
CAUTION: Do not use chemical solvents or harsh
abrasives to clean fixture.
NOTICE:: The important safeguards and instructions appearing
in this manual are not meant to cover all possible conditions and
situations that may occur. It must be understood that common
sense, caution and care are factors that cannot be built into any
product. These factors must be supplied by the person(s) caring
for, installing and operating the fixture. If you have any
questions, please contact our Customer Service Team at 1-877527-0313 or visit www.homedepot.com.
Warranty
LIMITED WARRANTY
The manufacturer warrants this lighting fixture to be free from defects in materials and workmanship for a period of
three (3) years from date of manufacture. This warranty applies only to the original consumer purchaser and only to
products in normal use and service. If this product is found to be defective, the manufacturer’s only obligation, and
your exclusive remedy, is the replacement of the product at the manufacturer’s discretion, provided that the product
has not been damaged through misuse, abuse, accident, modifications, alterations, neglect or mishandling. This
warranty shall not apply to any product that is found to have been improperly installed, set-up, or used in any way
not in accordance with the instructions supplied with the product. This warranty shall not apply to a failure of the
product as a result of an accident, misuse, abuse, negligence, alteration, or faulty installation, or any other failure
not relating to faulty material or workmanship. This warranty shall not apply to the finish on any portion of the
product, such as surface and/or weathering, as this is considered normal wear and tear. The manufacturer does not
warrant and specially disclaims any warranty, whether express or implied, of fitness for a particular purpose, other
than the warranty contained herein. The manufacturer specifically disclaims any liability and shall not be liable for
any consequential or incidental loss or damage, including but not limited to any labor/expense costs involved in the
replacement or repair of said product.
Contact the Customer Service Team at 1-877-527-0313 or visit www.HomeDepot.com.
2
Pre-Installation
P LANNING INSTALLATION
This LED Product comes with one 15W power supply unit per kit with each 12 in., 18 in., or 24 in. model. These can
be linked together either directly end-to-end or with the 12 in. connector cable (one included per kit) following the
specifications included in the tables below:
Item
Number
703-780
Item
Number
733-410
Item
Number
733-604
Description
12 in. LED Under Cabinet Task and Accent Light
Kit
Description
18 in. LED Under Cabinet Task and Accent Light
Kit
Description
24 in. LED Under Cabinet Task and Accent Light
Kit
Wattage per Single
Fixture
Max.
Linkable
3.4W
4pcs
Wattage per Single
Fixture
Max.
Linkable
5.0W
3pcs
Wattage per Single
Fixture
Max.
Linkable
7.1W
2pcs
Combinations of different lengths can be created provided that the total wattage of fixtures does not exceed the
15W maximum of the power supply unit. (For example, the combination of 1pc of 12 in. (3.4W) and 2pcs of 18 in.
(10W) for a total of 13.4W is acceptable.)
The dimming function of this product can only be achieved with the included in-line step on/off dimmer button
switch. This switch turns the light on at 100% at first press, down to 50% at next press, and then finally off with the
third press.
NOTE: This product is not compatible with wall dimmer
switches.
This product features a polarized clamp-on electrical plug which allows the option to shorten the power cord length.
Please consult a qualified electrician.
NOTE: Altering the original configuration of this product voids
the warranty.
For those wishing to bypass dimming and control the kit via an outlet connected to a wall on-off switch, the memory
function of the in-line switch returns the light(s) to last brightness setting (100% or 50%) before unplugging and/or
powering off.
TOOLS REQUIRED
Measuring
Tape
Phillips
screwdriver
Pencil
3
HOMEDEPOT.COM
Please contact 1-877-527-0313 for further assistance.
Pre-Installation (continued)
HARDWARE INCLUDED
NOTE: Hardware not shown to actual size.
Part
Description
Quantity
AA
Light Fixture Mounting Clips
2
BB
Mounting Clip Screws
2
CC
Power Supply Mounting Screws
2
PACKAGE CONTENTS
NOTE: Package contents not shown to scale.
Part
Description
A
12 in./18 in./24 in. LED Light Fixture
B
Connector to LED Light Fixture
C
On/Off Dimmer Button Switch
D
15W LED Power Supply
E
Clamp-on Electrical Plug
F
12 in. Connector Cable
4
Installation
1
2
Positioning the LED fixture
□ Identify the desired location for the LED fixture and
mark clearly.
Installing the mounting clips
□ Secure each lighting fixture mounting clip (AA)
in place with the mounting clip screws (BB).
NOTE Screws must be installed flush with surface.
□ Place the light fixture mounting clips (AA) along the
desired location and mark their intended position
through the holes with a pencil.
3
4
Installing the light fixture
□ To secure the fixture (A) in place, press it up evenly
into the lighting fixture mounting clips (AA).
Connecting the power
supply unit
□ Connect the power supply unit (D) to the
installed fixture (A) with the LED light fixture
connector (B).
IMPORTANT:: Do not plug in the power supply unit
to wall power until after connecting to lighting.
5
Installing the power supply unit
□ Mount the power supply unit (D) with the power
supply mounting screws (CC).
6
□
5
Connecting to the power
supply
Connect the power supply unit (D) to the
power outlet using the clamp-on electrical
plug (E).
HOMEDEPOT.COM
Please contact 1-877-527-0313 for further assistance.
Operation
1
2
Turning the fixture on
□ Upon plugging the unit into a power source, the
fixture(s) can now be turned on.
□ Press the in-line on/off button switch (C) once to
turn on the fixture(s) to 100% brightness
□ The in-line on/off dimmer button switch (C)
also acts as a step dimmer.
□ Once turned on, press the button a second
time to reduce the brightness from 100%
brightness to 50% brightness.
NOTE If multiple fixtures are linked, the first in-line switch
will control all linked fixtures.
IMPORTANT:: If the connected fixtures begin to flash,
the power supply may be overloaded. Please refer to the
“Pre-Installation” section for linking guidelines.
3
Using the on/ off dimmer
button switch
Turning the fixture off
off
□ Once dimmed, press the in-line on/ off dimmer
button switch (C) a third time to turn off the
fixture(s).
6
Care and Cleaning
□
□
Prior to cleaning, first turn off and unplug the system from the power source.
To clean the fixture, use a dry or slightly dampened, clean cloth to wipe the exterior of the fixture. Allow the
fixture to dry completely before connecting to power and operating.
IMPORTANT:: Do not use solvents to clean fixture.
Troubleshooting
Problem
□ The fixture(s) will not turn
on.
Possible Cause
Solution
□ The power is turned
□ Ensure there is power going to the outlet
□ The cables are not
□ Ensure all cables are properly connected
off.
properly connected.
□ The fixture(s) is flashing.
□ Too many fixtures
□ Ensure that the total wattage of linked
have been linked
together and the
15W power supply
has been overloaded.
7
fixtures does not exceed the single power
supply 15W limit. If so, reconfigure
according to the guidelines detailed in
“Pre-Installation”. (Additional power
supply units may be required.)
HOMEDEPOT.COM
Please contact 1-877-527-0313 for further assistance.
Questions, problems, missing parts? Before returning to the store,
call Commercial Electric Customer Service
8 a.m.- 6 p.m., EST, Monday-Friday
1-877877-527527-0313
HOMEDEPOT.COM
HOMEDEPOT .COM
Retain this manual for future use.
Núm. de artículo 703-780
Núm. de artículo 733-410
Núm. de artículo 733-604
Núm. de modelo S-LINCUS1-US-1-K1
Núm. de modelo S-LINCUS1-US-2-K1
Núm. de modelo S-LINCUS1-US-3-K1
GUÍA DE USO Y CUIDADO
JUEGO DE LÁMPARAS LED DE TRABAJO Y DECORATIVAS DE
INSTALACIÓN BAJO GABINETE DE 12 pulg./18 pulg./24 pulg.
¿Tiene preguntas, problemas, o faltan piezas? Antes de regresar a la tienda,
llame a Servicio al Cliente de Commercial Electric
de lunes a viernes de 8 a.m. a 6 p.m., hora local del Este
1-877877-527527-0313
HOMEDEPOT.COM
GRACIAS
Agradecemos la confianza que ha puesto en Commercial Electric a través de la compra de esta lámpara LED de instalación bajo
gabinete. Nos esforzamos por crear continuamente productos de calidad diseñados para mejorar su hogar. Visítenos en internet para
ver nuestra línea completa de productos disponibles para sus necesidades de mejorar su hogar. ¡Gracias por elegir a Commercial
Electric!
Tabla de contenido
Herraje incluido.......................................... 4
Contenido del paquete ............................... 4
Instalación ........................................... 5
Operación ............................................ 6
Cuidado y limpieza .............................. 7
Resolución de fallas ............................ 7
Tabla de contenido............................... 2
Información de seguridad .................... 2
Garantía ................................................ 2
Garantía limitada ........................................ 2
Pre-instalación ..................................... 3
Planificación de la instalación ................... 3
Herramientas requeridas ........................... 3
Información de seguridad
Cuando instale o use este sistema de iluminación LED
bajo gabinete, deben seguirse siempre medidas de
seguridad incluyendo las siguientes:
□
□
□
PRECAUCIÓN: No instale este producto en
exteriores.
PRECAUCIÓN: No use solventes químicos o
abrasivos fuertes para limpiar el dispositivo.
Lea todas las instrucciones antes de
ensamblar este sistema de iluminación.
Guarde estas instrucciones y consúltelas
cuando conecte dispositivos adicionales para
evitar sobrecargar el suministro de energía
LED.
La longitud del cable eléctrico incluido (desde
el enchufe hasta el suministro de energía LED)
no debe ser mayor de 36 pulg.
AVISO:: Las medidas preventivas y de precaución que aparecen
en este manual no están previstas para cubrir todas las
condiciones y situaciones posibles que puedan ocurrir. Debe
entenderse que el sentido común, la precaución y el cuidado son
factores que no pueden incluirse en ningún producto. Estos
factores deben ser provistos por la persona que se hace cargo,
instala y opera el dispositivo. Si tiene alguna pregunta, póngase
en contacto con el equipo de Servicio al Cliente al 1-877-5270313 o visite www.homedepot.com.
PRECAUCIÓN: No instale este producto en una
ubicación húmeda o mojada.
Garantía
GARANTÍA LIMITADA
El fabricante garantiza que esta luminaria está libre de defectos en materiales y mano de obra por un periodo de tres (3)
años a partir de la fecha de fabricación. Esta garantía aplica únicamente al comprador consumidor final y únicamente para
los productos usados en condiciones de uso y servicio normal. Si este producto está defectuoso, la única obligación del
fabricante y su exclusiva solución, es reemplazar el producto a discreción del fabricante, siempre y cuando el producto no
haya sido dañado por mal uso, abuso, accidente, modificaciones, alteraciones, negligencia o mal manejo. Esta garantía no
aplicará a ningún producto que se detecte que se haya instalado, configurado o usado incorrectamente de alguna manera
que no sea de acuerdo con las instrucciones proporcionadas con el producto. Esta garantía no aplicará a fallas del producto
como resultado de un accidente, mal uso, abuso, negligencia, alteración o instalación incorrecta o cualquier otra falla no
relacionada a una falla por fabricación material o de mano de obra. Esta garantía no aplicará al acabado de cualquier parte
del producto, como la superficie y/o intemperización, ya que esto es considerado deterioro por uso. El fabricante no
garantiza ni deniega específicamente ninguna garantía, sea expresa o implícita, o idoneidad para un propósito particular,
que no sea la garantía contenida en el presente. El fabricante renuncia específicamente a cualquier responsabilidad civil y
no se hará responsable por daños y perjuicios, por pérdida o daños accesorios, incluidos pero no limitados a los gastos de
mano de obra u otros gastos relacionados al reemplazo o reparación de dicho producto.
Póngase en contacto con el Equipo de Servicio al Cliente llamando al 1-877-527-0313 o visite www.HomeDepot.com.
2
Pre-instalación
PLANIFICACIÓN DE LA INSTALACIÓN
Este producto LED viene con una unidad de suministro de energía de 15W por juego con cada modelo de 12 pulg., 18 pulg.,
o 24 pulg. Estos se pueden unir ya sea directamente extremo con extremo o con el cable conector de 12 pulg. (uno incluido
por juego) siguiendo las especificaciones incluidas en las tablas a continuación.
Número de
artículo
703-780
Número de
artículo
703-410
Número de
artículo
703-604
Descripción
Juego de lámparas LED de trabajo y decorativas
de instalación bajo gabinete de 12 pulg.
Descripción
Juego de lámparas LED de trabajo y decorativas
de instalación bajo gabinete de 18 pulg.
Descripción
Juego de lámparas LED de trabajo y decorativas
de instalación bajo gabinete de 24 pulg.
Vatiaje por cada
dispositivo individual
Máx.
enlazables
3.4W
4 piezas
Vatiaje por cada
dispositivo individual
Máx.
enlazables
5.0W
3 piezas
Vatiaje por cada
dispositivo individual
Máx.
enlazables
7.1W
2 piezas
Las combinaciones de diferentes longitudes pueden ser creadas siempre que al vatiaje total de los dispositivos no sea
mayor de 15W máximo de la unidad de suministro de energía. (Por ejemplo, la combinación de 1 pieza de 12 pulg. (3.4W) y 2
piezas de 18 pulg. (10W) para un total de 13.4W es aceptable.)
La función atenuadora de este producto solo se puede lograr con el interruptor de botón atenuador en línea de paso on/off
incluido. El interruptor enciende la luz al 100% al primer pulso, la disminuye al 50% en el siguiente pulso, y finalmente la
apaga con el tercer pulso.
NOTA: Este producto no es compatible con otros
atenuadores.
Este producto presenta un enchufe eléctrico de abrazadera polarizado que permite la opción de acortar la longitud del cable
eléctrico. Consulte a un electricista calificado.
NOTA: La alteración de la configuración original de este
producto anula la garantía.
Para quienes deseen obviar la atenuación y controlar el juego mediante un tomacorriente conectado a un interruptor on/off
de pared, la función de memoria del interruptor en línea retorna la luz al último ajuste de luminosidad (100% o 50%) antes
de desconectar y o apagar la energía.
HERRAMIENTAS REQUERIDAS
REQUERI DAS
Cinta
métrica
Destornillador
Phillips
Lápiz
3
HOMEDEPOT.COM
Póngase en contacto con el 1-877-527-0313 para asistencia adicional.
Pre-instalación
(continuación)
HERRAJE INCLUIDO
NOTA: No se muestra el herraje en el tamaño real.
Pieza
Descripción
Cantidad
AA
Ganchos de montaje de la
luminaria
2
BB
Tornillos deganchode montaje
2
CC
Tornillosde montajede suministro
de energía
2
CONTENIDO DEL PAQUETE
PAQUET E
NOTA: El contenido del paquete nose muestra a escala.
Pieza
Descripción
A
Luminaria LED de 12 pulg./18
pulg./24 pulg.
B
Conector para luminaria LED
C
Interruptor de botón atenuador
on/off
D
Suministro de energía LED de 15W
E
Enchufe eléctrico de abrazadera
F
Cable conector de 12 pulg.
4
Instalación
1
□
Cómo colocar el dispositivo
LED
Identifique la ubicación deseada para el dispositivo LED
y marque con claridad.
2
□
Cómo instalar los ganchos
de montaje
Asegure en su lugar cada gancho de montaje del
dispositivo (AA) con los tornillos del gancho de
montaje (BB).
NOTA: Los tornillos deben instalarse alineados con
la superficie.
□
3
□
Coloque los ganchos de montaje de la luminaria (AA) a
lo largo de la ubicación deseada y marque su posición
prevista mediante los agujeros con un lápiz.
Cómo instalar la luminaria
Para asegurar en su lugar la luminaria (A), presione de
forma pareja en los ganchos de montaje de la luminaria
(AA).
4
□
Conexión de la unidad de
suministro de energía
Conecte la unidad de suministro de energía (D) al
dispositivo instalado (A) con el conector de la
luminaria LED (B).
IMPORTANTE: No enchufe la unidad de
suministro de energía a la energía de la pared hasta
después de conectar la iluminación.
5
□
Instalación de la unidad de
suministro de energía
Monte la unidad de suministro de energía (D) con los
tornillos de montaje del suministro de energía (CC).
6
Cómo conectar al suministro
de energía
□
Conecte la unidad de suministro de energía (D) al
tomacorriente usando el enchufe eléctrico de
abrazadera (E).
5
HOMEDEPOT.COM
Póngase en contacto con el 1-877-527-0313 para asistencia adicional.
Operación
1
□
□
2
Cómo encender el dispositivo
Luego de enchufar la unidad a la fuente de energía se
puede encenderel dispositivo.
Presione el interruptor de boton on/off en línea (C) una
vez para encender el dispositivo al 100% de
luminosidad.
NOTA: si están unidos varios dispositivos, el primer
interruptor en línea controlará todos los dispoitivos unidos.
IMPORTANTE: Si los dispositivos conectados
comienzan a destellar, el suministro de energía puede estar
sobrecargado. Consulte la sección “Pre-instalación” para
lineamientos de enlace.
3
□
Cómo apagar el dispositivo
Una vez atenuado, presione el interruptor de botón
atenuador on/off en línea (C) uns tercera vez para
apagar el dispositivo.
6
□
□
Cóm usar el interruptor de
botón atenuador on/off
El interruptor de botón atenuador on/off en línea
(C) funciona también como atenuador de paso.
Una vez encendido, presione el botón una
segunda vez para reducir la luminosidad de
100% a 50%.
Cuidado y limpieza
□
□
Antes de limpiarlo, apague y desconecte el sistema de la fuente de energía.
Para limpiar el dispositivo, use un paño limpio y ligeramente humedecido para limpiar el exterior del dispositivo.
Deje que el dispositivo seque completemante antes de conectarlo a la energía y operarlo.
IMPORTANTE: No use solventes para limpiar el dispositivo.
Resolución de fallas
Problema
□ El dispositivo no
enciende.
Posible causa
□ La energía está
□ Asegúrese de que llega energía al
□ Los cables no están
□ Asegúrese de que todos los cables estén
desconectada.
conectados
adecuadamente.
□ El dispositivo está
destellando.
Solución
□ Demasiados
dispositivos han sido
unidos y el
suministro de
energía de 15W ha
sido sobrecargado.
tomacorriente.
conectados adecuadamente.
□ Asegúrese de que el vatiaje total de los
dispositivos unidos no sea mayor del
límite de 15W del suministro de energía
individual. De ser así, reconfigure de
acuerdo a los lineamientos detallados en
“Pre-instalación”. (Se pueden requerir
unidades de suministro de energía
adicionales.)
7
HOMEDEPOT.COM
Póngase en contacto con el 1-877-527-0313 para asistencia adicional.
¿Tiene preguntas, problemas, o faltan piezas? Antes de regresar a la tienda,
llame al Servicio a Clientes de Commercial Electric
de lunes a viernes de 8 a.m. a 6 p.m., hora local del Este
1-877877-527527-0313
HOMEDEPOT.COM
Conserve este manual para uso futuro.