1
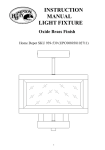
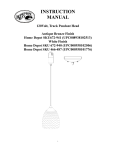
INSTRUCTION
MANUAL
120 Volt, Track Pendant Head
Antique Bronze Finish
Home Depot SKU 828-650 (UPC 008938241090)
1
Thank you for purchasing this Hampton Bay interior track pendant. This product has been manufactured with the highest standards
of safety and quality.
FEATURES:
1. Track pendant can be installed anywhere along the track section (sold separately).
2. Track Pendant is adjustable in length and comes complete with a Do-It-Yourself Pendant Adapter and a direct wire canopy.
3. The wire can be cut to desired lengths for different applications and ceiling heights.
QUESTIONS, PROBLEMS, MISSING PARTS:
Before returning to your local Home Depot, please call our Customer Service Team at 1-877-527-0313 or visit
www.homedepot.com. Please reference SKU828650, UPC008938241090.
GENERAL
All electrical connections must be in accordance with local codes, ordinances or national electrical codes. If you are unfamiliar
with methods of installing electrical wiring, secure the services of a qualified electrician. Before starting installation, disconnect
the power by turning off the circuit breaker or removing the fuse at fuse box. Turning the power off using the light switch is not
sufficient to prevent electrical shock.
Note: The important safeguards and instructions appearing in this manual are not meant to cover all possible conditions and
situations that may occur. It must be understood that common sense, caution and care are factors that cannot be built into any
product. These factors must be supplied by the person(s) caring for, installing and operating the fixture. If at any time you are
uncomfortable or are unsure of what to do, please contact a qualified licensed electrician for further assistance.
IMPORTANT SAFETY INSTRUCTIONS
1.
2.
3.
4.
5.
6.
7.
8.
9.
10.
11.
Read all instructions.
Do not install this lighting system in a damp or wet location.
Before energizing make sure that the lighting system is clear of all material which could cause a direct short and check all
electrical connections to make sure they are tight.
Do not install any part of this system (TRACK) less than 7 feet (2.2m) above floor.
To reduce the risk of fire and burns, do not install this lighting system where non insulated open bus-bar conductors can be
shorted or contact any conductive metals.
To reduce the risk of fire and overheating, make sure all connections are tight.
Turn off electrical power before modifying the light system in anyway.
For installation with HAMPTON BAY EC series track only.
CAUTION – To reduce the risk of a burn during re-lamping, remove from the track before re-lamping.
Do not install any luminaire assembly closer than 6 inches from any curtain, or similar combustible material.
DANGER – RISK OF SHOCK – DISCONNECT POWER BEFORE INSTALLATION.
SAVE THESE INSTRUCTIONS
TOOLS REQUIRED FOR ASSEMBLY & INSTALLATION (not included):
Ladder
Electrical tape
Safety goggles
Wire stripper
Gloves
Flathead screwdriver
Phillips screwdriver
Light bulb
PARTS INCLUDED FOR ASSEMBLY (parts are not to scale):
Box
x1 canopy
x1 Pendant Fixture
x1 Hardware Packet
ASSEMBLY INSTRUCTIONS (AS SHOWN IN DIAGRAM):
This pendant is already assembled and ready for installation to the track section. Proceed to Installing Fixture to Track. Section if
you do not need to adjust the length of the wire. Please follow these instructions if you do need to adjust the length of the wire.
1.
On the Adapter, remove the set screw on the side of the top end of the adapter as shown in Figure 1. Unscrew the
bushing and slide it down the wire a few inches. Keep these parts handy for the final installation.
2
2.
3.
4.
Separate the top and bottom portions of the adaptor by unscrewing them from one another. The two parts of the adapter
are joined with screw threads inside the top and bottom section.(See Figure 1)
Remove the three (3) wires connected to the three (3) screws inside the top of the adapter. Loosen the knot. Remove the
bottom portion of the adapter, and the bushing from the wire.
4a, Determine the distance from the ceiling where you want to hang the pendant by holding the wire at the ceiling or
using a tape measure. When the desired length is established, MARK THE WIRE WHERE IT MEETS THE
CEILING.
4b, Make a second mark 3 1/2in. below the first mark. Tie a knot so that it is at the top of the second mark (and between
both markings).
NOTE: If installing more than one pendant and the same height is desired for all pendants make sure the wires on all pendants are
marked at the same length.
CAUTION: Be careful not to cut or damage the insulation on the inside wires when removing the outer insulation.
5.
6.
Cut the wire 3in. above the knot.
The pendant wire has three (3) smaller wires running inside of it. Remove 3 inches of the outer insulation exposing the
three (3) smaller wires inside.
How to Identify the Wires: The NEUTRAL WIRE is transparent with a white line marking or simply a white wire, the HOT
WIRE is transparent without any marking or simply a black wire. The GROUND WIRE is a bare wire or simply a green wire or
transparent with a green line marking wire.
7.
8.
9.
Replace the bushing, bottom portion of the adapter and the knot respectively. Remove a half (1/2) inch of the insulation
on all three (3) of the smaller wires, twist the copper strands and loop each wire to its own screw matching the neutral
wire to the silver screw, the hot wire to the gold screw and the ground wire to the green screw. Tighten screws to secure
the wire.
Slide the bottom portion of the adapter up to the top and close the adapter by screwing the top and bottom together and
replace set screw.
Slide the bushing to the bottom of the adapter and re-attach.
Installing Fixture to Track:
1.
2.
IMPORTANT: Determine ground side of track (has indented groove on face and two internal copper bars) and connector
(side of connector with two metal tabs) It can only be installed if grounds are aligned. (See Figure 3)
Insert connector into track. Twist ground side of connector towards ground side of track until connector snaps into place
and locks.
Installing fixture to Ceiling: (Refer to Figure 4)
If you want to install the fixture to the ceiling using the direct wire canopy, start with steps 1-3.
NOTE: These fixtures are intended to be used with a 4in. x 2-1/8in. deep metal octagon junction box. The box must be directly
supported by the building structure.
1. Install mounting bracket to existing outlet box with screws.
2. Pull the pendant wire through the bushing and the canopy.
3. To adjust the wire, follow step 4a from above. Tie the knot at the marking and cut the wire 6in. above the knot. Then
follow step 6.
4. Rotate and twisted the mounting nut until the bushing secured.
5. Wire connections:
A. Make ELECTRICAL CONNECTION as directed below.
B. Carefully tuck connected wires back into the outlet box ensuring that the wire nuts do not come loose.
Install the lamp shade (For removable glass shades) (See Figure2)
Remove the retaining ring from the socket, slide the glass shade onto the socket placing it against the metal socket housing. While
holding the glass shade in place screw on the retaining ring onto the socket until it is snug. NOTE: Do not over tighten as the glass
could chip or break.
ELECTRICAL CONNECTIONS
a. Connect the neutral wire from the fixture to the neutral wire of the outlet box.
b. Connect the hot wire from the fixture to the hot wire of the outlet box.
c. Connect the ground wire from the fixture to the ground wire of the outlet box.
Note: Use UL Listed wire connectors suitable for the size, type and number of conductors. No loose strands or loose wires should
be present. Secure wire connectors with UL approved electrical tape.
6.
Secure the canopy to the mounting bracket with provided decorative nuts.
Install and replace light bulbs (excluded):
CAUTION: Refer to the re-lamping label located near the lamp holder for recommended maximum wattage. Do not exceed
recommended wattage.
1. Be sure the power is off, allow the fixture and bulb to cool, grasp connector and pull down while rotating it counter clockwise.
2. Twist the bulb counter clockwise from the socket to remove it. Insert a new bulb and rotate the bulb clockwise until it is
secure.
3. Restore electric power.
3
ASSEMBLY DIAGRAM
NOTICE:
1.
CONNECTOR IS DESIGNED TO LOCK INTO
TRACK SECTION BY TURNING CONNECTOR
IN ONE DIRECTION ONLY.
2.
TURN"GROUND INDICATOR"TAB TOWARDS
THE GROUND GROOVE ON TRACK TO ALIGN
GROUND TAB WITH GROUND CONDUCTOR.
Fig.2
Fig.3
Fig.4
Fig.1
TROUBLE SHOOTING:
Problem
Light Bulb will not illuminate.
Fuse blows or circuit breaker trips when
light bulb is illuminated.
Possible Cause
1. Light bulb is burned out.
2. Power is off.
3. Faulty wire connection.
4. Faulty switch.
Crossed wires or power wire is grounding out.
Corrective Action
1. Replace light bulb.
2. Make sure power supply is on.
3. Check wiring.
4. Test or replace switch.
Check wire connections.
PRODUCT MAINTENANCE:
1. Turn off power to the light fixture.
2. To clean the outside or inside of the fixture, first disconnect power to the fixture by turning off the circuit breaker or by
removing the fuse at the fuse box. Next, use a dry or slightly dampened clean cloth (use clean water, never use a solvent) to
wipe the inside glass and interior surface of the fixture. Allow the fixture to dry completely before power is restored.
CAUTION: Do not use chemical solvents or harsh abrasives to clean fixture as damage to the fixture or various components
may occur remedying the fixture inoperable.
LIMITED WARRANTY
The manufacturer warrants this lighting fixture to be free from defects in materials and workmanship for a period of five (5) years
from date of purchase. This warranty applies only to the original consumer purchaser and only to products used in normal use and
service. If this product is found to be defective, the manufacturer’s only obligation, and your exclusive remedy, is the repair or
replacement of the product at the manufacturer’s discretion, provided that the product has not been damaged through misuse,
abuse, accident, modifications, alterations, neglect or mishandling. This warranty shall not apply to any product that is found to
have been improperly installed, set-up, or used in any way not in accordance with the instructions supplied with the product. This
warranty shall not apply to a failure of the product as a result of an accident, misuse, abuse, negligence, alteration, or faulty
installation, or any other failure not relating to faulty material or workmanship. This warranty shall not apply to the finish on any
portion of the product, such as surface and/or weathering, as this is considered normal wear and tear. The manufacturer does not
warrant and specially disclaims any warranty, whether express or implied, of fitness for a particular purpose, other than the
warranty contained herein. The manufacturer specifically disclaims any liability and shall not be liable for any consequential or
incidental loss or damage, including but not limited to any labor/expense costs involved in the replacement or repair of said
product.
4
MANUAL DE
INSTRUCCIONES
Lámpara Colgante para Riel, de 120 voltios
Acabado en Bronce Antiguo
The Home Depot SKU 828-650 (UPC 008938241090)
5
Gracias por comprar Lámpara Colgante para Riel de Hampton Bay. Este producto se ha fabricado de acuerdo a las normas de
seguridad y calidad más altas.
CARACTERÍSTICAS:
1. La lámpara colgante se puede instalar en cualquier lugar de la sección del riel (se venden por separado).
2. La lámpara colgante para riel tiene una altura ajustable e incluye un adaptador y cubierta con cable directo.
3. Que puedes instalar tu mismo y que pueden cortarse a la medida para distintos usos y alturas de techos.
PREGUNTAS, PROBLEMAS O PIEZAS FALTANTES:
Antes de volver a The Home Depot, por favor llama a nuestro Equipo de Servicio al Cliente al 1-877-527-0313 o visita
www.homedepot.com. Por favor usa como referencia el Nº de SKU 828650, UPC008938241090.
GENERALIDADES
Todas las conexiones se deben hacer conforme a los códigos locales, ordenanzas o códigos nacionales de electricidad. Si no estás
familiarizado con los métodos de instalación del cableado eléctrico, contrata los servicios de un electricista calificado. Antes de empezar la
instalación corta el suministro de electricidad, apagando el cortacircuitos o retirando el fusible en la caja de fusibles. Cortar el
suministro de electricidad usando el interruptor de luz, no es suficiente para evitar una descarga eléctrica.
Nota: Las advertencias e instrucciones incluidas en este manual no tienen la intención de describir todas las posibles condiciones
o situaciones. El usuario debe entender que ningún producto está diseñado para sustituir el sentido común, la precaución y la
cautela. La responsabilidad de adoptar tales conductas reside enteramente en la(s) persona(s) que utiliza(n) o instala(n) o está(n) a
cargo de la pieza. Si en algún momento te sientes incómodo o no estás seguro de qué hacer, contacta a un electricista calificado y
certificado para obtener asistencia.
INSTRUCCIONES DE SEGURIDAD IMPORTANTES
1. Lee todas las instrucciones.
2. No instales este sistema de iluminación en un lugar húmedo.
3. Antes de dar energía, asegúrate de que no haya ningún material en el sistema de iluminación que pueda causar un corto
directo y verifica que todas las conexiones eléctricas estén ajustadas.
4. No instales partes de este sistema (RIEL) a menos de 7 pies (2,2 m) sobre el piso.
5. Para disminuir el riesgo de incendio y quemaduras, no instales este sistema de iluminación donde los conductores de barras de
distribución abiertos sin aislamiento puedan hacer cortos o estar en contacto con metales conductivos.
6. Para disminuir el riesgo de incendio o sobrecalentamiento, asegúrate que todas las conexiones estén ajustadas.
7. Desconecta la electricidad antes de hacer cualquier modificación en el sistema de iluminación.
8. Sólo para instalación con un riel HAMPTON BAY de la serie EC.
9. PRECAUCIÓN – Para disminuir el riesgo de quemaduras durante el cambio de las bombillas, desmonta la lámpara del riel
antes de cambiar la bombilla.
10. No instales lámparas a menos de 6 pulgadas (15 cm) de cortinas o material combustible similar.
11. PELIGRO –RIESGO DE CHOQUE –DESCONECTE LA ENERGÍA ANTES DE LA INSTALACIÓN.
GUARDA ESTAS INSTRUCCIONES
HERRAMIENTAS REQUERIDAS PARA ENSAMBLAJE E INSTALACIÓN (no incluidas):
Escalera
Gafas de seguridad
Cinta de electricista
Pelacables
Guantes
Destornillador de
cabeza plana
Destornillador Phillips
Bombilla de lámpara
PIEZAS INCLUIDAS PARA ENSAMBLAJE (no se muestran a escala)
caja
x1 Cubierta
x1 Paquete de herramientas
x1 Lámpara Colgante
INSTRUCCIONES DE ENSAMBLAJE (COMO SE MUESTRAN EN EL DIAGRAMA):
Esta lámpara colgante ya viene ensamblada y lista para su instalación en la sección del riel. Si no hay necesidad de ajustar la
longitud del cable, procede con la Instalación de la Lámpara en la sección del riel. En caso de que sea necesario ajustar la longitud
del cable, sigue estas instrucciones.
1. En el Adaptador, quita el tornillo de sujeción lateral en el extremo superior del adaptador como muestra la Figura 1.
Desenrosca el casquillo y deslízalo hacia abajo en el cable algunos centímetros. Mantén estas piezas a la mano para la
instalación final.
2. Desatornilla y separa las partes superior e inferior del adaptador. Las dos partes del adaptador están unidas por tornillos de
rosca en la sección superior e inferior (Ver la Figura 1).
6
3.
Quita los tres (3) cables conectados a los tres (3) tornillos dentro de la parte superior del adaptador. Afloja el nudo. Quita la
parte inferior del adaptador y el casquillo del cable.
4. 4a, Determina la distancia desde el techo donde deseas colgar la lámpara sosteniendo el cable en el techo o con una cinta
métrica.
Una vez que has determinado la longitud deseada, MARCA EL CABLE DONDE SE ENCUENTRA CON EL TECHO.
4b, Haz una segunda marca a 8,89 cm debajo de la primera marca. Ata un nudo para que quede por encima de la segunda
marca (y entre las dos marcas).
NOTA: Si vas a instalar más de una lámpara colgante y deseas que todas queden a la misma altura, asegúrate de que los
cables de todas las lámparas estén marcados con la misma longitud.
PRECAUCIÓN: Ten cuidado de no cortar o dañar el aislamiento en los cables internos cuando quites el aislamiento externo.
5. Corta el cable a 7,62 cm por encima del nudo.
6. El cable de la lámpara colgante tiene tres (3) cables más pequeños que van por dentro. Quita 7,62 cm del aislamiento externo
hasta exponer los tres (3) cables pequeños internos.
Cómo Identificar los Cables: El CABLE NEUTRO es transparente y está marcado con una línea blanca o es simplemente un
cable blanco, el CABLE POSITIVO es transparente sin marca o es simplemente un cable negro. El CABLE A TIERRA es un
cable desnudo o verde, o transparente con una línea verde.
7. Reemplaza el casquillo, la parte inferior del adaptador y el nudo respectivamente. Quita 1,27 cm de aislamiento en los tres (3)
cables más pequeños, enrosca las hebras de cobre y enrolla cada cable en su tornillo de modo que el cable neutro vaya
conectado al tornillo plateado, el cable positivo al tornillo dorado y el cable a tierra al tornillo verde. Aprieta los tornillos para
asegurar el cable.
8. Desliza la parte inferior del adaptador hasta arriba y cierra el adaptador al enroscar las partes superior e inferior juntas y vuelve
a colocar el tornillo.
9. Desliza el casquillo hacia la parte inferior del adaptador y vuelve a colocarlo en su sitio.
Instalar la Lámpara en el Riel:
1.
2.
IMPORTANTE: Determina el lado a tierra del riel (tiene una ranura mellada sobre la superficie y dos barras internas de
cobre) y conector (en el lateral del conector con dos pestañas de metal). Se puede instalar únicamente si las tomas a tierra
están alineadas. (Ver Figura 3)
Insertar el conector en el riel. Enrosca el lado a tierra del conector hacia el lado a tierra del riel hasta que el conector entre a
presión en el lugar y se ajuste.
Instalar la lámpara al Techo (Consulta la Figura 4) :
Si deseas instalar la lámpara en el techo usando la cubierta de cable directo, comienza con los pasos 1-3.
NOTA: Estas lámparas se deben usar con una caja de conexiones octagonal de metal de 10,16 cm x 5,39 cm de profundidad. La
caja debe estar directamente apoyada en la estructura de la vivienda.
1. Instale el soporte de montaje en la caja de empalme existente con tornillos.
2. Hala el cable de la lámpara a través del casquillo y la cubierta frontal.
3. Para ajustar el cable, sigue el paso 4a que se encuentra arriba. Ajusta el nudo en la marca y corta el cable a 15,24 cm arriba del
nudo. Luego sigue con el paso 6.
4. Rota la tuerca de montaje hasta que el casquillo esté ajustado y seguro en el tornillo de cierre.
5. Conexiones de los cables:
A. Haz la CONEXIÓN ELÉCTRICA como se indica a continuación.
B. Coloca con cuidado los cables conectados de nuevo dentro de la caja eléctrica asegurándote de que las tuercas del cable no
se aflojen.
Instale la cortina de lámpara (para las cortinas de cristal desprendibles) (Véase Figure2)
Quite el anillo de retención del zócalo, resbale la cortina de cristal sobre el zócalo que la coloca contra la cubierta del zócalo del
metal. Mientras que sostiene el tornillo de cristal de la cortina en el lugar en el anillo de retención sobre el zócalo hasta que sea
apretado un poco. NOTA: Sobre no apriete pues el vidrio podría saltar o romperse.
CONEXIONES ELÉCTRICAS
a. Conecta el cable neutro de la lámpara al cable neutro de la caja eléctrica.
b. Conecta el cable positivo de la lámpara al cable positivo de la caja eléctrica.
c. Conecta el cable a tierra de la lámpara al cable a tierra de la caja eléctrica.
Nota: Usa conectores de cable con clasificación UL adecuados para el tipo de tamaño y cantidad de conductores. No debe haber
cables sueltos o hilos flojos. Asegura los conectores de cable con cinta aislante con clasificación UL.
6.
Asegura la cubierta para el soporte de montaje con las tuercas decorativas provistas.
Instalar y reemplazar las bombillas (no incluidas) :
PRECAUCIÓN: Consulta el vataje máximo recomendado en la etiqueta para cambio de bombilla que se encuentra cerca del
portabombilla. No excedas el vataje recomendado.
1. Asegúrate de que esté desconectada la electricidad, deja enfriar la lámpara y la bombilla, sujeta el conector y tira hacia abajo
al tiempo que giras la bombilla en sentido contrario de las manecillas del reloj.
2. Gira la bombilla en sentido contrario a las manecillas del reloj desde el casquillo para quitarla. Inserta la nueva bombilla y
gira la bombilla en sentido a las manecillas del reloj hasta que esté ajustada.
3. Restablece la electricidad.
7
DIAGRAMA DE ENSAMBLAJE
NOTA:
1. EL CONECTOR ESTÁ DISEÑADO PARA GIRAR EN UNA
DIRECCIÓN Y BLOQUEARSE DENTRO DE LA SECCIÓN
DEL RIEL.
2. GIRA LA PESTAÑA"INDICADOR A TIERRA" HACIA LA
RANURA A TIERRA SOBRE EL RIEL PARA ALINEAR LA
PESTAÑA CON EL CONDUCTOR A TIERRA.
Fig.2
Fig.3
Fig.4
Fig.1
SOLUCIÓN DE PROBLEMAS:
Problema
La lámpara no se enciende.
El fusible se funde o el cortacircuitos se activa
en el momento en que enciendes la luz.
Causa posible
1. La bombilla se fundió.
2. No hay electricidad.
3. Conexión defectuosa del cable.
4. Interruptor defectuoso.
Los cables están pelados o el cable de corriente está en
cortocircuito.
Medida correctiva
1. Reemplaza la bombilla.
2. Asegúrate de que el suministro de
electricidad está encendido.
3. Verifica el cableado.
4. Prueba o reemplaza el interruptor.
Verifica las conexiones de cable.
MANTENIMIENTO DEL PRODUCTO:
1. Desconecta la electricidad de la lámpara.
2. Para limpiar el exterior o interior de la lámpara, primero corta el suministro de electricidad, apagando el cortacircuitos o
retirando el fusible correspondiente en la caja de fusibles. Seguidamente, usa un paño limpio, seco o ligeramente húmedo (usa
sólo agua limpia, nunca un solvente) para limpiar el interior de la superficie y del cristal de la lámpara. Deja secar la lámpara
completamente antes de restablecer la electricidad.
PRECAUCIÓN: No uses solventes químicos o abrasivos duros para limpiar la lámpara porque se puede dañar o los diversos
componentes o la lámpara pueden quedar inoperables.
GARANTÍA LIMITADA
El fabricante garantiza que esta pieza de iluminación está libre de defectos materiales o de fabricación durante cinco (5) años a
partir de la fecha original de compra. Esta garantía es válida sólo para el comprador original y sólo para los productos en uso y
servicio normales. Si se descubre que este producto presenta defectos, la única obligación del fabricante y la solución exclusiva
que se le dará será la reparación o reemplazo del producto, a criterio del fabricante, siempre que el producto no se haya dañado por
mal uso, abuso, accidente, modificaciones, alteraciones, negligencia o manejo indebido. Esta garantía no tiene vigencia para
ningún producto que se instale, configure o use incorrectamente sin regirse por las instrucciones adjuntas al producto. Esta
garantía no tiene vigencia por una falla del producto como consecuencia de un accidente, mal uso, abuso, negligencia, alteración o
instalación defectuosa o cualquier otra falla que no esté relacionada con el material o fabricación defectuosos. Esta garantía no se
aplica al acabado de ninguna parte del producto, como por ejemplo la superficie, ni tampoco al deterioro por condiciones
ambientales, ya que esto se considera desgaste normal. El fabricante no garantiza y niega especialmente cualquier garantía, ya sea
expresa o implícita, de idoneidad para un propósito en particular, distinto de la garantía indicada aquí. El fabricante niega
específicamente cualquier responsabilidad y no es responsable de daños o pérdida directa o indirecta, incluido, pero sin limitarse a,
cualquier costo de mano de obra o gastos que esté involucrado en el reemplazo o reparación de dicho producto.
EC410
8