1
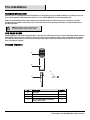
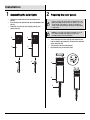
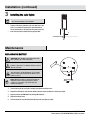
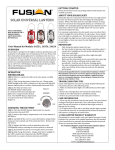
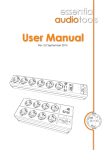
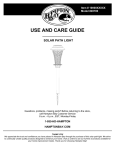
Item #1000 695 009
Model #NXT-12011
USE AND CARE GUIDE
6-PACK PLASTIC SOLAR PATHWAY LIGHTS
Questions, problems, missing parts? Before returning to the store,
call Hampton Bay Customer Service
8 a.m. - 6 p.m., EST, Monday-Friday
1-855-HD-HAMPTON
HAMPTONBAY.COM
THANK YOU
We appreciate the trust and confidence you have placed in Hampton Bay through the purchase of these solar pathway lights. We strive to continually
create quality products designed to enhance your home. Visit us online to see our full line of products available for your home improvement needs.
Thank you for choosing Hampton Bay!
Table of Contents
Table of Contents .......................................................... 2 Safety Information......................................................... 2 Warranty ......................................................................... 2 Pre-Installation .............................................................. 3 Planning Installation ................................................................3 How Solar Works......................................................................3 Package Contents ....................................................................3 Installation ..................................................................... 4 Maintenance .................................................................. 5 Replacing the Battery...............................................................5 Care and Cleaning ........................................................ 6 Troubleshooting ............................................................ 6 Safety Information
Please read and understand the instructions in this entire manual
before installing these solar lights.
WARNING: Only use NiMh rechargeable batteries with
these solar lights. Do not mix battery types.
WARNING: Do not open, short circuit, or mutilate
batteries as injury may occur. Batteries must be recycled or
disposed of properly.
Warranty
The manufacturer warrants this product to be free for one (1) year against any defects that are due to faulty materials or workmanship. This
warranty applies only to the original consumer purchaser and only to products used in normal use and service. If this product is found to be
defective, the manufacturer’s only obligation, and your exclusive remedy, is the repair or replacement of the product at the manufacturer’s
discretion, provided that the product has not been damaged through misuse, abuse, accident, modifications, alterations, neglect, or
mishandling. This warranty shall not apply to any product that is found to have been improperly installed, set up, or used in any way not in
accordance with the instructions supplied with the product. This warranty shall not apply to a failure of the product as a result of an
accident, misuse, abuse, negligence, alteration, or faulty installation or any other failure not relating to faulty workmanship. This warranty
shall not apply to the finish on any portion of the product, such as surface and/or weathering, as this is considered normal wear and tear.
The manufacturer does not warrant and specifically disclaims any warranty, whether expressed or implied, or fitness for a particular
purpose, other than the warranty contained herein. The manufacturer specifically disclaims any liability and shall not be liable for any
consequential or incidental loss or damage, including any labor/expense costs involved in the replacement or repair of said product.
Contact the Customer Service Team at 1-855-HD-HAMPTON or visit www.Hamptonbay.com.
2
Pre-Installation
PLANNING INSTALLATION
Compare all parts in the package with the Package Contents list. Verify that all parts are included and that there is no damage. If any parts
are missing or damaged, contact the Customer Service Team at 1-855-HD-HAMPTON or visit www.HamptonBay.com.
Choose an installation location where direct sunlight can be absorbed onto the face of the solar panel for as many hours as possible
throughout the day. Shadows cast by homes, trees, and structures will restrict the charging of the batteries and affect the total hours of
operation of the lights.
NOTE: The batteries come pre-charged but some
discharge may happen during storage or transit.
HOW SOLAR WORKS
During daylight hours, the sun will charge the batteries in the solar panel and the lights will turn on at dusk. Light output depends upon how
much light the solar panel receives. Position the solar panel so that it receives maximum sunlight. If there are streetlights or other lighting
that could shine directly into or near the solar panel, these lights may trigger the light sensor and the lights may turn off. The solar panel
must sense darkness to operate.
PACKAGE CONTENTS
A
B
D
C
Part
Description
Quantity
A
Solar light
6
B
Pole
6
C
Ground stake (located in Pole (B))
6
D
AA 1.2V 600 mAh NiMh rechargeable
battery, (preinstalled)
6
3
HAMPTONBAY.COM
Please contact 1-855-HD-HAMPTON for further assistance.
Installation
1 Assembling the solar lights
□
□
□
2 Preparing the solar panels
Remove the ground stake (C) from the bottom of the
pole (B).
Insert the top of the ground stake (C) into the bottom of the
pole (B).
Repeat this step for each solar light (A), pole (B), and
ground stake (C).
NOTE: To allow each battery to reach full capacity and
perform correctly, pull out the plastic tab and place the solar
light in full sunlight for the first 12 hours. Failure to do so can
shorten the life of the battery or operation of the light. On
cloudy or rainy days it may take several days for the batteries
to fully charge.
NOTE: To protect the solar panel from damage, do not use
force during assembly. Keep the plastic shades in the
packaging until you need to install them.
A
A
□
B
□
□
B
C
C
Twist off the top of the solar light (A) and remove the tab
from the battery compartment (1) located on the underside
of the solar panel top.
Twist the top of the solar light back on.
Repeat these steps for each solar light.
A
B
C
4
1
Installation (continued)
3
Installing the solar lights
NOTE: Do not use a hammer to install the ground stakes.
This could cause damage to the solar lights.
□
□
Prepare a hole in the ground for each solar light. Use a tool
such as a screwdriver to prepare the installation hole to
ensure that the hole is not larger than the ground stake (C).
Insert the solar light assembly into the prepared hole.
C
Maintenance
REPLACING THE BATTERY
WARNING: Only use NiMh rechargeable batteries with
these solar lights. Do not mix battery types.
WARNING: Do not open, short circuit, or mutilate
batteries as injury may occur. Batteries must be recycled or
disposed of properly.
CAUTION: Do not use a smaller mAh battery as it will
affect performance. Larger mAh batteries are acceptable.
Ensure you have positioned the batteries with the correct
polarity (+) and (-).
NOTE: Battery performance is affected by weather and
temperature. Expect reduced performance in adverse
conditions of cold, extreme cold, extreme heat, plus
humidity and dampness.
1.
Twist off the top of the solar light assembly and remove the battery cover.
2.
Remove the old batteries and clean the battery contacts on the new batteries and the solar lights.
3.
Replace with new AA NiMh 600 mAh rechargeable batteries.
4.
Replace the battery cover.
5.
Twist the top of the solar head back onto the top of the solar light assembly.
5
HAMPTONBAY.COM
Please contact 1-855-HD-HAMPTON for further assistance.
Care and Cleaning
□
It is recommended that solar lights not be used in freezing conditions. Monitor weather and take solar items indoors for storage as
needed. Keep snow or other buildup off the solar panels so that the batteries are able to recharge.
□
Remove batteries from equipment that will not be used for an extended period of time.
Troubleshooting
Problem
The solar lights do not come on.
Solution
Check to ensure there are no obstructions over the top of the solar panel.
Check to ensure that the battery(s) are installed correctly and there is nothing blocking the battery
terminals from making contact.
Check to ensure the solar panel is positioned to sense both daylight and night time. If bright lights
shine near or into the solar panel, these lights may trigger the light sensor and the lights may turn off.
Bright lights can act like daylight and keep the system from starting.
Batteries may need to be changed and vary by use, temperature, weather conditions, and heat.
Replace the batteries with the exact same type of rechargeable batteries.
Ensure the batteries are fully charged. It is important to charge the batteries for 12 hours in full sun
before usage. Cloudy or rainy days may require a longer charging time.
In some cases, you may have to open the battery compartment and “seat” the batteries correctly
between metal clips as some dislodging may occur during the shipment. Also ensure the correct
polarity (+) and (-).
Cloudy or rainy days generate far less charge on the solar panel and thus fewer hours of operation.
Prolonged cloudy or rainy days can affect performance dramatically.
6
Questions, problems, missing parts? Before returning to the store,
call Hampton Bay Customer Service
8 a.m. - 6 p.m., EST, Monday-Friday
1-855-HD-HAMPTON
HAMPTONBAY.COM
Retain this manual for future use.