Transcript
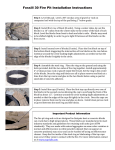
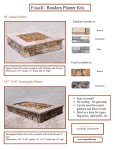
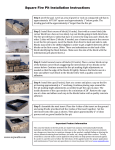
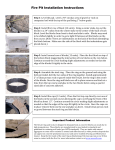
Random / Fossill Planter Installation Instructions Step 1:Level the pad. Level an area of gravel or rock on compacted soil that is approximately 72” X 72” for the Square Planter or 72” X 120” for the Rectangular Planter. The leveling pad will be approximately 6” larger than the planter. Step 2: Install first course of block. Start with a corner block (the corner block has a face on two sides). Lay out blocks going in both directions. The square planter will have 2 blocks both directions then a corner. The rectangular planter will have 2 blocks one direction and 5 blocks on the long side, then a corner. If needed, use a framers square at the corners to set the planter square. Level the blocks from front to back and side to side. Blocks may need to be shifted slightly in order to get a tight fit between all the blocks on the first course. Step 3: Install second course of blocks. Place a corner block on top of the bottom corner block staggering the intersection of two blocks on the course below. Continue around the planter making slight adjustments as needed so that the edge of the blocks fit tightly. Remove the blocks one at a time and adhere each block to the blocks below with a quality concrete adhesive. Step 4: Install the caps. Start at a corner and place a cap on the planter leaving approximately a 1” overhang. Continue placing caps around the planter making slight adjustments as needed to get the caps in place. Cap overhang may vary. You will need 10 caps for the square planter and 15 caps for the rectangular planter. Remove the caps one at a time and adhere each cap to the blocks below with a quality concrete adhesive. Step 5: Now you are ready to add your desired fill material, plants, mulch, rocks, etc. Important Product Information www.ncpwalls.com The concrete blocks in the planter kit are made from natural, environmentally-‐friendly material, and therefore, variations in color may occur. Also the colors of concrete products can change over time due to: moisture changes in the product; sunlight fading or altering the colors; chemical staining from fertilizers, ice melts, etc.; along with other reasons. To help avoid this a concrete sealer can be applied to the product to help protect the natural appeal. If a sealer is used be sure to follow the directions of the applied sealer for proper application and maintenance. If you have any questions or concerns, please visit us at www.ncpwalls.com