Transcript
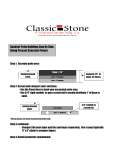
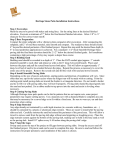
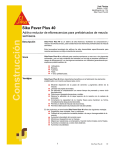
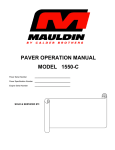
Pavers Installation Sheet
STEP 1
Pull all the Pavers out of the package and look
for the different paver configurations. Start
laying out the pattern prior to commencing.
STEP 2 (refer to diagram)
Align the corners to the center similar to installing
tile and use a “Nickel” between all sides as your
spacer allows for the “Quick Setting Sand” to fill in
between all sides of the pavers. The spacing step
of the installation process is done in Step 5.
STEP 3 (refer to diagram)
STEP 2
Mix “Polymer Thin-set” and apply the pavers to
your clean substrate. Start in the corner of your
project and work outward. Use a 1/2” “notch
trowel” for spreading the “Polymer Thin-set” to the
substrate and push Paver firmly into the mortar
bed of Thin-Set.
TIP - SPACING
For spacing use a “Nickel” on all sides of the square
paver to allow for “Quick Setting Sand” to be added
after the Pavers are set into the “Polymer Thin-set”.
TIP - CUTTING
Cut Pavers as required with a 4” carbon to diamond
blade rotary saw or grinder.
STEP 3
STEP 4
Clean surface prior to adding “Quick Setting Sand”
with a soft bristle brush or sponge using soap and
water in insure a clean surface if any Thin-set gets
on the surface.
STEP 5
Add the “Quick Setting Sand” between all the
paver spaces to achieve the Paver Sanded
Grout Look.
STEP 6
Clean entire surface with a soft bristle brush or
sponge using soap and water in insure a clean
final surface.
STEP 7
STEP 6
Sealing is not mandatory but optional if a shine
look is desired.
Please visit www.slimsurface.com for our full
installation video.