1
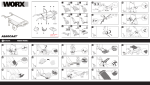
™ ASSEMBLY INSTRUCTIONS PACKAGING CONTENTS A Wooden Handle x2 E Axle Bracket x2 B Riser x2 F Axle x1 C Wheel Guard x1 D Tray x1 G Frt Wheel x1 H Undercarriage x1 I Easy Comfort Grip x1 Back Wheel x2 HARDWARE CONTENT J 5 ½ in. Bolt x2 K 2 ¾ in. Bolt x2 L 2 ¼ in. Bolt x4 M 2 ¼ in. Bolt x2 P Spacer x2 O Nut x10 N ¾ in. Wood Screw x2 Q Large Washers x4 R Cotter Pins x4 EXPLODED VIEW Read all instructions prior to assembly. Tools Required: • ½ in. wrench or ½ in deep-drive socket • Flat-head screwdriver • Phillips screwdriver • Drill and 8” bit WARNING Tire is not for highway service Donotoverinflatetire.Maximumtireinflation=30psi Tirechangingand/orinflationcanbedangerousand should be done only by trained personnel using proper tools. INSTRUCTIONS 1 RISER ASSEMBLY Step 1: Push bolts (J ) through bottom of tray towards the front and through the wide side of the riser (D). Step 2: Push bolts (K) through bottom of tray towards the back and through the small side of the riser (D). Step 3: Arrange riser (B) so that wider side is facing the front of tray. Slide over bolts. Step 4: Repeat for second riser. 2 Forward TIP: The riser will grab the bolts and hold them in place. ATTACH WOODEN HANDLES Step 1: Turn tray over. Step 2: Place handles (A) over bolts and lower onto risers. Front of tray 3 ATTACH UNDERCARRIAGE Step 1: Attach undercarriage (small slots facing back side of tray) to four bolts using nuts (O). Wait to tighten in Step 6. TIP: If the bolt holes don’t line up to the four bolts, loosen crossbar nuts and loosen axle u-bolt nuts and align undercarriage to your wheelbarrow bolt pattern. Retighten undercarriage nuts. 4 WHEEL GUARD ASSEMBLY Step 1: Use two bolts (M) and two nuts (O) to attach wheel guard (C) to front of handles. TIP: Bolts should point to the inside of the handles. Use a ½ in. wrench or socket to fully tighten wheel guard. Leave the rest of the nuts and bolts loosely fastened. 5 ATTACH FRONT WHEEL AXLE BRACKET Step 1: Loosely attach axle bracket (E) to bottom of handle using two bolts (L) and two nuts (O). TIP: Don’t tighten the nuts at this time. 6 FRONT WHEEL ASSEMBLY Step 1: Slide axle (F) through wheel (G) and through spacer (P) and then into attached bracket. Step 2: Slide second spacer (P) and second axle bracket (E) over other end of axle. Step 3: Loosely attach second axle bracket to handle using bolts (L) and nuts (O). Use a ½ in. wrench or socket to fully tighten all nuts. TIP: To keep wheel from sliding side to side after assembly, push axle brackets toward each other prior to tightening. Front of tray 7 REAR WHEEL ASSEMBLY Step 1: Slide cotter pin (R) through the inner hole of axle. R R Step 2: Slide Washer (Q) onto axle until touching pin. Step 3: Next slide the wheel on axle until it reaches washer. Step 4: Finally slide on another washer and insert cotter pin into outer hole. Q Q Step 5: Repeat for the other side. 8 EASY COMFORT GRIP ASSEMBLY Up I Step 1: Place the left side of the tube handle (I) onto the left wheelbarrow handle. Push it on partially. Step 2: Slide the right side of the tube handle into left side of tube handle. Now rotate right side of tube handle on right wheelbarrow handle. Tap tube handle until completely in place. N Step 3: Drill a 1/8” pilot hole into wheelbarrow handles through holes at each end of tube handle. Make sure tube handle is fully onto wheelbarrow handles. Step 4: Screw wood screws (N) into 1/8” pilot holes. BRAKE AND HITCH INFORMATION To tighten or loosen brake handle movement, tighten or loosen nut on this screw. To release brake, pull handle towards you until handle is away from brake-stop and then push handle down. Attaching Hitch. Note: Brake shown in ON position. For replacement parts or warranties visit www.wheelzbarrow.com or call 855-838-2646