1
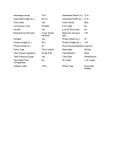
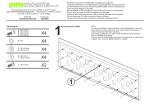
User Manual The Worlds #1 Wetpour Rubber Mixer www.archquip.com.au T: 07 3394 2724 F: 3394 3207 E: [email protected] INITIAL SETUP 1) Make sure the Rotatub mixer is up right with wheels and feet on the ground. 2) If you have purchased a mixer with optional extras you need to set them up before use. a) Adjustable legs - legs must be adjusted to suit the terrain the mixer will be operating on. To do this you need to loosen the locking nuts (use a hammer) on the threaded shaft and adjust the feet up or down by rotating them until the mixer is as level as possible. Once you are satisfied that the mixer is level tighten locking nuts for safety. Step Locking Nuts Feet b) Foldout Step - the step is secured with zip ties from new for safe transportation. Remove the zip tie securing step to mixer. (Take care not to remove zip ties holding crucial wiring to mixer). Fold the step over and slide out on its rails. Ensure the step is stable. 3) When mixing base rubber (eg. 4 mesh buffings or 8–15mm granules) replace the No.1 blade with the specially designed No.1-4 # blade to allow for big particle clearance between the blade and the discharge hole in the floor. 1 1- 4 # 2 www.archquip.com.au The Worlds #1 Wetpour Rubber Mixer INTRODUCTION Congratulations on the purchase of your ROTATUB wetpour mixer The Rotatub mixer range has been specially designed to significantly reduce the problem resin build up that most common wetpour mixers suffer from. It is manufactured to the highest standards and constructed from selected quality materials. The unique design will give many trouble free years of operation with only the minimum amount of maintenance when used in accordance with this User Manual. 1 www.archquip.com.au The Worlds #1 Wetpour Rubber Mixer OPERATION Outlet trap door handle Start Stop/ E-stop Trap door guard Fig 1 ALWAYS READ AND FOLLOW THE MANUFACTURERS INSTRUCTIONS OF THE PRODUCTS TO BE MIXED! 1) For best results add the rubber and glue products before starting the mixing blades. 2) Press start and once the required consistency has been achieved place a suitable container (wheelbarrow) under the outlet trap door (fig.1). The door height has been designed to fit a standard size wheelbarrow underneath. 3) Keep the mixer running and open the outlet trap door. The product will empty into the wheelbarrow and with the action of the spring loaded mixing blades the mixer will start to self clean. 4) Once the product is discharged close the outlet trap door. 5) The mixing blades can now be stopped and the process restarted if required. 2 www.archquip.com.au The Worlds #1 Wetpour Rubber Mixer CLEANING M12 BOLT CLAMPING PLATE MIXING SLEEVE MIXING BLADE SPRING HDPE DISC Fig. 2 ALWAYS DISCONNECT THE POWER SUPLY BEFORE CLEANING THE DRUM READ AND FOLLOW SAFETY INSTRUCTIONS FROM THE MANUFACTURES OF THE PRODUCTS WHICH WERE MIXED TO REMOVE MIXING ASSEMBLY 1) Remove the M12 bolt and clamping plate from the mixing sleeve. 2) Carefully lift the mixing sleeve upwards. As each mixing blade exits the mixing bowl it will move away from the centre under the pressure of the spring. 3) Remove the mixing blades and clean the bowl and blades as desired. 4) Care must be taken not to damage the springs. 3 www.archquip.com.au The Worlds #1 Wetpour Rubber Mixer TO RE-ASSEMBLE MIXING ASSEMBLY 1) Ensure all blade slots are clean and free from debris. Grease mixer arms after every use. 2) Check mixer arm springs are not bent or missing. 3) Whilst mixing arm assembly is not fitted to the mixer, install bottom scraper blade (marked as number 1) to bottom mixer arm. Ensure the numbering on the blade is upright and to the rear in relation to the rotational direction of the mixing arms. 4) Install 2nd, 3rd and 4th (if applicable) numbered blades from bottom to top with the top blade being numbered 3 for Rotatub 25 or 4 for Rotatub 50. All numbers to the rear of the direction of the mixing rotation. 5) Install the mixing arm assembly over the drive shaft and compress each blade as required to enable the assembly to slide down to the floor of the mixer. 6) Locate the drive shaft with the drive sockets on the bottom of the mixing arm assembly. 7) Always start the mixer dry to test correct operation prior to adding rubber. 4 www.archquip.com.au The Worlds #1 Wetpour Rubber Mixer PARTS SLEEVE CLAMPING PLATE (includes M12 Bolt) MIXING SLEEVE TUB SAFETY GUARD SPRING DRIVE SHAFT MIXING BLADE HDPE DISC (See note below) UPPER WHEEL TRAP DOOR SAFETY GUARD GEARBOX MOTOR Adjustable legs (optional) (See note below) LOWER WHEEL Note: 1) All mixing blades are imprinted with a number which corresponds to its position on the mixing sleeve (No. 1 being lowest on the sleeve), when ordering spare blades you must supply the blade number. 2) Always quote model and serial number when ordering spare parts. 5 www.archquip.com.au The Worlds #1 Wetpour Rubber Mixer MAINTENANCE The Rotatub has been designed with minimum maintenance requirements, to keep your mixer running at optimum performance simply follow these basic steps. Daily Weekly Monthly Comments Check safety guards are in place Lubricate spring and mixing blade arm Use general purpose grease Check motor cover is clear Check operation of top guard interlock Slowly open lid with mixer running and ensure it stops immediately Lubricate wheel axels (4 off) General purpose light oil Lubricate top guard hinge General purpose light oil Lubricate trap door hinge General purpose light oil Check all welds Visual check Check all fasteners SPECIFICATIONS Model Capacity Motor Gearbox HxWxD Mixing Blades Power Requirements Weight of Mixer Drum Dimensions Drum Volume - Cubic Metres Drum Volume - Litres Rotatub 25 25Kg of Rubber 1.5 Kw 40:1 1120 H x 850 W X 850 D 3 10 amps Single Phase 110kgs 400 H x 600 Diameter 0.11m3 113.1 Litres Rotatub 50 50Kg of Rubber 1.5 Kw 80:1 1380 H x 850 W x 1000 D 4 10 amps Single Phase 135kgs 550 H x 700 Diameter 0.21m3 211.6 Litres 6 www.archquip.com.au The Worlds #1 Wetpour Rubber Mixer TRAINING COMPETANCY Archquip supports good workplace safety. Copy this page and ensure each operator of the machine has read and understands how to correctly operate the machine. Have you read this manual in full Y/N Do you fully understand the instructions Y/N If you answer no to any of these questions then do not operate the mixer. I fully understand the instructions and agree to operate the mixer in a safe manner Sign_______________________________ Date________________ Print Name_______________________ Archquip 50 Morley Street Coorparoo Qld 4151 T: 07 3394 2724 F: 07 3394 3207 E: [email protected] 7 www.archquip.com.au The Worlds #1 Wetpour Rubber Mixer