1
We are delighted that you have chosen the InSinkErator® Instant Hot Water Dispenser to be
a part of your home. This unique appliance will save you time and effort in the kitchen, and
you’ll enjoy discovering new uses for it each day. That’s exactly why millions of people are
now using an InSinkErator Instant Hot Water Dispenser.
We are confident that by following our step-by-step instructions, you’ll soon be enjoying the
convenience of instant hot water.
Identify the model of your instant hot water dispenser and record it here:______________________
HC-View-SS
HC-Wave-SS
H-Wave-SS
H-Contour-SS
H-Classic-SS
H-Hot100
H-Hot150
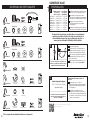
HOW TO USE THIS INSTRUCTION MANUAL
WHAT YOU SHOULD KNOW BEFORE YOU BEGIN
F or your satisfaction and safety, read all instructions, cautions and warnings before installing or using this instant
hot water dispenser.
This particular unit is not intended for commercial use.
Make sure that all electrical wiring and connections conform to local codes.
A standard 115-volt grounded electrical outlet is required under the sink for the dispenser’s electrical power.
The wall outlet powering your dispenser must have power supplied to it continuously.
This outlet must be fused and should not be controlled by the same wall switch that operates the disposer,
unless you have a SinkTop Switch™ from InSinkErator®.
Faucet must be installed such that the outlet opening is greater than 1" above the overflow rim of the sink.
It is recommended that a dedicated control valve be installed on the cold water line supplying water to
this system.
If you suspect elevated levels of chlorine in your water, or your water has a rusty appearance before the installation
of this unit, it is recommended to use our water filtration system.
This product contains stainless steel. The manufacturer cannot guarantee against rusty water because of the
number of factors that are involved beyond the manufacturer’s control. However, the sudden appearance of rusty
water discharged from the hot water dispenser may indicate the need for service or replacement of this product.
The use of a water filter should NOT result in the water pressure to drop below 30 psi (207kPa).
If it does, this will prevent your unit from operating properly.
Moving parts inside the tank causing a rattling noise is normal.
H-View-SS
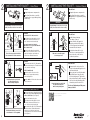
These instructions are separated into main sections, indicated by numbers, and subsections,
indicated by capital letters. The manual is setup this way to allow you to take a break at any
point after completing a section or subsection without affecting the installation process.
What you’ll see in the
instruction manual:
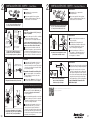
INSTALLING THE FAUCET - VIEW/WAVE
a
View/Wave
U
npack dispenser components.
O
n a firm, flat surface, carefully
straighten the copper tubing using
hands only.
2
NOTICE
3
Property Damage: Do not pinch or break copper
tubing. Do not distort the last 1 inch of tubing.
1
1
Provides a step-by-step narrative describing the installation step, with check boxes that
can be marked as you progress through the installation.
2
Contains simple illustrations that provide visual instruction to support the narrative.
3NOTICE
Important safety messages that will require your attention during the step.
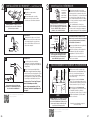
WHAT YOU NEED TO GET STARTED
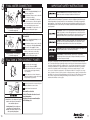
Warning indicates a hazardous situation, which, if not avoided, could result in death or
serious injury.
Equipment Required:
n
n
n
n
Drill
T
-fitting
D
edicated control valve
Adjustable wrench
n
n
n
n
P
hillips and flat blade screwdrivers
Pencil
Tape Measure / Ruler
Level
Caution indicates a hazardous situation which, if not avoided, could result in
minor or moderate injury.
NOTICE
NOTICE
Notice is used to address practices not related to personal injury.
Equipment You May Need:
Anchors for drywall
Hole saw
Basin wrench
Hole punch
If you intend to use the sprayer hole in your sink for your dispenser, you may need a basin wrench
and a 1/8" plug or a 1/4" cap (not supplied) for the faucet spray hose line. See Step 1-B.
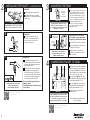
OVERVIEW OF A
COMPLETED SETUP
If you need to cut a mounting hole in your stainless steel sink, you may need a 1-1/4" – 1-1/2" hole
saw made for cutting stainless steel or a hole punch. Consult a professional if you are drilling into a
surface other than stainless steel.
To see a tutorial of this installation:
http://goo.gl/AZOHu
2
3