1
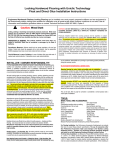
INSTALLATION GUIDE
Read all instructions before installation.
IMPORTANT:
•Laminate flooring is installed using a patented glueless locking
mechanism. Because this is a floating floor system, laminate
flooring should not be nailed or glued to the subfloor.
•The floor should not be installed directly against any fixed,
vertical objects (including walls, staircases, fixtures, etc.);
allow a minimum of 5/16 in. (8mm) expansion space around
the perimeter of the room and any fixed objects such as posts.
Use spacers included in a laminate flooring kit to achieve
uniform space around fixed objects
•Rooms measuring wider or longer than 30 ft (9m) require
the use of T-moldings to allow for normal expansion and
contraction of the floor. Be sure to stagger the boards by a
minimum of 12 in. (300mm).
•Laminate flooring should not be installed in wet areas or areas
where the relative humidity exceeds 70%.
REQUIRED TOOLS AND MATERIALS:
•Laminate installation kit (including spacers, tapping block, pull
bar)
•Hammer
•Table or hand saw
•Premium grade laminate flooring underlayment
•Carbide-tipped circular saw blades
•Vacuum
•Tape measure
•Duct tape
•Age-resistant, non-permeable polyethylene vapor barrier
(0.008 in. or 0.20 mm) for installation over concrete
•Safety glasses
•Gloves
SAFETY CAUTION: USE SAFETY GLASSES AND GLOVES WHEN
CUTTING THIS PRODUCT. DURING THE CUTTING PROCESS,
LAMINATE MAY CREATE WOOD DUST; BE SURE TO INSTALL
IN A WELL-VENTILATED AREA.
GENERAL REQUIREMENTS FOR ALL SUBFLOORING:
Laminate flooring can be installed over most floors such as vinyl,
tile and sheet floors. Substrates should be structurally sound and
immobile. Before installing flooring, ensure that the subfloor is
leveled within 3/16 in. in 10 ft (2 mm in 2 m). Irregularities in
the subfloor should be smoothed using a hydraulic cement base
patching and leveling compound. Suspended wood subfloors
should have a minimum of 18 in. (45 cm) of well-ventilated air
space above the ground.
CONCRETE:
•New concrete subflooring must be cured for at least 90 days
Clarion Laminates REV 08/2015
prior to installation. (Moisture vapor < 3 lbs/1,000 sq ft/24
hours per ASTM 1869 calcium chloride test.)
•Install 0.008 in. (0.20 mm) age-resistant, non-permeable
polyethylene vapor barrier over the concrete subfloor. Seams
must be taped using adhesive tape such as duct tape. The
vapor barrier should be installed up the wall by 1 in. (25 mm).
•Sheet Vinyl, Tile and Wood subflooring: moisture content of the
wood subfloor should not exceed 12%
CARPETING:
•Remove deep pile carpeting and padding prior to installation
of laminate flooring.
•Laminate flooring can be installed over industrial direct gluedown carpeting installed over wood subfloors without padding.
•Carpet installed over concrete must be removed. See instructions for installation over a concrete floor.
RADIANT HEATING SYSTEMS:
•Laminate flooring can be installed on under-floor radiant heating systems if the heating element is installed into wood or
concrete subfloors.
•Lower heating system to 60 ºF (16 ºC) for 1 week before installation.
•After installation, slowly increase the temperature in increments of 10 ºF (6 ºC) per hour.
•Surface temperature must not exceed 85 ºF (28ºC).
•Follow installation instructions for wood or concrete as outlined below.
CONDITIONING:
It is important to allow laminate flooring to acclimate to the room
temperature where it is to be installed by placing the packaged
flooring flat in the room for a minimum of 48 hours prior to installation. Do not remove the plastic wrapping. Be sure that the room
temperature is in the range of 65 - 75 ºF (18 - 20 ºC).
ROOM PREPARATION:
1. Determine which way to lay the planks. If installing in narrow
hallways or small rooms, the area will appear larger if flooring
is laid parallel to the longest wall.
2. Remove all existing moldings.
3. If room has electric baseboard heaters, leave a minimum of
1/2 in. (12.5 mm) between the surface of the flooring and the
bottom of the heaters, allowing heat to circulate.
4. Check door clearances, making necessary adjustments before
laying the flooring. Door moldings (jambs) should be undercut
to accomodate the thickness of the flooring and foam underlayment.
5. Install underlayment per manufacturer’s instructions.
Page 1 of 3
It is important to understand the parts of the plank to ensure proper installation:
Tongue
Tongue / Languette / Lengüeta
(Long side)
Languette
(Short side / Côté court / Deslizador corto)
(Côté long)
Lengüeta
(Deslizador largo)
Figure A
Groove
(Long side)
Rainure
(Côté long)
Ranura
(Deslizador largo)
Groove / Rainure / Ranura
(Short side / Côté court / Deslizador corto)
NOTE: ILLUSTRATION IS NOT TO SCALE. FOR ILLUSTRATIVE PURPOSES ONLY.
STEP 1 – Begin laying planks left
to right, placing 5/16 inch spacers
between the wall and the plank on either
side of the joint. Note: Ensure the tongue
side of the plank is positioned against
the wall.
STEP 4 – The next plank (plank D)
should be installed with the tongue on
the left side of the plank next to the
previous plank. Push plank flat to the
floor as in step 3.
STEP 2 – Use a laminate flooring tapping
block to gently tap second plank against
the short side to join plank A and plank B.
Refer to CUTTING A PLANK before
proceeding to step 3.
STEP 5 – Once plank is flat, gently tap
the second plank against the short side
of plank C, joining plank C and D.
STEP 3 – Install the second row by
angling plank C to allow the tongue to
slip into the groove of the plank in row
1. Push the plank flat to the floor until it
clicks into place. CAUTION: Do not force
the plank closed.
STEP 6 – Continue laying the floor
from left to right, as described in
steps 1 to 5.
CUTTING A PLANK:
If you need to cut a plank in order to achieve a desired staggered look or because the last (or first) plank in a row is too long (but not
less than 12 inches), follow the instructions below:
STEP 1 – Flip a full-sized
plank over so the tongue
points toward the wall, with
the underside of the plank
facing up. Mark where the
plank should be cut, then
cut with the decor side
down.
STEP 2 – Flip the plank
back over (décor side up) so
the tongue faces the groove
of the adjacent plank; install
as shown in step 4.
STEP 3 – Tap the two
sides together using a pull
bar. If the remainder of the
previous plank is at least 12
inches long, use it to start
the next row.
Page 2 of 3
FINAL INSTALLATION:
In difficult-to-fit areas, such as door moldings, remove the lip on
the grooved edge of the planks you are fitting into. This can be
done by lightly sanding or planing off the lip on the groove side of
the plank, allowing the plank to be installed laying flat. Once the
lip has been trimmed on the plank being fitted to, lay the plank flat
on the floor. Apply a thin bead of PVAc-D3 laminate glue on the top
of the tongue. Then push the plank into position. Once the plank
is positioned, wipe off excess glue with a damp cloth and warm
water.
Remove the spacers placed along the perimeter of the room and
cover the expansion space with the appropriate moulding. Be
sure to fasten the moulding into the wall, not through the flooring.
Quarter-rounds should be pre-drilled before nailing them to the
wall.
Felt protection pads should be placed under furniture legs or other
heavy objects to be left in place for an extended period of time. Do
not drag or pull heavy furniture, as doing so will damage the floor.
mop that sprays liquid directly onto the floor. Apply cleaning
solution formulated for laminate flooring to a cloth or mop,
not directly to the floor. Clean floor in the same direction as
the planks.
• Any furniture that rests directly on top of a laminate floor
should have floor protectors or wide furniture coasters under
all feet. Placement of mats at all outside entrances and
heavy traffic areas is recommended.
• Do not use oil soaps or wax-based cleaning products. These
products will leave a dull finish on your floor. Use a floor
cleaner specifically formulated for cleaning laminate flooring.
• Pets’ claws may scratch the surface if not trimmed regularly.
• When liquids are spilled on the laminate flooring, use a
slightly damp white cloth or paper towel to immediately blot
up and dry the affected area.
WARRANTY:
The manufacturer offers a limited warranty against manufacturing
defects from date of purchase of this product.
The manufacturer guarantees that:
CLEANING AND CARE:
• Vacuum using a soft bristle brush attachment. Do NOT use
vacuums with beater bars as doing so can damage your
floor.
• Laminate floors may be lightly damp-mopped when needed.
Avoid standing water as it may cause the joints between the
planks to lift. Do NOT use steam cleaners, jet-mops or any
HDC REV 08/2015
• The decorative laminate surface will not wear through.
• The surface of the plank will resist staining.
• The surface of the plank will not fade or discolor, due to natural or artificial lighting.
For questions regarding our products, please call toll-free:
1-800-986-3460
Page 3 of 3