1
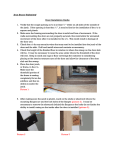
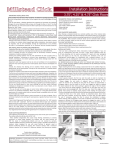
Installation Instructions: 5.5” Cork
Jobsite Conditions:
• Structure must be completely enclosed (including exterior
windows and doors). Gutters, downspouts, and exterior grading
should direct drainage away from the structures foundation. Basements and crawl spaces must be dry and well ventilated. Crawl
spaces must be covered at ground level with a 6-mil polyethylene
film with seams overlapped and tapped completely.
• Heating and cooling systems must be operating for a minimum
of 14 days, maintaining a room temperature of 65F and 35-65% RH.
Flooring Acclimation and Storage:
• Flooring requires 48 hours jobsite acclimation. Leave flooring
in packaging, and remove plastic wrapping only when ready to
install. Transport and store cork flooring in a laying position. If the
flooring needs to be stored, leave in packaging, laying down raised
off of subfloor (fully supported to prevent sagging). Store only in a
climate controlled area, minimum 65F room temperature, between
35-65% Relative Humidity.
Approved Installation Method:
• This flooring features a glueless locking system for floating
installation only. This flooring is factory finished and requires no
additional sealing. Note:This flooring does not require a cushioned
underlayment as the bottom cork layer serves this purpose. All
installations do require a polyethylene film moisture vapor barrier
as noted in the “Installing The Floor” section.
Installation Locations:
• Indoors only, in year round climate controlled rooms
(temperature 60-80F, Relative Humidity 35-65%). Cork flooring
products are based on natural materials and will expand and contact
through heating and non-heating seasons thus experiencing some
separation between the planks at different times during the year. Such separations are not considered a product defect. • Can be installed ON, ABOVE, AND BELOW GRADE over most
any dry, flat, clean, and structurally sound solid surface such as
flooring grade plywood & OSB board, particle board, concrete,
lightweight concrete, and soundly secured existing floors (linoleum,
vinyl, tile, etc.). Do not install over soft surfaces such as carpet. Not approved or warranted for installation in a full bath. Cork
flooring planks and stairnose moldings also are not approved for
use on stair treads.
• Can be installed over in-floor radiant heat systems (maximum
82F, maximum 5F temperature change plus or minus in a 24 hour
period). Follow installation instructions of the subfloor heating
system manufacturer, contractor, or contact the system supplier.
Checking Subfloor Flatness:
• Use a straightedge to check subfloor flatness. The subfloor
should be flat to within .12” (1/8”) in a 6-1/2’ area. Check various
areas throughout the subfloor. High areas need to be sanded and
low areas filled. High or low areas could cause the floated floor
to flex causing squeaking, popping, or other noises. Over time this
flexing could cause the locking system to weaken resulting in gaps
or loose boards in the floor. Never sand any area or existing floor
or cured adhesive suspected to contain asbestos or crystalline
silica (such as resilient vinyl or linoleum, or the adhesives used to
bond them).
Checking Moisture Content of Subfloor:
• All subfloors must be dry. Wooden and concrete subfloors
require insulation against moisture. See “Installing the Floor”
section for added details.
Wooden Subfloors:
• Using a reputable manufacturers moisture meter for wood
subfloors, the subfloors moisture content should not exceed 14%. Also, the moisture content readings between the subfloor and the
new flooring should not exceed 4%.
Concrete Subfloors:
One of the following moisture tests is recommended: (A) Calcium Chloride Test / maximum 3.0 pounds (B) Tramex Moisture Meter / maximum reading of 4.5
(C) Delmhorst BD2100 Moisture Meter / reading of green/dry.
Lightweight Concrete Floors:
Test as follows:
(A) For concrete screeds / <2,0% CM Instrument
(B) For anhydrite screeds / <0,5% CM Instrument
• Keep documentation of all moisture readings. If results indicate
a moisture problem exists, DO NOT INSTALL THE FLOOR. Most
moisture problems can be corrected easily (sealing, etc..). When
corrected, retest the subfloor..
Suggested Tools / Materials:
Polyethylene Film (2 or 6 mil), Adhesive tape, Tapping Block, 3/8”
Wood or Plastic Spacers, Measuring Tape, Safety Glasses, Dust
Mask, Chalk Line, Square, Pencil, Wood Chisel, Circular or Rip
Saw, Jamb Saw Pre-Planning Tips:
• Inspect flooring in adequate light before installing. Remove any
boards with visible defects or damage. Defective flooring that is
returned unused will be replaced. Contact your supplier.
• Slightly bowed (curved) boards can be installed and are not
considered to be defective.
• When installing flooring, always work from several cartons
blending lighter and darker boards to achieve a more uniform
appearance.
• When cutting or sanding Engineered Cork Flooring it is
recommended that you wear a dust mask to avoid inhaling wood
dust, and safety glasses for eye protection.
• A floating floor expands and contracts with the seasons and
should never be restricted in any way. This floating floor requires
a 3/8” expansion space around the perimeter of the room, and
around any vertical object (cabinets, columns, etc.). Be careful not
to put fasteners (nails, screws, etc.) through the floor or “pinch”
the floor under doorways, cabinets, etc.. This could cause the
floor to pull apart or buckle if it is not allowed to float freely. Be especially careful when installing moldings and trim not to nail
through the floating floor.
• Decide the direction the flooring will be installed in the room. If possible, it is best to install perpendicular to the direction of the
flooring joists. Flooring will be accented best if installed parallel to
the largest windows in the room.
• Larger areas require additional expansion space. In areas larger
than 24 ft. length in either direction, allow an additional ¼” space
for every 12 ft. in length above 24 ft. (Example: For a 36’x36’ size
room, allow 5/8” expansion (normal 3/8” plus ¼” space for the 12’
above 24’) around the perimeter of the room.
• Pre-plan the number of rows (base off of board face width). Often the last row will need to be ripped lengthwise to fit. If the
measurement for the last row is less than 2”, it would be best to
rip the boards in the first and last rows for balance. If the boards
have to be narrower that 2”, use a high quality carpenters glue to
secure the boards to the wider adjoining boards.
• Remove any base, shoe, or threshold moldings before installation.
• Undercut door jambs to allow for expansion and to avoid
difficult scribe cuts. Use a small piece of your flooring as a rest for
the jamb saw during cutting.
• The use of putty to fill small gaps or correct minor defects is
considered normal in any flooring installation.
Installing the Floor:
Call 1-800-258-5758 for assistance if required.
Over Concrete Subfloors:
• Loose-lay 1 layer of polyethylene film (minimum 2-mil, preferred
6-mil) as a moisture vapor barrier. Overlap the seams of the poly
by 8” and tape the seams completely with clear packaging tape. Poly should be lapped up the wall but not touching the sheetrock.
• Installation Tip: If you need to cover the floor during or after the
installation we recommend covering with a breathable material
such as cardboard, craft paper, etc.
• (Figure 1). Begin laying the flooring in the right corner of the
room.All boards should be installed with the tongue side facing the
wall. To determine the tongue side, look down directly from above
at the finished side of the board. Along both of the long sides of
the board you will see fiberboard showing that is the locking core. The side with the narrowest amount of core material showing is
the tongue side. This is the side that should face the wall.
Installation Tip:
Note that slightly bowed (curved) boards can be installed and are not
considered defective. There are a few tips that can help make installing
these boards easier. 1. When placing the bowed board at an angle
into the side groove of the row being installed into, apply pressure to
engage the boards as usual rotating the bowed board downwards. 2. As
you meet resistance, hold the bowed board near its’ center and apply
downward pressure. 3. Use a tapping block to tap against the groove
side of the bowed board while continuing to apply downward pressure
until the board engages and goes into the proper flat position. Do not
tap too hard as this can damage the groove side of the board being
installed.
• Lay the first board in the right corner flat on the poly film. Install
3/8” spacers to maintain the required expansion space against the
wall (and around the perimeter of the room as you progress) as
necessary. Tightly align the end of the second board with the first
and join these two boards by simply folding it down on top of the
end groove of the first board (Figure 2). Make sure that the long
sides of the two boards form a straight line. Repeat these steps to
complete the boards in the first row. Usually the last board in the
row will need to be cut to size. If leftover cut pieces are longer
than 12” they can be used as starter boards for other rows.
Installation tip:
• To assist with the stability of the first few rows, we recommend that
you install the first row, the 2 boards in the second row, then 1 board in
the third row. Go back to the second row to install 1 board, then back
to the third row to install 1 board. Repeat this “stepping” pattern until
the three rows are completed. Always stagger the end joints of adjoining
rows a minimum of 12”. Try to avoid a “stair step” pattern, and try to
avoid “H” joints in the installation.
• Figure 3: Start the second row by holding the long side of the
board at an angle to the first board in the first row. Make sure
the tongue of the board being installed is aligned properly with the
groove of the first row board. Engage the board sides by rotating
the board downward while pressing inward toward the first row
flooring (Figure 4). Use a tapping block to assist engaging the
boards if necessary. Repeat this step for the other boards as you
install them. Cut the last board to size as necessary.
Installation Tip:
Properly engaged boards will lay flat. You cannot force the boards to
go together, and if they are not laying flat when engaged they are not
fully seated. Disengage the board by lifting the side of the board at an
angle to remove. Reinstall the board and use a tapping block to assist
in securing the boards together until they lay flat.
• Install the third and remaining rows in the same manner as
described above. Once three rows have been installed, recheck
the spacers to be sure they are tight against the wall. If necessary,
adjust the flooring to be sure the installation is square (Figure 5).
• The boards in the last row often need to be ripped lengthwise
to the needed width (be sure to allow for required expansion
space). Mark the board to be ripped accordingly allowing for any
wall contours as required. The boards in the last row should be
at least 2” wide.
Installation Tip:
When working under door jambs or the toe kicks of cabinets, there will
not be enough clearance to get enough angle necessary to engage the
board sides. It will be necessary to trim away the raised portion on the
groove side using a wood chisel and then glue the boards together using
a high quality carpenter’s glue.
• After the floor is completely installed, remove spacers, install
moldings and thoroughly clean the floor with an approved
hardwood floor cleaner (call 1-800-258-5758 for a list of approved
cleaners). If the floor needs to be covered for protection, use a
breathable material like craft paper or cardboard. Never cover a
newly installed cork floor with plastic.
Tips For Protecting Your Floor:
• Regularly vacuum and clean your floor with an approved cleaner.
• Protect your floor by placing walk-off mats at all entrances to
retain tracked-in dirt, grit and moisture. Use breathable mats,….
never use latex or rubber backed mats that can trap moisture that
can damage your floor.
• Avoid moisture on the floor. Clean up spills quickly and don’t wet or damp mop your floor.
• Use felt pads on chair legs and furniture legs.
• Don’t drag or roll heavy objects directly across your floor. Put
down a layer of material such as plywood for protection.
• Avoid walking on the floor in high heeled shoes or sports shoes
with spikes or cleats,
• Office roller chairs must comply with DIN68131.
• Keep pets nails trimmed as closely as possible.
• The exposure to sun, UV rays and artificial lighting can fade
or change the color of your floor over time. If possible, we
recommend that you rearrange fixtures, rugs, and furniture
periodically to ensure the floor ages evenly. Our warranties do
not cover damage from the sun, UV rays, or artificial light.