1
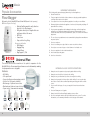
Classic
Fresh Flour Mill
Owner’s Manual
& User Guide
L’Chef LLC
188 N Bluff Street
Suite 100
St George, UT 84770
© 2013 v3.1 All Rights Reserved
Made in Korea
Classic
CONGRATULATIONS
Popular Accessories
Flour Bagger
Welcome to the Family! Congratulations on your
purchase
of the
theNutriMill
NutriMill
Classic.
This
product
is superbly
Exclusively for
Classic
Grain Mill
(Nutrimill
Sold Separately)
Mill
directly into
the bag!
engineered,
innovatively
designed, and built with lasting
• Nutrimill milling module easily attaches
quality. Thank you for your decision to utilize this high
directly to the flour bagger
speed flour mill. We•know
you will
enjoy
it supplied
for years
to
Mill grains
directly
into
freezer
safe
bags
without
the
mess
come. After all, it’s a NutriMill.
• BPA Free
• Saves time
Benefits of Milling: • Easy solution for gifting
Eating whole grains Accessory
on a regular
basis helps prevent
includes:
• Mill
Adapter
cardiovascular disease,
stroke,
heart attacks and clogged
• Bagging Ring
arteries. Freshly ground flours offer the most nutritional
• Sample Bags
Item # 760280
value. The fresher the
our,Support
the more
• flBag
/ Pailnutritious and better
tasting your food will be.
IMPORTANT SAFEGUARDS
Warranty
Information
The following safety
precautions apply when using electrical appliances:
1.
Read all instructions.
2.
To protect against electrical shock do not immerse cord, plugs, portable appliances
or milling unit in water or other liquid.
3.
Close supervision is necessary when any appliance is used by or near children.
4.
Remove plug from outlet when the appliance is not in use, before putting on/taking off
parts and before cleaning.
5.
Do not operate any appliance with a damaged cord or plug or after the appliance
malfunctions or is dropped or damaged in any manner. Return appliance to the
nearest authorized service facility for examination, repair, or electrical or mechanical
adjustment.
6.
Milling Heads,
Electronics
- Limited
Lifetimemanufacturer
TheMotor,
use of accessory
attachments
not recommended
by the appliance
may
causeand
injuries.
Parts
Plastics
- 10 Years
7.
Do not use outdoors.
8.
Do not let cord hang over edge of table or counter or touch hot surfaces.
9.
Do not place on or near a hot gas or electric burner or in a heated oven.
10. Do not use appliance for other than intended use.
For additional
11. Avoid contacting
movingservice
parts. or operational information visit us at
12. Save these instructions.
Universal Plus®
KEEP DATED SALES RECEIPT FOR WARRANTY SERVICE
We suggest your staple your dated sales receipt to this booklet so you may
The world’s finest kitchen machine is the perfect companion for the
NutriMill. Both offer unequaled performance and craftsmanship making
food preparation more enjoyable.
Features:
•
•
•
•
•
•
•
800 Watts
6 ½ quart bowl
4 speed settings and momentary switch
Suction feet for greater stability
Wide range of optional accessories
Overload and start motor protection
3 year motor / transmission warranty
have information available should you need warranty service.
Purchase Receipt Date:____________________________________
NUTRIMILL CLASSIC SAFETY INSTRUCTIONS
1.
Place of Purchase:________________________________________
Always be sure the separator cup is properly attached before milling.
2.
Always be sure the air filter is in place before milling.
3.
Always
be sure
yourwarranty
flour bowl
is positioned
correctly
before
milling.
Please
see the
information
sheet
included
in the
product
Always check your
grain
foreigndetails
objects
before
milling. Do not use grain that
box
for for
warranty
and
information.
has not been cleaned. We recommend purchasing and using grain from a reliable
source.
Circuit
breaker
protection:
if empty
the millthe
is fl
overloaded,
Do not over-fi
ll the
hopper,
it is easy to
our canisterthe
and continue
built-in circuit breaker may trip to protect against overheating.
milling.
The breaker is located on the bottom of the milling unit. Push the
Do not mill damp, wet or oily grains.
button to reset.
Always clean the filter after milling by tapping out excess flour.
If your mill is not functioning properly, contact our customer
All service and repairs
be done at
by the
an authorized
service center. For service
servicemust
department
number above.
information, see the warranty information on the last page of this manual.
4.
5.
6.
7.
8.
3
MUZ 6 DB2
batter whisks
2
14
MUZ 6 FW4
MUZ 6 ER2
stainless bowl
MUZ 6 FS4
flour sifter
MUZ 6 BS1
bowl scraper
www.lchef.com
or call us at 877.267.2434
HOUSEHOLD USE ONLY
Contains No User Serviceable Parts
15
3
Classic
CONGRATULATIONS
Popular Accessories
Flour Bagger
Welcome to the Family! Congratulations on your
purchase
of the
theNutriMill
NutriMill
Classic.
This
product
is superbly
Exclusively for
Classic
Grain Mill
(Nutrimill
Sold Separately)
Mill
directly into
the bag!
engineered,
innovatively
designed, and built with lasting
• Nutrimill milling module easily attaches
quality. Thank you for your decision to utilize this high
directly to the flour bagger
speed flour mill. We•know
you will
enjoy
it supplied
for years
to
Mill grains
directly
into
freezer
safe
bags
without
the
mess
come. After all, it’s a NutriMill.
• BPA Free
• Saves time
Benefits of Milling: • Easy solution for gifting
Eating whole grains Accessory
on a regular
basis helps prevent
includes:
• Mill
Adapter
cardiovascular disease,
stroke,
heart attacks and clogged
• Bagging Ring
arteries. Freshly ground flours offer the most nutritional
• Sample Bags
Item # 760280
value. The fresher the
our,Support
the more
• flBag
/ Pailnutritious and better
tasting your food will be.
IMPORTANT SAFEGUARDS
Warranty
Information
The following safety
precautions apply when using electrical appliances:
1.
Read all instructions.
2.
To protect against electrical shock do not immerse cord, plugs, portable appliances
or milling unit in water or other liquid.
3.
Close supervision is necessary when any appliance is used by or near children.
4.
Remove plug from outlet when the appliance is not in use, before putting on/taking off
parts and before cleaning.
5.
Do not operate any appliance with a damaged cord or plug or after the appliance
malfunctions or is dropped or damaged in any manner. Return appliance to the
nearest authorized service facility for examination, repair, or electrical or mechanical
adjustment.
6.
Milling Heads,
Electronics
- Limited
Lifetimemanufacturer
TheMotor,
use of accessory
attachments
not recommended
by the appliance
may
causeand
injuries.
Parts
Plastics
- 10 Years
7.
Do not use outdoors.
8.
Do not let cord hang over edge of table or counter or touch hot surfaces.
9.
Do not place on or near a hot gas or electric burner or in a heated oven.
10. Do not use appliance for other than intended use.
For additional
11. Avoid contacting
movingservice
parts. or operational information visit us at
12. Save these instructions.
Universal Plus®
KEEP DATED SALES RECEIPT FOR WARRANTY SERVICE
We suggest your staple your dated sales receipt to this booklet so you may
The world’s finest kitchen machine is the perfect companion for the
NutriMill. Both offer unequaled performance and craftsmanship making
food preparation more enjoyable.
Features:
•
•
•
•
•
•
•
800 Watts
6 ½ quart bowl
4 speed settings and momentary switch
Suction feet for greater stability
Wide range of optional accessories
Overload and start motor protection
3 year motor / transmission warranty
have information available should you need warranty service.
Purchase Receipt Date:____________________________________
NUTRIMILL CLASSIC SAFETY INSTRUCTIONS
1.
Place of Purchase:________________________________________
Always be sure the separator cup is properly attached before milling.
2.
Always be sure the air filter is in place before milling.
3.
Always
be sure
yourwarranty
flour bowl
is positioned
correctly
before
milling.
Please
see the
information
sheet
included
in the
product
Always check your
grain
foreigndetails
objects
before
milling. Do not use grain that
box
for for
warranty
and
information.
has not been cleaned. We recommend purchasing and using grain from a reliable
source.
Circuit
breaker
protection:
if empty
the millthe
is fl
overloaded,
Do not over-fi
ll the
hopper,
it is easy to
our canisterthe
and continue
built-in circuit breaker may trip to protect against overheating.
milling.
The breaker is located on the bottom of the milling unit. Push the
Do not mill damp, wet or oily grains.
button to reset.
Always clean the filter after milling by tapping out excess flour.
If your mill is not functioning properly, contact our customer
All service and repairs
be done at
by the
an authorized
service center. For service
servicemust
department
number above.
information, see the warranty information on the last page of this manual.
4.
5.
6.
7.
8.
3
MUZ 6 DB2
batter whisks
14
2
MUZ 6 FW4
MUZ 6 ER2
stainless bowl
MUZ 6 FS4
flour sifter
MUZ 6 BS1
bowl scraper
www.lchef.com
or call us at 877.267.2434
HOUSEHOLD USE ONLY
Contains No User Serviceable Parts
15
3
Classic
THE FIRST TIME YOU USE YOUR NUTRIMILL
Take the hopper extension ring out of the flour bowl. The hopper extension ring
must never be stored
in theWHEAT
flour bowlPEANUT
while milling.
Mill at least
2 cups of wheat or
WHOLE
BUTTER
COOKIES
other
discard
the flFidler,
our and
clean
the bowl.
Taken hard
from grain,
“Wild then
Flour”
by Denise
the
Country
Baker.This will eliminate any
contaminates the mill may have obtained in the manufacturing process. Make sure you
use clean
grain. Your warranty does not cover foreign object damage from plastics,
• 1 1⁄2 cups soft butter
metals, rocks or any other materials that could get into and damage the milling heads.
• 4 cups
or regular
Proper
care raw
of your
mill willsugar
ensure a reliable milling experience for many years to come.
• 2 1⁄2 cups natural peanut butter (unsweetened or sweetened)
• 1 Tbsp.
vanilla
KNOW
YOUR
NUTRIMILL
•
4
large
eggs
If you want to mill at a coarse meal consistency, never turn the upper and lower knobs
directly
to the
right
when
starting
to mill.
• 5 cups
soft
whole
wheat
pastry
flour Always allow grain to start flowing for 15-20
seconds
before
turning
• 2 tsp.
baking
soda knobs to the right.
• 1 tsp. salt (only if using unsalted butter)
The upper knob controls motor speed. This allows you
Motor Speed
to have greater control of the texture. For most grains leave the
Mix pastry flour, baking soda and salt in bowl and set aside. In BOSCH mixing bowl,
High
Low
knob turned all the way to the left, (high speed). For coarse
cream together butter, sugar and peanut butter. Then add vanilla and eggs and cream for
flour, start running the mill with the knob turned all the way to
3 minutes. Mix dry ingredients into the creamed mixture. Place by spoonful
onto
greased
the left for 15-20 seconds, then turn the knob all the way to the Motor
cookie sheets 2 inches apart and flatten with a fork dipped in flour. Bake at 350° for 15
right. Turning the knob to the right slows motor speed.
minutes. Cool for 1 minute and place on wire racks to cool. (Makes about 8 dozen)
See Page 7 For More Knob Information
The lower knob controls grain feed/flow and turns the
Grain Feed
mill on and off. When you start milling, always turn the feed rate
Bread Flour
Fine
knob all the way to the right for 15 seconds to allow the grain to
Coarse/Meal
Feed Rate
Texture
start flowing freely. NOTE: This is particularly important when
milling larger grains or legumes. Turning all the way to the right
will allow the larger grains to start flowing freely. You may then
turn the knob to your desired setting. The feed rate will affect
the fineness of the grind. Turning the knob to the right will feed grain faster and produce
coarser flour.* Turning the LIGHT
feed rateANGEL
knob all FOOD
the wayCAKE
left will turn the machine off.
To better understand how your mill works follow these simple steps:
• 12 large egg whites
1
1. • Unplug
mill so motor does not turn on while adjusting grain feed (lower) knob.
⁄4 cup cornstarch
1
2. • With
hopper
empty, look
2 ⁄4 cups
powdered
sugarunder grain inlet cover (located at bottom of hopper). A
maywheat
be helpful.
• fl3⁄4ashlight
cup whole
flour Do not touch or disassemble the inlet cover.
1
3. • When
⁄2 tsp.knob
salt is set to OFF, most grains cannot flow through the inlet.
•
1 tsp.lower
vanilla
or almond
extract
4. Turn
knob
back and
forth. You will see the size of the opening into the milling
gradually
changing.
• chamber
1 1⁄2 tsp. cream
of tartar
5. As you1turn the knob further to the right, inlet size increases. This allows grain to
First feed
mix 1and
⁄4 cups
the rapidly.
powdered sugar with the wheat flour and cornstarch in a small
flow of
more
bowl and set aside. Then separate the egg whites completely, add salt and cream of
6.
on whip
size of
the hopper,
knob
setting
has
point at
whichmixer
grainto
tartarDepending
to them and
ongrain
high in
speed
until egg
whites
stand
in apeaks.
Switch
beginsand
to flgradually
ow. (For example,
or millet
will
begin
to flowThen
into the
a
low speed
add 1 cupbarley
powdered
sugar
plus
flavoring.
stopmill
theatmixer
setting much
further
to fl
the
than corn
or lightly
beans again
because
theythe
areremaining
smaller in flour
and sprinkle
in 1⁄3 cup
of the
ourleft
mixture.
Blend
adding
size.)
mixture.
Blend only until mixed. Pour into angel food cake pan. Bake on 375° for 30-35
minutes
or you
untilfind
done.
7.
When
the point where grain begins to flow, turn the knob another 1/4” to
the right.
* NOTE - At the very finest setting (the point where grain first begins to flow), the flow may fluctuate this is normal. Turn the knob a little further to the right for a steady flow. The point where grain begins
to flow will vary depending on grain kernel size.
4
12
Hopper Lid
CHEF BRAD RECIPES
• Must be used during milling
Taken from “Cooking with Chef Brad - Those Wonderful Grains” by Brad E. Petersen. All
for quiet operation
Hopper
rights reserved. Use by permission
only. Extension Ring
• Comes packed inside the flour
bowl
OLD FASHIONED CORN BREAD
• Must always be removed from
bowl before milling
Hopper • 2 cups freshly milled popcorn
• Increases grain capacity
• Not necessary to use when
• 2 cups freshly milled high gluten flour
milling small amounts of grain
cup sugar
• 1⁄2 Cover
Grain Inlet
• 1⁄3 cup powdered milk
Milling Module Unit
Variable Motor Speed Control
1
Knob • ⁄2 cup canola oil
• 1 tsp. salt
Variable Texture Control
• 2 Tbsp. baking powder
Knob
• 2 cups water
• 2 eggs
• 2 Tbsp.
bacon
grease, or other grease substitute
Circuit Reset
Button
(Red)
*Inlet Grommet*
• Located at the bottom of the
Mix
all
ingredients
in
BOSCH
mixing
bowl
for
2
minutes.
Preheat
oven to 400°. Place large
Milling Module Unit
cast-iron skillet in oven with 2 Tbsp bacon drippings. When skillet is very hot, remove from
oven and
Separator
Cuppour in batter. Place back in oven and bake for 15-20 minutes.
• Must be attached when
Air Filter*
milling
• Must be dry and in place
• For air filtration
when milling
• Prevents Flour Leakage
• Helps air flow
Prevents flour leakage during
APPLESAUCE MASON JAR•CAKE
milling
Flour Bowl (Canister)
1
• Large 20
capacity
• 3cup
⁄2 cups
multi-grain flour (wheat, millet, rye, spelt, etc.)
• Large easy
grip raisins
handles
• 2 cups
• 2 cups nuts
• 1 tsp. salt
Base
• 2 tsp. baking soda
• Yes/No bowl position indicator
• 2 tsp. cinnamon
on front of base helps
position bowl into place
• 1 tsp. cloves
• Bowl must be pushed in far
• 2 cups white sugar or brown, packed
enough to reveal “YES” line on
• 1 cup butter (softened)
the base.
• 1 egg
2 cups thick applesauce
Locking •Pin
• It can be removed with a twist
• This knob at the back of the
to separate sections for storage,
a little
flour
the raisins and nuts. Resift the
remaining
flour
baking
millSift
firmly
holds
theover
mill unit
cleaning,
or for
usewith
withthe
the salt,
NutriMill
soda,
cinnamon and cloves. Sift flour mixture with
sugar.
Cream
butter,
adding sugar
to the
base
Classic
optional
Flour
Bagger
gradually until light. Beat in egg. Stir flour mixtureaccessory.
gradually into the butter mixture until
the batter is smooth. Add raisins, nuts and applesauce. Grease widemouth tapered mason
jars and fill barely over half full. Bake at 350° for about 45 minutes. As soon as baking is
done, place sterile lid and ring on hot jar to preserve for later use. Can also be baked in
small greased bread pans.
*Inlet grommet and filter should be replaced every 2 years or as needed.
13
5
Classic
THE FIRST TIME YOU USE YOUR NUTRIMILL
Take the hopper extension ring out of the flour bowl. The hopper extension ring
must never be stored
in theWHEAT
flour bowlPEANUT
while milling.
Mill at least
2 cups of wheat or
WHOLE
BUTTER
COOKIES
other
discard
the flFidler,
our and
clean
the bowl.
Taken hard
from grain,
“Wild then
Flour”
by Denise
the
Country
Baker.This will eliminate any
contaminates the mill may have obtained in the manufacturing process. Make sure you
use clean
grain. Your warranty does not cover foreign object damage from plastics,
• 1 1⁄2 cups soft butter
metals, rocks or any other materials that could get into and damage the milling heads.
• 4 cups
or regular
Proper
care raw
of your
mill willsugar
ensure a reliable milling experience for many years to come.
• 2 1⁄2 cups natural peanut butter (unsweetened or sweetened)
• 1 Tbsp.
vanilla
KNOW
YOUR
NUTRIMILL
•
4
large
eggs
If you want to mill at a coarse meal consistency, never turn the upper and lower knobs
directly
to the
right
when
starting
to mill.
• 5 cups
soft
whole
wheat
pastry
flour Always allow grain to start flowing for 15-20
seconds
before
turning
• 2 tsp.
baking
soda knobs to the right.
• 1 tsp. salt (only if using unsalted butter)
The upper knob controls motor speed. This allows you
Motor Speed
to have greater control of the texture. For most grains leave the
Mix pastry flour, baking soda and salt in bowl and set aside. In BOSCH mixing bowl,
High
Low
knob turned all the way to the left, (high speed). For coarse
cream together butter, sugar and peanut butter. Then add vanilla and eggs and cream for
flour, start running the mill with the knob turned all the way to
3 minutes. Mix dry ingredients into the creamed mixture. Place by spoonful
onto
greased
the left for 15-20 seconds, then turn the knob all the way to the Motor
cookie sheets 2 inches apart and flatten with a fork dipped in flour. Bake at 350° for 15
right. Turning the knob to the right slows motor speed.
minutes. Cool for 1 minute and place on wire racks to cool. (Makes about 8 dozen)
See Page 7 For More Knob Information
The lower knob controls grain feed/flow and turns the
Grain Feed
mill on and off. When you start milling, always turn the feed rate
Bread Flour
Fine
knob all the way to the right for 15 seconds to allow the grain to
Coarse/Meal
Feed Rate
Texture
start flowing freely. NOTE: This is particularly important when
milling larger grains or legumes. Turning all the way to the right
will allow the larger grains to start flowing freely. You may then
turn the knob to your desired setting. The feed rate will affect
the fineness of the grind. Turning the knob to the right will feed grain faster and produce
coarser flour.* Turning the LIGHT
feed rateANGEL
knob all FOOD
the wayCAKE
left will turn the machine off.
To better understand how your mill works follow these simple steps:
• 12 large egg whites
1
1. • Unplug
mill so motor does not turn on while adjusting grain feed (lower) knob.
⁄4 cup cornstarch
1
2. • With
hopper
empty, look
2 ⁄4 cups
powdered
sugarunder grain inlet cover (located at bottom of hopper). A
maywheat
be helpful.
• fl3⁄4ashlight
cup whole
flour Do not touch or disassemble the inlet cover.
1
3. • When
⁄2 tsp.knob
salt is set to OFF, most grains cannot flow through the inlet.
•
1 tsp.lower
vanilla
or almond
extract
4. Turn
knob
back and
forth. You will see the size of the opening into the milling
gradually
changing.
• chamber
1 1⁄2 tsp. cream
of tartar
5. As you1turn the knob further to the right, inlet size increases. This allows grain to
First feed
mix 1and
⁄4 cups
the rapidly.
powdered sugar with the wheat flour and cornstarch in a small
flow of
more
bowl and set aside. Then separate the egg whites completely, add salt and cream of
6.
on whip
size of
the hopper,
knob
setting
has
point at
whichmixer
grainto
tartarDepending
to them and
ongrain
high in
speed
until egg
whites
stand
in apeaks.
Switch
beginsand
to flgradually
ow. (For example,
or millet
will
begin
to flowThen
into the
a
low speed
add 1 cupbarley
powdered
sugar
plus
flavoring.
stopmill
theatmixer
setting much
further
to fl
the
than corn
or lightly
beans again
because
theythe
areremaining
smaller in flour
and sprinkle
in 1⁄3 cup
of the
ourleft
mixture.
Blend
adding
size.)
mixture.
Blend only until mixed. Pour into angel food cake pan. Bake on 375° for 30-35
minutes
or you
untilfind
done.
7.
When
the point where grain begins to flow, turn the knob another 1/4” to
the right.
* NOTE - At the very finest setting (the point where grain first begins to flow), the flow may fluctuate this is normal. Turn the knob a little further to the right for a steady flow. The point where grain begins
to flow will vary depending on grain kernel size.
12
4
Hopper Lid
CHEF BRAD RECIPES
• Must be used during milling
Taken from “Cooking with Chef Brad - Those Wonderful Grains” by Brad E. Petersen. All
for quiet operation
Hopper
rights reserved. Use by permission
only. Extension Ring
• Comes packed inside the flour
bowl
OLD FASHIONED CORN BREAD
• Must always be removed from
bowl before milling
Hopper • 2 cups freshly milled popcorn
• Increases grain capacity
• Not necessary to use when
• 2 cups freshly milled high gluten flour
milling small amounts of grain
cup sugar
• 1⁄2 Cover
Grain Inlet
• 1⁄3 cup powdered milk
Milling Module Unit
Variable Motor Speed Control
1
Knob • ⁄2 cup canola oil
• 1 tsp. salt
Variable Texture Control
• 2 Tbsp. baking powder
Knob
• 2 cups water
• 2 eggs
• 2 Tbsp.
bacon
grease, or other grease substitute
Circuit Reset
Button
(Red)
*Inlet Grommet*
• Located at the bottom of the
Mix
all
ingredients
in
BOSCH
mixing
bowl
for
2
minutes.
Preheat
oven to 400°. Place large
Milling Module Unit
cast-iron skillet in oven with 2 Tbsp bacon drippings. When skillet is very hot, remove from
oven and
Separator
Cuppour in batter. Place back in oven and bake for 15-20 minutes.
• Must be attached when
Air Filter*
milling
• Must be dry and in place
• For air filtration
when milling
• Prevents Flour Leakage
• Helps air flow
Prevents flour leakage during
APPLESAUCE MASON JAR•CAKE
milling
Flour Bowl (Canister)
1
• Large 20
capacity
• 3cup
⁄2 cups
multi-grain flour (wheat, millet, rye, spelt, etc.)
• Large easy
grip raisins
handles
• 2 cups
• 2 cups nuts
• 1 tsp. salt
Base
• 2 tsp. baking soda
• Yes/No bowl position indicator
• 2 tsp. cinnamon
on front of base helps
position bowl into place
• 1 tsp. cloves
• Bowl must be pushed in far
• 2 cups white sugar or brown, packed
enough to reveal “YES” line on
• 1 cup butter (softened)
the base.
• 1 egg
2 cups thick applesauce
Locking •Pin
• It can be removed with a twist
• This knob at the back of the
to separate sections for storage,
a little
flour
the raisins and nuts. Resift the
remaining
flour
baking
millSift
firmly
holds
theover
mill unit
cleaning,
or for
usewith
withthe
the salt,
NutriMill
soda,
cinnamon and cloves. Sift flour mixture with
sugar.
Cream
butter,
adding sugar
to the
base
Classic
optional
Flour
Bagger
gradually until light. Beat in egg. Stir flour mixtureaccessory.
gradually into the butter mixture until
the batter is smooth. Add raisins, nuts and applesauce. Grease widemouth tapered mason
jars and fill barely over half full. Bake at 350° for about 45 minutes. As soon as baking is
done, place sterile lid and ring on hot jar to preserve for later use. Can also be baked in
small greased bread pans.
*Inlet grommet and filter should be replaced every 2 years or as needed.
13
5
Classic
OPERATING INSTRUCTIONS
RECIPES
1.
AttachWHOLE
the Separator
Cup -BREAD
Must be attached
when milling.
100%
WHEAT
in a BOSCH
Universal Kitchen Machine
Align handle on cup with the handle guide on the bowl lid and snap
securely into place. This cup collects the finest flour. Flour in the cup
• 6 cups warm water
is useable. After milling either empty the separator cup and add to the
2
⁄3 cup
oil or save and use as pastry flour.
flour• in
the bowl
• 2⁄3 cup honey
2. Insert
air fisalt
lter into place on top of bowl lid - Must be attached
• 2 Tbsp.
when
Clean fitofu
lter and
cavity
it fits into after each milling
• 2milling.
Tbsp. L’EQUIP
drink
mix (optional)
session. Filter can be cleaned by tapping out flour that has
• 2 Tbsp. SAF instant yeast
collected. Be sure there is no flour in filter if you wish to wash it.
• 2 Tbsp. L’EQUIP Vital Wheat Gluten
NOTE: Make sure the filter is thoroughly dry before using.
• 2 Tbsp. L’EQUIP Dough Enhancer
• 20-22
cupslidfreshly
wheat
3. Attach
bowl
to topmilled
of flour
bowl.flour
Lids twists to lock into
place. Bowl lid has a durable rubber gasket that creates a seal
In your
BOSCH
mixing
bowl,On
putnew
water,
7 cups
ofwill
wheat
flour,
oil, honey, yeast, gluten,
and
prevents
flour
leakage.
mills
gasket
have
a tight
dough
enhancer,
and tofu.
Mix on speed
until combined.
grip,
this
also happens
sometimes
during1regular
use. For tight gaskets, we suggest
Then add approximately
more cups
of flour
andcornstarch
salt. Mix, and
continue cooking
to add flspray.
our
lubricating
the gasket by 7rubbing
on either
flour,
or non-stick
1 cup atNever
a time
untildirectly
the dough
pulls
away from
the
sides
of the
Then
knead
for
NOTE:
spray
on the
gasket.
Spray
only
a little
on bowl.
a rag or
paper
towel
another
The You
dough
feel soft
nottograiny.
Form
place in
and
wipe6-7
onmin.
gasket.
willshould
periodically
need
reapply
oneitofinto
theloaves
aboveand
lubricants,
pans. Let rise
double in size. Bake at 350° for 30 minutes or until the top is golden
especially
afteruntil
washing.
brown. ( Makes 5-6 1.5 lb. loaves.)
4. Lock on hopper extension ring - (not necessary to use when milling small amounts)
The hopper extension ring comes packed in the flour bowl and must never be left in the
bowl when milling. Extension ring has 3 locking tabs to secure it to the mill. It is best
to insert/remove the tabs one at a time. To attach: With mill facing you, insert tab at
the front right then move clockwise and insert the next two tabs. To remove: With mill
WHEAT
TORTILLAS to
facing you begin with front WHOLE
right tab and
move counterclockwise
Taken
Flour” by Denise Fidler, the Country Baker.
removefrom
next“Wild
two tabs.
5. Fill
• 3⁄4with
cupsgrain.
soft whole wheat pastry flour, kamut, or white flour
See•the
‘grain
flour’ ratio guide on the next page to help you
1 tsp.
seato
salt
understand
how much grain you should start with.
• 1⁄3 cup oil
• 1 cup
warm water
6. Plug
in machine
and turn on by turning lower knob.
NOTE: It is not necessary to start the motor before adding grain.
In your start
BOSCH
with
batter
whips,
mixturn
drythe
ingredients.
Always
thebowl
mill on
high
speed.
Never
knobs directly
Add
allfar
wet
ingredients
in a slow
steady
stream.
Mixfor
and
knead adding more water
to
the
right.
Always allow
yourand
grain
to start
flowing
15-20
or flour as
needed
to produce
smooth
dough
for 1-2
Form into 12-18 balls.
seconds
before
adjusting
knobato
coarsest
setting.
Youminutes.
may also
Coverthe
and
rest 30
minutes.
in electric or manual tortilla maker and cook. The
stop
milling
mid
cycle if Press
necessary.
secret to a great tortilla is a soft and moist dough.
7. Put on lid and let run.
NOTE
- Warmis
tortillas
with
cinnamon
sugar
sprinkled
on top are delicious.
The
NutriMill
designed
tobutter,
operate
with the and
lid on
for quieter
milling.
NOTE
- Tortillas
freeze
great. let
Just
seal
in for
heavy-duty
freezer
with layers
waxed
8.
When
milling is
complete,
mill
run
5 seconds.
Thisbag
eliminates
any of
flour
left
paper
them.
in
the between
self-cleaning
milling chamber. Tapping the bowl lid a few times after milling will
help settle the flour in the bowl and release flour from the bottom of the lid. Unplug the
machine and wipe or brush away any flour residue from the mill.
We recommend hand-washing the plastic bowl and lid. High-heat dishwashers can warp
the plastics. The gasket on the bowl lid will need to be relubricated after washing.
6
10
GRAIN TO FLOUR RATIO
You will want to adjust the amount of grain you add to the hopper so the flour bowl does
not overfill.
OVERNIGHT DOUGHNUTS (No knead)
Taken from “Wild Flour” by Denise Fidler, the Country Baker.
Overfilling the flour bowl may cause the mill to clog. The bowl will hold 21 to 22 cups of
flour. You will get about 21 cups of flour from 13 cups of hard wheat when milled at a
• 1 quart milk
medium texture. This texture is ideal for most breads.
• 3⁄4 cup butter
1
⁄2 cup honey
The•amount
of flour you get from a cup of grain varies with the type of grain and how
finely
is milled.
Fine milling
• 1itTbsp.
SAF instant
yeastproduces a greater volume of flour than coarse milling.
• 2 tsp. salt
NOTE1 - Soft grains like oats and beans will produce a greater volume of flour. With
• ⁄2 tsp. freshly grated nutmeg (optional)
the hopper extension ring in place only fill hopper 2⁄3 to 3⁄4 full of soft grains to avoid
⁄4 tsp.the
mace
(optional)
• 1lling
overfi
flour
bowl!
• 9 cups fresh milled soft pastry or hard Montana Spring white wheat
TEXTURE CONTROL KNOB GUIDE
First,Motor
scaldSpeed
milk. Add
butter
and(Upper
honey, Knob):
and stir until melted. Cool and set aside,
The
Control
Knob
temperature
should
be between
115°-130°
In separate
bowl,
yeast, salt, nutmeg,
The
motor speed
helps
determine
the texture
of your flour
or mix
meal.
mace, and freshly milled flour. Mix all together in mixer or by hand until dough is a
•
For most flour, upper knob should remain to the left.
smooth “wet batter like consistency.” Cover and set in refrigerator to firm up overnight
•or add
Fora very
ourto
and
medium
fine corn
meal,dough
knob and
should
be set
togluten
the right.
littlecoarse
more flflour
make
a smooth
and silky
knead
until
is
•developed
For heavy
flour & dense
texturedin
breads,
a middle
setting.
Adjust
fordough
desired
(approximately
5 minutes
a mixerselect
or 10-12
minutes
by hand).
Roll
1
results in the future
based
on and
yourcut
experience.
out approximately
⁄2 - 3⁄4 inch
thick
into doughnut shapes using a doughnut cutter
• large
NOTE:
allow glass.
the mill
to run
forplastic
15 to 20
or
glassAlways
and smaller
Cover
with
wrap and rise until double. Fry in hot
seconds
with the knob
all turning
the wayonce.
to theDust with confectioner’s sugar or
oil (375°)
approximately
3 - 4turned
minutes,
before
adjusting
theglaze.
knob Can
to your
glazeleft
with
a powdered
sugar
adddesired
sprinkles also.
setting in the middle or the right.
The Grain Feed Rate Knob (Lower Knob):
This is the ON-OFF switch and a valve that controls how
quickly grains can flOATMEAL
ow into the mill.
(You can look CHIP
under COOKIES
CHOCOLATE
the inlet cover and see how this valve opens and closes.
Instructions
for better
understanding
how your mill
• 2 cups packed
brown
sugar
works are on page 4).
• 2 eggs
1 tsp.
vanilla
• • For
finer
flour set the knob towards 11:00 – 12:00.
• (Most
1 cup shortening
grains will not flow at less than a 10:00 position on the knob.)
• • For
flour(rye,
turnwheat,
the knob
toward
1 3⁄4 coarse
cups flour
white,
etc.)the right.
• • Large
beans) won’t begin to flow until the knob is turned far to the right.
1 tsp. items
baking(like
soda
1
• Texture
⁄2 teaspoon
saltalso vary with the kind of grain being milled. Soft grains, such as
results
mill
much finer than
hard
grains. Hard wheat mills more coarsely than soft
• oats,
3 cups
quick-cooking
rolled
oats
• wheat.
1 cup chocolate chips
•
Larger grains such as legumes or rice will mill slowly while small grains like wheat or
millet
millsugar,
quickly.
Cream
the will
brown
shortening, eggs, and vanilla with cookie paddles in a BOSCH
•bowl.NOTE:
optimum
milling
turnand
the salt.
knobStir
all in
the
way
to the
right
15 seconds,
Blend For
in the
flour, baking
soda,
the
rolled
oats
andfor
chocolate
soThen
graindrop
will by
start
to flow onto
freely.
Then baking
turn the
knob back
to your
desired
chips.
spoonfuls
greased
sheets.
Bake left
at 350°
for 8-10
setting.
minutes.
(Makes 5 dozen.)
•
NOTE: PERIODICALLY MILL 3 CUPS OF WHITE RICE ON A COARSE SETTING
TO CLEAN THE MILLING HEADS AND REMOVE ANY POSSIBLE LEFT OVER
PARTICLES.
11
7
Classic
OPERATING INSTRUCTIONS
RECIPES
1.
AttachWHOLE
the Separator
Cup -BREAD
Must be attached
when milling.
100%
WHEAT
in a BOSCH
Universal Kitchen Machine
Align handle on cup with the handle guide on the bowl lid and snap
securely into place. This cup collects the finest flour. Flour in the cup
• 6 cups warm water
is useable. After milling either empty the separator cup and add to the
2
⁄3 cup
oil or save and use as pastry flour.
flour• in
the bowl
• 2⁄3 cup honey
2. Insert
air fisalt
lter into place on top of bowl lid - Must be attached
• 2 Tbsp.
when
Clean fitofu
lter and
cavity
it fits into after each milling
• 2milling.
Tbsp. L’EQUIP
drink
mix (optional)
session. Filter can be cleaned by tapping out flour that has
• 2 Tbsp. SAF instant yeast
collected. Be sure there is no flour in filter if you wish to wash it.
• 2 Tbsp. L’EQUIP Vital Wheat Gluten
NOTE: Make sure the filter is thoroughly dry before using.
• 2 Tbsp. L’EQUIP Dough Enhancer
• 20-22
cupslidfreshly
wheat
3. Attach
bowl
to topmilled
of flour
bowl.flour
Lids twists to lock into
place. Bowl lid has a durable rubber gasket that creates a seal
In your
BOSCH
mixing
bowl,On
putnew
water,
7 cups
ofwill
wheat
flour,
oil, honey, yeast, gluten,
and
prevents
flour
leakage.
mills
gasket
have
a tight
dough
enhancer,
and tofu.
Mix on speed
until combined.
grip,
this
also happens
sometimes
during1regular
use. For tight gaskets, we suggest
Then add approximately
more cups
of flour
andcornstarch
salt. Mix, and
continue cooking
to add flspray.
our
lubricating
the gasket by 7rubbing
on either
flour,
or non-stick
1 cup atNever
a time
untildirectly
the dough
pulls
away from
the
sides
of the
Then
knead
for
NOTE:
spray
on the
gasket.
Spray
only
a little
on bowl.
a rag or
paper
towel
another
The You
dough
feel soft
nottograiny.
Form
place in
and
wipe6-7
onmin.
gasket.
willshould
periodically
need
reapply
oneitofinto
theloaves
aboveand
lubricants,
pans. Let rise
double in size. Bake at 350° for 30 minutes or until the top is golden
especially
afteruntil
washing.
brown. ( Makes 5-6 1.5 lb. loaves.)
4. Lock on hopper extension ring - (not necessary to use when milling small amounts)
The hopper extension ring comes packed in the flour bowl and must never be left in the
bowl when milling. Extension ring has 3 locking tabs to secure it to the mill. It is best
to insert/remove the tabs one at a time. To attach: With mill facing you, insert tab at
the front right then move clockwise and insert the next two tabs. To remove: With mill
WHEAT
TORTILLAS to
facing you begin with front WHOLE
right tab and
move counterclockwise
Taken
Flour” by Denise Fidler, the Country Baker.
removefrom
next“Wild
two tabs.
5. Fill
• 3⁄4with
cupsgrain.
soft whole wheat pastry flour, kamut, or white flour
See•the
‘grain
flour’ ratio guide on the next page to help you
1 tsp.
seato
salt
understand
how much grain you should start with.
• 1⁄3 cup oil
• 1 cup
warm water
6. Plug
in machine
and turn on by turning lower knob.
NOTE: It is not necessary to start the motor before adding grain.
In your start
BOSCH
with
batter
whips,
mixturn
drythe
ingredients.
Always
thebowl
mill on
high
speed.
Never
knobs directly
Add
allfar
wet
ingredients
in a slow
steady
stream.
Mixfor
and
knead adding more water
to
the
right.
Always allow
yourand
grain
to start
flowing
15-20
or flour as
needed
to produce
smooth
dough
for 1-2
Form into 12-18 balls.
seconds
before
adjusting
knobato
coarsest
setting.
Youminutes.
may also
Coverthe
and
rest 30
minutes.
in electric or manual tortilla maker and cook. The
stop
milling
mid
cycle if Press
necessary.
secret to a great tortilla is a soft and moist dough.
7. Put on lid and let run.
NOTE
- Warmis
tortillas
with
cinnamon
sugar
sprinkled
on top are delicious.
The
NutriMill
designed
tobutter,
operate
with the and
lid on
for quieter
milling.
NOTE
- Tortillas
freeze
great. let
Just
seal
in for
heavy-duty
freezer
with layers
waxed
8.
When
milling is
complete,
mill
run
5 seconds.
Thisbag
eliminates
any of
flour
left
paper
them.
in
the between
self-cleaning
milling chamber. Tapping the bowl lid a few times after milling will
help settle the flour in the bowl and release flour from the bottom of the lid. Unplug the
machine and wipe or brush away any flour residue from the mill.
We recommend hand-washing the plastic bowl and lid. High-heat dishwashers can warp
the plastics. The gasket on the bowl lid will need to be relubricated after washing.
10
6
GRAIN TO FLOUR RATIO
You will want to adjust the amount of grain you add to the hopper so the flour bowl does
not overfill.
OVERNIGHT DOUGHNUTS (No knead)
Taken from “Wild Flour” by Denise Fidler, the Country Baker.
Overfilling the flour bowl may cause the mill to clog. The bowl will hold 21 to 22 cups of
flour. You will get about 21 cups of flour from 13 cups of hard wheat when milled at a
• 1 quart milk
medium texture. This texture is ideal for most breads.
• 3⁄4 cup butter
1
⁄2 cup honey
The•amount
of flour you get from a cup of grain varies with the type of grain and how
finely
is milled.
Fine milling
• 1itTbsp.
SAF instant
yeastproduces a greater volume of flour than coarse milling.
• 2 tsp. salt
NOTE1 - Soft grains like oats and beans will produce a greater volume of flour. With
• ⁄2 tsp. freshly grated nutmeg (optional)
the hopper extension ring in place only fill hopper 2⁄3 to 3⁄4 full of soft grains to avoid
⁄4 tsp.the
mace
(optional)
• 1lling
overfi
flour
bowl!
• 9 cups fresh milled soft pastry or hard Montana Spring white wheat
TEXTURE CONTROL KNOB GUIDE
First,Motor
scaldSpeed
milk. Add
butter
and(Upper
honey, Knob):
and stir until melted. Cool and set aside,
The
Control
Knob
temperature
should
be between
115°-130°
In separate
bowl,
yeast, salt, nutmeg,
The
motor speed
helps
determine
the texture
of your flour
or mix
meal.
mace, and freshly milled flour. Mix all together in mixer or by hand until dough is a
•
For most flour, upper knob should remain to the left.
smooth “wet batter like consistency.” Cover and set in refrigerator to firm up overnight
•or add
Fora very
ourto
and
medium
fine corn
meal,dough
knob and
should
be set
togluten
the right.
littlecoarse
more flflour
make
a smooth
and silky
knead
until
is
•developed
For heavy
flour & dense
texturedin
breads,
a middle
setting.
Adjust
fordough
desired
(approximately
5 minutes
a mixerselect
or 10-12
minutes
by hand).
Roll
1
results in the future
based
on and
yourcut
experience.
out approximately
⁄2 - 3⁄4 inch
thick
into doughnut shapes using a doughnut cutter
• large
NOTE:
allow glass.
the mill
to run
forplastic
15 to 20
or
glassAlways
and smaller
Cover
with
wrap and rise until double. Fry in hot
seconds
with the knob
all turning
the wayonce.
to theDust with confectioner’s sugar or
oil (375°)
approximately
3 - 4turned
minutes,
before
adjusting
theglaze.
knob Can
to your
glazeleft
with
a powdered
sugar
adddesired
sprinkles also.
setting in the middle or the right.
The Grain Feed Rate Knob (Lower Knob):
This is the ON-OFF switch and a valve that controls how
quickly grains can flOATMEAL
ow into the mill.
(You can look CHIP
under COOKIES
CHOCOLATE
the inlet cover and see how this valve opens and closes.
Instructions
for better
understanding
how your mill
• 2 cups packed
brown
sugar
works are on page 4).
• 2 eggs
1 tsp.
vanilla
• • For
finer
flour set the knob towards 11:00 – 12:00.
• (Most
1 cup shortening
grains will not flow at less than a 10:00 position on the knob.)
• • For
flour(rye,
turnwheat,
the knob
toward
1 3⁄4 coarse
cups flour
white,
etc.)the right.
• • Large
beans) won’t begin to flow until the knob is turned far to the right.
1 tsp. items
baking(like
soda
1
• Texture
⁄2 teaspoon
saltalso vary with the kind of grain being milled. Soft grains, such as
results
mill
much finer than
hard
grains. Hard wheat mills more coarsely than soft
• oats,
3 cups
quick-cooking
rolled
oats
• wheat.
1 cup chocolate chips
•
Larger grains such as legumes or rice will mill slowly while small grains like wheat or
millet
millsugar,
quickly.
Cream
the will
brown
shortening, eggs, and vanilla with cookie paddles in a BOSCH
•bowl.NOTE:
optimum
milling
turnand
the salt.
knobStir
all in
the
way
to the
right
15 seconds,
Blend For
in the
flour, baking
soda,
the
rolled
oats
andfor
chocolate
soThen
graindrop
will by
start
to flow onto
freely.
Then baking
turn the
knob back
to your
desired
chips.
spoonfuls
greased
sheets.
Bake left
at 350°
for 8-10
setting.
minutes.
(Makes 5 dozen.)
•
NOTE: PERIODICALLY MILL 3 CUPS OF WHITE RICE ON A COARSE SETTING
TO CLEAN THE MILLING HEADS AND REMOVE ANY POSSIBLE LEFT OVER
PARTICLES.
11
7
Classic
QUALITY OF GRAIN TO PURCHASE
1.
Know the source of your grain. Purchase your grain through a reputable dealer. The grain
should have been thoroughly cleaned and bagged. We recommend double or triple cleaned
grains.
2.
The quality of your grain will affect the quality of your bread. The bran and wheat germ
contained in wheat have a tendency to make bread heavy and unresponsive to yeast. A high
protein wheat will counteract this so bread rises properly.
3.
Check the moisture content. Make sure your grains are dry. Wet or damp grains may cause
your mill to plug up.
4.
Rotation and use of grains is as important as the rotation and use of your other perishable food items.
GRAIN INFORMATION
WHEAT - Contains 26 vitamins and minerals. An excellent source of Vitamins E, B, and others.
Wheat contains the highest gluten amounts of any grain. Gluten provides the elasticity in dough
and holds the air bubbles in the yeast causing the bread to rise.
WHOLE OAT GROATS - Oats are rich in high quality protein, calcium, fiber, unsaturated fats,
and seven B vitamins. A versatile grain, it can be used in cereal, cookies, breads, pancakes and
waffles. (Rolled Oats cannot be milled)
RYE - An excellent supplementary grain to wheat or in recipes that call for corn or oatmeal as
part of the flour. Bread made entirely from rye makes a moist, dense loaf. 2 parts rye to 5 parts
wheat will make a great light bread. It has less gluten than wheat and can be milled alone or
with other grains.
THE NUTRIMILL WILL MILL THE FOLLOWING
GLUTEN-FREE BEANS & PEAS
• Yellow lentils
• Red lentils
• Chickpeas (garbanzo beans)
• Lima beans
• Soybeans
• Anasazi beans
• Mung beans
• Black beans
• Kidney beans
• Navy beans
• Green split peas
• Yellow split peas
GLUTEN-FREE GRAINS
• Popcorn
• blue corn
• Oat groats
• White rice
• Brown rice
• Wild rice
• Sorghum
• Millet
• Buckwheat
• Red quinoa
• Quinoa
• Amaranth
WHOLE GRAINS
• Kamut
• Hard red wheat
• Hard white wheat
• Spelt
• Barley
• Farro
• Soft wheat
• Rye
• Bulgur Wheat
USE CAUTION WHEN MILLING THE FOLLOWING
Fill the hopper no more than 2⁄3 to 3⁄4 with these as they produce more flour volume.
• Dried Lentils
• Legumes (generally)
• Barley
• Dried Sweet Corn
• Dried Garbanzo Beans
• Soybeans
• Dried Pinto Beans
• Quinoa
• ChickPeas
• Dried Green Beans
• Oat Groats
• Kamut
• Dried Mung Beans
• Spelt
RICE - Low in both fat and sodium, high in carbohydrates and rich in iron and many of the
B vitamins. Rice is wonderful in cereals, casseroles, side dishes and soups. It also makes
delicious breads with a cake like texture.
BARLEY - A great addition to soups, casseroles, and doughs when making pastries. It’s a good
rice substitute. Try it as a supplement in wheat bread at 1 part barley to 5 parts wheat. It’s
especially good pan browned on medium heat using 2 tablespoons of oil and stirred constantly
until browned. Do not mill barley after browning.
POPCORN - Contains less starch than other types of corn and makes the best cornbread. Use
also in pancakes, waffles, breads, and as dusting flour.
MILLET - Used in soups, puddings, casseroles, and breads. Its effect and flavor in bread is
similar to corn. 1 part millet to 5 parts wheat is ideal. Too much will make dense bread that
separates from its crust. At the right amount it adds crunchiness.
SOY - Containing the highest protein amount of any vegetable, it is very versatile. Soy milk, tofu
cheese, TVP meat substitute, casseroles and bread are all ways of using soy. It has a higher oil
content, but can easily be ground to flour by itself.
NOTE - Soy, Kamut, Quinoa and Spelt must be dry before milling.
8
DO NOT MILL ANY OF THE FOLLOWING
• Oatmeal
• Seeds (flax, sesame, chia,
sunflower, etc.)
• Nuts Of Any Kind
• Coffee Beans
• Spices
•
•
•
•
•
Rolled or Steel Cut Oats
Herbs
Hemp
Sugars (white & brown)
Dried Fruits or vegetables
(dates, raisins, etc.)
•
•
•
•
•
•
Chocolate
Sprouted Legumes
Sprouted Grains
Sprouted Seeds
Goji Berries
Tapioca
Avoid grains, beans and seeds that have high oil or moisture content. Noncommercially dried
products may cause plugging.
For any grains not listed above that you have a question about, mill only 1/4 cup, then test the
flour by pinching a small amount between your thumb and finger. If it holds the shape of a pinch
and does not fall apart, it contains too much moisture. Do not mill this grain.
9