Transcript
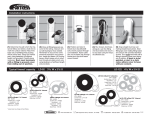
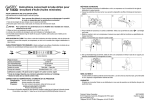
Airtec
WBB300 & WBB500 Installation
Bracket Arm (2)
Crossbar (1)
10mm Concrete
Anchor (6)
2
Extend bracket arms.
1” Bolt (4)
Clip Nut (4)
Rubber Mount (4)
3
>
Level and attach crossbar with two lag
screws or anchors provided (Substitute
other fastener types where appropriate).
Slide extended bracket arms onto
crossbar.
Insert clear clip/nut into mounting
key hole from below arm. Attach
rubber mount through key hole,
aligning center hole with clip/nut.
Repeat and slide all four mounts to
the center of their respective slots.
>
1
8x80mm
Lag Screw(6)
>
Tighten two bolts on
each arm.
>
4
6
5
Position arms to accomodate equipment
measurments and tighten set screws.
Use remaining lag screws or anchors to
secure bracket arms.
>
>
back of each arm as needed to
level both arms.
Position mounts to accomodate
equipment measurments. Place
condenser on mounts aligning holes
in feet with center hole in mounts.
Attach using 4 provided bolts.
>
>
condenser foot
<
The buyer of the aforelisted product(s) hereby indemnify RectorSeal Corporation, its successors and assigns, as they may in time appear, harmless against any claims,
demands or liability arising out of the misuse of or from any use outside the intended scope of the aforelisted product(s). Misuse or use outside the intended scope shall
include any use contrary to that which is indicated with the accompanying literature and instructions. This unit must be installed in accordance with all applicable local
building and mechanical codes.
®