Transcript
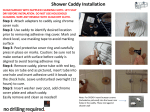
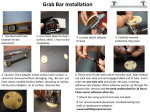
Bath Accessory Installation
•
•
•
•
•
•
Step 1 - Clean surface using a clean dry cloth or use
rubbing alcohol to remove any residue (wax, grease,
solvents). Allow to dry one hour. Caution! DO NOT use
any household cleaners as they can leave a residue.
Step 2 - Locate position desired and mark. Remove
protective paper from foam securing ring and apply firm
pressure for 4 seconds. Avoid mounting adapter over
grout lines.
Step 3 – Use the red key end to puncture the adhesive
tube. Slide tube end into slot in red key and turn the key
until firm.
Step 4 – Insert tube end into one hole of the adapter.
Turn the red key forcing the adhesive into the adapter
base until the white adhesive beads up out of the other
hole. Caution! DO NOT apply any pressure or disturb the
adapter once the adhesive has been inserted.
Step 5 – Allow adapter to cure (harden) for 12 hours
undisturbed. Remove any excess adhesive once dry.
Caution! Allow 24 hours for Grab Bars
Step 6 – Mount your accessory using the tool provided
and enjoy!
Note: Surface must be able to bear load of accessory. Not intended for use on Polyethylene (PE)
Polypropylene (PP), Polytetraflouroethylene (PTE, Teflon) as they do not allow for proper adhesion