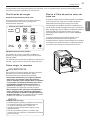
1
ENGLISH
ESPAÑOL
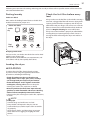
OWNER’S MANUAL
DRYER
Please read this owner’s manual thoroughly before
operating and keep it handy for reference at all times.
DLE1001W
DLG1002W
P/No. : 3828EL2001T
www.lg.com
2
TABLE OF CONTENTS
TABLE OF CONTENTS
3
IMPORTANT SAFETY INSTRUCTIONS
34
MAINTENANCE
3
4
4
WHAT TO DO IF YOU SMELL GAS
BASIC SAFETY PRECAUTIONS
CALIFORNIA SAFE DRINKING WATER AND
TOXIC ENFORCEMENT ACT
GROUNDING INSTRUCTIONS
SAFETY INSTRUCTIONS FOR INSTALLATION
SAFETY INSTRUCTIONS FOR CONNECTING
ELECTRICITY
34
Regular Cleaning
35
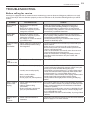
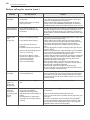
TROUBLESHOOTING
35
Before Calling for Service
37
SPECIFICATIONS
38
USING SMART DIAGNOSISTM
39
WARRANTY
5
5
7
8
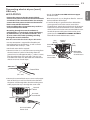
PRODUCT FEATURES
9
INTRODUCING YOUR DRYER
9
9
10
11
Parts
Accessories
Control Panel Features
Display
12
INSTALLATION INSTRUCTIONS
12
13
13
14
15
16
17
19
21
26
26
27
Preview Installation Order
Installation Location Requirements
Clearances
Leveling the Dryer
Reversing the Door
Installing the Side Vent Kit
Venting the Dryer
Connecting Gas Dryers
Connecting Electric Dryers
Special Requirements for Manufactured or
Mobile Homes
Final Installation Check
Installation Test (Duct Check)
29
HOW TO USE
29
Operating the Dryer
Cycle Guide
Sorting Laundry
Loading the Dryer
Check the Lint Filter Before Every Load
Cycle Settings and Options
Special Functions
Custom Program
30
31
31
31
32
33
33
IMPORTANT SAFETY INSTRUCTIONS
3
IMPORTANT SAFETY INSTRUCTIONS
WWARNING
For your safety, the information in this manual must be followed to minimize the risk of fire or explosion, electric
shock, or to prevent property damage, injury to persons, or death.
Your safety and the safety of others is very important.
We have provided many important safety messages in this manual and on your appliance. Always read and obey all
safety messages.
This is the safety alert symbol.
This symbol alerts you to potential hazards that can kill or hurt you and others.
All safety messages will follow the safety alert symbol and either the word DANGER, WARNING, or CAUTION.
W
These words mean:
WDANGER
You will be killed or seriously injured if you don’t immediately follow instructions.
WWARNING
You can be killed or seriously injured if you don’t follow instructions.
WCAUTION
You may be slightly injured or cause damage to the product if you do not follow instructions.
All safety messages will tell you what the potential hazard is, tell you how to reduce the chance of injury, and tell
you what can happen if the instructions are not followed.
t%POPUJOTUBMMBDMPUIFTESZFSXJUIGMFYJCMFQMBTUJDWFOUJOHNBUFSJBMT*GGMFYJCMFNFUBMGPJMUZQF
EVDUJT
JOTUBMMFEJUNVTUCFPGBTQFDJGJDUZQFJEFOUJGJFECZUIFBQQMJBODFNBOVGBDUVSFSBTTVJUBCMFGPSVTFXJUI
DMPUIFTESZFST'MFYJCMFWFOUJOHNBUFSJBMTBSFLOPXOUPDPMMBQTFCFFBTJMZDSVTIFEBOEUSBQMJOU5IFTF
DPOEJUJPOTXJMMPCTUSVDUDMPUIFTESZFSBJSGMPXBOEJODSFBTFUIFSJTLPGGJSF
t%POPUTUPSFPSVTFHBTPMJOFPSPUIFSGMBNNBCMFWBQPSTBOEMJRVJETJOUIFWJDJOJUZPGUIJTBQQMJBODFPSBOZ
PUIFSBQQMJBODFT
t*OTUBMMBUJPOBOETFSWJDFNVTUCFQFSGPSNFECZBRVBMJGJFEJOTUBMMFSTFSWJDFBHFODZPSUIFHBTTVQQMJFS
t*OTUBMMUIFDMPUIFTESZFSBDDPSEJOHUPUIFNBOVGBDUVSFSTJOTUSVDUJPOTBOEMPDBMDPEFT
t4BWFUIFTFJOTUSVDUJPOT
8)"550%0*':064.&--("4
%POPUUSZUPMJHIUBNBUDIPSDJHBSFUUFPSUVSOPOBOZHBTPSFMFDUSJDBMBQQMJBODF
%POPUUPVDIBOZFMFDUSJDBMTXJUDIFT%POPUVTFBOZQIPOFJOZPVSCVJMEJOH
$MFBSUIFSPPNCVJMEJOHPSBSFBPGBMMPDDVQBOUT
*NNFEJBUFMZDBMMZPVSHBTTVQQMJFSGSPNBOFJHICPSTQIPOF'PMMPXUIFHBTTVQQMJFSTJOTUSVDUJPOT
DBSFGVMMZ
*GZPVDBOOPUSFBDIZPVSHBTTVQQMJFSDBMMUIFGJSFEFQBSUNFOU
WWARNING:This product contains chemicals known to the State of California to cause cancer and birth defects or
other reproductive harm. Wash hands after handling.
ENGLISH
READ ALL INSTRUCTIONS BEFORE USE
4
IMPORTANT SAFETY INSTRUCTIONS
IMPORTANT SAFETY INSTRUCTIONS
READ ALL INSTRUCTIONS BEFORE USE
WWARNING
For your safety, the information in this manual must be followed to minimize the risk of fire or explosion, electric
shock, or to prevent property damage, injury to persons, or death.
#"4*$4"'&5:13&$"65*0/4
WWARNING
To reduce the risk of fire, electric shock, or injury to persons when using this appliance, follow basic precautions,
including the following:
t3FBEBMMJOTUSVDUJPOTCFGPSFVTJOHUIFESZFS
t#FGPSFVTFUIFESZFSNVTUCFQSPQFSMZJOTUBMMFEBT
described in this manual.
t%POPUQMBDFJUFNTFYQPTFEUPDPPLJOHPJMTJOZPVS
dryer. Items contaminated with cooking oils may
contribute to a chemical reaction that could cause a
load to catch fire.
t%POPUESZBSUJDMFTUIBUIBWFCFFOQSFWJPVTMZDMFBOFE
in, washed in, soaked in, or spotted with gasoline, drycleaning solvents, or other flammable or explosive
substances as they give off vapors that could ignite or
explode.
t%POPUSFBDIJOUPUIFESZFSJGUIFESVNPSBOZPUIFS
part is moving.
t%POPUSFQBJSPSSFQMBDFBOZQBSUPGUIFESZFS
or attempt any servicing unless specifically
recommended in this owner’s manual or in published
user-repair instructions that you understand and have
the skills to carry out.
t%POPUUBNQFSXJUIDPOUSPMT
t#FGPSFUIFESZFSJTSFNPWFEGSPNTFSWJDFPSEJTDBSEFE
remove the door to the drying compartment.
t%POPUBMMPXDIJMESFOUPQMBZPOPSJOUIFESZFS$MPTF
supervision of children is necessary when the dryer is
used near children.
t%POPUVTFGBCSJDTPGUFOFSTPSQSPEVDUTUPFMJNJOBUF
static unless recommended by the manufacturer of
the fabric softener or product.
t%POPUVTFIFBUUPESZBSUJDMFTDPOUBJOJOHGPBNSVCCFS
or similarly textured rubber-like materials.
t,FFQBSFBBSPVOEUIFFYIBVTUPQFOJOHBOEBEKBDFOU
surrounding areas free from the accumulation of lint,
dust, and dirt.
t5IFJOUFSJPSPGUIFESZFSBOEFYIBVTUWFOUTIPVMECF
cleaned periodically by qualified service personnel.
t%POPUJOTUBMMPSTUPSFUIFESZFSXIFSFJUXJMMCF
exposed to the weather.
t"MXBZTDIFDLUIFJOTJEFPGUIFESZFSGPSGPSFJHO
objects.
t$MFBOMJOUTDSFFOCFGPSFPSBGUFSFBDIMPBE
t%POPUTUPSFQMBTUJDQBQFSPSDMPUIJOHUIBUNBZ
CVSOPSNFMUPOUPQPGUIFESZFSEVSJOHPQFSBUJPO
$"-*'03/*"4"'&%3*/,*/(8"5&3"/%509*$&/'03$&.&/5"$5
This act requires the governor of California to publish a list of substances known to the state to cause cancer, birth
defects, or other reproductive harm and requires businesses to warn customers of potential exposure to such
substances.
Gas appliances can cause minor exposure to four of these substances, namely benzene, carbon monoxide,
formaldehyde, and soot, caused primarily by the incomplete combustion of natural gas or LP fuels.
Properly adjusted dryers will minimize incomplete combustion. Exposure to these substances can be minimized
further by properly venting the dryer to the outdoors.
IMPORTANT SAFETY INSTRUCTIONS
5
IMPORTANT SAFETY INSTRUCTIONS
WWARNING
For your safety, the information in this manual must be followed to minimize the risk of fire or explosion, electric
shock, or to prevent property damage, injury to persons, or death.
(306/%*/(*/4536$5*0/4
This appliance must be grounded. In the event of
malfunction or breakdown, grounding will reduce
the risk of electric shock by providing a path of least
resistance for electric current. This appliance must be
equipped with a cord having an equipment-grounding
conductor and a grounding plug. The plug must be
plugged into an appropriate outlet that is properly
installed and grounded in accordance with all local
codes and ordinances.
Do not modify the plug provided with the appliance. If
it will not fit the outlet, have a proper outlet installed by
a qualified electrician.
This appliance must be connected to a grounded metal,
permanent wiring system or an equipment-grounding
conductor must be run with the circuit conductors and
connected to the equipment-grounding terminal or
lead on the appliance.
Electric shock can result if the dryer is not properly
grounded.
WWARNING
Improper connection of the equipment-grounding conductor can result in a risk of electric shock. Check with a
qualified electrician or service person if you are in doubt that the appliance is properly grounded.
4"'&5:*/4536$5*0/4'03*/45"--"5*0/
WWARNING
To reduce the risk of fire, electric shock, or injury to persons when using this appliance, follow basic precautions,
including the following:
t1SPQFSMZHSPVOEUIFESZFSUPDPOGPSNXJUIBMM
HPWFSOJOHDPEFTBOEPSEJOBODFT Follow details in
the installation instructions. Electric shock can result if
the dryer is not properly grounded.
t#FGPSFVTFUIFESZFSNVTUCFQSPQFSMZJOTUBMMFE as
described in this manual. Electric shock can result if
the dryer is not properly grounded.
t*OTUBMMBOETUPSFUIFESZFSXIFSFJUXJMMOPUCF
FYQPTFEUPUFNQFSBUVSFTCFMPXGSFF[JOHPS
FYQPTFEUPUIFXFBUIFS
t"MMSFQBJSTBOETFSWJDJOHNVTUCFQFSGPSNFE
CZBOBVUIPSJ[FETFSWJDFSVOMFTTTQFDJGJDBMMZ
SFDPNNFOEFEJOUIJTPXOFSTNBOVBM6TFPOMZ
BVUIPSJ[FEGBDUPSZQBSUTFailure to follow this
warning can cause serious injury, fire, electric shock, or
death.
t5PSFEVDFUIFSJTLPGFMFDUSJDTIPDLEPOPUJOTUBMM
UIFESZFSJOIVNJETQBDFT Failure to follow this
warning can cause serious injury, fire, electric shock, or
death.
t$POOFDUUPBQSPQFSMZSBUFEQSPUFDUFEBOETJ[FE
QPXFSDJSDVJUUPBWPJEFMFDUSJDBMPWFSMPBEImproper
power circuit can melt, creating electric shock and/or
fire hazard.
t3FNPWFBMMQBDLJOHJUFNTBOEEJTQPTFPGBMM
TIJQQJOHNBUFSJBMTQSPQFSMZFailure to do so can
result in death, explosion, fire, or burns.
t1MBDFESZFSBUMFBTUJODIFTBCPWFUIFGMPPSGPS
BHBSBHFJOTUBMMBUJPOFailure to do so can result in
death, explosion, fire, or burns.
t,FFQBMMQBDLBHJOHGSPNDIJMESFO Packaging
material can be dangerous for children. There is a risk
of suffocation.
t%POPUJOTUBMMOFBSBOPUIFSTPVSDFPGIFBUTVDI
BTBTUPWFPSDPPLJOHPWFOFailure to observe this
warning can cause product deformation, smoke and
fire.
t%POPUQMBDFDBOEMFTTNPLJOHNBUFSJBMTPSPUIFS
GMBNNBCMFTPOUPQPGUIFQSPEVDU Dripping wax,
smoke, or fire can result.
t3FNPWFBMMQSPUFDUJWFWJOZMGJMNGSPNUIFQSPEVDU
Failure to do so can cause product damage, smoke or
fire.
ENGLISH
READ ALL INSTRUCTIONS BEFORE USE
6
IMPORTANT SAFETY INSTRUCTIONS
IMPORTANT SAFETY INSTRUCTIONS
READ ALL INSTRUCTIONS BEFORE USE
WWARNING
For your safety, the information in this manual must be followed to minimize the risk of fire or explosion, electric
shock, or to prevent property damage, injury to persons, or death.
4"'&5:*/4536$5*0/4'03*/45"--"5*0/
WWARNING
To reduce the risk of injury to persons, follow all industry recommended safety procedures including the use of long
sleeved gloves and safety glasses. Failure to follow all of the safety warnings in this manual could result in property
damage, injury to persons, or death.
Exhaust/Ducting:
t(BTESZFST.645CFFYIBVTUFEUPUIFPVUTJEF
Failure to follow these instructions can result in fire or
death.
t5IFESZFSFYIBVTUTZTUFNNVTUCFFYIBVTUFE
UPUIFPVUTJEFPGUIFEXFMMJOH*GUIFESZFSJTOPU
FYIBVTUFEPVUEPPSTTPNFGJOFMJOUBOEMBSHF
BNPVOUTPGNPJTUVSFXJMMCFFYQFMMFEJOUPUIF
MBVOESZBSFB. An accumulation of lint in any area of
the home can create a health and fire hazard.
t6TFPOMZSJHJENFUBMPSGMFYJCMFNFUBMJODI
EJBNFUFSEVDUXPSLJOTJEFUIFESZFSDBCJOFUPSGPS
FYIBVTUJOHUPUIFPVUTJEF6TFPGQMBTUJDPSPUIFS
DPNCVTUJCMFEVDUXPSLDBODBVTFBGJSF Punctured
ductwork can cause a fire if it collapses or becomes
otherwise restricted in use or during installation.
t%VDUXPSLJTOPUQSPWJEFEXJUIUIFESZFSBOEZPV
TIPVMEPCUBJOUIFOFDFTTBSZEVDUXPSLMPDBMMZ5IF
FOEDBQTIPVMEIBWFIJOHFEEBNQFSTUPQSFWFOU
CBDLESBGUXIFOUIFESZFSJTOPUJOVTF Failure to
follow these instructions can result in fire or death.
t5IFFYIBVTUEVDUNVTUCFJODIFTDN
JO
EJBNFUFSXJUIOPPCTUSVDUJPOT5IFFYIBVTUEVDU
TIPVMECFLFQUBTTIPSUBTQPTTJCMF.BLFTVSF
UPDMFBOBOZPMEEVDUTCFGPSFJOTUBMMJOHZPVSOFX
dryer. Failure to follow these instructions can result in
fire or death.
t3JHJEPSTFNJSJHJENFUBMEVDUJOHJTSFDPNNFOEFE
GPSVTFCFUXFFOUIFESZFSBOEUIFXBMM*OTQFDJBM
JOTUBMMBUJPOTXIFOJUJTJNQPTTJCMFUPNBLFB
DPOOFDUJPOXJUIUIFBCPWFSFDPNNFOEBUJPOTB6-
MJTUFEGMFYJCMFNFUBMUSBOTJUJPOEVDUNBZCFVTFE
CFUXFFOUIFESZFSBOEXBMMDPOOFDUJPOPOMZ5IF
VTFPGUIJTEVDUJOHXJMMBGGFDUESZJOHUJNF Failure to
follow these instructions can result in fire or death.
t%0/05VTFTIFFUNFUBMTDSFXTPSPUIFSGBTUFOFST
XIJDIFYUFOEJOUPUIFEVDUUIBUDPVMEDBUDIMJOUBOE
SFEVDFUIFFGGJDJFODZPGUIFFYIBVTUTZTUFN Secure
all joints with duct tape. For complete details, follow
the Installation Instructions. Failure to follow these
instructions can result in fire or death.
IMPORTANT SAFETY INSTRUCTIONS
7
IMPORTANT SAFETY INSTRUCTIONS
WWARNING
For your safety, the information in this manual must be followed to minimize the risk of fire or explosion, electric
shock, or to prevent property damage, injury to persons, or death.
4"'&5:*/4536$5*0/4'03$0//&$5*/(&-&$53*$*5:
WWARNING
To reduce the risk of fire, electric shock, or injury to persons when using this appliance, follow basic precautions,
including the following:
t%POPUVOEFSBOZDJSDVNTUBODFTDVUPSSFNPWF
UIFHSPVOEQSPOHGSPNUIFQPXFSDPSETo prevent
injury to persons or damage to the dryer, the electrical
power cord must be plugged into a properly grounded
outlet.
t'PSQFSTPOBMTBGFUZUIJTESZFSNVTUCFQSPQFSMZ
HSPVOEFEFailure to do so can result in electric shock
or injury.
t3FGFSUPUIFJOTUBMMBUJPOJOTUSVDUJPOTJOUIJTNBOVBM
GPSTQFDJGJDFMFDUSJDBMSFRVJSFNFOUTGPSZPVSNPEFM
Failure to follow these instructions can create an
electric shock hazard and/or a fire hazard.
t5IJTESZFSNVTUCFQMVHHFEJOUPBQSPQFSMZ
HSPVOEFEPVUMFU&MFDUSJDTIPDLDBOSFTVMUJGUIF
ESZFSJTOPUQSPQFSMZHSPVOEFE)BWFUIFXBMM
PVUMFUBOEDJSDVJUDIFDLFECZBRVBMJGJFEFMFDUSJDJBO
UPNBLFTVSFUIFPVUMFUJTQSPQFSMZHSPVOEFE
Failure to follow these instructions can create an
electric shock hazard and/or a fire hazard.
t5IFESZFSTIPVMEBMXBZTCFQMVHHFEJOUPJUTPXO
JOEJWJEVBMFMFDUSJDBMPVUMFUXIJDIIBTBWPMUBHF
SBUJOHUIBUNBUDIFTUIFSBUJOHQMBUFThis provides
best performance and also prevents overloading
house wiring circuits which could cause a fire hazard
from overheated wires.
t/FWFSVOQMVHZPVSESZFSCZQVMMJOHPOUIFQPXFS
DPSE"MXBZTHSJQQMVHGJSNMZBOEQVMMTUSBJHIUPVU
GSPNUIFPVUMFUThe power cord can be damaged,
resulting in a risk of fire and electric shock.
t3FQBJSPSSFQMBDFJNNFEJBUFMZBMMQPXFSDPSETUIBU
IBWFCFDPNFGSBZFEPSPUIFSXJTFEBNBHFE%POPU
VTFBDPSEUIBUTIPXTDSBDLTPSBCSBTJPOEBNBHF
BMPOHJUTMFOHUIPSBUFJUIFSFOEThe power cord can
melt, creating an electric shock and/or fire hazard.
t8IFOJOTUBMMJOHPSNPWJOHUIFESZFSCFDBSFGVMOPU
UPQJODIDSVTIPSEBNBHFUIFQPXFSDPSEThis will
prevent injury and prevent damage to the dryer from
fire and electric shock.
4"7&5)&4&*/4536$5*0/4
ENGLISH
READ ALL INSTRUCTIONS BEFORE USE
PRODUCT FEATURES
PRODUCT FEATURES
EASY-TO-USE CONTROL PANEL
An entire selection of user-friendly functions make operating the dryer easy.
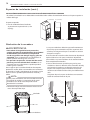
EASY-ACCESS REVERSIBLE DOOR
The wide-opening door provides easy access for loading and unloading. The door hinge can be reversed to
adjust for installation location.
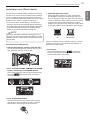
FLOW SENSE™ DUCT BLOCKAGE SENSING SYSTEM INDICATOR
5IF'-084&/4&5.
EVDUCMPDLBHFTFOTJOHTZTUFNEFUFDUTBOEBMFSUTZPVUPSFTUSJDUJPOTJOUIFJOTUBMMFE
household ductwork that reduce exhaust airflow through the dryer. If you see the alert, clean or repair the
EVDUTUPSFNPWFUIFSFTUSJDUJPOT,FFQZPVSEVDUTDMFBOUPIFMQJODSFBTFFGGJDJFODZBOESFEVDFMPOHESZJOH
times caused by blocked ducts.
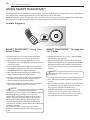
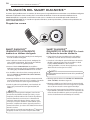
SMART DIAGNOSIS™
Should you experience any technical difficulty with your dryer, it has the capability of transmitting data via
your telephone to the Customer Information Center. The call center agent records the data transmitted from
ZPVSNBDIJOFBOEVTFTJUUPBOBMZ[FUIFJTTVFQSPWJEJOHBGBTUBOEFGGFDUJWFEJBHOPTJTSFGFSUPQBHF
D
8
ES
C
ER
IGN
TIFIE
D
INTRODUCING YOUR DRYER
9
INTRODUCING YOUR DRYER
ENGLISH
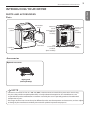
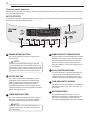
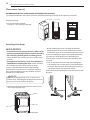
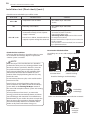
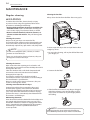
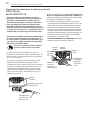
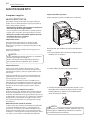
PARTS AND ACCESSORIES
Parts
Reversible
door
Control
panel
Lint filter
Leveling
feet
Terminal
block
access panel
(Electric
models)
Power cord
location
(Gas
models)
Gas
connection
location
(Gas models)
Exhaust
duct
outlet
Accessories
0QUJPOBMBDDFTTPSJFT
%SZJOHSBDL
TPMETFQBSBUFMZ
NOTE
t$POUBDU-($VTUPNFS4FSWJDFBUJO$BOBEB
JGBOZBDDFTTPSJFTBSFNJTTJOH
t'PSZPVSTBGFUZBOEGPSFYUFOEFEQSPEVDUMJGFVTFPOMZBVUIPSJ[FEDPNQPOFOUT5IFNBOVGBDUVSFSJTOPU
responsible for product malfunction or accidents caused by the use of separately purchased unauthorized
components or parts.
t5IFJNBHFTJOUIJTPXOFSTNBOVBMNBZCFEJGGFSFOUGSPNUIFBDUVBMDPNQPOFOUTBOEBDDFTTPSJFTBOEBSFTVCKFDU
to change by the manufacturer without prior notice for product improvement purposes.
10
INTRODUCING YOUR DRYER
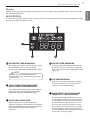
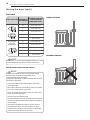
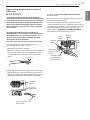
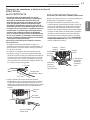
Control panel features
Following are instructions for starting and using your new dryer. Please refer to specific sections of this manual for
more detailed information.
WWARNING
To reduce the risk of fire, electric shock, or injury to persons, read this entire manual, including the Important Safety
Instructions, before operating this dryer.
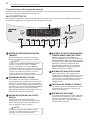
A
F
E
A 108&30/0''#6550/
Press to turn the dryer ON. Press again to turn
the dryer OFF.
NOTE
Pressing the ON/OFF button during a cycle will
cancel that cycle and any load settings will be lost.
AUTO OFF : To conserve energy, the dryer shuts off
automatically after a cycle is complete or anytime
the dryer is paused for more than a few minutes.
B $:$-&4#6550/
Press the CYCLES button repeatedly to scroll
through the cycle selections until the desired
cycle is selected. The standard presets for the
selected cycle will be shown in the display.
0O."/6"-%3:DZDMFTUIFTFTFUUJOHTDBOCF
adjusted using the cycle setting buttons anytime
before starting the cycle.
G
D
B
C
D .03&5*.&-&445*.ᦖ/4
6TFUIFTFCVUUPOTXJUIUIF5*.&%3:BOEPUIFS
."/6"-%3:DZDMFTUPBEKVTUUIFESZJOHUJNF
1SFTTUIF.03&5*.&CVUUPOUPJODSFBTFUIF
selected manual cycle time by one minute;
QSFTT-&445*.&UPEFDSFBTFUIFDZDMFUJNFCZ
one minute.
E $:$-&4&55*/(#6550/4
Use these buttons to select the desired cycle
settings for the selected cycle. The current
settings are shown in the display. Press the
button for that option to select other settings.
F 5*.&"/%45"564%*41-":
The display shows the settings, estimated time
remaining, options, and status messages for
your dryer.
G 015*0/#6550/4
C 45"351"64ᦖ/
Press this button to START the selected cycle. If
the dryer is running, use this button to PAUSE
the cycle without losing the current settings.
NOTE
If you do not press the START/PAUSE button to
SFTVNFBDZDMFXJUIJONJOVUFTUIFESZFSUVSOT
off automatically.
The OPTION buttons allow you to select
additional cycle options. Certain buttons also
allow you to activate special functions by
QSFTTJOHBOEIPMEJOHUIFCVUUPOGPSTFDPOET
INTRODUCING YOUR DRYER
11
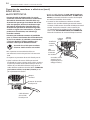
Display
WWARNING
To reduce the risk of fire, electric shock, or injury to persons, read this entire manual, including the Important Safety
Instructions, before operating this dryer.
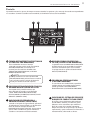
F
D
B
C
E
A &45*."5&%5*.&3&."*/*/(
This display shows the estimated time remaining
for SENSOR DRY cycles or the actual time
SFNBJOJOHGPS5*.&%%3:PS."/6"-%3:DZDMFT
A
D $)&$,'*-5&33&.*/%&3
5IFEJTQMBZXJMMTIPX$)&$,'*-5&3XIFOUIF
dryer is turned on as a reminder to check the
filter. It turns off when the START/PAUSE button
is pressed.
NOTE
The cycle time on SENSOR DRY cycles may
fluctuate as the dryer recalculates drying time for
optimal results.
B $:$-&$0.1-&5*0/*/%*$"503
8*5)$)&$,'*-5&33&.*/%&3
This portion of the display shows which stage of
UIFESZJOHDZDMFJTDVSSFOUMZVOEFSXBZ$)&$,
'*-5&3%3:$00-*/(PS83*/,-&$"3&
E $6450.130(3".
If you have a special combination of settings
that you use frequently, you can save these
TFUUJOHTBTB$6450.130(3".
F '-084&/4&%6$5#-0$,"(&
4&/4*/(4:45&.*/%*$"503
C $)*-%-0$,*/%*$"503
8IFO$)*-%-0$,JTTFUUIF$)*-%-0$,
indicator will appear and all buttons are disabled
except the POWER button. This prevents children
from changing settings while the dryer is
operating.
5IF'-084&/4&5.
EVDUCMPDLBHFTFOTJOH
system detects and alerts you to restrictions in
the installed household ductwork that reduce
exhaust airflow through the dryer. If you see
the alert, clean or repair the ducts to remove
UIFSFTUSJDUJPOT,FFQZPVSEVDUTDMFBOUPIFMQ
increase efficiency, reduce long drying times
caused by blocked ducts, and help to minimize
service calls, saving you money.
ENGLISH
Following are instructions for starting and using your new dryer. Please refer to specific sections of this manual for
more detailed information.
12
INSTALLATION INSTRUCTIONS
INSTALLATION INSTRUCTIONS
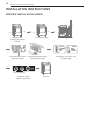
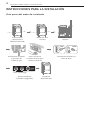
PREVIEW INSTALLATION ORDER
Checking and
choosing the proper
location
Leveling the dryer
Venting the Dryer
120V
Connecting Gas Dryers
(Gas Dryer Type)
Connecting Electric Dryers
(Electric Dryer Type)
Press and hold
Installation check
(Refer to page 27.)
Test run
240V
Plugging in the power cord
and grounding
INSTALLATION INSTRUCTIONS
13
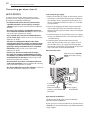
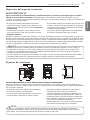
Installation location requirements
3FBEBMMJOTUBMMBUJPOJOTUSVDUJPOTDPNQMFUFMZCFGPSFJOTUBMMJOHBOEPQFSBUJOHZPVSESZFSIt is important that
you review this entire manual before installing and using your dryer. Detailed instructions concerning electrical
connections, gas connections, and exhaust requirements are provided on the following pages.
t"MPDBUJPOUIBUBMMPXTGPSQSPQFSFYIBVTUJOTUBMMBUJPO"
gas dryer must be exhausted to the outdoors.
See 7FOUJOHUIFESZFS
t"TUVSEZGMPPSUPTVQQPSUUIFUPUBMESZFSXFJHIUPG
MCTLH
5IFDPNCJOFEXFJHIUPGBDPNQBOJPO
appliance should also be considered.
t"HSPVOEFEFMFDUSJDBMPVUMFUMPDBUFEXJUIJOGU
DN
PGFJUIFSTJEFPGUIFESZFS4FF$POOFDUJOH
FMFDUSJDESZFST
tNo other fuel-burning appliance can be installed in the
same closet as a dryer.
%POPUPQFSBUFZPVSESZFSBUUFNQFSBUVSFTCFMPX¡'¡$
"UMPXFSUFNQFSBUVSFTUIFESZFSNJHIUOPUTIVUPGG
at the end of an automatic cycle. This can result in longer drying times. The dryer must not be installed or stored in
an area where it will be exposed to water and/or weather. Check code requirements. Some codes limit, or do not
permit, installation of the dryer in garages, closets, mobile homes or
sleeping quarters. Contact your local building inspector.
NOTE
t'MPPSNVTUCFMFWFMXJUIBNBYJNVNTMPQFPGJODIDN
VOEFSFOUJSFESZFS*GTMPQFJTHSFBUFSUIBOJODI
DN
JOTUBMMUIF&YUFOEFE%SZFS'FFU,JU$MPUIFTNBZOPUUVNCMFQSPQFSMZBOEBVUPNBUJDTFOTPSDZDMFTNBZOPU
operate correctly if dryer is not level.
t'PSBHBSBHFJOTUBMMBUJPOZPVXJMMOFFEUPQMBDFUIFESZFSBUMFBTUJODIFTDN
BCPWFUIFGMPPS*GVTJOHB
QFEFTUBMZPVXJMMOFFEJODIFTDN
UPUIFCPUUPNPGUIFESZFS
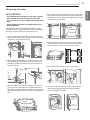
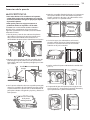
Clearances
(7.6 cm)
14" max.*
(35.6 cm)
21 1/4"
(54 cm)
40 3/16"
(102 cm)
28 15/16"
(73.4 cm)
5"**
(12.7 cm)
(2.54 cm)
50 1/4"
(127.5 cm)
(68.6 cm)
(2.54 cm)
Closet Door Vent
(7.6 cm) Requirements
INSTALLATION SPACING FOR RECESSED AREA OR CLOSET INSTALLATION
The following spacing dimensions are recommended for this dryer. This dryer has been tested for spacing of
JODIFTDN
DMFBSBODFPOUIFTJEFTBOESFBS3FDPNNFOEFETQBDJOHTIPVMECFDPOTJEFSFEGPSUIFGPMMPXJOH
reasons:
t"EEJUJPOBMTQBDJOHTIPVMECFDPOTJEFSFEPOBMMTJEFT
t"EEJUJPOBMTQBDJOHTIPVMECFDPOTJEFSFEGPSFBTFPG
of the dryer to reduce noise transfer.
installation and servicing.
t"EEJUJPOBMDMFBSBODFTNJHIUCFSFRVJSFEGPSXBMMEPPS
and floor moldings.
For closet installation, with a door, minimum
ventilation openings in the top and bottom of the
door are required. Louvered doors with equivalent
ventilation openings are acceptable.
t$PNQBOJPOBQQMJBODFTQBDJOHTIPVMEBMTPCF
considered.
NOTE
5IFSFTIPVMECFBUMFBTUBMJUUMFTQBDFBSPVOEUIFESZFSPSBOZPUIFSBQQMJBODF
UPFMJNJOBUFUIFUSBOTGFSPG
vibration from one to the other. If there is too much vibration, it could cause them to make noise or touch each
other causing paint damage and making even more noise.
ENGLISH
WWARNING
14
INSTALLATION INSTRUCTIONS
Clearances (cont.)
RECOMMENDED INSTALLATION SPACING FOR CABINET INSTALLATION
tFor cabinet installation with a door, minimum ventilation openings in the top of the cabinet are required.
7"* (17.8 cm)
*Required spacing
7"* (17.8 cm)
**For side or bottom venting,
JODIFTDN
TQBDJOHJTBMMPXFE
5"* 28
1"*
(12.7 cm) (73.4 cm) (2.5 cm)
1"
27 "
(2.54 cm) (68.6 cm)
1"
(2.54 cm)
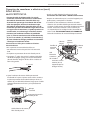
Leveling the dryer
WWARNING
t5PSFEVDFUIFSJTLPGJOKVSZUPQFSTPOTBEIFSFUPBMM
JOEVTUSZSFDPNNFOEFETBGFUZQSPDFEVSFTJODMVEJOH
UIFVTFPGMPOHTMFFWFEHMPWFTBOETBGFUZHMBTTFT
Failure to follow this warning can cause serious injury
or death.
t5IFBQQMJBODFTBSFIFBWZ5XPPSNPSFQFPQMFBSF
SFRVJSFEXIFOJOTUBMMJOHUIFESZFSFailure to follow
this warning can cause serious injury or death.
To ensure that the dryer provides optimal drying
performance, it must be level. To minimize vibration,
noise, and unwanted movement, the floor must be a
perfectly level, solid surface.
NOTE
Adjust the leveling feet only as far as necessary to
level the dryer. Extending the leveling feet more than
necessary can cause the dryer to vibrate.
1PTJUJPOUIFESZFSJOUIFGJOBMMPDBUJPO1MBDFBMFWFM
across the top of the dryer.
Level
Leveling Feet
t"MMGPVSMFWFMJOHGFFUNVTUSFTUTPMJEMZPOUIFGMPPS
Gently push on the top corners of the dryer to make
sure that the dryer does not rock from corner to corner.
If you are installing the dryer on the optional pedestal,
you must use the leveling feet on the pedestal to
level the dryer. The dryer leveling feet should be fully
retracted.
6TFBOBEKVTUBCMFXSFODIUPUVSOUIFMFWFMJOHGFFU
Turn clockwise to raise the dryer or counterclockwise
to lower it. Raise or lower the leveling feet until dryer
is level from side to side and front to back.
.BLFTVSFUIBUBMMMFWFMJOHGFFUBSFJOGJSNDPOUBDUXJUI
the floor.
INSTALLATION INSTRUCTIONS
15
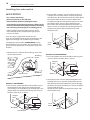
Reversing the door
t5PBWPJEEBNBHFUPUIFESZFSPSUIFEPPSTVQQPSU
UIFEPPSXJUIBTUPPMPSCPYUIBUGJUTVOEFSUIF
EPPSPSIBWFBOBTTJTUBOUTVQQPSUUIFXFJHIUPGUIF
door.
3FNPWFUIFTDSFXTTFDVSJOHUIFIJOHFTUPUIFEPPS
frame. Remove the two plastic cover caps. Reinstall
the hinges and cover caps on the opposite sides from
which they were removed.
t"WPJEESPQQJOHUIFEPPSUPBWPJEEBNBHFUPUIF
EPPSPSUIFGMPPS
)JOHF
assembly
5)&%3:&3%003*47&3:-"3(&"/%)&"7:'BJMVSF
to follow the instructions below can result in damage to
the dryer, property damage or injury to persons.
Cover cap
0QFOUIFEPPSBOESFNPWFUIFUXPQMBTUJDIPMFDBQT
on the catch side by gently prying up with a flat blade
TDSFXESJWFS4BWFUIFTFGPSTUFQ
8JUIUIFIJOHFTBOEDPWFSDBQTJOUIFOFXMPDBUJPOT
remount the inner door frame onto the outer door
GSBNFXJUIUIFTDSFXTSFNPWFEJOTUFQBCPWF
)PMFDBQ
8IJMFTVQQPSUJOHUIFEPPSSFNPWFUIFTDSFXTUXP
from each hinge. Set the door aside face down on a
protected surface to prevent damage to the door or
the work surface.
3FJOTUBMMUIFEPPSXJUIUIFTDSFXTGSPNTUFQ
)JOHFTDSFX
8JUIUIFEPPSPOBQSPUFDUFETVSGBDFSFNPWFUIF
screws on each side of the door and lift off the inner
door frame using a flat blade screwdriver. Remove the
latch hook and blank and move them to the opposite
side.
5FTUUIFTXJOHPGUIFEPPSUPNBLFTVSFUIFIJOHFT
and latch are properly aligned and that the door
closes and latches correctly.
Inner door
frame
Latch hook
Swing Door
ENGLISH
WWARNING
16
INSTALLATION INSTRUCTIONS
Installing the side vent kit
WWARNING
t6TFBIFBWZNFUBMWFOU
t%POPUVTFQMBTUJDPSUIJOGPJMEVDU
t$MFBOPMEEVDUTCFGPSFJOTUBMMJOHUIJTESZFS
t5PSFEVDFUIFSJTLPGJOKVSZUPQFSTPOTBEIFSFUPBMM
JOEVTUSZSFDPNNFOEFETBGFUZQSPDFEVSFTJODMVEJOH
UIFVTFPGMPOHTMFFWFEHMPWFTBOETBGFUZHMBTTFT
t'BJMVSFUPGPMMPXBMMPGUIFTBGFUZXBSOJOHTJOUIJT
manual could result in property damage, injury to
persons, or death.
1SFBTTFNCMFBJODIFTDN
FMCPXUPUIFOFYU
JODIFTDN
EVDUTFDUJPOBOETFDVSFBMMKPJOUT
XJUIEVDUUBQF#FTVSFUIBUUIFNBMFFOEPGUIFFMCPX
faces AWAY from the dryer. Insert the elbow/duct
assembly through the side opening and press it onto
the adapter duct. Secure in place with duct tape.
#FTVSFUIBUUIFNBMFFOEPGUIFEVDUQSPUSVEFT/
JODIFTDN
UPDPOOFDUUIFSFNBJOJOHEVDUXPSL
Attach cover plate to the back of the dryer with
included screw.
Your new dryer is shipped to vent to the rear.
It can also be configured to vent to the bottom or side
SJHIUTJEFWFOUJOHJTOPUBWBJMBCMFPOHBTNPEFMT
An adapter kit, part number &&-#, may be
purchased from your LG retailer. This kit contains the
necessary duct components to change the dryer vent
location.
3FNPWFUIFSFBSFYIBVTUEVDUSFUBJOJOHTDSFX1VMM
out the exhaust duct.
Retaining
Screw
Cover
Plate
Elbow
/”
DN
OPTION 2: BOTTOM VENTING
1SFTTUIFBEBQUFSEVDUPOUPUIFCMPXFSIPVTJOHBOE
secure to the base of the dryer as shown.
Adapter
Duct
Rear
Exhaust Duct
OPTION 1: SIDE VENTING
1SFTTUIFUBCTPOUIFLOPDLPVUBOEDBSFGVMMZSFNPWF
UIFLOPDLPVUGPSUIFEFTJSFEWFOUPQFOJOHSJHIU
TJEFWFOUJOHJTOPUBWBJMBCMFPOHBTNPEFMT
1SFTTUIF
adapter duct onto the blower housing and secure to
the base of the dryer as shown.
#SBDLFU
*OTFSUUIFJODIFDN
FMCPXUISPVHIUIFSFBS
PQFOJOHBOEQSFTTJUPOUPUIFBEBQUFSEVDU#FTVSF
that the male end of the elbow faces down through
the hole in the bottom of the dryer. Secure the elbow
in place with duct tape.
Attach the cover plate to the back of the dryer with
the included screw.
Adapter
Duct
Cover
Plate
#SBDLFU
Elbow
,OPDLPVU
INSTALLATION INSTRUCTIONS
17
Venting the dryer
To reduce the risk of fire, electric shock, or injury to persons when using this appliance, follow basic precautions,
including the following:
t%POPUDSVTIPSDPMMBQTFEVDUXPSL Failure to follow
these instructions can result in fire or death.
t%POPUBMMPXEVDUXPSLUPSFTUPOPSDPOUBDUTIBSQ
PCKFDUT Failure to follow these instructions can result
in fire or death.
t*GDPOOFDUJOHUPFYJTUJOHEVDUXPSLNBLFTVSFJU
JTTVJUBCMFBOEDMFBOCFGPSFJOTUBMMJOHUIFESZFS
Failure to follow these instructions can result in fire or
death.
t7FOUJOHNVTUDPOGPSNUPMPDBMCVJMEJOHDPEFT
Failure to follow these instructions can result in fire or
death.
t(BTESZFST.645FYIBVTUUPUIFPVUEPPST
Failure to follow these instructions can result in fire or
death.
t6TFPOMZJODIDN
SJHJEPSGMFYJCMFNFUBM
EVDUXPSLJOTJEFUIFESZFSDBCJOFUBOEGPSWFOUJOH
outside. Failure to follow these instructions can result
in fire or death.
t5PSFEVDFUIFSJTLPGGJSFDPNCVTUJPOPS
BDDVNVMBUJPOPGDPNCVTUJCMFHBTFT%0/05
FYIBVTUESZFSBJSJOUPBOFODMPTFEBOEVOWFOUJMBUFE
BSFBTVDIBTBOBUUJDXBMMDFJMJOHDSBXMTQBDF
DIJNOFZHBTWFOUPSDPODFBMFETQBDFPGB
CVJMEJOH Failure to follow these instructions can result
in fire or death.
t5PSFEVDFUIFSJTLPGGJSF%0/05FYIBVTUUIFESZFS
XJUIQMBTUJDPSUIJOGPJMEVDUJOH
Failure to follow these instructions can result in fire or
death.
t5IFFYIBVTUEVDUNVTUCFJODIFTDN
JO
EJBNFUFSXJUIOPPCTUSVDUJPOT5IFFYIBVTUEVDU
TIPVMECFLFQUBTTIPSUBTQPTTJCMF.BLFTVSF
UPDMFBOBOZPMEEVDUTCFGPSFJOTUBMMJOHZPVSOFX
dryer. Failure to follow these instructions can result in
fire or death.
t3JHJEPSTFNJSJHJENFUBMEVDUJOHJTSFDPNNFOEFE
GPSVTFCFUXFFOUIFESZFSBOEUIFXBMM*OTQFDJBM
JOTUBMMBUJPOTXIFOJUJTJNQPTTJCMFUPNBLFB
DPOOFDUJPOXJUIUIFBCPWFSFDPNNFOEBUJPOTB
6-MJTUFEGMFYJCMFNFUBMUSBOTJUJPOEVDUNBZCFVTFE
CFUXFFOUIFESZFSBOEXBMMDPOOFDUJPOPOMZ5IF
VTFPGUIJTEVDUJOHXJMMBGGFDUESZJOHUJNF Failure to
follow these instructions can result in fire or death.
t%0/05VTFTIFFUNFUBMTDSFXTPSPUIFSGBTUFOFST
XIJDIFYUFOEJOUPUIFEVDUUIBUDPVMEDBUDIMJOUBOE
SFEVDFUIFFGGJDJFODZPGUIFFYIBVTUTZTUFN4FDVSF
BMMKPJOUTXJUIEVDUUBQF Failure to follow these
instructions can result in fire or death.
t5PNBYJNJ[FPQFSBUJOHSFTVMUTQMFBTFPCTFSWF
UIFEVDUMFOHUIMJNJUBUJPOTOPUFEJOUIFDIBSUOFYU
QBHF Failure to follow these instructions can result in
fire or death.
t%VDUXPSLJTOPUQSPWJEFEXJUIUIFESZFS:PV
TIPVMEPCUBJOUIFOFDFTTBSZEVDUXPSLMPDBMMZ5IF
FOEDBQTIPVMEIBWFIJOHFEEBNQFSTUPQSFWFOU
CBDLESBGUXIFOUIFESZFSJTOPUJOVTFFailure to
follow these instructions can result in fire or death.
t5IFUPUBMMFOHUIPGGMFYJCMFNFUBMEVDUTIBMMOPU
FYDFFEGU N
t*O$BOBEB POMZUIPTFGPJMUZQFGMFYJCMFEVDUT
JGBOZTQFDJGJDBMMZJEFOUJGJFEGPSVTFXJUIUIF
BQQMJBODFCZUIFNBOVGBDUVSFSTIBMMCFVTFEIn the
United States, only those foil-type flexible ducts, if any,
specifically identified for use with the appliance by the
manufacturer and that comply with the Outline for
$MPUIFT%SZFS5SBOTJUJPO%VDU4VCKFDU"TIBMMCF
used.
ENGLISH
WWARNING
18
INSTALLATION INSTRUCTIONS
Venting the dryer (cont.)
Ductwork
8"--$"15:1&
/6.#&30'
¡&-#084
."9*.6.-&/(5)0'
ű*/$)%*".&5&3
3*(*%.&5"-%6$5
Recommended
GUN
GUN
GUN
GUN
GUN
GUN
GUN
GUN
GUN
GUN
w
DN
w
DN
Use only for
short run
installations
/”
DN
NOTE
%FEVDUGUN
GPSFBDIBEEJUJPOBMFMCPX*UJTOPU
SFDPNNFOEFEUPVTFNPSFUIBOGPVS¡FMCPXT
ROUTING AND CONNECTING DUCTWORK
NOTE
Follow the guidelines below to maximize drying
performance and reduce lint buildup and
condensation in the ductwork.
Ductwork and fittings are NOT included and must be
purchased separately.
t6TFJODIDN
EJBNFUFSSJHJEPSTFNJSJHJE
metal ductwork.
t5IFFYIBVTUEVDUSVOTIPVMECFBTTIPSUBTQPTTJCMF
t6TFBTGFXFMCPXKPJOUTBTQPTTJCMF
t5IFNBMFFOEPGFBDITFDUJPOPGFYIBVTUEVDUNVTU
point away from the dryer.
t6TFEVDUUBQFPOBMMEVDUKPJOUT
t*OTVMBUFEVDUXPSLUIBUSVOTUISPVHIVOIFBUFEBSFBT
in order to reduce condensation and lint buildup on
duct surfaces.
t*ODPSSFDUPSJOBEFRVBUFFYIBVTUTZTUFNTBSFOPU
covered by the dryer warranty. Failures or poor
performance caused by such exhaust systems will
not be covered by the dryer warranty.
$033&$57&/5*/(
*/$033&$57&/5*/(
INSTALLATION INSTRUCTIONS
19
Connecting gas dryers
To reduce the risk of fire, electric shock, or injury to persons when using this appliance, follow basic precautions,
including the following:
t(BTTVQQMZSFRVJSFNFOUT
"TTIJQQFEGSPNUIFGBDUPSZUIJTESZFSJT
DPOGJHVSFEGPSVTFXJUIOBUVSBMHBT*UDBOCF
DPOWFSUFEGPSVTFXJUI-1-JRVFGJFE1SPQBOF
HBT
(BTQSFTTVSFNVTUOPUFYDFFEJODIFTPGXBUFS
DPMVNO
t"RVBMJGJFETFSWJDFPSHBTDPNQBOZUFDIOJDJBONVTU
DPOOFDUUIFESZFSUPUIFHBTTFSWJDF
Failure to follow this warning can result in fire,
explosion, or death.
t*TPMBUFUIFESZFSGSPNUIFHBTTVQQMZTZTUFNCZ
DMPTJOHJUTJOEJWJEVBMNBOVBMTIVUPGGWBMWFEVSJOH
BOZQSFTTVSFUFTUJOHPGUIFHBTTVQQMZ Failure to do
so can result in fire, explosion, or death.
t4VQQMZMJOFSFRVJSFNFOUT
:PVSMBVOESZSPPNNVTUIBWFBSJHJEHBT
TVQQMZMJOFUPZPVSESZFS*OUIF6OJUFE4UBUFT
BOJOEJWJEVBMNBOVBMTIVUPGGWBMWF.645CF
JOTUBMMFEXJUIJOBUMFBTUGUN
PGUIFESZFS
JOBDDPSEBODFXJUIUIF/BUJPOBM'VFM(BT$PEF
"/4*;PS$BOBEJBOHBTJOTUBMMBUJPODPEF$4"
#"1cľJODI/15QJQFQMVHNVTUCFJOTUBMMFE
Failure to do so can result in fire, explosion, or death.
t*GVTJOHBSJHJEQJQFUIFSJHJEQJQFTIPVMECF
JODI*14*GBDDFQUBCMFVOEFSMPDBMDPEFTBOE
PSEJOBODFTBOEXIFOBDDFQUBCMFUPZPVSHBT
TVQQMJFS3cľJODIBQQSPWFEUVCJOHNBZCFVTFE
XIFSFMFOHUITBSFMFTTUIBOGUN
-BSHFS
UVCJOHTIPVMECFVTFEGPSMFOHUITJOFYDFTTPGGU
N
Failure to do so can result in fire, explosion, or
death.
t$POOFDUUIFESZFSUPUIFUZQFPGHBTTIPXOPO
UIFOBNFQMBUFFailure to do so can result in fire,
explosion, or death.
t5PQSFWFOUDPOUBNJOBUJPOPGUIFHBTWBMWF
QVSHFUIFHBTTVQQMZPGBJSBOETFEJNFOUCFGPSF
DPOOFDUJOHUIFHBTTVQQMZUPUIFESZFS#FGPSF
UJHIUFOJOHUIFDPOOFDUJPOCFUXFFOUIFHBTTVQQMZ
BOEUIFESZFSQVSHFSFNBJOJOHBJSVOUJMUIFPEPS
PGHBTJTEFUFDUFE Failure to do so can result in fire,
explosion, or death.
t%0/05VTFBOPQFOGMBNFUPJOTQFDUGPSHBTMFBLT
6TFBOPODPSSPTJWFMFBLEFUFDUJPOGMVJE Failure to
do so can result in fire, explosion, or death.
t6TFPOMZBOFX"("PS$4"DFSUJGJFEHBTTVQQMZ
MJOFXJUIGMFYJCMFTUBJOMFTTTUFFMDPOOFDUPST Failure
to do so can result in fire, explosion, or death.
t4FDVSFMZUJHIUFOBMMHBTDPOOFDUJPOT Failure to do
so can result in fire, explosion, or death.
t%0/05BUUFNQUBOZEJTBTTFNCMZPGUIFESZFS
BOZEJTBTTFNCMZSFRVJSFTUIFBUUFOUJPOBOEUPPMT
PGBOBVUIPSJ[FEBOERVBMJGJFETFSWJDFQFSTPOPS
DPNQBOZ Failure to follow this warning can result in
fire, explosion, or death.
t6TFBQJQFKPJOUDPNQPVOEUIBUJTJOTPMVCMFJO
-JRVFGJFE1FUSPMFVN-1
HBTPOBMMQJQFUISFBET
Failure to do so can result in fire, explosion, or death.
Electrical requirements for gas models only
WWARNING
To reduce the risk of fire, electric shock, or injury to persons when using this appliance, follow basic precautions,
including the following:
t5IJTESZFSNVTUCFQMVHHFEJOUPB)[7"$
t%POPUVOEFSBOZDJSDVNTUBODFTDVUPSSFNPWFUIF
HSPVOEFEPVUMFUQSPUFDUFECZBBNQFSFGVTF
UIJSEHSPVOE
QSPOHGSPNUIFQPXFSDPSEFailure
PSDJSDVJUCSFBLFS Failure to follow this warning can
to follow this warning can result in fire, explosion, or
result in fire, explosion, or death.
death.
t'PSQFSTPOBMTBGFUZUIJTESZFSNVTUCFQSPQFSMZ
HSPVOEFE Failure to follow this warning can result in
fire, explosion, or death.
t5IFQPXFSDPSEPGUIJTESZFSJTFRVJQQFEXJUI
BQSPOHHSPVOEJOH
QMVHXIJDINBUFTXJUI
BTUBOEBSEQSPOHHSPVOEJOH
XBMMPVUMFUUP
NJOJNJ[FUIFQPTTJCJMJUZPGFMFDUSJDTIPDLIB[BSE
GSPNUIJTBQQMJBODFFailure to follow this warning
can result in fire, explosion, or death.
t8IFSFBTUBOEBSEQSPOHXBMMPVUMFUJT
FODPVOUFSFEJUJTZPVSQFSTPOBMSFTQPOTJCJMJUZ
BOEPCMJHBUJPOUPIBWFJUSFQMBDFEXJUIBQSPQFSMZ
HSPVOEFEQSPOHXBMMPVUMFU Failure to follow this
warning can result in fire, explosion, or death.
ENGLISH
WWARNING
20
INSTALLATION INSTRUCTIONS
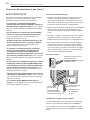
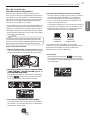
Connecting gas dryers (cont.)
WWARNING
Connecting the gas supply
To reduce the risk of fire, electric shock, or injury
to persons when using this appliance, follow basic
precautions, including the following:
.BLFTVSFUIBUUIFHBTTVQQMZUPUIFMBVOESZSPPNJT
turned OFF. Confirm that the type of gas available in
your laundry room is appropriate for the dryer. The
dryer is prepared for Natural Gas with a ⁄8 - inch NPT
gas connection.
t*OTUBMMBUJPOBOETFSWJDFNVTUCFQFSGPSNFECZ
BRVBMJGJFEJOTUBMMFSTFSWJDFBHFODZPSUIFHBT
TVQQMJFS Failure to do so can result in fire, explosion,
or death.
t6TFPOMZBOFXTUBJOMFTTTUFFMGMFYJCMFDPOOFDUPS
BOEBOFX"("DFSUJGJFEDPOOFDUPS Failure to do so
can result in fire, explosion, or death.
t"HBTTIVUPGGWBMWFNVTUCFJOTUBMMFEXJUIJOGU
N
PGUIFESZFSFailure to do so can result in fire,
explosion, or death.
t5IFESZFSJTDPOGJHVSFEGPS/BUVSBM(BTXIFO
TIJQQFEGSPNUIFGBDUPSZ.BLFTVSFUIBUUIFESZFS
JTFRVJQQFEXJUIUIFDPSSFDUCVSOFSPSJGJDFGPSUIF
UZQFPGHBTCFJOHVTFE/BUVSBM(BTPS-JRVFGJFE
1FUSPMFVN
Failure to do so can result in fire,
explosion, or death.
3FNPWFUIFTIJQQJOHDBQGSPNUIFHBTDPOOFDUJPO
BUUIFCBDLPGUIFESZFS#FDBSFGVMOPUUPEBNBHF
the threads of the gas connector when removing the
shipping cap.
$POOFDUUIFESZFSUPZPVSMBVOESZSPPNTHBTTVQQMZ
using a new flexible stainless steel connector with a ⁄8
- inch NPT fitting.
4FDVSFMZUJHIUFOBMMDPOOFDUJPOTCFUXFFOUIF
dryer and your laundry room’s gas supply. Turn on
your laundry room’s gas supply and check all pipe
DPOOFDUJPOTCPUIJOUFSOBMBOEFYUFSOBM
GPSHBTMFBLT
with a noncorrosive leak-detection fluid.
Electrical connection
t*GOFDFTTBSZUIFDPSSFDUPSJGJDFGPS-1PSJGJDF
LJUPSEFSQBSUOVNCFS&&-%
TIPVMECF
JOTUBMMFECZBRVBMJGJFEUFDIOJDJBOBOEUIFDIBOHF
TIPVMECFOPUFEPOUIFESZFS Failure to do so can
result in fire, explosion, or death.
Plug dryer into a 7"$
)[HSPVOEFEQSPOH
outlet.
t"MMDPOOFDUJPOTNVTUCFJOBDDPSEBODFXJUIMPDBM
DPEFTBOESFHVMBUJPOT. Failure to follow this warning
can result in fire, explosion, or death.
t(BTESZFST.645FYIBVTUUPUIFPVUEPPST Failure to
do so can result in fire, explosion, or death.
w/15(BT
Connection
AGA/CSA-Certified
Stainless Steel Flexible
Connector
w/151JQF
Plug
Gas Supply
4IVUPGG7BMWF
High-altitude installations
5IF#56SBUJOHPGUIJTESZFSJT"("DFSUJGJFEGPS
FMFWBUJPOTCFMPXGFFU
If your gas dryer is being installed at an elevation above
GFFUJUNVTUCFEFSBUFECZBRVBMJGJFEUFDIOJDJBO
or gas supplier.
INSTALLATION INSTRUCTIONS
21
Connecting electric dryers
WWARNING
To help prevent fire, electric shock, serious injury,
or death, the wiring and grounding must conform
to the latest edition of the National Electrical Code,
"/4*/'1"BOEBMMBQQMJDBCMFMPDBMSFHVMBUJPOT
Please contact a qualified electrician to check your
home’s wiring and fuses to ensure that your home has
adequate electrical power to operate the dryer.
To reduce the risk of fire, electric shock, or injury
to persons when using this appliance, follow basic
precautions, including the following:
Electrical requirements for electric models only
t*GJUEPFTOPUGJUUIFPVUMFUBQSPQFSPVUMFUXJMM
OFFEUPCFJOTUBMMFECZBRVBMJGJFEFMFDUSJDJBO
WWARNING
To reduce the risk of fire, electric shock, or injury
to persons when using this appliance, follow basic
precautions, including the following:
t5IJTESZFSNVTUCFDPOOFDUFEUPBHSPVOEFE
NFUBMQFSNBOFOUXJSJOHTZTUFNPSBOFRVJQNFOU
HSPVOEJOHDPOEVDUPSNVTUCFSVOXJUIUIFDJSDVJU
DPOEVDUPSTBOEDPOOFDUFEUPUIFFRVJQNFOU
HSPVOEJOHUFSNJOBMPSMFBEPOUIFESZFSFailure to
do so can result in fire, explosion, or death.
t5IFESZFSIBTJUTPXOUFSNJOBMCMPDLUIBUNVTU
CFDPOOFDUFEUPBTFQBSBUF7"$)FSU[
TJOHMFQIBTFDJSDVJUGVTFEBUBNQFSFTUIF
DJSDVJUNVTUCFGVTFEPOCPUITJEFTPGUIFMJOF
&-&$53*$"-4&37*$&'035)&%3:&34)06-%#&
0'5)&."9*.6.3"5&70-5"(&-*45&%0/5)&
/".&1-"5&%0/05$0//&$5%3:&350
0370-5$*3$6*5 Failure to follow these
instructions can result in fire, explosion, or death.
t*GCSBODIDJSDVJUUPESZFSJTGUN
PSMFTTJO
MFOHUIVTF6-6OEFSXSJUFST-BCPSBUPSJFT
MJTUFE
/P"8(XJSFDPQQFSXJSFPOMZ
PSBTSFRVJSFE
CZMPDBMDPEFT*GPWFSGUN
VTF6-MJTUFE
/P"8(XJSFDPQQFSXJSFPOMZ
PSBTSFRVJSFE
CZMPDBMDPEFT"MMPXTVGGJDJFOUTMBDLJOXJSJOH
TPESZFSDBOCFNPWFEGSPNJUTOPSNBMMPDBUJPO
XIFOOFDFTTBSZ Failure to do so can result in fire,
explosion, or death.
t5IFQPXFSDPSEQJHUBJM
DPOOFDUJPOCFUXFFO
XBMMSFDFQUBDMFBOEESZFSUFSNJOBMCMPDL*4/05
TVQQMJFEXJUIESZFS5ZQFPGQJHUBJMBOEHBVHF
PGXJSFNVTUDPOGPSNUPMPDBMDPEFTBOEXJUI
JOTUSVDUJPOTPOUIFGPMMPXJOHQBHFTFailure to
follow these instructions can result in fire, explosion,
or death.
t"XJSFDPOOFDUJPOJTSFRVJSFEGPSBMMNPCJMFBOE
NBOVGBDUVSFEIPNFJOTUBMMBUJPOTBTXFMMBTBMM
OFXDPOTUSVDUJPOBGUFS+BOVBSZ"XJSF
DPOOFDUJPONVTUCFVTFEXIFSFMPDBMDPEFTEPOPU
QFSNJUHSPVOEJOHUISPVHIUIFOFVUSBMXJSF Failure
to do so can result in fire, explosion, or death.
t%POPUNPEJGZUIFQMVHBOEJOUFSOBMXJSFQSPWJEFE
XJUIUIFESZFS
t5IFESZFSTIPVMECFDPOOFDUFEUPBIPMFPVUMFU
WWARNING
To reduce the risk of fire, electric shock, or injury
to persons when using this appliance, follow basic
precautions, including the following:
t"OZJOTUBMMBUJPOJOBNBOVGBDUVSFEPSNPCJMF
IPNFNVTUDPNQMZXJUIUIF.BOVGBDUVSFE)PNF
$POTUSVDUJPOBOE4BGFUZ4UBOEBSET5JUMF$'3
1BSUPS4UBOEBSE$"/$4";.)BOE
MPDBMDPEFTBOEPSEJOBODFT
t"XJSFDPOOFDUJPOJTSFRVJSFEGPSBMMNPCJMFBOE
NBOVGBDUVSFEIPNFJOTUBMMBUJPOTBTXFMMBTBMM
OFXDPOTUSVDUJPOBGUFS+BOVBSZ Failure to
follow these requirements can result in fire, explosion,
or death.
ENGLISH
WWARNING
22
INSTALLATION INSTRUCTIONS
Connecting electric dryers (cont.)
USA only
WWARNING
t$POOFDUUIFQPXFSDPSEUPUIFUFSNJOBMCMPDL
$POOFDUFBDIQPXFSDPSEXJSFUPUIFUFSNJOBMCMPDL
TDSFXUIBUIBTUIFTBNFDPMPSFEXJSF'PSFYBNQMF
DPOOFDUUIFCMBDLQPXFSDPSEXJSFUPUIFUFSNJOBM
CMPDLTDSFXXJUIUIFCMBDLXJSF'BJMVSFUPGPMMPX
UIFTFJOTUSVDUJPOTNBZSFTVMUJOBTIPSUPWFSMPBE
fire or death.
t(SPVOEJOHUISPVHIUIFOFVUSBMDPOEVDUPSJT
QSPIJCJUFEGPS
OFXCSBODIDJSDVJUJOTUBMMBUJPOT
NPCJMFIPNFT
SFDSFBUJPOBMWFIJDMFTBOE
BSFBTXIFSFMPDBMDPEFTQSPIJCJUHSPVOEJOH
UISPVHIUIFOFVUSBMDPOEVDUPS
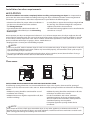
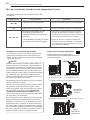
Four-wire connection for electric dryers:
Power cord
t"XJSFDPOOFDUJPOJTSFRVJSFEGPSBMMNPCJMFBOE
manufactured home installations, as well as all new
DPOTUSVDUJPOBGUFS+BOVBSZ
t"6-MJTUFETUSBJOSFMJFGJTSFRVJSFE
3FNPWFUIFUFSNJOBMCMPDLBDDFTTDPWFSPOUIFVQQFS
back of the dryer. Install a UL-listed strain relief into
the power cord through-hole; then thread a UL-listed,
"7XJSF"8(NJOJNVNDPQQFS
conductor power cord through the strain relief.
Terminal
#MPDL
UL-Listed
Strain Relief
UL-Listed
8JSF1PXFS
Cord
t6TFB"76-MJTUFEQPXFSDPSEXJUI
"8(NJOJNVNDPQQFS conductor and closed loop or
forked terminals with upturned ends.
5SBOTGFSUIFESZFSTHSPVOEXJSFGSPNCFIJOEUIF
green ground screw to the center screw of the
terminal block. Attach the two hot leads of the power
cord to the outer terminal block screws. Attach the
white neutral wire to the center terminal block screw.
Attach the power cord ground wire to the green
ground screw. 5*()5&/"--4$3&844&$63&-:.
Reinstall the terminal block access cover.
)PU
#MBDL
Ground
Screw
Power Cord
Ground Wire
Neutral
8IJUF
)PU
3FE
White Wire
moved from
Ground Screw
INSTALLATION INSTRUCTIONS
23
WWARNING
t$POOFDUUIFQPXFSDPSEUPUIFUFSNJOBMCMPDL
$POOFDUFBDIQPXFSDPSEXJSFUPUIFUFSNJOBMCMPDL
TDSFXUIBUIBTUIFTBNFDPMPSFEXJSF'PSFYBNQMF
DPOOFDUUIFCMBDLQPXFSDPSEXJSFUPUIFUFSNJOBM
CMPDLTDSFXXJUIUIFCMBDLXJSF
'BJMVSFUPGPMMPXUIFTFJOTUSVDUJPOTNBZSFTVMUJOB
TIPSUPWFSMPBEGJSFPSEFBUI
t(SPVOEJOHUISPVHIUIFOFVUSBMDPOEVDUPSJT
QSPIJCJUFEGPS
OFXCSBODIDJSDVJUJOTUBMMBUJPOT
NPCJMFIPNFT
SFDSFBUJPOBMWFIJDMFTBOE
BSFBTXIFSFMPDBMDPEFTQSPIJCJUHSPVOEJOH
UISPVHIUIFOFVUSBMDPOEVDUPS
t6TF6-MJTUFEXJSF"8(NJOJNVNDPQQFS
conductor cable.
t"MMPXBUMFBTUGUN
MFOHUIUPBMMPXGPSSFNPWBM
and reinstallation of the dryer.
5SBOTGFSUIFESZFSTHSPVOEXJSFGSPNCFIJOEUIF
green ground screw to the center screw of the
terminal block. Attach the two hot leads of the power
cable to the outer terminal block screws. Attach the
white neutral wire to the center terminal block screw.
Attach the power cable ground wire to the green
ground screw. 5*()5&/"--4$3&844&$63&-:.
Reinstall the terminal block access cover.
Four-wire connection for electric dryers: Direct wire
t"XJSFDPOOFDUJPOJTSFRVJSFEGPSBMMNPCJMFBOE
manufactured home installations, as well as all new
DPOTUSVDUJPOBGUFS+BOVBSZ
)PU
#MBDL
Ground
Screw
Neutral
8IJUF
)PU
3FE
t"6-MJTUFETUSBJOSFMJFGJTSFRVJSFE
3FNPWFJODIFTDN
PGUIFPVUFSDPWFSJOHGSPN
UIFXJSF3FNPWFJODIFTPGJOTVMBUJPOGSPNUIF
HSPVOEXJSF$VUPGGBQQSPYJNBUFMZcĸJODIFTDN
GSPNUIFPUIFSUISFFXJSFTBOETUSJQJODIDN
JOTVMBUJPOGSPNFBDIXJSF#FOEUIFFOETPGUIFUISFF
shorter wires into a hook shape.
DN
Ground Wire
DN
3FNPWFUIFUFSNJOBMCMPDLBDDFTTDPWFSPOUIFVQQFS
back of the dryer. Install a UL-listed strain relief into
the power cord through-hole; then thread the power
DBCMFQSFQBSFEJO4UFQUISPVHIUIFTUSBJOSFMJFG
Terminal
#MPDL
UL-Listed
Strain Relief
6--JTUFE8JSF
Power Cord
Power Cord
Ground Wire
White Wire
moved from
Ground Screw
ENGLISH
Connecting electric dryers (cont.)
USA only
24
INSTALLATION INSTRUCTIONS
Connecting electric dryers (cont.)
USA only
WWARNING
t$POOFDUUIFQPXFSDPSEUPUIFUFSNJOBMCMPDL
$POOFDUFBDIQPXFSDPSEXJSFUPUIFUFSNJOBM
CMPDLTDSFXUIBUIBTUIFTBNFDPMPSFEXJSF'PS
FYBNQMFDPOOFDUUIFCMBDLQPXFSDPSEXJSFUPUIF
UFSNJOBMCMPDLTDSFXXJUIUIFCMBDLXJSF'BJMVSF
UPGPMMPXUIFTFJOTUSVDUJPOTNBZSFTVMUJOBTIPSU
PWFSMPBEGJSFPSEFBUI
t(SPVOEJOHUISPVHIUIFOFVUSBMDPOEVDUPSJT
QSPIJCJUFEGPS
OFXCSBODIDJSDVJUJOTUBMMBUJPOT
NPCJMFIPNFT
SFDSFBUJPOBMWFIJDMFTBOE
BSFBTXIFSFMPDBMDPEFTQSPIJCJUHSPVOEJOH
UISPVHIUIFOFVUSBMDPOEVDUPS
t6TFB"76-MJTUFEQPXFSDPSEXJUI
"8(NJOJNVNDPQQFS conductor and closed loop or
forked terminals with upturned ends.
"UUBDIUIFUXPIPUMFBETPGUIFQPXFSDPSEUPUIF
outer terminal block screws. Attach the neutral wire to
the center terminal block screw. Connect the external
HSPVOEJGSFRVJSFECZMPDBMDPEFT
UPUIFHSFFO
ground screw. 5*()5&/"--4$3&844&$63&-:.
Reinstall the terminal block access cover.
)PU
#MBDL
Ground
Screw
Three-wire connection for electric dryers:
Power cord
t"XJSFDPOOFDUJPOJT/05QFSNJUUFEPOOFX
DPOTUSVDUJPOBGUFS+BOVBSZ
t"6-MJTUFETUSBJOSFMJFGJTSFRVJSFE
3FNPWFUIFUFSNJOBMCMPDLBDDFTTDPWFSPOUIF
upper back of the dryer. Install a UL-listed strain relief
into the power cord through-hole; then thread a ULlisted, "7XJSF"8(NJOJNVN
DPQQFS conductor power cord through the strain
relief.
Terminal
#MPDL
UL-Listed
Strain Relief
UL-Listed
8JSF1PXFS
Cord
White Wire
from Dryer
harness
External Ground
8JSF*GSFRVJSFE
CZMPDBMDPEFT
Neutral
8IJUF
)PU
3FE
INSTALLATION INSTRUCTIONS
25
WWARNING
t$POOFDUUIFQPXFSDPSEUPUIFUFSNJOBMCMPDL
$POOFDUFBDIQPXFSDPSEXJSFUPUIFUFSNJOBMCMPDL
TDSFXUIBUIBTUIFTBNFDPMPSFEXJSF'PSFYBNQMF
DPOOFDUUIFCMBDLQPXFSDPSEXJSFUPUIFUFSNJOBM
CMPDLTDSFXXJUIUIFCMBDLXJSF'BJMVSFUPGPMMPX
UIFTFJOTUSVDUJPOTNBZSFTVMUJOBTIPSUPWFSMPBE
fire or death.
t(SPVOEJOHUISPVHIUIFOFVUSBMDPOEVDUPSJT
QSPIJCJUFEGPS
OFXCSBODIDJSDVJUJOTUBMMBUJPOT
NPCJMFIPNFT
SFDSFBUJPOBMWFIJDMFTBOE
BSFBTXIFSFMPDBMDPEFTQSPIJCJUHSPVOEJOH
UISPVHIUIFOFVUSBMDPOEVDUPS
Three-wire connection for electric dryers: Direct wire
t6TF6-MJTUFEXJSF"8(NJOJNVNDPQQFS
conductor cable.
t"MMPXBUMFBTUGUN
MFOHUIUPBMMPXGPSSFNPWBM
and reinstallation of the dryer.
"UUBDIUIFUXPIPUMFBETPGUIFQPXFSDPSEUPUIF
outer terminal block screws. Attach the neutral wire to
the center terminal block screw. Connect the external
HSPVOEJGSFRVJSFECZMPDBMDPEFT
UPUIFHSFFO
ground screw. 5*()5&/"--4$3&844&$63&-:.
Reinstall the terminal block access cover.
)PU
#MBDL
Ground
Screw
t"XJSFDPOOFDUJPOJT/05QFSNJUUFEPOOFX
DPOTUSVDUJPOBGUFS+BOVBSZ
t"6-MJTUFETUSBJOSFMJFGJTSFRVJSFE
3FNPWFcĸJODIFTDN
PGUIFPVUFSDPWFSJOHGSPN
UIFXJSF4USJQJODIDN
JOTVMBUJPOGSPNFBDI
XJSF#FOEUIFFOETPGUIFUISFFXJSFTJOUPBIPPL
shape.
DN
3FNPWFUIFUFSNJOBMCMPDLBDDFTTDPWFSPOUIFVQQFS
back of the dryer. Install a UL-listed strain relief into
the power cord through-hole; then thread the power
DBCMFQSFQBSFEJO4UFQUISPVHIUIFTUSBJOSFMJFG
Terminal
#MPDL
UL-Listed
Strain Relief
6--JTUFE8JSF
Power Cord
White Wire
from Dryer
harness
External Ground
8JSF*GSFRVJSFE
CZMPDBMDPEFT
Neutral
8IJUF
)PU
3FE
ENGLISH
Connecting electric dryers (cont.)
USA only
26
INSTALLATION INSTRUCTIONS
Special requirements for
manufactured or mobile homes
Any installation in a manufactured or mobile home must
DPNQMZXJUIUIF.BOVGBDUVSFE)PNF$POTUSVDUJPOBOE
4BGFUZ4UBOEBSET5JUMF$'31BSUPS4UBOEBSE
$"/$4";.)BOEMPDBMDPEFTBOEPSEJOBODFT*G
you are uncertain whether your proposed installation
will comply with these standards, please contact a
service and installation professional for assistance.
t"HBTESZFSNVTUCFQFSNBOFOUMZBUUBDIFEUPUIFGMPPS
t5IFFMFDUSJDBMDPOOFDUJPOGPSBOFMFDUSJDESZFSNVTU
CFBXJSFDPOOFDUJPO.PSFEFUBJMFEJOGPSNBUJPO
concerning the electrical connection is provided in the
section Connecting Electric Dryers.
t5PSFEVDFUIFSJTLPGDPNCVTUJPOBOEGJSFUIFESZFS
must be vented to the outside.
t%0/05WFOUUIFESZFSVOEFSBNBOVGBDUVSFEIPNFPS
mobile home.
t&MFDUSJDESZFSTNBZCFWFOUFEUPUIFPVUTJEFVTJOHUIF
back, left, right, or bottom panel.
t(BTESZFSTNBZCFWFOUFEUPUIFPVUTJEFVTJOHUIF
back, left, or bottom panel. Gas dryers may not be
vented to the outside using the right side panel
because of the burner housing.
t5IFESZFSFYIBVTUEVDUNVTUCFBGGJYFETFDVSFMZUP
the manufactured or mobile home structure, and the
exhaust duct must be made of a material that will resist
fire and combustion.
It is recommended that you use a rigid or flexible metal
duct.
t%0/05DPOOFDUUIFESZFSFYIBVTUEVDUUPBOZPUIFS
duct, vent, chimney, or other exhaust duct.
t.BLFTVSFUIFESZFSIBTBEFRVBUFBDDFTTUPPVUTJEF
fresh air to ensure proper operation. The opening for
PVUTJEFGSFTIBJSNVTUCFBUMFBTUJODN
t*UJTJNQPSUBOUUIBUUIFDMFBSBODFPGUIFEVDUGSPNBOZ
DPNCVTUJCMFDPOTUSVDUJPOCFBUMFBTUJODIFTDN
and when venting the dryer to the outdoors, the dryer
DBOCFJOTUBMMFEXJUIBDMFBSBODFPGJODIDN
BU
the sides and back of the dryer.
t1MFBTFCFBXBSFUIBUWFOUJOHNBUFSJBMTBSFOPUTVQQMJFE
with the dryer. You should obtain the venting materials
necessary for proper installation.
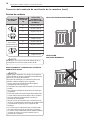
Final installation check
Once you have completed the installation of the dryer
and it is in its final location, confirm proper operation
XJUIUIFGPMMPXJOHUFTUTBOE*OTUBMMBUJPO5FTU%VDU
$IFDL
POUIFGPMMPXJOHQBHF
Testing dryer heating
("4.0%&-4
Close the dryer door, press the ON/OFF button to turn
the dryer on, and start the dryer on a heat setting.
When the dryer starts, the igniter should ignite the main
burner.
NOTE
If all air is not purged from the gas line, the gas igniter
may turn off before the main burner ignites. If this
happens, the igniter will reattempt gas ignition after
approximately two minutes.
&-&$53*$.0%&-4
Close the dryer door, press the ON/OFF button to turn
the dryer on, and start the dryer on a heat setting. The
exhaust air should be warm after the dryer has been
PQFSBUJOHGPSNJOVUFT
Checking airflow
Effective dryer operation requires proper airflow.
The adequacy of the airflow can be measured by
evaluating the static pressure. Static pressure in the
exhaust duct can be measured with a manometer,
QMBDFEPOUIFFYIBVTUEVDUBQQSPYJNBUFMZGUDN
from the dryer.
4UBUJDQSFTTVSFJOUIFFYIBVTUEVDUTIPVMEOPUFYDFFE
JODIFTDN
5IFESZFSTIPVMECFDIFDLFEXIJMFUIF
dryer is running with no load.
Checking levelness
Once the dryer is in its final location, recheck the dryer
UPCFTVSFJUJTMFWFM.BLFTVSFJUJTMFWFMGSPOUUPCBDL
BOETJEFUPTJEFBOEUIBUBMMMFWFMJOHGFFUBSFGJSNMZPO
the floor.
INSTALLATION INSTRUCTIONS
27
Installation test (Duct check)
t:PVSESZFSGFBUVSFTFLOW SENSE5., an innovative
sensing system that automatically detects blockages
BOESFTUSJDUJPOTJOESZFSEVDUXPSL,FFQJOHEVDUXPSL
clean of lint buildup and free of restrictions allows
clothes to dry faster and reduces energy use.
$IFDLUIFEJTQMBZGPSSFTVMUT
During the three minute test cycle, monitor the
FLOW SENSE5. display on the control panel. If no
bars are displayed, when the cycle ends, the exhaust
system is adequate. If the exhaust system is severely
restricted, the display will show four bars. Other
problems may also be shown with error codes. Refer
to the next page for error code details and solutions.
NOTE
The dryer should be cool before starting this test. If
the dryer was warmed up during installation, run the
AIR DRY cycle for a few minutes to reduce the interior
temperature.
5PBDUJWBUFUIFJOTUBMMBUJPOUFTU
3FNPWFUIFMJUFSBUVSFBOEUIFODMPTFUIFEPPS
Do not load anything in the drum for this test, as it
may affect the accuracy of the results.
1SFTTBOEIPMEUIF5&.1$0/530-BOE015*0/
CVUUPOTBOEUIFOQSFTTUIF108&3CVUUPO
This button sequence activates the installation test.
The code
will display if the activation is
successful.
1SFTT45"351"64&CVUUPO
The dryer will start the test, which will last about
two minutes. The heat will be turned on and the
temperatures in the drum will be measured.
/0#"34
0,
'063#"34
RESTRICTED
Four bars indicates that the exhaust system is severely
SFTUSJDUFE)BWFUIFTZTUFNDIFDLFEJNNFEJBUFMZBT
performance will be poor.
&OEPGDZDMF
At the end of the test cycle,
will display.
The test cycle will end and the dryer will shut off
automatically after a short delay.
ENGLISH
Once you have completed the installation of the dryer,
use this test to make sure the condition of the exhaust
system is adequate for proper operation of the dryer.
This test should be performed to alert you to any serious
problems in the exhaust system of your home.
28
INSTALLATION INSTRUCTIONS
Installation test (Duct check) (cont.)
t$IFDLUIFFSSPSDPEFCFGPSFZPVDBMMGPSTFSWJDF
Error Code
U& or U&
)4
Possible Causes
Solutions
t5FNQFSBUVSFTFOTPSGBJMVSF
tTurn off the dryer and call for
service.
t)VNJEJUZTFOTPSGBJMVSF
tTurn off the dryer and call for
service.
tCheck the power supply or the
connection of power cord to the
terminal block. Refer to the
$POOFDUJOHFMFDUSJDESZFST section of this manual
t)PVTFGVTFJTCMPXODJSDVJUCSFBLFSIBT for complete instructions.
tripped, or power outage has occurred. t3FTFUDJSDVJUCSFBLFSPSSFQMBDFGVTF%POPUJODSFBTF
the fuse capacity.
If the problem is a circuit overload, have it corrected
by a qualified electrician.
t&MFDUSJDESZFSQPXFSDPSEJTOPU
connected correctly, or house power
supply is incorrect.
14 or 1' or O1
3FTUSJDUFEPSCMPDLFEBJSGMPX
t$IFDLUIFEVDUDPOEJUJPO
If the test displays four bars, check the exhaust system
for restrictions and damage. Repair or replace the
exhaust system as needed.
Avoid long runs or runs with multiple elbows or
bends.
NOTE
When the dryer is first installed, this test should be
performed to alert you to any existing problems with
UIFFYIBVTUEVDUJOZPVSIPNF)PXFWFSTJODFUIF
test performed during normal operation provides
more accurate information on the condition of the
exhaust duct than does the installation test, the
number of bars displayed during the two tests may
not be the same.
Excess or crushed
transition duct
Too many elbows or
exhaust too long
Check for blockages and lint buildup.
Do not interrupt the test cycle, as this could result in
inaccurate results.
Even if no bars are displayed during the test cycle,
some restrictions may still be present in the exhaust
system. Refer to the 7FOUJOHUIF%SZFS section of
this manual for complete exhaust system and venting
requirements.
Your dryer features Flow Sense™, an innovative
sensing system that automatically detects and alerts
you to blockages and restrictions in installed household ductwork. If you see the alert, clean or repair the
EVDUTUPSFNPWFUIFSFTUSJDUJPOT,FFQJOHEVDUXPSL
clean of lint buildup and free of restrictions allows
clothes to dry faster and reduces energy use.
Lint buildup
or blockage
.BLFTVSFUIFEVDUXPSLJTOPUDSVTIFEPSSFTUSJDUFE
Crushed or
damaged
exhaust
HOW TO USE
29
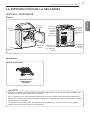
HOW TO USE
ENGLISH
Operating the dryer
1
$-&"/5)&-*/5'*-5&3
If the lint filter has not already been cleaned, lift out the filter and remove the
lint from the last load. This will help ensure the fastest and most efficient drying
performance.
Lint
Filter
2
-0"%5)&%3:&3
Load the dryer with the wet laundry from the washer. If the load is extra large,
you may need to divide it into smaller loads for proper performance and fabric
care.
3
563/0/5)&%3:&3
Press the POWER button to turn on the dryer. The cycle LEDs will illuminate
BOEBTJHOBMXJMMTPVOEJGUVSOFEPO3FGFSUPQBHF
4
4&-&$5"$:$-&
Press the CYCLES button until the indicator for the desired cycle is lit.
The preset temperature, dry level, and option settings for that cycle will be
shown. Default settings for the selected cycle can now be changed if desired.
Refer to the Cycle settings and options page for details.
NOTE
Not all options or modifiers are available on all cycles. Refer to the Cycle
guide page for default settings and allowable options. A different chime will
sound and the LED will not come on if the selection is not allowed.
5
#&(*/$:$-&
Press the START/PAUSE button to begin the cycle. The cycle can be paused at
any time either by opening the door or by pressing the START/PAUSE button. If
UIFDZDMFJTOPUSFTUBSUFEXJUIJONJOVUFTUIFESZFSXJMMTIVUPGGBOEUIFDZDMF
settings will be lost.
6
&/%0'$:$-&
When the cycle is finished, the chime will sound if it is set. Remove your
DMPUIJOHGSPNUIFESZFSJNNFEJBUFMZUPSFEVDFXSJOLMJOH*G83*/,-&$"3&
is selected, the dryer will tumble briefly every few minutes to help prevent
wrinkles from setting in the clothes.
30
HOW TO USE
= default setting
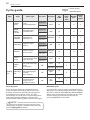
Cycle guide
5ZQF
$ZDMF
'BCSJD5ZQF
)&"7:
DUTY
Jeans,
heavyweight items
1&3.
PRESS
CASUAL
Permanent press,
synthetic items
COTTON/
/03."-
Work clothes,
corduroys, etc.
DELICATES
Lingerie, sheets,
blouses
TOWELS
."/6"DRY
Å
Denims, towels,
heavy cottons
%SZ-FWFM
.PSF
5JNF
-FTT
5JNF
8SJOLMF
Care
%BNQ
%SZ
4JHOBM
Å
Å
LOW
Å
Å
.&%*6.
Å
Å
LOW
Å
Å
.&%*6.
)*()
Å
Å
)*()
Å
)*()
Adjustable
Adjustable
.&%*6.
)*()
Adjustable
Adjustable
5FNQFSBUVSF
5JNF
JO.JO
)*()
Normal Dry
Adjustable
Normal Dry
Adjustable
Normal Dry
Adjustable
Normal Dry
Adjustable
Normal Dry
Adjustable
Normal Dry
4."--
LOAD
Only Normal &
Cotton/Towels Fabric
5ZQF.BYMC
SPEED
DRY
For small loads with
short
drying times
Off
'3&4)&/
UP
For removing light
wrinkles
from clothing
Off
For items that
require heat-free
drying such as
plastics or rubber
Off
AIR DRY
= allowable option
Adjustable
Sensor dry cycles
Sensor dry cycles utilize LG’s unique dual sensor
system to detect and compare the moisture level
in clothes and in the air and adjust the drying time
as needed to ensure superior results. The dryer
automatically sets the dryness level and temperature
at the recommended setting for each cycle. The
estimated time remaining will be shown in the display.
NOTE
To protect your garments not every dryness level,
temperature, or option is available with every cycle.
See the $ZDMFHVJEF for details.
NO
)&"5
Å
Å
Å
Å
Å
Å
Adjustable
Manual dry cycles
Use manual dry cycles to select a specific amount of
drying time and a drying temperature. When a manual
ESZDZDMFJTTFMFDUFEUIF&45*."5&%5*.&3&."*/*/(
display shows the actual time remaining in your cycle.
You can change the actual time in the cycle by
QSFTTJOH.03&5*.&PS-&445*.&
HOW TO USE
31
Following are instructions for starting and using your new dryer. Please refer to specific sections of this manual for
more detailed information.
Check the lint filter before every
load
Fabric care labels
.PTUBSUJDMFTPGDMPUIJOHGFBUVSFGBCSJDDBSFMBCFMTUIBU
include instructions for proper care.
To clean, pull the lint filter straight up and roll any lint
off the filter with your fingers. Do not rinse or wash the
filter to remove lint. Push the lint filter firmly back into
place. See 3FHVMBSDMFBOJOH for more information.
Fabric care labels
Tumble
dry
Dry
Gentle/
delicate
Always make sure the lint filter is clean before starting a
new load; a clogged lint filter will increase drying times.
Normal
Always ensure the lint filter is properly installed before
running the dryer. Running the dryer with a loose or
missing lint filter will damage the dryer and articles in
the dryer.
Permanent Press/
wrinkle resistant
Do not dry
Do not tumble dry (used with
do not wash)
Heat
setting
High
Medium
Low
No heat/air
Grouping similar items
For best results, sort clothes into loads that can be dried
with the same drying cycle.
Different fabrics have different care requirements, and
some fabrics will dry more quickly than others.
Loading the dryer
WWARNING
To reduce the risk of fire, electric shock, or injury
to persons when using this appliance, follow basic
precautions, including the following:
t$IFDLBMMQPDLFUTUPNBLFTVSFUIBUUIFZBSF
FNQUZ*UFNTTVDIBTDMJQTQFOTDPJOTBOELFZT
DBOEBNBHFCPUIZPVSESZFSBOEZPVSDMPUIFT
'MBNNBCMFPCKFDUTTVDIBTMJHIUFSTPSNBUDIFT
DPVMEJHOJUFDBVTJOHBGJSF Failure to obey this
warning can result in fire, explosion, or death.
t/FWFSESZDMPUIFTUIBUIBWFCFFOFYQPTFEUPPJM
HBTPMJOFPSPUIFSGMBNNBCMFTVCTUBODFT8BTIJOH
DMPUIFTXJMMOPUDPNQMFUFMZSFNPWFPJMSFTJEVFT
Failure to obey this warning can result in fire, explosion,
or death.
NOTE
Loading tips
t$PNCJOFMBSHFBOETNBMMJUFNTJOBMPBE
t%BNQDMPUIFTXJMMFYQBOEBTUIFZESZ%POPU
overload the dryer; clothes require room to tumble
dry properly.
t$MPTF[JQQFSTIPPLTBOEESBXTUSJOHTUPQSFWFOU
these items from snagging or tangling on other
clothes.
Lint
Filter
ENGLISH
Sorting laundry
32
HOW TO USE
Cycle settings and options
Sensor dry cycles have preset settings that are selected
BVUPNBUJDBMMZ.BOVBMESZDZDMFTIBWFEFGBVMUTFUUJOHT
but you may also customize the settings using the cycle
setting buttons. Press the button for each option to view
and select available settings.
NOTE
To protect your garments, not every dryness level,
temperature, or option is available with every cycle.
See the $ZDMFHVJEF for details.
DRY LEVEL
Selects the level of dryness for the cycle. Press the DRY
-&7&-CVUUPOSFQFBUFEMZUPTDSPMMUISPVHIBWBJMBCMF
settings.
t5IJTPQUJPOJTPOMZBWBJMBCMFXJUITFOTPSESZDZDMFT
t5IFESZFSXJMMBVUPNBUJDBMMZBEKVTUUIFDZDMFUJNF
4FMFDUJOH.03&%3:PS7&3:%3:XJMMJODSFBTFUIF
DZDMFUJNFXIJMF-&44%3:PS%".1%3:XJMMEFDSFBTF
the cycle time.
t6TFB-&44%3:PS%".1%3:TFUUJOHGPSJUFNTUIBUZPV
wish to iron.
TEMP. CONTROL
Adjusts the temperature setting in increments from
-08UP)*()5IJTBMMPXTQSFDJTFDBSFPGZPVSGBCSJDTBOE
HBSNFOUT1SFTTUIF5&.1$0/530-CVUUPOSFQFBUFEMZ
to scroll through available settings. Temp control is not
adjustable in Sensor dry cycles.
TIME DRY
"MMPXTZPVUPNBOVBMMZTFMFDUUIFESZJOHUJNFGSPN
UPNJOVUFTJONJOVUFJODSFNFOUT6TFUIJTGPS
TNBMMMPBETPSUPSFNPWFXSJOLMFT6TFUIF.03&5*.&
-&445*.&CVUUPOTUPBEEPSSFEVDFUIFESZJOHUJNFJO
NJOVUFJODSFNFOUT
SIGNAL
Adjusts the volume of the melody and button tones on
the dryer or turns them off. Press the button repeatedly
until the desired volume setting is illuminated.
Your dryer features several additional cycle options to
customize cycles to meet your individual needs. Certain
PQUJPOCVUUPOTBMTPGFBUVSFBTQFDJBMGVODUJPOTFFUIF
GPMMPXJOHQBHFGPSEFUBJMT
UIBUDBOCFBDUJWBUFECZ
QSFTTJOHBOEIPMEJOHUIBUPQUJPOCVUUPOGPSTFDPOET
HOW TO USE
Cycle settings and options (cont.)
NOTE
You may save only one custom program at a time.
1SFTTJOHBOEIPMEJOHUIF$6450.130(3".CVUUPO
will overwrite any previously saved custom program.
To Recall a Custom Program:
5VSOPOUIFESZFS
1SFTTUIF$6450.130(3".CVUUPO
WRINKLE CARE
Selecting this option will tumble the load periodically for
VQUPIPVSTBGUFSUIFTFMFDUFEDZDMFPSVOUJMUIFEPPSJT
opened. This is helpful in preventing wrinkles when you
are unable to remove items from the dryer immediately.
Special functions
The option buttons also activate special functions,
JODMVEJOH3"$,%3:BOE$)*-%-0$,1SFTTBOEIPME
the option button marked with the special function
* CHILD LOCK
Use this option to prevent unwanted use of the dryer
or to keep cycle settings from being changed while the
ESZFSJTPQFSBUJOH1SFTTBOEIPMEUIF%3:-&7&-CVUUPO
GPSTFDPOETUPBDUJWBUFPSEFBDUJWBUFUIF$)*-%-0$,
function.
5IF$)*-%-0$,JDPOXJMMCFTIPXOJOUIFEJTQMBZBOE
all controls are disabled except the POWER button.
NOTE
0ODFTFU$)*-%-0$,SFNBJOTBDUJWFVOUJMJUJT
NBOVBMMZEFBDUJWBUFE$)*-%-0$,NVTUCFUVSOFEPGG
UPSVOBOPUIFSDZDMF5PEFBDUJWBUF$)*-%-0$,QSFTT
BOEIPMEUIF%3:-&7&-CVUUPOGPSUISFFTFDPOET
Custom program
If you have a special combination of settings that you
VTFGSFRVFOUMZZPVDBOTBWFUIFTFTFUUJOHTBTB$6450.
130(3".
To Save a Custom Program:
5VSOPOUIFESZFSBOEQSFTTUIF$:$-&4CVUUPOUP
select the desired cycle.
6TFUIFDZDMFTFUUJOHCVUUPOTUPBEKVTUUIFTFUUJOHTGPS
that cycle.
1SFTTUIFDZDMFPQUJPOCVUUPOT
GPSUIFPQUJPOZPV
would like to add.
1SFTTBOEIPMEUIF$6450.130(3".CVUUPOGPS
seconds.
1SFTTUIF45"351"64&CVUUPOUPTUBSUUIFDZDMF
ENGLISH
DAMP DRY SIGNAL
With this option, the dryer will signal when the load
JTBQQSPYJNBUFMZESZ5IJTBMMPXTZPVUPSFNPWF
faster- drying lightweight items or items that you would
like to iron or hang while still slightly damp. Press the
015*0/CVUUPOUPBDUJWBUFPSEFBDUJWBUFUIF%".1%3:
SIGNAL.
33
34
MAINTENANCE
MAINTENANCE
Regular cleaning
Cleaning the lint filter
Always clean the lint from the filter after every cycle.
WWARNING
To reduce the risk of fire, electric shock, or injury
to persons when using this appliance, follow basic
precautions, including the following:
t6OQMVHUIFESZFSCFGPSFDMFBOJOHUPBWPJEUIFSJTL
PGFMFDUSJDTIPDL Failure to follow this warning can
cause serious injury, fire, electrical shock, or death.
t/FWFSVTFIBSTIDIFNJDBMTBCSBTJWFDMFBOFSTPS
TPMWFOUTUPDMFBOUIFXBTIFSThey will damage the
finish.
Cleaning the exterior
Proper care of your dryer can extend its life.
The outside of the machine can be cleaned with warm
water and a mild, nonabrasive household detergent.
Immediately wipe off any spills with a soft, damp cloth.
NOTE
Do not use methylated spirits, solvents, or similar
products to clean the dryer.
Lint
Filter
To clean, open the dryer door and pull the lint filter
straight up. Then:
'PSFWFSZEBZDMFBOJOHSPMMBOZMJOUPGGUIFGJMUFSXJUI
your fingers, or
Never use steel wool or abrasive cleansers; they can
damage the surface of the dryer.
Cleaning the interior
Wipe around the door opening and seal with a soft,
damp cloth to prevent lint and dust buildup that could
damage the door seal.
Clean the window with a soft cloth dampened with
warm water and a mild, nonabrasive household
detergent; then wipe dry.
The stainless steel drum can be cleaned with a
conventional stainless steel cleaner, used according to
the manufacturer’s specifications.
Never use steel wool or abrasive cleansers; they can
scratch or damage the surface.
Cleaning around and under the dryer
7BDVVNMJOUBOEEVTUGSPNBSPVOEUIFESZFSBOE
VOEFSOFBUIJUSFHVMBSMZ7FOUEVDUXPSLTIPVMECF
checked for lint buildup and cleaned at least once per
year. If any noticeable reduction in airflow or drying
performance occurs, immediately check ductwork for
obstructions and blockages.
Maintaining ductwork
7FOUEVDUXPSLTIPVMECFDIFDLFEGPSMJOUCVJMEVQPODF
per month and cleaned at least once per year. If any
noticeable reduction in airflow or drying performance
occurs, immediately check ductwork for obstructions
and blockages. Contact a qualified technician or
service provider.
7BDVVNUIFMJOUGJMUFS
*GUIFMJOUGJMUFSIBTCFDPNFWFSZEJSUZPSDMPHHFE
with fabric softener, wash the lint filter in warm,
soapy water and allow to dry thoroughly before
reinstalling.
NOTE
/&7&3PQFSBUFUIFESZFSXJUIPVUUIFMJOUGJMUFSJO
QMBDF/&7&3PQFSBUFUIFESZFSXJUIBXFUMJOUGJMUFS
TROUBLESHOOTING
35
TROUBLESHOOTING
Your dryer is equipped with an automatic error-monitoring system to detect and diagnose problems at an early
stage. If your dryer does not function properly or does not function at all, check the following before you call for
service.
1SPCMFN
1PTTJCMF$BVTFT
4PMVUJPOT
Dryer will not
turn on
t1PXFSDPSEJTOPUQSPQFSMZ
plugged in.
t)PVTFGVTFJTCMPXODJSDVJU
breaker has tripped, or power
outage has occurred.
t.BLFTVSFUIBUUIFQMVHJTQMVHHFETFDVSFMZJOUPB
grounded outlet matching the dryer’s rating plate.
t3FTFUDJSDVJUCSFBLFSPSSFQMBDFGVTF%POPUJODSFBTF
fuse capacity. If the problem is a circuit overload, have it
corrected by a qualified electrician.
Dryer does
not heat
t)PVTFGVTFJTCMPXODJSDVJU
breaker has tripped, or power
outage has occurred.
t(BTTVQQMZPSTFSWJDFUVSOFEPGG
HBTNPEFMTPOMZ
t3FTFUDJSDVJUCSFBLFSPSSFQMBDFGVTF%POPUJODSFBTF
fuse capacity. If the problem is a circuit overload, have it
corrected by a qualified electrician.
t$POGJSNUIBUUIFIPVTFHBTTIVUPGGBOEUIFESZFSHBT
shutoff are both fully open.
Greasy or dirty t'BCSJDTPGUFOFSVTFEJODPSSFDUMZ
t$MFBOBOEEJSUZDMPUIFTCFJOH
spots
dried together.
on clothes
t$POGJSNBOEGPMMPXUIFJOTUSVDUJPOTQSPWJEFEXJUIZPVS
fabric softener.
t.BLFTVSFUPVTFZPVSESZFSUPESZPOMZDMFBOJUFNT
because dirty items can soil clean clothes placed in the
same or subsequent loads.
t4UBJOTPOESJFEDMPUIFTBSFBDUVBMMZTUBJOTUIBUXFSFOPU
removed during the washing process.
.BLFTVSFUIBUDMPUIFTBSFCFJOHDPNQMFUFMZDMFBOFE
according to the instructions for your washer and
detergent.
Display shows
error
DPEFU&PSU&
t5IFSNJTUPSJTNBMGVODUJPOJOH
Lint on clothes t-JOUGJMUFSOPUDMFBOFEQSPQFSMZ
t-BVOESZOPUTPSUFEQSPQFSMZ
t&YDFTTTUBUJDJODMPUIFT
t%SZFSJTPWFSMPBEFE
t5JTTVFQBQFSFUDMFGUJOQPDLFUT
t5VSOPGGUIFESZFSBOEDBMMGPSTFSWJDF
t.BLFTVSFUIFMJOUGJMUFSJTDMFBOFECFGPSFFWFSZMPBE8JUI
some loads that produce high amounts of lint, it may be
necessary to clean the filter during the cycle.
t4PNFGBCSJDTBSFMJOUQSPEVDFSTJFBGV[[ZXIJUFDPUUPO
UPXFM
BOETIPVMECFESJFETFQBSBUFMZGSPNDMPUIFTUIBU
BSFMJOUUSBQQFSTJFBQBJSPGCMBDLMJOFOQBOUT
t4FFUIF&YDFTTTUBUJDJODMPUIFTBGUFSESZJOHTFDUJPOCFMPX
t%JWJEFMBSHFSMPBETJOUPTNBMMFSMPBETGPSESZJOH
t$IFDLQPDLFUTUIPSPVHIMZCFGPSFXBTIJOHBOEESZJOH
clothes.
Excess static in
clothes after
drying
t'BCSJDTPGUFOFSOPUVTFEPSVTFE
incorrectly.
t$MPUIFTESJFEUPPMPOH
PWFSESJFE
t%SZJOHTZOUIFUJDTQFSNBOFOU
press, or synthetic blends.
t6TFBGBCSJDTPGUFOFSUPSFEVDFTUBUJDFMFDUSJDJUZDPSSFDUMZ
Do not use fabric softeners or products to eliminate static
unless recommended by the manufacturer of the fabric
softener or product.
t0WFSESZJOHBMPBEPGMBVOESZDBODBVTFBCVJMEVQPGTUBUJD
electricity. Adjust settings and use a shorter drying time,
or use SENSOR DRY cycles.
t5IFTFNBUFSJBMTDBODBVTFTUBUJDCVJMEVQ5SZVTJOHBGBCSJD
softener.
Display shows
error
code PS
t1PXFSDPSEDPOOFDUJPOJT
incorrect.
t$IFDLUIFDPOOFDUJPOPGQPXFSDPSEUPUIFUFSNJOBMCMPDL
3FGFSUPQBHFTPGUIJTNBOVBM
ENGLISH
Before calling for service
36
TROUBLESHOOTING
Before calling for service (cont.)
1SPCMFN
Clothes are
wrinkled
1PTTJCMF$BVTFT
t$MPUIFTESJFEUPPMPOH
PWFSESJFE
t$MPUIFTMFGUJOESZFSUPPMPOH
after cycle ends.
4PMVUJPOT
t0WFSESZJOHBMPBEPGMBVOESZDBOMFBEUPXSJOLMFEDMPUIFT
Try a shorter drying time, and remove items while they
still retain a slight amount of moisture.
t3FNPWFJUFNTGSPNUIFESZFSJNNFEJBUFMZBUUIFFOE
PGUIFDZDMF6TFUIF83*/,-&$"3&PQUJPOUPDPOUJOVF
UVNCMJOHDMPUIFTBUUIFFOEPGUIFDZDMFGPSVQUPIPVST
Drying time is
not consistent
t)FBUTFUUJOHTMPBETJ[FPS
dampness of clothing is not
consistent.
t5IFESZJOHUJNFGPSBMPBEXJMMWBSZEFQFOEJOHPOUIFIFBU
TFUUJOHUIFUZQFPGIFBUVTFEFMFDUSJDOBUVSBMHBTPS-1
HBT
UIFTJ[FPGUIFMPBEUIFUZQFPGGBCSJDTUIFXFUOFTT
of the clothes, and the condition of the exhaust ducts and
lint filter.
Clothes take
too
long to dry
t-PBEJTOPUQSPQFSMZTPSUFE
t4FQBSBUFIFBWZJUFNTGSPNMJHIUXFJHIUJUFNT-BSHFSBOE
heavier items take longer to dry.
t)FBWZGBCSJDTUBLFMPOHFSUPESZCFDBVTFUIFZUFOEUP
retain more moisture. To help reduce and maintain more
consistent drying times for large and heavy fabrics,
separate these items into smaller loads of a consistent
size.
t6TFUIFBQQSPQSJBUFDPOUSPMTFUUJOHTGPSUIFUZQFPGMPBE
you are drying.
t.BLFTVSFUIFMJOUGJMUFSJTDMFBOFECFGPSFFWFSZMPBE8JUI
some loads that produce high amounts of lint, it may be
necessary to clean the filter during the cycle.
t$POGJSNUIBUUIFFYIBVTUEVDUXPSLJTQSPQFSMZDPOGJHVSFE
BOEGSFFPGEFCSJTMJOUBOEPCTUSVDUJPOT.BLFTVSFUIBU
outside wall dampers can open properly and are not
blocked, jammed, or damaged.
t3FTFUDJSDVJUCSFBLFSPSSFQMBDFGVTF%POPUJODSFBTF
fuse capacity. If the problem is a circuit overload, have it
corrected by a qualified electrician.
t%JWJEFMBSHFSMPBETJOUPTNBMMFSMPBETGPSESZJOH
t*GZPVBSFESZJOHBWFSZTNBMMMPBEBEEBGFXFYUSBJUFNT
to ensure proper tumbling action.
t-BSHFMPBEPGIFBWZGBCSJDT
t%SZFSDPOUSPMTBSFOPUTFU
properly.
t-JOUGJMUFSOFFETUPCFDMFBOFE
t&YIBVTUEVDUTCMPDLFEEJSUZPS
duct run is too long.
t)PVTFGVTFJTCMPXODJSDVJU
breaker has tripped, or power
outage has occurred.
t%SZFSJTPWFSMPBEFE
t%SZFSJTVOEFSMPBEFE
Clothes are
shrinking
t(BSNFOUDBSFJOTUSVDUJPOTBSF
not being followed.
t5PBWPJETISJOLBHFQMFBTFDBSFGVMMZGPMMPXUIFGBCSJD
care instructions for your garment, because some fabrics
will naturally shrink when washed. Other fabrics can be
washed but will shrink when dried in a dryer. Use a low or
no heat setting.
$)&$,'*-5&3
light is on
during the
drying cycle
t-JOUGJMUFSJTBMNPTUDMPHHFEPS
full.
t1BVTFUIFESZJOHDZDMFBOEDMFBOUIFMJOUGJMUFS
FLOW SENSE5.
indicator
shows four
bars during the
drying
cycle
t%VDUXPSLJTUPPMPOHPSIBTUPP
many turns/restrictions.
t4JHOJGJDBOUCMPDLBHFPGUIF
ductwork due to lint buildup or
debris.
t5IFBQQMJBODFIBTEFUFDUFEB
restriction in the external dryer
venting.
t*OTUBMMBTIPSUFSPSTUSBJHIUFSEVDUSVO4FFUIF*OTUBMMBUJPO
Instructions.
t%VDUXPSLTIPVMECFDIFDLFEDMFBOFETPPO
Dryer can be used in this condition, but drying times may
be longer.
t*GFYIBVTUSFTUSJDUJPOTBSFTFOTFECZUIF'-084&/4&5.
system, the indicator will remain on for two hours after
the end of the cycle. Opening the door or pressing the
POWER button will turn off the display.
SPECIFICATIONS
37
Before calling for service (cont.)
5IFEJTQMBZ
shows
iEwiEw
Possible Causes
Solutions
t5IFEVDUXPSLJTBCPVU t%POPUVTFUIFESZFSVOUJMUIFFYIBVTUTZTUFNIBTCFFO
CMPDLFE
DMFBOFEBOEPSSFQBJSFE6TJOHUIFESZFSXJUIBTFWFSFMZ
iEwPSiEwFSSPSDPEF
SFTUSJDUFEFYIBVTUJTEBOHFSPVTBOEDPVMESFTVMUJOBGJSF
EJTQMBZFEIPVSTPOMZ
PSPUIFSQSPQFSUZEBNBHF
t)PVTFFYIBVTUTZTUFNCMPDLFE
t$IFDLUIFPVUTJEFESZFSWFOUXIJMFUIFESZFSJTPQFSBUJOH
UPNBLFTVSFUIFSFJTTUSPOHBJSGMPX
t*GUIFFYIBVTUTZTUFNJTFYUSFNFMZMPOHIBWFJUSFQBJSFEPS
SFSPVUFE
t,FFQUIFBSFBBSPVOEUIFESZFSDMFBOBOEGSFFPGDMVUUFS
t$IFDLWFOUIPPEGPSEBNBHFPSMJOUDMPHHJOH
t.BLFTVSFUIFBSFBBSPVOEUIFWFOUIPPEJTDMFBS
SPECIFICATIONS
DryerTM Models
DLE1001W, DLG1002W
%FTDSJQUJPO
%SZFS
&MFDUSJDBMSFRVJSFNFOUT
1MFBTFSFGFSUPUIFSBUJOHMBCFMSFHBSEJOHEFUBJMFEJOGPSNBUJPO
(BTSFRVJSFNFOUT
/(2JODIFT8$
-1oJODIFT8$(BT.PEFMTPOMZ
%JNFOTJPOT
w8
9w%
9w)
w%XJUIEPPSPQFO
DN8
9DN%
9DN)
DN%XJUIEPPSPQFO
/FUXFJHIU
&MFDUSJDMCLH
(BTMCLH
%SZJOHDBQBDJUZ
/PSNBMDZDMF
*&$DVGUMCLH
ENGLISH
Problem
38
USING SMARTDIAGNOSISTM
USING SMART DIAGNOSIS™
Should you experience any problems with your dryer, it has the capability of transmitting data to your Smart Phone
using the LG Smart Laundry Application or via your telephone to the LG call center.
SMART DIAGNOSIS™ cannot be activated unless your dryer is turned on by pressing the POWER button. If your dryer
is unable to turn on, then troubleshooting must be done without using SMART DIAGNOSIS™.
Audible Diagnosis
SMART DIAGNOSIS™ Using Your
Smart Phone
SMART DIAGNOSIS™ Through the
Call Center
1. Download the free LG Smart Laundry application
from the application store on your smart phone.
1. Call the LG call center at: (LG U.S.) 1-800-243-0000
(LG Canada) 1-888-542-2623.
2. Open the LG Smart Laundry application on your
smart phone. Press the right arrow button to advance
to the next screen.
2. When instructed to do so by the call center agent,
hold the mouthpiece of your phone over the SMART
DIAGNOSIS™ logo on the machine. Hold the phone
no more than one inch from (but not touching) the
machine.
3. Press the RECORD button on the smart phone and
then hold the mouth piece of the smart phone near
the SMART DIAGNOSIS™ logo on the dryer.
NOTE
4. With the phone held in place, press and hold the
TEMP.CONTROL button for three seconds.
Do not touch any other buttons or icons on the
display screen.
5. Keep the phone in place until the tone transmission
has finished. This takes about 6 seconds and the
dryer’s display will count down the time.
3. Press and hold the TEMP.CONTROL button for three
seconds.
6. When the recording is complete, view the diagnosis
by pressing the Next button on the phone.
NOTE
Smart Diagnosis is a troubleshooting feature
designed to assist, not replace, the traditional method
of troubleshooting through service calls. The
effectiveness of this feature depends upon various
factors, including, but not limited to, the reception
of the cellular phone being used for transmission,
any external noise that may be present during the
transmission, and the acoustics of the room where the
machine is located.
Accordingly, LG does not guarantee that Smart
Diagnosis would accurately troubleshoot any given
issue.
4. Keep the phone in place until the tone transmission
has finished. This takes about 6 seconds and the
dryer’s display will count down the time.
5. Once the countdown is over and the tones have
stopped, resume your conversation with the call
center agent, who will then be able to assist you in
using the information transmitted for analysis.
WARRANTY
39
Your LG Dryer will be will repaired or replaced, at LG’s option, if it proves to be defective in material or workmanship
VOEFSOPSNBMVTFEVSJOHUIFXBSSBOUZQFSJPEi8BSSBOUZ1FSJPEw
TFUGPSUICFMPXFòFDUJWFGSPNUIFEBUFi%BUFPG
1VSDIBTFw
PGPSJHJOBMDPOTVNFSQVSDIBTFPGUIFQSPEVDU5IJTXBSSBOUZJTHPPEPOMZUPUIFPSJHJOBMQVSDIBTFSPGUIF
QSPEVDUBOEFòFDUJWFPOMZXIFOVTFEJOUIF6OJUFE4UBUFTJODMVEJOH"MBTLB)BXBJJBOE645FSSJUPSJFT
8"33"/5:1&3*0%
)084&37*$&*4)"/%-&%
-"#030OF:FBSfrom the Date of Purchase.
*O)PNF4FSWJDF
1"3540OF:FBSfrom the Date of Purchase.
Please retain dealer’s dated bill of sale or delivery
ticket as evidence of the Date of Purchase for proof of
warranty, and submit a copy of the bill of sale to the
service person at the time warranty service is provided.
Replacement Units and Repair Parts may be new or
remanufactured.
Replacement Units and Repair Parts are warranted for
the remaining portion of the original unit’s warranty
period.
1MFBTFDBMMBOEDIPPTFUIF
BQQSPQSJBUFPQUJPOUPMPDBUFZPVSOFBSFTU-(
"VUIPSJ[FE4FSWJDF$FOUFS
Or visit our Web site at: http://www.lgservice.com.
5)*48"33"/5:*4*/-*&60'"/:05)&38"33"/5:&913&4403*.1-*&%*/$-6%*/(8*5)065-*.*5"
5*0/"/:8"33"/5:0'.&3$)"/5"#*-*5:03'*5/&44'03"1"35*$6-"3163104&505)&&95&/5
"/:*.1-*&%8"33"/5:*43&26*3&%#:-"8*5*4-*.*5&%*/%63"5*0/505)&&913&448"33"/5:
1&3*0%"#07&
/&*5)&35)&."/6'"$563&3/03*5464%*453*#65034)"--#&-*"#-&'03"/:*/$*%&/5"-$0/4&
26&/5*"-*/%*3&$541&$*"-0316/*5*7&%"."(&40'"/:/"563&*/$-6%*/(8*5)065-*.*5"5*0/
-0453&7&/6&403130'*5403"/:05)&3%"."(&8)&5)&3#"4&%*/$0/53"$550350305)&3
8*4&.
Some states do not allow the exclusion or limitation of incidental or
consequential damages or limitations on how long an implied warranty lasts, so the above exclusion or limitation
may not apply to you. This warranty gives you specific legal rights and you may also have other rights that vary
from state to state.
5)*4-*.*5&%8"33"/5:%0&4/05"11-:50
t4FSWJDFUSJQTUPZPVSIPNFUPEFMJWFSQJDLVQBOEPSJOTUBMMUIFQSPEVDUJOTUSVDUPSSFQMBDFIPVTFGVTFTPSDPSSFDU
wiring, or correction of unauthorized repairs.
t%BNBHFTPSPQFSBUJOHQSPCMFNTUIBUSFTVMUGSPNNJTVTFBCVTFPQFSBUJPOPVUTJEFFOWJSPONFOUBMTQFDJöDBUJPOT
or contrary to the requirements of precautions in the Operating Guide, accident, vermin, fire, flood, improper
installation, acts of God, unauthorized modification or alteration, incorrect electrical current or voltage, or commercial use, or use for other than intended purpose.
The cost of repair or replacement under these excluded circumstances shall be borne by the consumer.
$6450.&3*/'03."5*0/$&/5&3/6.#&34
5PPCUBJO$VTUPNFS"TTJTUBODF1SPEVDU
*OGPSNBUJPOPS%FBMFSPS"VUIPSJ[FE4FSWJDF
$FOUFSMPDBUJPO
$BMMIPVSTBEBZEBZTQFS
ZFBS
BOETFMFDUUIFBQQSPQSJBUFPQUJPOGSPNUIF
menu.
0SWJTJUPVS8FCTJUFBUIUUQXXXMHTFSWJDFDPN
50$0/5"$5-(&-&$530/*$4#:."*-
LG Customer Information Center
10#PY
+BNFT3FDPSE3PBE
)VOUTWJMMF"MBCBNB
ATTN: CIC
Product Registration Information
.PEFM
4FSJBM/VNCFS
%BUFPG1VSDIBTF
The model and serial number can be located on the
rating plate inside the front door of the dryer.
ENGLISH
-(&-&$530/*$4*/$
-(%3:&3-*.*5&%8"33"/5:64"
40
ESPAÑOL
MANUAL DE PROPIETARIO
SECADORA
lea este manual de usuario detenidamente antes de la
utilización y guárdelo a mano para futuras consultas.
DLE1001W
DLG1002W
www.lg.com
2
TABLA DE CONTENIDOS
TABLA DE CONTENIDOS
3
INSTRUCCIONES IMPORTANTES DE
SEGURIDAD
3
4
4
QUÉ HACER SI HUELE GAS
PRECAUCIONES BÁSICAS DE SEGURIDAD
LEY EJECUTIVA PARA LA SEGURIDAD
DEL AGUA POTABLE Y LOS TÓXICOS DE
CALIFORNIA (CALIFORNIA SAFE DRINKING
WATER AND TOXIC ENFORCEMENT ACT)
INSTRUCCIONES DE CONEXIÓN A TIERRA
INSTRUCCIONES IMPORTANTES PARA LA
INSTALACIÓN
INSTRUCCIONES IMPORTANTES PARA
CONECTAR LA ELECTRICIDAD
5
5
7
31
31
32
33
33
Cómo cargar la secadora
Revise el filtro de pelusa antes de cada uso
Configuraciones del ciclo y opciones
Funciones especiales
Programa personalizado
34
MANTENIMIENTO
34
Limpieza regular
35
RESOLUCIÓN DE PROBLEMAS
35
Antes de llamar a mantenimiento
8
CARAC TERÍSTICAS DEL PRODUCTO
37
ESPECIFICACIONES
9
LA INTRODUCCIÓN DE LA SECADORA
38
UTILIZACIÓN DEL SMART DIAGNOSISTM
9
9
10
11
Partes
Accesorios
Características del panel de control
Pantalla
39
GARANTÍA
12
INSTRUCCIONES PARA LA
INSTALACIÓN
12
13
13
14
15
16
17
26
27
Vista previa del orden de instalación
Requisitos del lugar de instalación
Espacios de instalación
Nivelación de la secadora
Inversion de la puerta
Instalación del kit de ventilación lateral
Cónexión del conducto de ventilación de la
secadora
Conexión de secadoras a gas
Conexión de secadoras a eléctricas
Requisitos especiales para viviendas móviles o
prefabricadas
Revisión de instalación final
Test de Instalación (conducto de comprobar)
29
CÓMO USAR
29
Funcionamiento de la secadora
Guía de ciclos
Clasificación de cargas
19
21
26
30
31
INSTRUCCIONES IMPORTANTES DE SEGURIDAD
3
INSTRUCCIONES IMPORTANTES DE SEGURIDAD
LEA TODAS LA INSTRUCCIONES ANTES DE USAR
WADVERTENCIA
Su seguridad y la de los demás son de suma importancia.
En este manual y en su electrodoméstico figuran muchos mensajes importantes de seguridad. Lea y cumpla
siempre con todos los mensajes de seguridad.
Éste es el símbolo de alerta de seguridad.
El mismo alerta sobre potenciales riesgos de muerte o heridas tanto para usted como para otras personas.
Todos los mensajes de seguridad estarán a continuación del símbolo de alerta de seguridad y con la palabra
PELIGRO, ADVERTENCIA o PRECAUCIÓN.
Estas palabras significan:
W
WPELIGRO
Corre riesgo de muerte o de sufrir heridas serias si no sigue las instrucciones inmediatamente.
WADVERTENCIA
Corre riesgo de muerte o de sufrir heridas serias si no sigue las instrucciones.
WPRECAUCIÓN
De no seguir las instrucciones podría sufrir daños leves o causar daños en el producto.
Todos los mensajes de seguridad le indicarán cuál es el riesgo potencial, le dirán cómo reducir las posibilidades de
sufrir heridas y qué puede suceder si no se siguen las instrucciones.
t/PJOTUBMFVOBTFDBEPSBKVOUPBNBUFSJBMFTEFWFOUJMBDJØOQMÈTUJDPTGMFYJCMFT4JTFJOTUBMBVODPOEVDUP
GMFYJCMFNFUÈMJDPEFUJQPMÈNJOBEFNFUBM
ÏTUFEFCFSÈDVNQMJSMBTFTQFDJGJDBDJPOFTEFUFSNJOBEBTQPS
FMGBCSJDBOUFEFMFMFDUSPEPNÏTUJDPQBSBTVVTPDPOTFDBEPSBT4FTBCFRVFMPTNBUFSJBMFTEFWFOUJMBDJØO
GMFYJCMFTTFDPOUSBFOTFBHSJFUBODPOSBQJEF[ZBUSBQBOQFMVTBT&TUBTDPOEJDJPOFTPCTUSVJSÈOFMGMVKPEFBJSF
de la secadora y aumentarán el riesgo de incendio.
t/PBMNBDFOFPVTFHBTPMJOBOJOJOHÞOPUSPUJQPEFWBQPSFTPMÓRVJEPTJOGMBNBCMFTDFSDBEFFTUF
FMFDUSPEPNÏTUJDPOJEFOJOHÞOPUSPFMFDUSPEPNÏTUJDP
tÁOJDBNFOUFVOUÏDOJDPDBMJGJDBEPEFNBOUFOJNJFOUPBHFODJBEFNBOUFOJNJFOUPPDPNQB×ÓBEFHBTEFCFSÈO
SFBMJ[BSFMNBOUFOJNJFOUPZMBJOTUBMBDJØO
t*OTUBMFMBTFDBEPSBTFHÞOMBTJOTUSVDDJPOFTEFMGBCSJDBOUFZMBTOPSNBUJWBTMPDBMFT
t(VBSEFFTUBTJOTUSVDDJPOFT
26²)"$&34*)6&-&("4
/PJOUFOUFFODFOEFSVODJHBSSJMMPPGØTGPSPOJFODFOEFSOJOHÞOFMFDUSPEPNÏTUJDPBHBTPFMÏDUSJDP
/PUPRVFOJOHÞOJOUFSSVQUPSFMÏDUSJDP/PVTFOJOHÞOUFMÏGPOPFOTVFEJGJDJP
/PQFSNJUBRVFOJOHVOBQFSTPOBTFFODVFOUSFFOMBIBCJUBDJØOFEJGJDJPPÈSFB
-MBNFBTVDPNQB×ÓBEFHBTJONFEJBUBNFOUFEFTEFFMUFMÏGPOPEFVOWFDJOP4JHBMBTJOTUSVDDJPOFTEFTV
DPNQB×ÓBEFHBTBMQJFEFMBMFUSB
4JOPQVFEFDPNVOJDBSTFDPOTVDPNQB×ÓBEFHBTMMBNFBMEFQBSUBNFOUPEFCPNCFSPT
ESPAÑOL
Por su seguridad, debe seguir la información indicada en este manual para minimizar el riesgo de incendio o
explosión, descarga eléctrica, o para prevenir daños a la propiedad, lesiones personales o muerte.
4
INSTRUCCIONES IMPORTANTES DE SEGURIDAD
INSTRUCCIONES IMPORTANTES DE SEGURIDAD
LEA TODAS LA INSTRUCCIONES ANTES DE USAR
WADVERTENCIA
Por su seguridad, debe seguir la información indicada en este manual para minimizar el riesgo de incendio o
explosión, descarga eléctrica, o para prevenir daños a la propiedad, lesiones personales o muerte.
13&$"6$*0/&4#«4*$"4%&4&(63*%"%
WADVERTENCIA
Para minimizar el riesgo de incendio o explosión, descarga eléctrica, o para prevenir lesiones personales cuando use
electrodomésticos, se deben seguir precauciones básicas de seguridad, incluyendo las siguientes:
t-FBUPEBTMBTJOTUSVDDJPOFTBOUFTEFVTBSMBTFDBEPSB
t"OUFTEFVTBSMBTFDBEPSBEFCFFTUBSDPSSFDUBNFOUF
instalada como se describe en este manual.
t/PEFKFRVFMPTOJ×PTKVFHVFOFOMBTFDBEPSBOJEFOUSP
de ella. Cuando se usa la secadora cerca de los niños,
se necesita una supervisión estricta.
t/PDPMPRVFBSUÓDVMPTRVFIBZBOTJEPFYQVFTUPT
a aceites, incluyendo aceites comestibles, en su
secadora. Los artículos contaminados con aceites
comestibles podrían contribuir a la generación de una
reacción química que podría ocasionar que una carga
se incendie.
t6TFTVBWJ[BEPSFTEFUFMBPQSPEVDUPTQBSBFMJNJOBS
estática únicamente del modo recomendado por el
fabricante.
t/PTFRVFBSUÓDVMPTRVFIBZBOTJEPMJNQJBEPTMBWBEPT
remojados o salpicados previamente con gasolina,
disolventes de limpieza en seco u otras substancias
inflamables o explosivas, ya que emanan vapores que
podrían encenderse o explotar, incluso después del
lavado.
t&WJUFMBBDVNVMBDJØOEFQFMVTBQPMWPPUJFSSB
alrededor del área de la apertura de ventilación y áreas
adyacentes.
t/PJOUSPEV[DBMBTNBOPTFOMBTFDBEPSBDVBOEPFM
tambor o las otras partes estén en movimiento.
t/PSFQBSFPSFFNQMBDFOJOHVOBQBSUFEFMBTFDBEPSB
ni intente reparar la misma a menos que esto se
recomiende en forma específica en esta Guía de Uso y
Cuidado o en instrucciones de reparación publicadas
las cuales comprende y sabe aplicar.
t/PBMUFSFMPTDPOUSPMFT
t"OUFTEFQPOFSMBTFDBEPSBGVFSBEFTFSWJDJPPEF
tirarla, quite la puerta para prevenir que los niños se
metan dentro.
t/PVTFDBMPSQBSBTFDBSBSUÓDVMPTRVFDPOUJFOFODBVDIP
espumoso, plásticos o materiales de textura similar al
caucho.
t-BQBSUFJOUFSJPSEFMBTFDBEPSBZFMDPOEVDUPEF
ventilación se deberán limpiar periódicamente, y la
misma deberá ser realizada por personal calificado del
servicio.
t/PJOTUBMFOJDPMPRVFFTUBTFDBEPSBFOMVHBSFTEPOEF
pueda estar expuesta a variables climáticas.
t"OUFTEFDBSHBSMBTFDBEPSBTJFNQSFSFWJTFRVFOP
haya objetos extraños en su interior.
t3FUJSFMBQFMVTBEFMGJMUSPBOUFTEFDBEBDBSHB
t/PEFKFQMÈTUJDPTQBQFMPUFMBTRVFQVFEBORVFNBSTF
o fundirse sobre la secadora en funcionamiento.
-&:&+&$65*7"1"3"-"4&(63*%"%%&-"(6"105"#-&:-045»9*$04
%&$"-*'03/*"ŷ$"-*'03/*"4"'&%3*/,*/(8"5&3"/%509*$
&/'03$&.&/5"$5Ÿ
Esta ley requiere que el gobernador de California publique un listado de sustancias conocidas en el estado que
causan cáncer, defectos congénitos u otras lesiones reproductivas, y obliga a los negocios a alertar a los clientes
sobre la posible exposición a tales sustancias. Los electrodomésticos a gas pueden causar exposición leve a cuatro de
estas sustancias, principalmente benceno, monóxido de carbono, formaldehído y hollín, generado principalmente
por la combustión parcial del gas natural o los combustibles LP (petróleo líquido). Las secadoras calibradas
adecuadamente minimizarán la combustión parcial. Para minimizar incluso más la exposición a estas sustancias, se
puede dotar a la secadora de la ventilación adecuada al exterior.
INSTRUCCIONES IMPORTANTES DE SEGURIDAD
5
INSTRUCCIONES IMPORTANTES DE SEGURIDAD
LEA TODAS LA INSTRUCCIONES ANTES DE USAR
WADVERTENCIA
*/4536$$*0/&4%&$0/&9*»/"5*&33"
Este electrodoméstico deberá estar conectado a tierra. En caso de avería o mal funcionamiento, la conexión a tierra
reducirá el riesgo de descargas eléctricas al brindar un camino con una resistencia menor para la corriente eléctrica.
Este electrodoméstico debe estar equipado con un cable con un conductor para la conexión a tierra del equipo y
un enchufe con conexión a tierra. El enchufe deberá estar conectado a una toma de corriente instalada en forma
adecuada y con conexión a tierra de acuerdo con todos los códigos y ordenanzas locales.
WADVERTENCIA
6OBDPOFYJØOJOBQSPQJBEBEFMDPOEVDUPSEFDPOFYJØOBUJFSSBEFMFRVJQPQVFEFQSPWPDBSSJFTHPTEF
EFTDBSHBTFMÏDUSJDBTConsulte a un electricista calificado o personal del servicio si tiene dudas de que el
electrodoméstico se encuentre conectado a tierra apropiadamente.
No modifique el enchufe que se entrega con el electrodoméstico. Si no coincide con la toma de corriente, contrate a
un electricista calificado para que instale una toma de corriente en forma adecuada.
Este electrodoméstico debe estar conectado a un sistema de cableado de metal permanente con conexión a tierra
o se debe tender un conducto para la conexión a tierra del equipo con los conductores del circuito y conectado al
terminal de tierra del equipo o al conductor de suministro del electrodoméstico.
Si la secadora no se encuentra adecuadamente conectada a tierra se pueden producir descargas eléctricas.
*/4536$$*0/&4*.1035"/5&41"3"-"*/45"-"$*»/
WADVERTENCIA
Para reducir el riesgo de incendio, descargas eléctricas o heridas al usar su electrodoméstico, siga las precauciones
básicas, incluyendo lo siguiente:
t$POFDUFMBTFDBEPSBBEFDVBEBNFOUFBUJFSSBTFHÞO
UPEPTMPTDØEJHPTZMBTSFHVMBDJPOFTWJHFOUFT Siga
los detalles en las instrucciones de instalación. Si la
secadora no se encuentra adecuadamente conectada
a tierra se pueden producir descargas eléctricas.
t"OUFTEFVTBSMBTFDBEPSBEFCFFTUBSDPSSFDUBNFOUF
JOTUBMBEBDPNPTFEFTDSJCFFOFTUFNBOVBM Si la
secadora no se encuentra adecuadamente conectada
a tierra se pueden producir descargas eléctricas.
t*OTUBMFZBMNBDFOFMBTFDBEPSBFOVOMVHBSOP
FYQVFTUPBUFNQFSBUVSBTJOGFSJPSFTBMQVOUPEF
DPOHFMBDJØOOJFYQVFTUPBMBJOUFNQFSJF
t5PEBTMBTSFQBSBDJPOFTZDPOUSPMFTEFCFSÈOTFS
SFBMJ[BEPTQPSVODFOUSPEFTFSWJDJPBVUPSJ[BEP
BNFOPTRVFTFEFOPUSBTSFDPNFOEBDJPOFT
FTQFDÓGJDBTFOFM.BOVBMEFM6TVBSJP6UJMJDFTØMP
QJF[BTEFGÈCSJDBBVUPSJ[BEBT Si no se cumple con
esta advertencia se podrán producir heridas graves,
incendios, descargas eléctricas o muerte.
t$POFMGJOEFSFEVDJSFMSJFTHPEFEFTDBSHBT
FMÏDUSJDBTOPJOTUBMFMBTFDBEPSBFOFTQBDJPT
IÞNFEPTSi no se cumple con esta advertencia se
podrán producir heridas graves, incendios, descargas
eléctricas o muerte.
t$POFDUFVODJSDVJUPFMÏDUSJDPDMBTJGJDBEPQSPUFHJEP
ZBEFDVBEPQBSBFWJUBSTPCSFDBSHBFMÏDUSJDB Un
circuito eléctrico inadecuado se puede fundir, creando
descargas eléctricas y/o riesgo de incendio.
t.BOUFOHBUPEPTMPTFOWPMUPSJPTBMFKBEPTEFMPT
OJ×PT Los materiales de los envoltorios pueden resultar
peligrosos para los niños. Existe riesgo de asfixia.
t2VJUFUPEPTMPTFMFNFOUPTEFFNCBMBKFZEFTFDIF
BEFDVBEBNFOUFUPEPTMPTNBUFSJBMFTEFFOWÓPSi no
se cumple con esto se podrá producir una explosión,
incendio, quemaduras o muerte.
t$PMPRVFMBTFDBEPSBBVOBMUVSBNÓOJNBEF
QVMHBEBTFODJNBEFMQJTPQBSBVOBJOTUBMBDJØOFO
FMHBSBKF Si no se cumple con esto se podrá producir
una explosión, incendio, quemaduras o muerte.
t/PJOTUBMFMBTFDBEPSBDFSDBEFPUSBGVFOUFEFDBMPS
DPNPTFSVOBFTUVGBVIPSOPSi no cumple con
esta advertencia, puede provocar la deformación del
electrodoméstico, humo o incendio.
t/PDPMPRVFWFMBTPDJHBSSJMMPTTPCSFFMQSPEVDUP Si
no lo hace puede ocasionar daños en el equipo, humos
o un incendio.
t2VJUFMBQFMÓDVMBEFWJOJMPQSPUFDUPSBEFMQSPEVDUP
Si no lo hace puede ocasionar daños en el equipo,
humos o un incendio.
ESPAÑOL
Por su seguridad, debe seguir la información indicada en este manual para minimizar el riesgo de incendio o
explosión, descarga eléctrica, o para prevenir daños a la propiedad, lesiones personales o muerte.
6
INSTRUCCIONES IMPORTANTES DE SEGURIDAD
INSTRUCCIONES IMPORTANTES DE SEGURIDAD
LEA TODAS LA INSTRUCCIONES ANTES DE USAR
WADVERTENCIA
Por su seguridad, debe seguir la información indicada en este manual para minimizar el riesgo de incendio o
explosión, descarga eléctrica, o para prevenir daños a la propiedad, lesiones personales o muerte.
*/4536$$*0/&4*.1035"/5&41"3"-"*/45"-"$*»/
WADVERTENCIA
Para reducir el riesgo de lesiones personales, cumpla con todos los procedimientos de seguridad recomendados
por la industria, incluyendo el uso de use guantes con mangas largas y gafas de seguridad. En caso de no cumplir
con todas las advertencias de seguridad de este manual se podrán producir daños sobre la propiedad, lesiones
personales o la muerte.
Conducto de escape/Tubería:
t-BTTFDBEPSBTBHBT%&#&/UFOFSVODPOEVDUP
EFWFOUJMBDJØOBMFYUFSJPSSi no se siguen estas
instrucciones se podrá producir incendio o muerte.
t1BSBQSFWFOJSFMJOHSFTPEFHSBOEFTDBOUJEBEFTEF
IVNFEBEZQFMVTBBMBIBCJUBDJØOTFSFDPNJFOEB
FOGÈUJDBNFOUFEPUBSMBTTFDBEPSBTFMÏDUSJDBTEFVO
DPOEVDUPEFWFOUJMBDJØOBMFYUFSJPS La acumulación
de pelusa en cualquier parte de la casa puede crear
riesgos de salud e incendio.
t6TFÞOJDBNFOUFTJTUFNBTEFWFOUJMBDJØOEFNFUBM
SÓHJEPPGMFYJCMFEFQVMHBEBTEFEJÈNFUSPEFOUSP
EFMHBCJOFUFEFMBTFDBEPSBPQBSBWFOUJMBDJØOBM
FYUFSJPS-PTTJTUFNBTEFWFOUJMBDJØOEFQMÈTUJDPV
otro material pueden causar incendios. Los sistemas
de ventilación agujereados pueden causar incendios si
se colapsan o bloquean durante el uso o la instalación.
t/PTFQSPWFFFMTJTUFNBEFWFOUJMBDJØODPOMB
TFDBEPSBFMNJTNPEFCFSÈPCUFOFSTFMPDBMNFOUF
-BUBQBUFSNJOBMEFCFSÈUFOFSSFHVMBEPSFTEFUJSP
DPOCJTBHSBTQBSBQSFWFOJSFMSFUPSOPEFEFTDBSHB
cuando no se usa la secadora. Si no se siguen estas
instrucciones se podrá producir incendio o muerte.
t&MDPOEVDUPEFFTDBQFEFCFSÈUFOFSDN
QVMH
EFEJÈNFUSPTJOPCTUSVDDJPOFT&MDPOEVDUP
EFFTDBQFEFCFSÈNBOUFOFSTFMPNÈTDPSUPQPTJCMF
"TFHÞSFTFEFMJNQJBSDVBMRVJFSUJQPEFDPOEVDUP
BOUJHVPBOUFTEFJOTUBMBSTVTFDBEPSBOVFWB Si
no se siguen estas instrucciones se podrá producir
incendio o muerte.
t4FSFDPNJFOEBODPOEVDUPTSÓHJEPTP
TFNJSÓHJEPTQBSBVTBSFOUSFMBTFDBEPSBZMB
QBSFE&OJOTUBMBDJPOFTQBSUJDVMBSFTDVBOEPFT
JNQPTJCMFSFBMJ[BSVOBDPOFYJØOTJHVJFOEPMBT
SFDPNFOEBDJPOFTBOUFTJOEJDBEBTÞOJDBNFOUFTF
QVFEFVUJMJ[BSVODPOEVDUPNFUÈMJDPEFUSBOTJDJØO
BQSPCBEPQPS6-FOUSFMBTFDBEPSBZMBDPOFYJØO
EFQBSFE6TBSFTUFUJQPEFDPOEVDUPBGFDUBSÈFM
tiempo de secado. Si no se siguen estas instrucciones
se podrá producir incendio o muerte.
t/0VUJMJDFUPSOJMMPTEFMÈNJOBEFNFUBMOJPUSP
UJQPEFBTFHVSBEPSFTRVFTFFYUJFOEBOEFOUSP
del conducto y puedan atrapar pelusa y reducir la
FGJDJFODJBEFMTJTUFNBEFFTDBQFAsegure todas las
uniones con cinta adhesiva impermeable. Para más
detalles, siga las Instrucciones de Instalación. Si no se
siguen estas instrucciones se podrá producir incendio
o muerte.
INSTRUCCIONES IMPORTANTES DE SEGURIDAD
7
INSTRUCCIONES IMPORTANTES DE SEGURIDAD
LEA TODAS LA INSTRUCCIONES ANTES DE USAR
WADVERTENCIA
*/4536$$*0/&4*.1035"/5&41"3" $0/&$5"3-"&-&$53*$*%"%
WADVERTENCIA
Para reducir el riesgo de incendio, descargas eléctricas o heridas al usar su electrodoméstico, siga las precauciones
básicas, incluyendo lo siguiente:
t#BKPOJOHVOBDJSDVOTUBODJBDPSUFPRVJUFMBUFSDFSB
QBUBQVFTUBBUJFSSB
EFMDBCMFFMÏDUSJDPPara evitar
heridas a nivel personal o daños sobre la secadora, el
cable de corriente eléctrica debe estar conectado en
una conexión a tierra en condiciones adecuadas.
t1PSNPUJWPTEFTFHVSJEBEQFSTPOBMFTUF
FMFDUSPEPNÏTUJDPEFCFFTUBSDPOFDUBEPBUJFSSB
adecuadamente. Si esto no se cumple se podrán
producir descargas eléctricas o heridas.
t$POTVMUFMBTJOTUSVDDJPOFTEFJOTUBMBDJØOEFFTUF
NBOVBMQBSBPCUFOFSMPTSFRVJTJUPTFMÏDUSJDPT
FTQFDÓGJDPTEFTVNPEFMP Si estas instrucciones no se
cumplen se podrán producir descargas eléctricas y/o
riesgo de incendio.
t&TUBTFDBEPSBEFCFFTUBSFODIVGBEBBVO
tomacorriente conectado a tierra adecuadamente.
Si la secadora no se encuentra adecuadamente
conectada a tierra se pueden producir descargas
FMÏDUSJDBT$POUSBUFBVOFMFDUSJDJTUBDBMJGJDBEPQBSB
RVFDPOUSPMFFMUPNBDPSSJFOUFZFMDJSDVJUPFMÏDUSJDP
QBSBBTFHVSBSTFRVFFMFODIVGFFTUÈDPSSFDUBNFOUF
conectado a tierra. Si estas instrucciones no se
cumplen se podrán producir descargas eléctricas y/o
riesgo de incendio.
t-BTFDBEPSBEFCFFTUBSTJFNQSFFODIVGBEBBTV
UPNBDPSSJFOUFJOEJWJEVBMRVFUFOHBVOÓOEJDF
EFWPMUBKFFRVJWBMFOUFBMRVFGJHVSBFOTVQMBDB
EFFTQFDJGJDBDJPOFTUÏDOJDBTEsta configuración
proporciona el mejor rendimiento y, al mismo tiempo,
evita la sobrecarga de la instalación eléctrica de la casa
que podría provocar un peligro de incendio debido a
un sobrecalentamiento de los cables.
t/VODBEFTFODIVGFTVTFDBEPSBFNQVKBOEPFMDBCMF
EFDPSSJFOUF4JFNQSFUPNFTVFODIVGFGJSNFNFOUF
ZFNQVKFFMNJTNPIBDJBGVFSBQBSBSFUJSBSMP El
cable de corriente se puede cortar debido a cualquier
movimiento de su parte central, resultando en una
descarga eléctrica.
t3FQBSFPSFFNQMBDFEFJONFEJBUPUPEPTMPTDBCMFT
EFDPSSJFOUFQFMBEPTPDPODVBMRVJFSUJQPEFEB×P
/PVTFVODBCMFDPODPSUBEVSBTPBCSBTJØOTPCSF
TVFYUFOTJØOPFYUSFNPTEste cable de corriente se
puede fundir, creando descargas eléctricas y/o riesgo
de incendio.
t"MJOTUBMBSPDBNCJBSEFMVHBSMBTFDBEPSBFWJUF
UPEPUJQPEFDPSUFTVPUSPTEB×PTFOFMDBCMFEF
corriente. Esto evitará heridas o daños debido a
incendios o descargas eléctricas sobre la secadora.
(6"3%&&45"4*/4536$$*0/&4
ESPAÑOL
Por su seguridad, debe seguir la información indicada en este manual para minimizar el riesgo de incendio o
explosión, descarga eléctrica, o para prevenir daños a la propiedad, lesiones personales o muerte.
CARACTERÍSTICAS DEL PRODUCTO
CARACTERÍSTICAS DEL PRODUCTO
PANEL DE CONTROL FÁCIL PARA USAR
Una amplia selección de funciones sencillas de usar para facilitar la operación de la secadora.
EASY-ACCESS REVERSIBLE DOOR
La amplia puerta provee acceso para carga y descarga. Se puede invertir el sentido de la puerta para adaptarlo
al lugar de la instalación.
INDICADOR DEL SISTEMA DE SENSOR DE BLOQUEO DE CONDUCTO FLOW SENSE™
El sistema de detección de bloqueo de conductos FLOW SENSE™ detecta y alerta sobre la existencia de
obstrucciones en el sistema de ventilación doméstico instalado que reducen el flujo de ventilación de la
secadora. Si aparece el mensaje de alerta: Limpie o repare los conductos para eliminar las obstrucciones.
Mantenga sus conductos limpios para aumentar la eficiencia y reducir largos ciclos de secado causados por
conductos bloqueados.
SMARTDIAGNOSIS™
Si experimenta alguna dificultad técnica en su secadora, la misma cuenta con la capacidad de transmitir datos
por teléfono al Centro de Atención al Cliente. El agente del centro de atención registra los datos transmitidos
desde su máquina y los usa para analizar el problema, brindando un diagnóstico rápido y efectivo (consulte la
QÈHJOB
D
8
ES
C
ER
IGN
TIFIE
D
LA INTRODUCCIÓN DE LA SECADORA
9
LA INTRODUCCIÓN DE LA SECADORA
PART ES Y ACCESORIOS
Partes
Filtro de
pelusa
Patas
niveladoras
Panel de
acceso del
bloque
terminal
(Modelos
eléctricos)
Ubicación de
la toma de
gas (Modelos
a gas)
Ubicación
del cable
eléctrico
(Modelos a
gas)
Salida del
conducto
de escape
Accesorios
Accesorios opcionales
Secado en parrilla
"ERVJSJEPQPS
TFQBSBEP
NOTA
t1ØOHBTFFODPOUBDUPDPOFM%FQBSUBNFOUPEFBUFODJØOBMDMJFOUFEF-(FOFMOÞNFSP
FO$BOBEÈ
TJGBMUBBMHVOPEFMPTBDDFTPSJPT
t1BSBTVTFHVSJEBEZDPOFMGJOEFBNQMJBSMBWJEBÞUJMEFTVMBWBEPSBVUJMJDFTØMPDPNQPOFOUFTBVUPSJ[BEPT&M
fabricante no se hace responsable de los fallos del producto o accidentes causados por la utilización de piezas o
componentes no autorizados.
t-BTJNÈHFOFTEFFTUBHVÓBQVFEFOOPDPJODJEJSDPOMPTDPNQPOFOUFTZBDDFTPSJPTSFBMFTZFTUÈOTVKFUBTB
cambios sin previo aviso para mejoras en el producto.
ESPAÑOL
Puerta
reversible
Panel de
control
10
LA INTRODUCCIÓN DE LA SECADORA
Características del panel de control
A continuación encontrará instrucciones para comenzar a usar su secadora nueva. Para más información por favor
consulte las secciones específicas de este manual.
WADVERTENCIA
Para reducir el riesgo de incendios, descargas eléctricas o heridas, lea este manual en su totalidad, incluyendo las
Instrucciones Importantes de Seguridad, antes de operar la secadora.
A
F
E
A #05»/%&&/$&/%*%0"1"("%0
G
D
B
C
D #050/&4%&.«45*&.10.&/04
ŷ0/0''Ÿ
5*&.10ŷ.03&5*.&-&445*.&Ÿ
Apriete el botón para encender la secadora.
Apriete nuevamente para apagar la secadora.
Utilice esos botones con el TIEMPO DE
SECADO(TIME DRY) y otros ciclos de SECADO
MANUAL(MANUAL DRY) para ajustar el tiempo
de secado. Pulse el botón MÁS TIEMPO(MORE
TIME) para aumentar el tiempo del ciclo
manual seleccionado de un minuto; pulse
MENOS TIEMPO(LESS TIME) para reducir el
tiempo del ciclo de un minuto.
NOTA
Si pulsa el botón APAGADO/ENCENDIDO durante
un ciclo, se cancelará ese ciclo y se perderán
todas las configuraciones de carga. APAGADO
AUTOMÁTICO(AUTO OFF:) : para preservar la energía,
la secadora se apaga automáticamente tras finalizar
un ciclo o en cualquier momento si se pausa la
secadora durante más de algunos minutos.
B 130(3"."#05»/ŷ$:$-&4Ÿ
Pulse el botón CICLOS(CYCLES) repetidamente
para desplazarse por las selecciones de ciclo hasta
seleccionar el cicclo deseado. La pre configuración
estándar para el ciclo seleccionado se mostrará en el
visualizador. En ciclos de SECADO MANUAL(MANUAL
DRY), se pueden ajustar esas configuraciones
mediante los botones de configuración del ciclo en
todo momento antes de iniciar el ciclo.
C #05»/%&*/*$*01"64"ŷ45"35
1"64&Ÿ
Apriete este botón para iniciar el ciclo
seleccionado. Si la secadora está funcionando,
utilice este botón para hacer una PAUSA en el
ciclo, sin perder los ajustes actuales.
NOTA
Si no aprieta el botón INICIO/pAUSA (START/
Q"64&
QBSBEFUFOFSVODJDMPFONJOVUPTMB
secadora se apagará automáticamente.
E #050/&4%&"+645&%&$*$-04
Utilice estos botones para seleccionar las
configuraciones del ciclo deseado para el ciclo
seleccionado. Las configuraciones actuales
se muestran en el visualizador. Pulse el botón
para esa opción a fin de seleccionar otras
configuraciones.
F 1"/5"--"%&5*&.10:&45"%0
La pantalla muestra las configuraciones, tiempo
restante estimado, opciones, y mensajes de
estado de su secadora.
G #050/&4%&01$*0/&4
Los botones de opciones le permiten seleccionar
opciones de ciclo adicionales. Ciertos botones
también le permitirán activar funciones
especiales al apretar y mantener apretado el
CPUØOEVSBOUFTFHVOEPT
LA INTRODUCCIÓN DE LA SECADORA
11
Pantalla
La pantalla muestra los ajustes, el tiempo restante estimado, las opciones y los mensajes de estado correspondientes
a su secadora. Cuando la secadora está encendida, se iluminarán las luces del visualizador.
D
B
C
E
A 5*&.103&45"/5&3&45"/5&&45*."%0
ŷ&45*."5&%5*.&3&."*/*/(Ÿ
Este visualizador muestra el tiempo
estimado restante para los ciclos de SECADO
SENSOR(SENSOR DRY) o el tiempo real
restante para los ciclos de SECADO CON
TIEMPO LIMITADO(TIMED DRY) o SECADO
MANUAL(MANUAL DRY).
A
D 3&$03%"503*0%&7&3*'*$"3
'*-530$)&$,'*-5&33&.*/%&3
La pantalla mostrará VERIFICAR FILTRO(CHECK
FILTER) cuando se ha encendido la secadora
como un recordatorio para revisar el filtro.
Se apaga cuando se aprieta el botón INICIO/
PAUSA (START/PAUSE)
NOTA
El tiempo de ciclo en los ciclos SECADO CON
SENSOR (SENSOR DRY) podrian fluctuar a medida
que la secadora vuelve a calcular el tiempo de
secado para obtener resultados optimos.
B */%*$"%03%&'*/"-*;"$*»/%&$*$-0$0/
3&$03%"503*0%&$0/530-%&'*-530
Esta opción de la pantalla muestra qué
etapa del ciclo de secado se está llevando
a cabo: VERIFICAR FILTRO(CHECK FILTER),
SECADO(DRYING), ENFRIADO(COOLING) o ANTI
ARRUGAS (WRINKLE CARE).
E 130(3"."1&340/"-*;"%0
ŷ$6450.130(3".Ÿ
Si usted tiene una combinación especial de
configuraciones que utiliza con frecuencia,
puede guardarlas como PROGRAMA
PERSONALIZADO (CUSTOMTOM PROGRAM)
F */%*$"%03%&-4*45&."%&4&/403%&
C */%*$"%03%&$&33"%63""
136&#"%&/*º04ŷ$)*-%-0$,Ÿ
Cuando se ha fijado el seguro infantil, aparecerá
el indicador de seguro infantil y se desactivarán
todos los botones excepto el botón de
ENCENDIDO/APAGADO (ON/OFF). Esto previene
que los niños cambien los ajustes mientras la
secadora se encuentra en funcionamiento.
#-026&0%&$0/%6$50'-084&/4&
El sistema sensor de bloqueo del conducto
FLOW SENSE™ detecta y le alerta de graves
bloqueos en los conductos que reducen el
flujo de escape de la secadora. Mantener
limpio el sistema de escape mejora la eficacia
operacional y ayuda a minimizar las llamadas a
mantenimiento, ahorrando su dinero.
ESPAÑOL
F
12
INSTRUCCIONES PARA LA INSTALACIÓN
INSTRUCCIONES PARA LA INSTALACIÓN
Vista previa del orden de instalación
Comprobación
y elección de la
ubicación adecuada
Nivelación de la
secadora
ventilación de la
secadora
120V
Conexión de secadoras
a gas (Tipo de
secadoras gas)
Cómo conectar las
secadoras eléctricas (Tipo
secadoras eléctricas)
Pulse y mantenga
Test de Instalación
(consulte la página 27)
Prueba de
funcionamiento
240V
Conexión del enchufe y la
toma de tierra
INSTRUCCIONES PARA LA INSTALACIÓN
13
Requisitos del lugar de instalación
WADVERTENCIA
4JHBMBTJOTUSVDDJPOFTEFGVODJPOBNJFOUPZDVJEBEPJODMVJEBTFOFTUFNBOVBMZDPOTFHVJSÈRVFTVTFDBEPSB
PGSF[DBVOTFSWJDJPGJBCMFZEVSBEFSPEs importante que revise todo este manual antes de instalar y usar su
secadora. Se proporcionan instrucciones detalladas pertinentes a las conexiones eléctricas, de gas y los requisitos de
escape en las siguientes páginas.
t&MTVFMPEFCFTFSGJSNFQBSBTPQPSUBSFMQFTPUPUBMEFMB
TFDBEPSBTJFOEPÏTUFEFLHMCT
*HVBMNFOUF
se tendrá en cuenta el peso combinado de un posible
electrodoméstico acoplado.
tNo se puede instalar ningún aparato de combustión
en el mismo compartimento que la secadora.
/PVUJMJDFMBTFDBEPSBBUFNQFSBUVSBTJOGFSJPSFTB¡$¡'
"UFNQFSBUVSBTCBKBTMBTFDBEPSBQVFEFOPBQBHBSTFBM
final de un ciclo automático. Esto puede conllevar a tiempos de secado más largos. La secadora no se debe instalar ni
almacenar en una zona donde pueda estar expuesta al agua o a inclemencias meteorológicas. Compruebe los requi
sitos del código. Algunos códigos limitan, o no permiten, la instalación de la secadora en garajes, muebles cerrados,
caravanas o dormitorios. Contacte con la persona encargada de la inspección de su edificio.
NOTA
t&MTVFMPEFBQPZPEFMBTFDBEPSBEFCFFTUBSOJWFMBEPZOPUFOFSVOBJODMJOBDJØOTVQFSJPSBDNQVMH
4J
MBJODMJOBDJØOFTTVQFSJPSBDNQVMH
DPMPRVFVODPOKVOUPEFQBUBTEFFYUFOTJØOEFMBTFDBEPSB4JMB
secadora no está nivelada, las prendas no se centrifugarán correctamente y los ciclos de sensor automático
puede que no funcionen como corresponde.
t1BSBMBJOTUBMBDJØOFOVOHBSBKFOFDFTJUBDPMPDBSMBTFDBEPSBBDNQVMH
DPNPNÓOJNPEFMTVFMP4JVUJMJ[B
VOQFEFTUBMEFCFEFKBSVOBTFQBSBDJØOEFDNQVMH
SFTQFDUPBMBQBSUFJOGFSJPSEFMBTFDBEPSB
Espacios de instalación
(7,6 cm)
14" max.*
(35,6 cm)
21 1/4"
(54 cm)
40 3/16"
(102 cm)
28 15/16"
(73,4 cm)
5"**
(12,7 cm)
(2,54 cm)
50 1/4"
(127,5 cm)
(68,6 cm)
(2,54 cm)
Requisitos de ventilación
(7,6 cm) de la puerta del armario
SEPARACIÓN AL REALIZAR LA INSTALACIÓN EN ÁREAS CERRADAS O EMPOTRADAS
Para esta secadora, se recomienda dejar las siguientes separaciones. Esta secadora se ha evaluado dejando una
TFQBSBDJØOEFDNQVMH
BBNCPTMBEPTZFOMBQBSUFQPTUFSJPS4FSFDPNJFOEBEFKBSFMFTQBDJPSFDPNFOEBEP
por las razones siguientes:
t4FEFCFEFKBSVOFTQBDJPBEJDJPOBMQBSBGBDJMJUBSMBT
tareas de instalación y mantenimiento.
t-BTTFQBSBDJPOFTBEJDJPOBMFTQVFEFOTFSOFDFTBSJBT
para las molduras del techo, el suelo o la pared.
t*HVBMNFOUFTFEFCFODPOTJEFSBSMBTTFQBSBDJPOFT
a ambos lados de la secadora para reducir la
transmisión de ruido. Al realizar la instalación en un
armario o habitáculo cerrado, debe haber salidas de
ventilación mínimas en la parte superior e inferior del
lugar. También se permiten las puertas apersianadas
con salidas de ventilación equivalentes.
t"EFNÈTEFCFUFOFSTFFODVFOUBFMFTQBDJPSFRVFSJEP
por cualquier otro aparato que se acompañe.
NOTA
Al menos se debe dejar un espacio alrededor de la secadora (o de cualquier otro equipo) para eliminar la
transferencia de vibración de uno a otro. Si la vibración es importante, podría desencadenar ruidos o fricción
entre ambos, con el consecuente deterioro de la pintura e incluso, más ruido.
ESPAÑOL
t6OMVHBSRVFQFSNJUBMBJOTUBMBDJØODPSSFDUBEFM
sistema de escape. El secador de gas debe tener una
salida de escape hacia el exterior. Consulte 3FRVJTJUPT
EFWFOUJMBDJØO.
t-BTBMJEBFMÏDUSJDBEFUPNBBUJFSSBEFCFFTUBSB
DNQJFT
EFBNCPTMBEPTEFMBTFDBEPSB$POTVMUF
3FRVJTJUPTFMÏDUSJDPT.
14
INSTRUCCIONES PARA LA INSTALACIÓN
Espacios de instalación (cont.)
SEPARACIÓN RECOMENDADA PARA LA INSTALACIÓN EN UN HABITÁCULO CERRADO
t"MSFBMJ[BSMBJOTUBMBDJØOFOVOIBCJUÈDVMPDFSSBEPEFCFIBCFSTBMJEBTEFWFOUJMBDJØONÓOJNBTFOMBQBSUFTVQFSJPSF
inferior del lugar.
7"* (17,8 cm)
7"* (17,8 cm)
*Espacio requerido
** Para la ventilación lateral e inferior,
TFQFSNJUFVOBTFQBSBDJØOEFDN
QVMH
5"* 28
1"*
(12,7 cm) (73,4 cm) (2,5 cm)
1"
27 "
(2,54 cm) (68,6 cm)
1"
(2,54 cm
Nivelación de la secadora
WADVERTENCIA
t1BSBSFEVDJSFMSJFTHPEFMFTJPOFTQFSTPOBMFT
cumpla con todos los procedimientos de seguridad
SFDPNFOEBEPTQPSMBJOEVTUSJBJODMVZFOEPFM
VTPEFVTFHVBOUFTDPONBOHBTMBSHBTZHBGBTEF
seguridad. Si no se cumple con esta advertencia se
podrán producir heridas graves o muerte.
t-PTBQBSBUPTTPOQFTBEPT4FOFDFTJUBOEPTPNÈT
QFSTPOBTQBSBMBJOTUBMBDJØOEFMBTFDBEPSBSi no
se cumple con esta advertencia se podrán producir
heridas graves o muerte.
Para asegurar que la secadora brinde un desempeño
óptimo de secado, debe estar nivelada. Para minimizar
la vibración, el ruido y movimiento no deseados, el piso
deberá ser una superficie perfectamente nivelada y
sólida.
NOTA
Fije las patas niveladoras sólo en la medida necesaria
para nivelar la secadora. La extensión de las patas
niveladoras más de lo necesario puede causar
vibración de la secadora.
1PTJUJPOUIFESZFSJOUIFGJOBMMPDBUJPO1MBDFBMFWFM
across the top of the dryer.
Nivelador
Patas niveladoras
t-BTQBUBTOJWFMBEPSBTEFCFSÈOBQPZBSTFGJSNFNFOUFFO
el piso. Empuje suavemente las esquinas superiores de la
secadora para asegurarse de que su secadora no se mece
de esquina a esquina.
Si está instalando la secadora sobre el accesorio de pedestal
opcional, deberá usar las patas niveladoras del pedestal
para nivelarla. Las patas niveladoras de la secadora deberán
estar completamente retraídas.
6TFVOBMMBWFEFUVFSDBTBKVTUBCMFQBSBHJSBSMBTQBUBT
niveladoras. Gire en la dirección de las manecillas del reloj
para levantar la secadora o en dirección contraria para
bajarla. Suba o baje las patas niveladoras hasta que la
secadora esté nivelada de lado a lado y de adelante hacia
atrás.
"TFHÞSFTFEFRVFMBTQBUBTOJWFMBEPSBTTFFODVFOUSBO
haciendo contacto firme con el piso.
INSTRUCCIONES PARA LA INSTALACIÓN
15
Inversion de la puerta
WADVERTENCIA
3FUJSFMPTUPSOJMMPTGJKBOEPMBTCJTBHSBTBMBFTUSVDUVSB
de la puerta. Retire los dos rellenadores de plástico.
Vuelva a instalar las bisagras y los rellenadores en los
lados opuestos a su posición inicial.
Montaje
de bisagra
Tapa de
cubierta
5. Con las bisagras y los rellenadores en la nueva
posición, monte de nuevo el panel interior de la
puerta en la estructura de ésta con los tornillos
SFUJSBEPTFOFMQBTPBOUFSJPS
Cubierta
de agujero
.JFOUSBTTVKFUBMBQVFSUBSFUJSFMPTUPSOJMMPTEPTEF
cada bisagra. Deje la puerta a un lado, posicionada
hacia abajo sobre una superficie protegida para evitar
que se dañe.
Tornillo de
bisagra
$POMBQVFSUBDPMPDBEBTPCSFVOBTVQFSGJDJFQSPUFHJEB
SFUJSFMPTUPSOJMMPTEFDBEBMBEPEFMBQVFSUBZSFUJSF
el panel interior de la puerta con un destornillador de
punta plana. Retire el enganche y la pieza, y llévelas al
lado opuesto.
7VFMWBBDPMPDBSMBQVFSUBVUJMJ[BOEPMPTUPSOJMMPTEFM
QBTP
$PNQSVFCFFMHJSPEFMBQVFSUBQBSBBTFHVSBSTFEF
que las bisagras y el enganche están bien alineados y
que la puerta cierra y abre correctamente.
Estructura interior
de la puerta
Enganche
Puerta
giratoria
ESPAÑOL
t1BSBFWJUBSEB×PTFOMBTFDBEPSBPFOMBQVFSUB
TVKFUFEJDIBQVFSUBDPOVOUBCVSFUFPVOBDBKBEF
VOUBNB×PBDPSEFPDPOTJHBVOBQPZPRVFTPQPSUF
el peso de la puerta.
t&WJUFRVFMBQVFSUBTFDBJHBQBSBRVFOPTF
QSPEV[DBOEB×PTFOMBQVFSUBPFOFMTVFMP
LA PUERTA DE LA SECADORA ES MUY GRANDE Y
PESADA. El no seguimiento de las instrucciones
siguientes puede dañar la secadora, ocasionar daños
materiales o físicos.
Abra la puerta y retire las dos cubiertas de plástico
que cubren el agujero en la zona de sujeción; para
ello, presione con cuidado hacia arriba con un
EFTUPSOJMMBEPSEFQVOUBQMBOB(VÈSEFMBTQBSBFMQBTP
16
INSTRUCCIONES PARA LA INSTALACIÓN
Instalación del kit de ventilación lateral
WADVERTENCIA
t6UJMJDFNBUFSJBMQBSBWFOUJMBDJØOEFNFUBMQFTBEP
t/PVUJMJDFDPOEVDUPTEFQMÈTUJDPPBMVNJOJPEFMHBEP
t-JNQJFMPTDPOEVDUPTBOUJHVPTBOUFTEFJOTUBMBSFTUB
secadora.
t1BSBSFEVDJSFMSJFTHPEFMFTJPOFTQFSTPOBMFT
cumpla con todos los procedimientos de seguridad
SFDPNFOEBEPTQPSMBJOEVTUSJBJODMVZFOEPFMVTPEF
VTFHVBOUFTDPONBOHBTMBSHBTZHBGBTEFTFHVSJEBE
t&ODBTPEFOPDVNQMJSDPOUPEBTMBTBEWFSUFODJBTEF
seguridad de este manual se podrán producir daños sobre
la propiedad, lesiones personales o la muerte.
Su secadora está equipada de fábrica para ventilar en la
parte trasera. También puede configurarse para ventilar
en la parte inferior o lateralmente (no está disponible la
ventilación del lado derecho en los modelos a gas).
1VFEFBERVJSJSTFFMLJUBEBQUBEPSOÞNFSPEFQJF[B
&&-#EFTVEJTUSJCVJEPS-(&TUFLJUDPOUJFOFMPT
componentes de conducto necesarios para cambiar la
ubicación de la ventilación de la secadora.
3FUJSFFMUPSOJMMPEFTFHVSJEBEEFMDPOEVDUPEFFTDBQF
trasero. Saque el conducto de escape.
Tornillo de
seguridad
Parte trasera
Conducto de escape
OPCIÓN 1: VENTILACIÓN LATERAL
"QSJFUFMBTMFOHàFUBTFOFMEJTQPTJUJWPEFFYQVMTJØOZ
retírelo cuidadosamente para obtener la ventilación
adecuada (no está disponible ventilación lateral en los
modelos a gas). Apriete el conducto adaptador en la
carcasa del ventilador y asegure la base de la secadora
como se indica.
$POFDUFVODPEPEFQVMHBEBTDN
BMB
TJHVJFOUFTFDDJØOEFDPOEVDUPEFQVMHBEBT
cm), y asegure todas las conexiones con cinta
adhesiva impermeable. Asegúrese de que el extremo
macho del codo apunte hacia AFUERA de la secadora.
Inserte el montaje de codo/conducto a través de
la abertura lateral y presiónelo en el conducto
adaptador. Asegúrelo en su lugar con cinta adhesiva
impermeable. Asegúrese de que el extremo macho
EFMDPOEVDUPTPCSFTBMHB/QVMHBEBTDN
QBSB
conectar el resto del sistema de ventilación. Conecte
la placa de cubierta a la parte trasera de la secadora
con el tornillo provisto.
Cover
Plate
Elbow
OPCIÓN 2: VENTILACIÓN INFERIOR
"QSJFUFFMDPOEVDUPBEBQUBEPSFOMBDBSDBTBEFM
ventilador y asegure la base de la secadora como se
indica.
Conducto
adaptador
Abrazadera
*OTFSUFFMDPEPEFQVMHBEBTDN
BUSBWÏTEFMB
abertura trasera y apriételo en el conducto adaptador.
Asegúrese de que el extremo macho y el codo
apunten hacia abajo por el orificio ubicado en la parte
inferior de la secadora. Asegúrelo en su lugar con cinta
adhesiva impermeable. Conecte la placa de cubierta a
la parte trasera de la secadora con el tornillo provisto.
Conducto
adaptador
Abrazadera
Placa de
cubierta
Codo
Dispositivo de expulsión
/”
DN
INSTRUCCIONES PARA LA INSTALACIÓN
17
Cónexión del conducto de ventilación de la secadora
WADVERTENCIA
Para reducir el riesgo de incendio, descargas eléctricas o heridas al usar su electrodoméstico, siga las precauciones
básicas, incluyendo lo siguiente:
t/PQFSNJUBRVFFMTJTUFNBEFDPOEVDUPTFBTJFOUF
TPCSFPCKFUPTQVOUJBHVEPTOJFOUSFFODPOUBDUP
con los mismos. Si no se siguen estas instrucciones se
podrá producir incendio o muerte.
t4JDPOFDUBBVOTJTUFNBEFDPOEVDUPFYJTUFOUF
BTFHÞSFTFEFRVFTFBBEFDVBEPZEFRVFFTUÏ
limpio antes de instalar la secadora. Si no se siguen
estas instrucciones se podrá producir incendio o
muerte.
t&MTJTUFNBEFWFOUJMBDJØOEFCFTFHVJSMPTDØEJHPT
EFDPOTUSVDDJØO Si no se siguen estas instrucciones
se podrá producir incendio o muerte.
t-BTTFDBEPSBTEFHBT%&#&/WFOUJMBSIBDJBFM
FYUFSJPSSi no se siguen estas instrucciones se podrá
producir incendio o muerte.
tÁOJDBNFOUFVTFVOTJTUFNBEFDPOEVDUPSÓHJEP
ZEFNFUBMGMFYJCMFEFDNQVMH
EFOUSP
EFMHBCJOFUFEFMBTFDBEPSBZQBSBWFOUJMBDJØOBM
FYUFSJPS Si no se siguen estas instrucciones se podrá
producir incendio o muerte.
t1BSBSFEVDJSFMSJFTHPEFJODFOEJPDPNCVTUJØOP
BDVNVMBDJØOEFHBTFTDPNCVTUJCMFT/0EFTDBSHVF
el escape de la secadora en un área cerrada o no
WFOUJMBEBUBMDPNPVOEFTWÈOQBSFEDJFMPSBTP
FTQBDJPFOUSFFMDJNJFOUPZMBUJFSSBDIJNFOFB
DPOEVDUPEFHBTPFTQBDJPTPDVMUPTEFVOFEJGJDJP
Si no se siguen estas instrucciones se podrá producir
incendio o muerte.
t1BSBSFEVDJSFMSJFTHPEFJODFOEJP/0EFTDBSHVF
el escape de la secadora usando conductos de
plástico ni de lámina metálica. Si no se siguen estas
instrucciones se podrá producir incendio o muerte.
t&MDPOEVDUPEFFTDBQFEFCFSÈUFOFSDN
QVMH
EFEJÈNFUSPTJOPCTUSVDDJPOFT&MDPOEVDUP
EFFTDBQFEFCFSÈNBOUFOFSTFMPNÈTDPSUPQPTJCMF
"TFHÞSFTFEFMJNQJBSDVBMRVJFSUJQPEFDPOEVDUP
BOUJHVPBOUFTEFJOTUBMBSTVTFDBEPSBOVFWB Si
no se siguen estas instrucciones se podrá producir
incendio o muerte.
t4FSFDPNJFOEBODPOEVDUPTSÓHJEPTP
TFNJSÓHJEPTQBSBVTBSFOUSFMBTFDBEPSBZMB
QBSFE&OJOTUBMBDJPOFTQBSUJDVMBSFTDVBOEPFT
JNQPTJCMFSFBMJ[BSVOBDPOFYJØOTJHVJFOEPMBT
SFDPNFOEBDJPOFTBOUFTJOEJDBEBTÞOJDBNFOUFTF
QVFEFVUJMJ[BSVODPOEVDUPNFUÈMJDPEFUSBOTJDJØO
BQSPCBEPQPS6-FOUSFMBTFDBEPSBZMBDPOFYJØO
EFQBSFE6TBSFTUFUJQPEFDPOEVDUPBGFDUBSÈFM
tiempo de secado. Si no se siguen estas instrucciones
se podrá producir incendio o muerte.
t/0VUJMJDFUPSOJMMPTEFMÈNJOBEFNFUBMOJPUSP
UJQPEFBTFHVSBEPSFTRVFTFFYUJFOEBOEFOUSP
del conducto y puedan atrapar pelusa y reducir la
FGJDJFODJBEFMTJTUFNBEFFTDBQF"TFHVSFUPEBTMBT
VOJPOFTDPODJOUBBEIFTJWBJNQFSNFBCMF Si no se
siguen estas instrucciones se podrá producir incendio
o muerte.
t1BSBNBYJNJ[BSMPTSFTVMUBEPTEFGVODJPOBNJFOUP
siga las limitaciones de longitud del conducto
JOEJDBEBTFOFMDVBESPEFBSSJCB Si no se siguen
estas instrucciones se podrá producir incendio o
muerte.
t/PTFQSPWFFFMTJTUFNBEFWFOUJMBDJØODPOMB
TFDBEPSBFMNJTNPEFCFSÈPCUFOFSTFMPDBMNFOUF
-BUBQBUFSNJOBMEFCFSÈUFOFSSFHVMBEPSFTEFUJSP
DPOCJTBHSBTQBSBQSFWFOJSFMSFUPSOPEFEFTDBSHB
cuando no se usa la secadora. Si no se siguen estas
instrucciones se podrá producir incendio o muerte.
t-BMPOHJUVEUPUBMEFMDPOEVDUPNFUÈMJDPGMFYJCMFOP
EFCFSÈTVQFSBSMPTNQJFT
t&O$BOBEÈTØMPTFEFCFSÈOVTBSDPOEVDUPT
GMFYJCMFTEFMÈNJOBEFNFUBMTJTFQSFDJTBTFO
FTQFDÓGJDBNFOUFJEFOUJGJDBEPTQPSFMGBCSJDBOUFQBSB
TVVTPDPOFMFMFDUSPEPNÏTUJDPEn EE.UU., sólo se
deberán usar conductos flexibles de lámina de metal,
si se precisasen, específicamente identificados por el
fabricante para su uso con el electrodoméstico y que
cumplan la “Outline for Clothes Dryer Transition Duct”
(Directriz para conductos de transición de secadoras),
4VKFUP"
ESPAÑOL
t/PBQMBTUFOJEPCMFFMTJTUFNBEFDPOEVDUPSi no se
siguen estas instrucciones se podrá producir incendio
o muerte.
18
INSTRUCCIONES PARA LA INSTALACIÓN
Conexión del conducto de ventilación de la secadora (cont.)
Sistema de conducto
5*10%&5"1"
%&1"3&%
Recomendado
w
DN
w
DN
Solamente para
el uso en los
instalaciones de
conducto cortos
/”
DN
-0/(.«9
/Á.&30%&
%&$0/%6$50
$0%04%&
.&5«-*$0'-&9*#-&
¡
%&%*«.w
QJFTN
QJFTN
QJFTN
QJFTN
QJFTN
QJFTN
QJFTN
QJFTN
QJFTN
QJFTN
NOTA
3FTUFQJFTN
QPSDBEBDPEPBEJDJPOBM/PTF
SFDPNJFOEBVTBSNÈTEFDVBUSPDPEPTEF¡
DIRECCIONAMIENTO Y CONEXIÓN DEL SISTEMA DE
CONDUCTO DE ESCAPE
NOTA
Siga las pautas indicadas más abajo para maximizar
el desempeño de secado y reducir la acumulación de
pelusa en el sistema de conducto.
El sistema de conducto y las conexiones NO están
incluidas y deben adquirirse por separado.
t6TFVOTJTUFNBEFDPOEVDUPNFUÈMJDPSÓHJEPP
TFNJSÓHJEPEFDNQVMH
t&MDPOEVDUPEFFTDBQFEFCFSÈUFOEFSTFMPNÈTDPSUP
posible.
t6TFMBNFOPSDBOUJEBEEFDPOFYJPOFTEFDPEPRVF
sea posible.
t&MFYUSFNPNBDIPEFDBEBTFDDJØOEFMDPOEVDUPEF
escape deberá apuntar hacia afuera de la secadora.
t6TFDJOUBBEIFTJWBJNQFSNFBCMFFOUPEBTMBT
conexiones de conducto.
t"ÓTMFFMTJTUFNBEFDPOEVDUPRVFTFUJFOEFBUSBWÏT
de áreas sin calefacción para reducir la condensación
y acumulación de pelusa en las superficies del
conducto.
t-PTTJTUFNBTEFFTDBQFJODPSSFDUPTPJOBEFDVBEPT
no están cubiertos por la garantía de la secadora.
Las averías o un rendimiento escaso debido a dichos
sistemas de escape no estarán cubiertos por la
garantía de la secadora.
7&/5*-"$*»/%&&4$"1&$033&$5"
7&/5*-"$*»/
%&&4$"1&*/$033&$5"
INSTRUCCIONES PARA LA INSTALACIÓN
19
Conexión de secadoras a gas
WADVERTENCIA
Para reducir el riesgo de incendio, descargas eléctricas o heridas al usar su electrodoméstico, siga las precauciones
básicas, incluyendo lo siguiente:
tConecte la secadora al tipo de gas indicado en la placa
EFMOPNCSF Si no se cumple con esto se podrá producir
una explosión, incendio o muerte.
t1BSBQSFWFOJSMBDPOUBNJOBDJØOEFMBWÈMWVMBEFHBT
purgue el aire y sedimento del suministro de gas antes
de conectar el suministro de gas a la secadora. Antes
EFBKVTUBSMBDPOFYJØOFOUSFFMTVNJOJTUSPEFHBTZ
MBTFDBEPSBQVSHVFFMBJSFIBTUBRVFTFEFUFDUFPMPS
a gas. Si no se cumple con esto se podrá producir una
explosión, incendio o muerte.
t/0VTFVOBMMBNBBCJFSUBQBSBJOTQFDDJPOBSMBTGVHBT
EFHBT6TFVOGMVJEPBOUJDPSSPTJWPQBSBEFUFDDJØOEF
GVHBTSi no se cumple con esto se podrá producir una
explosión, incendio o muerte.
t6UJMJDFÞOJDBNFOUFVOBMÓOFBEFTVNJOJTUSPEFHBT
OVFWBDFSUJGJDBEBQPS"("P$4"DPODPOFDUPSFT
GMFYJCMFTEFBDFSPJOPYJEBCMF Si no se cumple con esto
se podrá producir una explosión, incendio o muerte.
t"KVTUFCJFOUPEBTMBTDPOFYJPOFTEFHBT
Si no se cumple con esto se podrá producir una explosión,
incendio o muerte.
t/0JOUFOUFEFTNPOUBSOJOHÞODPNQPOFOUFEFMB
TFDBEPSBDVBMRVJFSEFTNPOUBKFSFRVJFSFEFMB
BUFODJØOZIFSSBNJFOUBTEFVOUÏDOJDPPDPNQB×ÓBEF
NBOUFOJNJFOUPBVUPSJ[BEPZDBMJGJDBEPSi no se cumple
con esto se podrá producir una explosión, incendio o
muerte.
t6TFVODPNQVFTUPQBSBDPOFYJPOFTEFUVCFSJB
JOTPMVCMFFOHBTEFQFUSPMFPMJRVJEP-1
FOUPEBTMBT
SPTDBTEFUVCFSJB Si no se cumple con esto se podra
producir una explosion, incendio o muerte.
Requisitos eléctricos para modelos a gas únicamente
WADVERTENCIA
Para reducir el riesgo de incendio, descargas eléctricas o heridas al usar su electrodoméstico, siga las precauciones
básicas, incluyendo lo siguiente:
t#BKPOJOHVOBDJSDVOTUBODJBDPSUFPRVJUFMBUFSDFSB
QBUBQVFTUBBUJFSSB
EFMDBCMFFMÏDUSJDP Si no se
cumple con esto se podrá producir una explosión,
incendio o muerte.
t1PSNPUJWPTEFTFHVSJEBEQFSTPOBMMBTFDBEPSB
EFCFFTUBSDPOFDUBEBBUJFSSBBEFDVBEBNFOUFSi no
se cumple con esto se podrá producir una explosión,
incendio o muerte.
t&MDBCMFFMÏDUSJDPEFFTUBTFDBEPSBFTUÈFRVJQBEP
DPOVOFODIVGFEFQBUBTDPOFYJØOBUJFSSB
RVFTF
DPOFDUBBVOUPNBDPSSJFOUFEFQBSFEEFUSFTQBUBTDPO
DPOFYJØOBUJFSSB
QBSBNJOJNJ[BSMBQPTJCJMJEBEEF
QFMJHSPEFEFTDBSHBFMÏDUSJDBEFFTUFFMFDUSPEPNÏTUJDP
Si no se cumple con esto se podrá producir una explosión,
incendio o muerte.
t4FEFCFFODIVGBSFTUBTFDBEPSBBVOUPNBDPSSJFOUF
DPOFDUBEPBUJFSSBEF7$")[QSPUFHJEPQPSVO
GVTJCMFPDPSUBDJSDVJUPTEFBNQFSJPT Si no se cumple
con esto se podrá producir una explosión, incendio o
muerte.
t&ODBTPEFEJTQPOFSEFVOUPNBDPSSJFOUFEFQBSFE
FTUÈOEBSEFQBUBTFTTVSFTQPOTBCJMJEBEZ
PCMJHBDJØOQFSTPOBMFTDBNCJBSMPQPSVOPEFQBUBT
conectado a tierra adecuadamente. Si no se cumple con
esto se podrá producir una explosión, incendio o muerte
ESPAÑOL
t3FRVJTJUPTEFTVNJOJTUSPEFHBT
$PNPFOWJBEPEFGÈCSJDBTJDPOGJHVSBMBTFDBEPSBQBSB
VTPDPOHBTOBUVSBM1VFEFDPOWFSUJSTFQBSBVTBSDPO
HBT-1QSPQBOPMÓRVJEP
-BQSFTJØOEFHBTOPEFCF
TPCSFQBTBSMBDPMVNOBEFBHVBEFQVMHBEBT
t6OUÏDOJDPDBMJGJDBEPEFNBOUFOJNJFOUPPEFMB
DPNQB×ÓBEFHBTEFCFDPOFDUBSMBTFDBEPSBBM
suministro de gas. Si no se cumple con esto se podrá
producir una explosión, incendio o muerte.
t"ÓTMFMBTFDBEPSBEFMTJTUFNBEFTVNJOJTUSPEFHBT
DFSSBOEPTVWÈMWVMBEFDPSUFJOEJWJEVBMNBOVBM
EVSBOUFDVBMRVJFSUJQPEFQSVFCBEFQSFTJØOEFM
suministro de gas. Si no sigue esta advertencia, se puede
producir un incendio, explosión, o muerte.
t3FRVJTJUPTEFMBMÓOFBEFTVNJOJTUSP4VDVBSUPEF
MBWBEPEFCFUFOFSVOBMÓOFBSÓHJEBEFTVNJOJTUSPEF
HBTQBSBMBTFDBEPSB&OMPT&&66TFEFCFJOTUBMBS
VOBWÈMWVMBEFDPSUFNBOVBMJOEJWJEVBMBVOBEJTUBODJB
EFQPSMPNFOPTQJFTN
EFMBTFDBEPSBEF
BDVFSEPDPOFM$ØEJHP/BDJPOBMEF(BT$PNCVTUJCMF
"/4*;4FEFCFJOTUBMBSVOUBQØOEFUVCFSÓBEF
QVMHBEBT/15 Si no se cumple con esto se podrá
producir una explosión, incendio o muerte.
t4JTFVTBUVCFSÓBSÓHJEBMBUVCFSÓBSÓHJEBEFCFSÈTFSEF
QVMHBEBT*144JFTBDFQUBCMFTFHÞOMPTDØEJHPTZ
MBTSFHVMBDJPOFTMPDBMFTZDVBOEPTFBBDFQUBCMFTFHÞO
TVDPNQB×ÓBQSPWFFEPSBEFHBTTFQVFEFVTBSUVCFSÓB
EFQVMHBEBTBQSPCBEBDVBOEPMBTMPOHJUVEFTTFBO
NFOPSFTEFQJFTN
4FEFCFVTBSUVCFSÓBNÈT
MBSHBFODBTPEFMPOHJUVEFTRVFFYDFEFOMPTQJFT
N
Si no se cumple con esto se podrá producir una
explosión, incendio o muerte.
20
INSTRUCCIONES PARA LA INSTALACIÓN
Conexión de secadoras a gas (cont.)
WADVERTENCIA
Conexión del suministro de gas
Para reducir el riesgo de incendio, descargas eléctricas
o heridas al usar su electrodoméstico, siga las
precauciones básicas, incluyendo lo siguiente:
"TFHÞSFTFEFRVFFMTVNJOJTUSPEFHBTBMDVBSUPEF
lavado se encuentre APAGADO.Confirme que el
tipo de gas disponible en su cuarto de lavado sea el
adecuado para la secadora. La secadora está lista para
la conexión de gas natural de ⁄8 pulgadas NPT.
t-BJOTUBMBDJØOZFMNBOUFOJNJFOUPEFCFO
QSPWFFSTFQPSVOJOTUBMBEPSDBMJGJDBEPBHFODJBEF
NBOUFOJNJFOUPPDPNQB×ÓBEFHBT Si no se cumple
con esto se podrá producir una explosión, incendio o
muerte.
t6TFÞOJDBNFOUFVODPOFDUPSEFBDFSPJOPYJEBCMF
OVFWPZVODPOFDUPSDFSUJGJDBEPQPS"("OVFWP
Si no se cumple con esto se podrá producir una
explosión, incendio o muerte.
t4FEFCFJOTUBMBSVOBWÈMWVMBEFDPSUFEFHBTBVOB
EJTUBODJBNÓOJNBEFQJFTN
EFMBTFDBEPSB
Si no se cumple con esto se podrá producir una
explosión, incendio o muerte.
t-BTFDBEPSBFTUÈDPOGJHVSBEBQBSBHBTOBUVSBM
DVBOEPTFFOWÓBEFGÈCSJDB"TFHÞSFTFEFRVF
MBTFDBEPSBFTUÈFRVJQBEBDPOMBCPRVJMMBEF
RVFNBEPSDPSSFDUBQBSBFMUJQPEFHBTRVFTFVTBSÈ
HBTOBUVSBMPQFUSØMFPMÓRVJEP-1
Si no se cumple
con esto se podrá producir una explosión, incendio o
muerte.
2VJUFMBUBQBEFFOWÓPEFMBDPOFYJØOEFHBTMPDBMJ[BEB
de la parte trasera de la secadora.Asegúrese de no
dañar la rosca del conector de gas al quitar la tapa de
envío.
$POFDUFMBTFDBEPSBBMTVNJOJTUSPEFHBTEFTVDVBSUP
de lavado usando un conector de acero inoxidable
GMFYJCMFOVFWPDPOVOBDPOFYJØOEFQVMHBEBT/15
"KVTUFCJFOUPEBTMBTDPOFYJPOFTFOUSFMBTFDBEPSBZ
el suministro de gas de su cuarto de lavado. Abra el
suministro de gas de su cuarto de lavado y verifique
que no haya fugas en todas las conexiones de tubería
(tanto interiores como exteriores) usando un fluido
anticorrosivo para detección de fugas.
Conexión eléctrica
Enchufe la secadora en un
tomacorriente de
7"$)[ de tres patas
conectado a tierra.
t%FTFSOFDFTBSJPMBCPRVJMMBDPSSFDUBQBSBFMLJUEF
CPRVJMMB-1OÞNFSPEFQJF[B&&-%
EFCF
TFSJOTUBMBEBQPSVOUÏDOJDPDBMJGJDBEPEFCJÏOEPTF
UPNBSOPUBEFFTUFDBNCJPFOMBTFDBEPSB Si no se
cumple con esta advertencia, se puede producir un
incendio, explosión, o muerte.
t5PEBTMBTDPOFYJPOFTEFCFOSFBMJ[BSTFEFBDVFSEP
BMPTDØEJHPTZSFHVMBDJPOFTMPDBMFT Si no se cumple
con esta advertencia, se puede producir un incendio,
explosión, o muerte.
t-BTTFDBEPSBTEFHBT%&#&/WFOUJMBSIBDJBFM
FYUFSJPS Si no se cumple con esto, se puede producir
un incendio, explosión, o muerte.
Conexión de
HBTw/15
Conector flexible
de acero inoxidable
certificado por AGA/CSA
Tapón de tubería
EFw/15
Válvula de corte
de suministro
de gas
Instalaciones en lugares de gran altitud
-BDMBTJGJDBDJØO#56QBSBFTUBTFDBEPSBFTDFSUJGJDBDJØO
"("QBSBFMFWBDJPOFTQPSEFCBKPEFMPTQJFT
4JWBBJOTUBMBSTVTFDBEPSBBNÈTEFQJFTEFCF
ser desclasificada por un técnico calificado o compañía
de gas.
INSTRUCCIONES PARA LA INSTALACIÓN
21
Conexión de secadoras a eléctricas
WADVERTENCIA
Para ayudar a evitar incendios, descargas eléctricas, heridas
graves o muerte, el cableado e instalación a tierra deben
cumplir con la última edición del Código Eléctrico Nacional,
"/4*/'1"ZUPEBTMBTSFHVMBDJPOFTMPDBMFTBQMJDBCMFT
Por favor comuníquese con un electricista calificado para
que controle el cableado y los fusibles y así asegurar que
su casa posee energía eléctrica adecuada para operar la
secadora.
Requisitos eléctricos únicamente para modelos eléctricos
Para reducir el riesgo de incendio, descargas eléctricas o
heridas al usar su electrodoméstico, siga las precauciones
básicas, incluyendo lo siguiente:
t/PNPEJGJRVFFMFODIVGFOJFMDBCMFBEPJOUFSOP
GBDJMJUBEPDPOMBTFDBEPSB
t-BTFDBEPSBEFCFSÈDPOFDUBSTFBVOBTBMJEBEFWÓBT
t4JOPTFBEBQUBBMBUPNBEFDPSSJFOUFEFCFSÈ
BTFHVSBSTFEFRVFVOFMFDUSJDJTUBDVBMJGJDBEPJOTUBMF
una adecuada.
WADVERTENCIA
Para reducir el riesgo de incendio, descargas eléctricas o
heridas al usar su electrodoméstico, siga las precauciones
básicas, incluyendo lo siguiente:
t&TUBTFDBEPSBEFCFFTUBSDPOFDUBEBBVOTJTUFNBEF
DBCMFBEPNFUÈMJDPQFSNBOFOUFDPOFDUBEPBUJFSSBP
TFEFCFUFOEFSVODPOEVDUPSEFDPOFYJØOBUJFSSBEF
FRVJQPDPOMPTDPOEVDUPSFTEFDJSDVJUPZDPOFDUBEPBMB
UFSNJOBMEFDPOFYJØOBUJFSSBEFMFRVJQPPDPOEVDUPSEF
la secadora. Si no se cumple con esto se podrá producir
una explosión, incendio o muerte.
t-BTFDBEPSBUJFOFTVQSPQJPCMPRVFUFSNJOBMFMDVBM
EFCFDPOFDUBSTFBVODJSDVJUPEFVOBTPMBGBTFEF
7$"EF)[QSPUFHJEPDPOGVTJCMFEFBNQFSJPT
FMDJSDVJUPEFCFUFOFSQSPUFDDJØOEFGVTJCMFBBNCPT
UFSNJOBMFTEFMBMÓOFB
&MTVNJOJTUSPFMÏDUSJDPEF
MBTFDBEPSBEFCFSBTFSEFMBNÈYJNBDMBTJGJDBUJØO
EFWPMUBHFMJTUBEBFOMBQMBDBEFDBSBDUFSÓTUJDBT/P
DPOFDUFMBTFDBEPSBBVODJSDVJUPEFØ
WPMUJPT Si no se cumple con esto se podrá producir una
explosión, incendio o muerte.
t4JVODJSDVJUPEFSBNBMBMBTFDBEPSBFTEFQJFT
N
PNFOPTEFMPOHJUVEVTFBMBNCSFMJTUBEPQPS6-
6OEFSXSJUFST-BCPSBUPSJFT
/ÞN"8(ÞOJDBNFOUF
BMBNCSFDPCSF
TFHÞOMPSFRVJFSBOMBTMFZFTMPDBMFT
4JFTNÈTMBSHPEFQJFTN
VTFBMBNCSFMJTUBEP
QPS6-6OEFSXSJUFST-BCPSBUPSJFT
/ÞN"8(
ÞOJDBNFOUFBMBNCSFEFDPCSF
PTFHÞOMPSFRVJFSBO
MBTMFZFTMPDBMFT%JTQPOHBEFTVGJDJFOUFEPUBDJØOEF
DBCMFBEPEFNBOFSBEFQPEFSNPWFSMBTFDBEPSBEFTV
VCJDBDJØOOPSNBMDVBOEPTFBOFDFTBSJP Si no se cumple
con esto se podrá producir una explosión, incendio o
muerte.
t/0TFQSPWFFMBDPOFYJØOFOFTQJSBMEFMDBCMFFMÏDUSJDP
FOUSFMBDBKBEFQBSFEZFMCMPRVFUFSNJOBMEFMB
TFDBEPSBDPOMBNJTNB&MUJQPEFDPOFYJØOFOFTQJSBMZ
FMDBMJCSFEFMBMBNCSFEFCFOTFHVJSMPTDØEJHPTMPDBMFT
y las instrucciones indicadas en las siguientes páginas.
Si no se cumple con esto se podrá producir una explosión,
incendio o muerte.
t4FSFRVJFSFVOBDPOFYJØOEFIJMPTFOUPEBTMBT
JOTUBMBDJPOFTEFWJWJFOEBTNØWJMFTZQSFGBCSJDBEBTBTÓ
DPNPFOUPEBTMBTDPOTUSVDDJPOFTOVFWBTQPTUFSJPSFT
BMEFFOFSPEF4FEFCFVTBSVOBDPOFYJØOEF
IJMPTTJMPTDØEJHPTMPDBMFTOPQFSNJUFOMBDPOFYJØOB
UJFSSBVUJMJ[BOEPFMBMBNCSFOFVUSP Si no se cumple con
esto se podrá producir una explosión, incendio o muerte.
Requisitos eléctricos especiales para viviendas móviles
o prefabricadas
WADVERTENCIA
Para reducir el riesgo de incendio, descargas eléctricas o
heridas al usar su electrodoméstico, siga las precauciones
básicas, incluyendo lo siguiente:
t$VBMRVJFSJOTUBMBDJØOFOVOBWJWJFOEBNØWJMP
QSFGBCSJDBEBEFCFSFBMJ[BSTFEFDPOGPSNJEBEDPOMPT
&TUÈOEBSFTEFTFHVSJEBEZDPOTUSVDDJØOEFWJWJFOEBT
QSFGBCSJDBEBT5ÓUVMP$'31BSUFPFTUÈOEBS
$"/$4";.)ZDPOMPTDØEJHPTZSFHVMBDJPOFT
locales.
t4FSFRVJFSFVOBDPOFYJØOEFIJMPTFOUPEBTMBT
JOTUBMBDJPOFTEFWJWJFOEBTNØWJMFTZQSFGBCSJDBEBT
BTÓDPNPFOUPEBTMBTDPOTUSVDDJPOFTOVFWBT
QPTUFSJPSFTBMEFFOFSPEF Si no se cumple
con esto se podrá producir una explosión, incendio o
muerte.
ESPAÑOL
WADVERTENCIA
22
INSTRUCCIONES PARA LA INSTALACIÓN
Conexión de secadoras a eléctricas (cont.)
SÓLO EE.UU.
WADVERTENCIA
t$POFDUFFMDBCMFEFBMJNFOUBDJØOBMBDBKBEF
terminales. Conecte cada uno de los conductores
EFMDBCMFEFBMJNFOUBDJØOBMUPSOJMMPEFMBDBKB
EFUFSNJOBMFTRVFUFOHBFMDPOEVDUPSEFMNJTNP
DPMPS1PSFKFNQMPDPOFDUFFMDPOEVDUPSOFHSP
EFMDBCMFEFBMJNFOUBDJØOBMUPSOJMMPEFMBDBKBEF
UFSNJOBMFTRVFUJFOFFMDPOEVDUPSOFHSP&ODBTPEF
OPTFHVJSFTUBTJOTUSVDDJPOFTTFQPESÓBQSPEVDJSVO
DPSUPDJSDVJUPVOBTPCSFDBSHBJODFOEJPPNVFSUF
t$POUBDUPQPSDPOEVDUPSOFVUSPFTUÈQSPIJCJEPQBSB
OVFWBTJOTUBMBDJPOFTEFDJSDVJUPEFSJWBEP
MBTDBTBTNØWJMFT
WFIÓDVMPTSFDSFBDJPOBMFTZ
ÈSFBTEPOEFMPTDØEJHPTQSPIÓCFOVOBDPOFYJØOB
tierra por el conductor neutro.
Conexión de cuatro hilos para secadoras
eléctricas: Cable eléctrico con enchufe
t4FSFRVJFSFVOBDPOFYJØOEFIJMPTFOUPEBTMBT
instalaciones de viviendas móviles y prefabricadas, así
como en todas las construcciones nuevas posteriores
BMEFFOFSPEF
t*OTUBMFVODBCMFFMÏDUSJDPEF"7MJTUBEPQPS
6-DPOVODPOEVDUPSEFDPCSF/ÞN"8( como
mínimo y terminales de bucle cerrado o de horquilla
con extremos doblados hacia arriba.
55SBOTGJFSBFMBMBNCSFEFDPOFYJØOBUJFSSBEFMB
secadora detrás del tornillo de conexión a tierra de
color verde al tornillo central del bloque terminal.
Conecte los dos conductores calientes del cable
eléctrico a los tornillos del bloque terminal exterior.
Conecte el cable neutro de color blanco al tornillo
del bloque terminal central. Conecte el alambre de
conexión a tierra del cable eléctrico al tornillo de
conexión a tierra de color verde.
"+645&#*&/50%04-04503/*--04. Reinstale la
cubierta de acceso del bloque terminal.
Caliente
(negro)
Tornillo de
conexión a
tierra
t4FSFRVJFSFVOQSPUFDUPSEFUFOTJØOMJTUBEPQPS6-
2VJUFMBDVCJFSUBEFBDDFTPBMCMPRVFUFSNJOBM
localizado en la parte superior trasera de la secadora.
Instale un protector de tensión listado por UL en el
orificio de pase del cable eléctrico; luego pase un
DBCMFFMÏDUSJDPDPOEVDUPSEFDPCSF/ÞN"8(
EFQPSMPNFOPTIJMPT"MJTUBEPQPS6-QPSFM
protector de tensión.
#MPRVF
terminal
Protector de tensión
listado por UL
Cable eléctrico
de cuatro hilos
listado por UL
Alambre de
conexión
a tierra del
cable eléctrico
Neutro
(blanco)
Caliente
(rojo)
Cable blanco
movido de
tornillo de
conexión a
tierra
INSTRUCCIONES PARA LA INSTALACIÓN
23
Conexión de secadoras a eléctricas (cont.)
SÓLO EE.UU.
WADVERTENCIA
DN
5"
DN
Alambre de
conexión a tierra
2VJUFMBDVCJFSUBEFBDDFTPBMCMPRVFUFSNJOBM
localizado en la parte superior trasera de la secadora.
Instale un protector de tensión listado por UL en el
orificio de pase del cable eléctrico; luego pase el cable
FMÏDUSJDPGBCSJDBEPFOFM1BTPQPSFMQSPUFDUPSEF
tensión.
Terminal
#MPDL
6--JTUFE
Strain Relief
6--JTUFE8JSF
Power Cord
t1SFQBSFVONÓOJNPEFQJFTN
EFMPOHJUVEQBSB
poder quitar y reemplazar la secadora.
5SBOTGJFSBFMBMBNCSFEFDPOFYJØOBUJFSSBEFMB
secadora detrás del tornillo de conexión a tierra de
color verde al tornillo central del bloque terminal.
Conecte los dos conductores calientes del cable
eléctrico a los tornillos del bloque terminal exterior.
Conecte el cable neutro de color blanco al tornillo
del bloque terminal central. Conecte el alambre
de conexión a tierra del cable eléctrico al tornillo
de conexión a tierra de color verde. "+645&#*&/
50%04-04503/*--04. Reinstale la cubierta de
acceso del bloque terminal.
Caliente
(negro)
Tornillo de
conexión a
tierra
Alambre de
conexión
a tierra del
cable eléctrico
Neutro
(blanco)
Caliente
(rojo)
Cable blanco
movido de
tornillo de
conexión a
tierra
ESPAÑOL
t$POFDUFFMDBCMFEFBMJNFOUBDJØOBMBDBKBEF
terminales. Conecte cada uno de los conductores
EFMDBCMFEFBMJNFOUBDJØOBMUPSOJMMPEFMBDBKB
EFUFSNJOBMFTRVFUFOHBFMDPOEVDUPSEFMNJTNP
DPMPS1PSFKFNQMPDPOFDUFFMDPOEVDUPSOFHSP
EFMDBCMFEFBMJNFOUBDJØOBMUPSOJMMPEFMBDBKBEF
UFSNJOBMFTRVFUJFOFFMDPOEVDUPSOFHSP&ODBTPEF
OPTFHVJSFTUBTJOTUSVDDJPOFTTFQPESÓBQSPEVDJSVO
DPSUPDJSDVJUPVOBTPCSFDBSHBJODFOEJPPNVFSUF
t$POUBDUPQPSDPOEVDUPSOFVUSPFTUÈQSPIJCJEP
QBSB
OVFWBTJOTUBMBDJPOFTEFDJSDVJUPEFSJWBEP
MBTDBTBTNØWJMFT
WFIÓDVMPTSFDSFBDJPOBMFTZ
ÈSFBTEPOEFMPTDØEJHPTQSPIÓCFOVOBDPOFYJØO
a tierra por el conductor neutro.
Conexión de cuatro hilos para secadoras eléctricas:
Conexión directa
t4FSFRVJFSFVOBDPOFYJØOEFIJMPTFOUPEBTMBT
instalaciones de viviendas móviles y prefabricadas, así
como en todas las construcciones nuevas posteriores
BMEFFOFSPEF
t4FSFRVJFSFVOQSPUFDUPSEFUFOTJØOMJTUBEPQPS6-
%FTQFHVFQVMHDN
EFMBDVCJFSUBEFMDBCMF
del final. Descubra 5 pulg. de aislamiento del cable de
DPOFYJØOBUJFSSB$PSUFBQSPYJNBEBNFOUFcQVMH
DN
EFMPTPUSPTDBCMFTZEFTQFHVFQVMH
cm) del aislamiento del cado uno. Haga los finales de
MPTDBCMFTFOGPSNBEFHBODIP
t*OTUBMFVODBCMFFMÏDUSJDPMJTUBEPQPS6-DPO4
DPOEVDUPSFTEFDPCSF/ÞN"8(DPNPNÓOJNP.
24
INSTRUCCIONES PARA LA INSTALACIÓN
Conexión de secadoras a eléctricas (cont.)
SÓLO EE.UU.
WADVERTENCIA
t$POFDUFFMDBCMFEFBMJNFOUBDJØOBMBDBKBEF
terminales. Conecte cada uno de los conductores
EFMDBCMFEFBMJNFOUBDJØOBMUPSOJMMPEFMBDBKB
EFUFSNJOBMFTRVFUFOHBFMDPOEVDUPSEFMNJTNP
DPMPS1PSFKFNQMPDPOFDUFFMDPOEVDUPSOFHSP
EFMDBCMFEFBMJNFOUBDJØOBMUPSOJMMPEFMBDBKB
EFUFSNJOBMFTRVFUJFOFFMDPOEVDUPSOFHSP&O
DBTPEFOPTFHVJSFTUBTJOTUSVDDJPOFTTFQPESÓB
QSPEVDJSVODPSUPDJSDVJUPVOBTPCSFDBSHB
incendio o muerte.
t$POUBDUPQPSDPOEVDUPSOFVUSPFTUÈQSPIJCJEP
QBSB
OVFWBTJOTUBMBDJPOFTEFDJSDVJUPEFSJWBEP
MBTDBTBTNØWJMFT
WFIÓDVMPTSFDSFBDJPOBMFT
Z
ÈSFBTEPOEFMPTDØEJHPTQSPIÓCFOVOB
DPOFYJØOBUJFSSBQPSFMDPOEVDUPSOFVUSP
Conexión de tres hilos para secadoras
eléctricas: Cable eléctrico con enchufe
t/0TFQFSNJUFVOBDPOFYJØOEFIJMPTFO
DPOTUSVDDJPOFTOVFWBTEFTQVÏTEFMEFFOFSPEF
t4FSFRVJFSFVOQSPUFDUPSEFUFOTJØOMJTUBEPQPS6-
2VJUFMBDVCJFSUBEFBDDFTPBMCMPRVFUFSNJOBM
localizado en la parte superior trasera de la secadora.
Instale un protector de tensión listado por UL en el
orificio de pase del cable eléctrico; luego pase un
cable eléctrico conductor de cobre Núm. "8(EF
QPSMPNFOPTIJMPT"7MJTUBEP por UL
por el protector de tensión.
#MPRVF
terminal
Protector de tensión
listado por UL
Cable eléctrico
de tres hilos
listado por UL
t*OTUBMFVODBCMFFMÏDUSJDPEF"7MJTUBEPQPS
6-DPOVODPOEVDUPSEFDPCSF/ÞN"8(DPNP
NÓOJNP y terminales de bucle cerrado o de horquilla
con extremos doblados hacia arriba.
$POFDUFMPTEPTDPOEVDUPSFTDBMJFOUFTEFMDBCMF
eléctrico a los tornillos del bloque terminal exterior.
Conecte el cable neutro al tornillo del bloque terminal
central. Conecte la conexión a tierra exterior (de
ser requerido por los códigos locales) al tornillo de
color verde. "+645&#*&/50%04-04503/*--04.
Reinstale la cubierta de acceso del bloque terminal.
Caliente
(negro)
Tornillo de
conexión
a tierra
Hilo
blanco de
estructura
de secadora
Conexión a tierra
exterior (de ser
requerido por los
códigos locales)
Neutro
(blanco)
Caliente
(rojo)
INSTRUCCIONES PARA LA INSTALACIÓN
25
Conexión de secadoras a eléctricas (cont.)
SÓLO EE.UU.
WADVERTENCIA
t$POUBDUPQPSDPOEVDUPSOFVUSPFTUÈQSPIJCJEP
QBSB
OVFWBTJOTUBMBDJPOFTEFDJSDVJUPEFSJWBEP
MBTDBTBTNØWJMFT
WFIÓDVMPTSFDSFBDJPOBMFTZ
ÈSFBTEPOEFMPTDØEJHPTQSPIÓCFOVOBDPOFYJØO
a tierra por el conductor neutro.
Conexión de tres hilos para secadoras eléctricas:
Conexión directa
t/0TFQFSNJUFVOBDPOFYJØOEFIJMPTFO
DPOTUSVDDJPOFTOVFWBTEFTQVÏTEFMEFFOFSPEF
t4FSFRVJFSFVOQSPUFDUPSEFUFOTJØOMJTUBEPQPS6-
%FTQFHVF cĸQVMHDN
EFMBDVCJFSUBEFMDBCMF
EFMGJOBM%FTQFHVFQVMHDN
EFMBJTMBNJFOUP
EFDBEBBMBNCSF)BHBMPTGJOBMFTEFMPTDBCMFTFO
forma de gancho.
DN
2VJUFMBDVCJFSUBEFBDDFTPBMCMPRVFUFSNJOBM
localizado en la parte superior trasera de la secadora.
Instale un protector de tensión listado por UL en el
orificio de pase del cable eléctrico; luego pase el cable
FMÏDUSJDPGBCSJDBEPFOFM1BTPQPSFMQSPUFDUPSEF
tensión.
#MPRVF
terminal
Protector de tensión
listado por UL
Cable eléctrico de cuatro
hilos listado por UL
t1SFQBSFVONÓOJNPEFQJFTN
EFMPOHJUVEQBSB
poder quitar y reemplazar la secadora.
$POFDUFMPTEPTDPOEVDUPSFTDBMJFOUFTEFMDBCMF
eléctrico a los tornillos del bloque terminal exterior.
Conecte el cable neutro al tornillo del bloque terminal
central. Conecte la conexión a tierra exterior (de
ser requerido por los códigos locales) al tornillo de
color verde. "+645&#*&/50%04-04503/*--04.
Reinstale la cubierta de acceso del bloque terminal.
Caliente
(negro)
Tornillo de
conexión
a tierra
Hilo
blanco de
estructura
de secadora
Conexión a tierra
exterior (de ser
requerido por los
códigos locales)
Neutro
(blanco)
Caliente
(rojo)
ESPAÑOL
t$POFDUFFMDBCMFEFBMJNFOUBDJØOBMBDBKBEF
terminales. Conecte cada uno de los conductores
EFMDBCMFEFBMJNFOUBDJØOBMUPSOJMMPEFMBDBKB
EFUFSNJOBMFTRVFUFOHBFMDPOEVDUPSEFMNJTNP
DPMPS1PSFKFNQMPDPOFDUFFMDPOEVDUPSOFHSP
EFMDBCMFEFBMJNFOUBDJØOBMUPSOJMMPEFMBDBKBEF
UFSNJOBMFTRVFUJFOFFMDPOEVDUPSOFHSP&ODBTPEF
OPTFHVJSFTUBTJOTUSVDDJPOFTTFQPESÓBQSPEVDJSVO
DPSUPDJSDVJUPVOBTPCSFDBSHBJODFOEJPPNVFSUF
t*OTUBMFVODBCMFFMÏDUSJDPMJTUBEPQPS6-DPO3
DPOEVDUPSFTEFDPCSF/ÞN"8(DPNPNÓOJNP.
26
INSTRUCCIONES PARA LA INSTALACIÓN
Requisitos especiales para viviendas
móviles o prefabricadas
Cualquier instalación en una vivienda móvil o
prefabricada debe realizarse de conformidad con los
Estándares de seguridad y construcción de viviendas
QSFGBCSJDBEBT5ÓUVMP$'31BSUFPFTUÈOEBS$"/
$4";.)ZDPOMPTDØEJHPTZSFHVMBDJPOFTMPDBMFT
Si no está seguro de si la instalación que ha propuesto
cumple con estos estándares, llame a un técnico de
mantenimiento e instalación para obtener ayuda.
t6OBTFDBEPSBEFHBTEFCFSÓBGJKBSTFQFSNBOFOUFNFOUF
sobre el piso.
t-BDPOFYJØOFMÏDUSJDBEFVOBTFDBEPSBFMÏDUSJDBEFCF
TFSVOBDPOFYJØOEFIJMPT4FQSPWFFJOGPSNBDJØO
más detallada pertinente a la conexión eléctrica en la
sección Cómo conectar las secadoras eléctricas.
t1BSBSFEVDJSFMSJFTHPEFDPNCVTUJØOFJODFOEJPTF
debe ventilar la secadora hacia el exterior.
t/0WFOUJMFMBTFDBEPSBEFCBKPEFVOBWJWJFOEBNØWJMP
prefabricada.
t-BTTFDBEPSBTFMÏDUSJDBTEFCFOWFOUJMBSTFIBDJBFM
exterior usando el panel trasero, izquierdo, derecho o
inferior.
t-BTTFDBEPSBTBHBTEFCFOWFOUJMBSTFBMFYUFSJPSVTBOEP
el panel trasero, izquierdo o inferior. Las secadoras a
gas no deben ventilarse hacia el exterior usando el
panel derecho debido a la carcasa del quemador.
t&MDPOEVDUPEFFTDBQFEFMBTFDBEPSBEFCFFTUBS
bien fijado a la estructura de la vivienda móvil o
prefabricada, y el conducto de escape debe estar
fabricado de un material resistente al fuego y la
combustión. Se recomienda el uso de un conducto de
metal rígido o flexible.
t/0DPOFDUFFMDPOEVDUPEFFTDBQFEFMBTFDBEPSBB
ningún otro conducto, respiradero, chimenea ni a
ningún otro tipo de conducto de escape.
t"TFHÞSFTFEFRVFMBTFDBEPSBEJTQPOHBEFBDDFTP
adecuado al aire fresco del exterior para garantizar un
funcionamiento adecuado. La abertura para la toma
EFBJSFGSFTDPFYUFSJPSEFCFTFSEFQPSMPNFOPT
pulgadasDN).
t&TJNQPSUBOUFRVFFMFTQBDJPMJCSFEFMDPOEVDUP
con respecto a cualquier material combustible de
DPOTUSVDDJØOTFBEFQPSMPNFOPTQVMHBEBTDN
y que, cuando se ventile la secadora al exterior, se
pueda instalar la secadora dejando un espacio libre de
QVMHBEBTDN
BMPTMBEPTZMBQBSUFUSBTFSBEFMB
secadora.
t5FOHBFODVFOUBRVFMPTNBUFSJBMFTEFWFOUJMBDJØO
no se proveen con la secadora. Debe obtener los
materiales de ventilación necesarios para una
instalación adecuada.
Revisión de instalación final
Una vez que haya completado la instalación de la
secadora y la misma se encuentre en su ubicación final,
confirme que funcione correctamente realizando las
siguientes pruebas.
Comprobación del calentamiento de la secadora
.0%&-04"("4
Cierre la puerta de la secadora, apriete el interruptor
ON/OFF para encender la secadora, e iniciar la secadora
en un ajuste de calor.Cuando inicia la secadora, el
encendedor deberá encender el quemador principal.
NOTA
Si no se purga todo el aire de la línea de gas, el
encendedor de gas podría apagarse antes de que se
encienda el quemador. Si esto sucede, el encendedor
volverá a intentar encender el gas después de
aproximadamente dos minutos.
.0%&-04&-²$53*$04
Cierre la puerta de la secadora, apriete el interruptor
ON/OFF para encender la secadora, e iniciar la secadora
en un ajuste de calor. El escape de aire deberá estar
caliente después de que la secadora haya funcionado
EVSBOUFNJOVUPT
Revisión del flujo de aire
El funcionamiento efectivo de la secadora requiere de
un flujo de aire adecuado. La corrección del flujo de aire
puede medirse evaluando la presión estática. La presión
estática del conducto del escape se puede medir con
un manómetro, colocado en el conducto de escape
BQSPYJNBEBNFOUFBQJFTDN
EFEJTUBODJBEFMB
secadora. La presión estática del conducto de escape
OPEFCFSÓBFYDFEFSMBTQVMHBEBTDN
4FEFCF
revisar la secadora mientras está funcionando sin carga
Revisión del nivelado
Una vez que la secadora se encuentra en su ubicación
final, vuelva a revisar que la misma se encuentre
nivelada. Asegúrese de que esté nivelada de adelante
hacia atrás y de lado a lado, y de que las cuatro patas
niveladoras se encuentren asentadas en el piso
firmemente.
INSTRUCCIONES PARA LA INSTALACIÓN
27
Test de Instalación
(conducto de comprobar)
t&TUBTFDBEPSBDVFOUBDPOFMTJTUFNBFLOW SENSE™, un
sistema innovador que detecta automáticamente los
bloqueos y restricciones en la tubería de la secadora.
Mantener la tubería sin acumulación de pelusa y libre
de restricciones le permitirá secar la ropa más rápido y
reducir el gasto de energía.
0CTFSWFMBQBOUBMMBQBSBDPOPDFSFMSFTVMUBEP
Durante el ciclo de prueba de tres minutos, controle
el visualizador del FLOW SENSE™ en el panel de
control. Si al terminar el test no muestra ninguna
barra, el sistema de evacuación es adecuado. Si el
sistema de evacuación sufre
SFTUSJDDJPOFTJNQPSUBOUFTFMJDPOPNPTUSBSÈCBSSBT
Si existen otros problemas, estos se le indicarán con
códigos de error. Consulte en la página siguiente el
listado de códigos de error y sus soluciones.
NOTA
La secadora deberá estar fría antes de iniciar el test.
4JMBVOJEBETFIBDBMFOUBEPEVSBOUFMBJOTUBMBDJØO
active el sistema SECADO CON AIRE (AIR DRY) durante
unos minutos para reducir la temperatura interior.
"DUJWBSFMUFTUEFJOTUBMBDJØO
3FUJSFMBEPDVNFOUBDJØOZDJFSSFMBQVFSUB No meta
nada en el tambor cuando se disponga a hacer este test
porque podría influir en la precisión de los resultados.
4*/#"33"4
CORRECTO
#"33"4
RESTRICCIÓN
4JMBTCBSSBTFTUÈOFODFOEJEBTFMTJTUFNBEF
evacuación está considerablemente bloqueado. Revise
el sistema de inmediato, ya que de no hacerlo el
funcionamiento será muy deficiente.
5. 'JOEFMDJDMP
en la pantalla
Al finalizar el test aparecerá
de visualización. Una vez haya terminado este ciclo,
la secadora se apagará automáticamente después de
unos momentos.
.BOUFOHBQVMTBEPTMPTCPUPOFT$0/530-5&.1
5&.1$0/530-
Z01$*»/015*0/
ZQVMTFFM
CPUØO&/$&/%*%0108&3
Esta secuencia de botones activa el test de instalación.
El código
BQBSFDFSÈFOMBQBOUBMMBEFWJTVBMJ
zación si la activación se ha realizado con éxito.
1VMTFFMCPUØO*/*$*01"64"45"351"64&
La secadora iniciará el test, que durará alrededor de
dos minutos. Se encenderá el calor y se medirán las
temperaturas en el tambor.
ESPAÑOL
Una vez haya instalado la secadora, haga este test
para asegurarse de que las condiciones del sistema de
evacuación son las adecuadas para el funcionamiento
correcto de la secadora. Este test tiene como objetivo
mostrarle si existe algún problema importante en el
sistema de evacuación de su vivienda.
28
INSTRUCCIONES PARA LA INSTALACIÓN
Test de Instalación (conducto de comprobar) (cont.)
t$PNQSVFCFFMDØEJHPEFFSSPSBOUFTEFMMBNBSBMTFSWJ
cio técnico
Código de error
U& o U&
HS
Causas posibles
Soluciones
t'BMMPEFMTFOTPSEFUFNQFSBUVSB
tApague la secadora y llame al servicio técnico.
t'BMMPEFMTFOTPSEFIVNFEBE
tApague la secadora y llame al servicio técnico.
t&MDBCMFEFBMJNFOUBDJØOOPFTUÈ
conectado correctamente o el
suministro eléctrico de la vivienda es
incorrecto.
tCompruebe el suministro eléctrico o la conexión
del cable de alimentación al enchufe. Consulte la
TFDDJØOi$ØNPDPOFDUBSMBTTFDBEPSBTFMÏDUSJDBTwEF
este manual para las instrucciones completas.
t4FIBOGVOEJEPMPTGVTJCMFTIBTBMUBEP
el disyuntor o ha habido un apagón.
t3FBDUJWFFMEJTZVOUPSPSFFNQMBDFFMGVTJCMF/P
incremente la capacidad del fusible. Si el problema
es una sobrecarga del circuito, solicite los servicios
de un electricista cualificado.
PS o 1' o nP
t$PNQSVFCFMBTDPOEJDJPOFTEFMDPOEVDUP
4JTFJMVNJOBOMBTCBSSBTUSBTFMUFTUDPNQSVFCFFM
sistema de evacuación en busca de restricciones o
daños. Repare o reemplace el sistema de evacuación
según sea necesario.
'MVKPEFBJSFSFTUSJOHJEPPCMPRVFBEP
Evite funcionamientos prolongados o
funcionamientos con múltiples formaciones de
torceduras o codos.
NOTA
Cuando recién instala la secadora, debe realizar esta
prueba para que lo alerte sobre cualquier problema
existente en el conducto de ventilación de su hogar.
Sin embargo, puesto que la prueba realizada durante
el normal funcionamiento de la secadora ofrece una
información más precisa sobre el estado del conducto
de ventilación que la que ofrece la prueba de insta
lación, la cantidad de barras visualizadas durante las
dos pruebas puede no ser la misma.
No interrumpa el ciclo de prueba, ya que esto podría
generar resultados erróneos.
Aunque no se ilumine ninguna barra durante el ciclo
de prueba, es posible que existan algunas restric
ciones que podrían estar aún presentes en el sistema
de ventilación. Consulte la sección $POFYJØOEFM
DPOEVDUPEFWFOUJMBDJØOEFMBTFDBEPSB en este
manual para conocer todos los requisitos del sistema
de evacuación y de ventilación.
Esta secadora cuenta con Flow SenseTM, un innovador
sistema que automáticamente detecta y alerta los
bloqueos y restricciones en los conductos de venti
lación domésticos instalados. Si aparece el mensaje
de alerta, limpie o repare los conductos para eliminar
las restricciones. Mantener la tubería sin acumulación
de pelusa y libre de restricciones le permitirá secar la
ropa más rápido y reducir el gasto de energía.
Conducto demasiado
largo o muy torcido
Tubería demasiado larga
o con demasiados codos
Controle los bloqueos y la acumulación de pelusa.
Acumulación
de pelusa o
bloqueo
Asegúrese que la tubería no posea cortes ni restricciones.
Tubería
estrangulada
o bloqueada
CÓMO USAR
29
CÓMO USAR
Funcionamiento de la secadora
-*.1*"3&-'*-530%&1&-64"4
Si aún no ha limpiado el filtro de pelusas, extráigalo y elimine las pelusas
procedentes de la última carga. Esto le ayudará a asegurar un funcionamiento
más rápido y eficiente de secado.
Filtro de
pelusa
2
$"3("3-"4&$"%03"
Cargue en la secadora la carga húmeda procedente de la lavadora. Si la carga
es muy grande, deberá dividirla en cargas más pequeñas para obtener un buen
rendimiento y proteger los tejidos.
3
&/$&/%&3-"4&$"%03"
Presione el botón ENCENDIDO/APAGADO (POWER) para encender la secadora.
Si se enciende, los LEDs de ciclo se iluminarán y se emitirá un aviso sonoro.
$POTVMUFMBQÈHJOB
4
4&-&$$*0/"36/$*$-0
Pulse el botón de CICLOS(CYCLES) hasta que el indicador para el ciclo
deseado se encienda. La temperatura pre configurada, el nivel de secado y
las configuraciones de opción se visualizarán para ese ciclo. Ya se pueden
modificar las configuraciones por defecto para el ciclo seleccionado si se desea.
Refiérase a las configuraciones del ciclo y la página de opciones para más
detalles.
NOTE
No todas las opciones o modificadores están disponibles en todos los ciclos.
Refiérase à la página de la guía sobre Ciclos para configuraciones por defecto
y opciones permisibles. Una campanilla diferente sonará y el LED no se
encenderá si la selección no está permitida.
5
*/*$*"3&-$*$-0
Presione el botón INICIO/PAUSA(START/PAUSE) para que comience el ciclo.
El ciclo puede ser pausado en cualquier momento abriendo la puerta o
presionando el botón INICIO/PAUSA
45"351"64&
4JOPWVFMWFBJOJDJBSTFFMDJDMPUSBTNJOVUPTMBTFDBEPSBTF
apagará y los ajustes del ciclo se perderán.
6
'*/%&-$*$-0
Al finalizar el ciclo, si lo tiene ajustado, oirá un aviso sonoro. Retire
inmediatamente sus prendas de la secadora para reducir las arrugas. Si tiene
seleccionada la función ANTI ARRUGAS (WRINKLE CARE), la secadora volteará
brevemente la carga cada pocos minutos para ayudar a prevenir la aparición
de arrugas en sus prendas.
ESPAÑOL
1
30
CÓMO USAR
= configuración por defecto
Guía de ciclos
5ZQF
Cycle
CARGA
PESADA
(HEAVY
DUTY)
PLANCHADO
PERM.
CASUAL
(PERM PRESS
CASUAL)
ALGODÓN/
NORMAL
(COTTON/
NORMAL)
Å
'BCSJD5ZQF
Vaqueros, prendas
pesadas.
Prendas sintéticas,
planchado
permanente.
Ropa de trabajo, pana,
etc.
DELICADOS Lencería, sábanas,
(DELICATES) blusas
%SZ-FWFM
Å
Å
#"+0
Å
Å
MEDIO
Å
Å
#"+0
Å
Å
MEDIO ALTO
55
Å
Å
ALTO
Å
ALTO
Regulable
Regulable
MEDIO ALTO
Regulable
Regulable
Regulable
Normal seco
Regulable
Normal seco
Regulable
Normal seco
Sólo prendas normales Normal seco
ZEFBMHPEØOUJQPUPB
MMBTNÈYBQSPY
Regulable
LH
Para prendas que no
precisan calor, por
llevar plástico o goma.
ALTO
Normal seco
CARGAS
1&26&º"4
(SMALL
LOAD)
SECADO
CON AIRE
(AIR DRY)
%BNQ
%SZ
Signal
5JNF
JO.JO
Regulable
Prendas vaqueras,
toallas, algodón
resistente.
SECADO
MANUAL REFRESCADO Para quitar arrugas
(FRESHEN
menores
(MANUAL UP)
de la ropa
DRY)
.PSF
5JNF
-FTT
5JNF
8SJOLMF
Care
5FNQFSBUVSF
Normal seco
TOALLAS
(TOWELS)
SECADO
Para poca carga con
RÁPIDO
tiempos de secado
(SPEED DRY) cortos.
= opción permisible de
Regulable
Apagado
Apagado
Apagado
Ciclos de secado con sensor (sensor dry)
Los ciclos de secado con sensor utilizan el sistema
exclusivo de sensor doble de LG para detectar y
comparar el nivel de humedad en las prendas y en
el aire, y programar el tiempo de secado del modo
necesario para asegurar resultados superiores.
La secadora ajusta automáticamente el nivel de
sequedad y temperatura del ajuste recomendado para
cada ciclo. El tiempo restante estimado se mostrará en
la pantalla.
NOTA
Para proteger sus prendas, no todos los niveles,
temperatura u opciones están disponible con cada
ciclo. Consulte la guía de ciclos para los detalles.
SIN
CALOR
Å
Å
Å
Å
Å
Å
Regulable
Ciclos de secado manual (manual dry)
Use los ciclos de secado manual para seleccionar
una cantidad especifica de tiempo y temperatura
de secado. Cuando se selecciona el ciclo de secado
manual, la pantalla de TIEMPO RESTANTE ESTIMADO
(ESTIMATED TIME REMAINING) muestra el tiempo
restante real en su ciclo. Puede cambiar el tiempo
real en el ciclo apretando MÁS TIEMPO (MORE TIME) o
MENOS TIEMPO (LESS TIME).
CÓMO USAR
31
A continuación encontrará instrucciones para comenzar a usar su secadora nueva. Para más información por favor
consulte las secciones específicas de este manual.
Clasificación de cargas
Revise el filtro de pelusa antes de
cada uso
Etiquetas de mantenimiento de las telas
Etiquetas de cuidado de las telas
Secado a
máquina
Seco
Suave/
delicado
Normal
Planchado permanente/
antiarrugas
No secar
a máquina
Mediano
Bajo
Para limpiarlo, tire del filtro de pelusa verticalmente y,
con los dedos, enrolle cualquier pelusa para retirarla del
filtro. No enjuague ni lave el filtro para eliminar la pelusa.
Empuje el filtro de pelusa firmemente en su lugar.
Para informacaión adicional, vea la sección LIMPIEZA
REGULAR.
Asegúrese siempre de que el filtro de pelusa esté
instalado adecuadamente antes de poner en
funcionamiento la secadora. Hacer funcionar la secadora
sin el filtro o con un filtro de pelusa suelto podría dañar
la secadora y los artículos en el interior de la misma.
No secar
(utilizado junto
a “no lavar”)
Ajuste
de calor
Alto
Asegúrese siempre de que el filtro de pelusa esté limpio
antes de iniciar una carga nueva; un filtro de pelusa
bloqueado incrementará los tiempos de secado.
Sin calor/ai
Agrupamiento de prendas similares
Para obtener los mejores resultados, clasifique las
prendas en cargas que puedan secarse con el mismo
ciclo de secado.
Los diferentes tipos de telas tienen diferentes requisitos de
cuidado, y algunas telas se secarán más rápido que otras.
Cómo cargar la secadora
WADVERTENCIA
Para reducir el riesgo de incendio, descargas eléctricas
o heridas al usar su electrodoméstico, siga las
precauciones básicas, incluyendo lo siguiente:
t3FWJTFUPEPTMPTCPMTJMMPTQBSBBTFHVSBSTFEFRVF
FTUÏOWBDÓPT-PTBSUÓDVMPTDPNPDMJQTGØTGPSPT
QMVNBTNPOFEBTZMMBWFTQVFEFOEB×BSTVTFDBEPSB
PTVTQSFOEBT-PTPCKFUPTJOGMBNBCMFTUBMFTDPNP
FODFOEFEPSFTPGØTGPSPTQPESÓBOFODFOEFSTFZ
QSPWPDBSVOJODFOEJPSi no se cumple con esto se
podrá producir una explosión, incendio o muerte.
t/VODBTFRVFQSFOEBTRVFIBZBOTJEPFYQVFTUBTB
BDFJUFHBTPMJOBVPUSBTTVCTUBODJBTJOGMBNBCMFT
-BWBSMBTQSFOEBTOPFMJNJOBSÈDPNQMFUBNFOUFMPT
residuos de aceite. Si no se cumple con esto se podrá
producir una explosión, incendio o muerte.
NOTA
Consejos útiles de carga
t$PNCJOFQSFOEBTHSBOEFTZQFRVF×BTFOVOBDBSHB
t-BTQSFOEBTIÞNFEBTTFFYUFOEFSÈONJFOUSBT
se secan. No sobrecargue la secadora; las
prendas necesitan de espacio para girar y secar
adecuadamente.
t$JFSSFMBTDSFNBMMFSBTHBODIPTZDPSEPOFTQBSB
prevenir que estos artículos se enganchen o enreden
en otras prendas.
Filtro de
pelusa
ESPAÑOL
La mayoría de las prendas de vestir tienen etiquetas
de mantenimiento de las telas para lograr un
mantenimiento adecuado.
32
CÓMO USAR
Configuraciones del ciclo y opciones
Los ciclos de secado con sensor (sensor dry) tienen
ajustes preprogramados que se seleccionan
automáticamente. Los ciclos de secado manual (manual
dry) tienen ajustes predeterminados, pero pueden
personalizarse usando los botones de ajustes de ciclos.
Pulse el botón correspondiente a cada opción para
visualizar y seleccionar los ajustes disponibles.
NOTA
Para proteger las prendas, no todos los niveles de secado,
temperatura u opción están disponibles en todos los
ciclos. Vea la Guía de ciclos para obtener más detalles.
NIVEL DE SECADO (DRY LEVEL)
Selecciona el nivel de sequedad para el ciclo. Apriete el
boton de NIVEL DE SECADO (DRY LEVEL) varias veces
para navegar por los ajustes disponibles.
t&TUBPQDJPOFTUBEJTQPOJCMFVOJDBNFOUFFOMPTDJDMPT
de secado con sensor (sensor dry).
tLa secadora ajustara el tiempo de ciclo
automaticamente. Al seleccionar MÁS SECO (MORE
DRY) o MUY SECO (VERY DRY) se incrementara el tiempo
del ciclo, mientras que HUMEDO SECO (DAMP DRY) o
MENOS SECO (LESS DRY) disminuira el tiempo del ciclo.
t6TFVOBKVTUF)6.&%04&$0%".1%3:
P.&/04
SECO (LESS DRY) en los articulos que desee planchar.
CONTROL DEL TEMPERATURA (TEMP. CONTROL)
3FHVMBFMBKVTUFEFUFNQFSBUVSBEFTEF#"+0-08
a ALTO (HIGH). Esto permite el cuidado preciso de
sus telas y prendas. Apriete el boton CONTROL DEL
TEMPERATURA (TEMP. CONTROL) varias veces para
navegar por los ajustes disponibles.
El control de la temperatura no se puede ajustar en
ciclos de secado sensor.
SECADO DE TIEMPO (TIME DRY)
Le permite seleccionar el tiempo de secado manualmente,
EFBNJOVUPTFOJODSFNFOUPTEFNJOVUPT6TF
esta opcion en cargas pequenas o para eliminar arrugas.
Use los botones de MÁS TIEMPO/MENOS TIEMPO (MORE
TIME/LESS TIME) para anadir o reducir el tiempo de
TFDBEPFOJODSFNFOUPTEFNJOVUP
ALARMA ENCENDIDO/APAGADO (SIGNAL ON/OFF)
1BSBBQBHBSFMQJUJEPQSFTJPOFZTPTUFOHBTFHVOEPT
el botón OPCIÓN. Presione y sostenga para volver a
encender el pitido.
Su secadora dispone de varias opciones de ciclo
adicionales, las cuales personalizan los ciclos para
satisfacer sus necesidades individuales.Ciertos botones
de opción también incorporan una función especial (vea
la siguiente página para obtener mayor información)
que puede activarse apretando y manteniendo apretado
FTFCPUØOEFPQDJØOQPSTFHVOEPT
CÓMO USAR
33
Configuraciones del ciclo y opciones
Programa personalizado
ALERTA DE SECADO HÚMEDO (DAMP DRY SIGNAL)
Si tiene una combinacion especial de ajustes que usa
con frecuencia, puede guardar estos ajustes a manera
de PROGRAMA PERSONALIZADO (CUSTOM PROGRAM).
ANTI ARRUGAS (WRINKLE CARE)
Al seleccionar esta opción, hará girar la carga
QFSJØEJDBNFOUFQPSVOQMB[PEFIBTUBIPSBTEFTQVÏT
del ciclo seleccionado, o hasta que se abra la puerta.
Esto es de ayuda para prevenir la formación de arrugas
cuando no le sea posible retirar las prendas de la
secadora inmediatamente.
Funciones especiales
Los botónes de NIVEL DE SECADO(DRY LEVEL) tambien
BDUJWBOMBTGVODJPOFTFTQFDJBMFTJODMVZFOEP#-026&0
1"3"/*º04$)*-%-0$,
* Para guardar un programa personalizado:
&ODJFOEBMBTFDBEPSBZQSFTJPOFFMCPUØO130(3"."
(CYCLES) para seleccionar el ciclo deseado.
6TFMPTCPUPOFTEFQSPHSBNBDJØOEFDJDMPQBSBGJKBS
los ajustes para ese ciclo.
"QSJFUFFMMPT
CPUØOFT
EFPQDJØOEFDJDMPQBSBMB
opción que desea añadir. Aparecerá en la pantalla un
mensaje de confirmación.
"QSJFUFZNBOUFOHBBQSFUBEPFMCPUØO130(3"."
PERSONALIZADO (CUSTOM PROGRAM).
NOTA
Puede guardar solo un programa personalizado
a la vez. Al apretar y mantener apretado el botón
PROGRAMA PERSONALIZADO (CUSTOM PROGRAM),
reemplazará cualquier programa personalizado que
haya guardado anteriormente.
Para recuperar un programa personalizado:
&ODJFOEBMBTFDBEPSB
* BLOQUEO PARA NIÑOS (CHILD LOCK)
Utilice esta opcion para evitar un uso no deseado
de la secadora o para evitar modificaciones en las
configuraciones de ciclo mientras la secadora esta
funcionando. Presione y sostenga los botones NIVEL
%&4&$"%0%3:-&7&-
BMNJTNPUJFNQPEVSBOUF
TFHVOEPTQBSBBDUJWBSPEFTBDUJWBSMBGVODJPO#-026&0
1"3"/*º04$)*-%-0$,
&MJDPOPEFCMPRVFPQPESB
verse en la pantalla y todos los controles quedaran
desactivados.
Cuando se ha fijado el seguro infantil, aparecerá el
indicador de seguro infantil y se desactivarán todos los
botones excepto el botón de ENCENDIDO/APAGADO
(POWER).
NOTA
#-026&01"3"/*º04$)*-%-0$,
se mantiene
después del fin del ciclo. Si desea desactivar esta
GVODJØOQSFTJPOFZTPTUFOHBTFHVOEPTFMCPUØO
NIVEL DE SECADO (DRY LEVEL).
"QSJFUFFMCPUØO130(3"."1&340/"-*;"%0
(CUSTOM PROGRAM).
"QSJFUFFMCPUPO*/*$*01"64"45"351"64&
QBSB
iniciar el ciclo.
ESPAÑOL
Con esta opción, la secadora hará sonar la alarma
DVBOEPMBDBSHBFTUÈTFDB&TUBGVODJØOMF
permite retirar el(los) artículo(s) liviano(s) que seca(n)
rápidamente o que desea planchar o colgar mientras
aún se encuentran húmedos. Presione y sostenga el
CPUØO01$*»/015*0/
EVSBOUFTFHVOEPTQBSB
activar o desactivar ALERTA DE SECADO HÚMEDO(DAMP
DRY SIGNAL).
34
MANTENIMIENTO
MANTENIMIENTO
Limpieza regular
Limpieza del filtro de pelusa
Limpie siempre las pelusas del filtro tras cada ciclo.
WADVERTENCIA
Para reducir el riesgo de incendio, descargas eléctricas o
heridas al usar su electrodoméstico, siga las precauciones
básicas, incluyendo lo siguiente:
t%FTFODIVGFMBTFDBEPSBBOUFTEFMJNQJBSMBNJTNBQBSB
FWJUBSFMSJFTHPEFEFTDBSHBTFMÏDUSJDBT
Si no se cumple con esta advertencia se podrán producir
heridas graves, incendios, descargas eléctricas o muerte.
t"MMJNQJBSMBTFDBEPSBOVODBVUJMJDFRVÓNJDPTEFDPSUF
MJNQJBEPSFTBCSBTJWPTPTPMWFOUFT
Los mismos dañarán su aspecto.
Limpieza del exterior
El mantenimiento adecuado de su secadora podría
prolongar su vida útil. El exterior de la unidad puede
limpiarse con agua tibia y un detergente de jabón medio,
no abrasivo.
Limpie inmediatamente cualquier clase de fuga, con un
trapo suave y húmedo.
NOTA
Filtro de
pelusa
Para limpiarlo, tire del filtro de pelusa verticalmente.
Luego:
1BSBVOBMJNQJF[BEJBSJBSFNVFWBDVBMRVJFSQFMVTB
del filtro con sus dedos, o
No use alcoholes de quemar, solventes, o productos
similares para limpiar la secadora.
Nunca use lana de acero o limpiadores abrasivos;
éstos pueden dañar la superficie de la secadora.
Limpieza del interior
Limpie con un paño alrededor de la abertura y el sello
de la puerta con un paño suave húmedo para prevenir la
acumulación de pelusa y polvo que podrían dañar el sello
de la puerta.
Limpie la ventanilla con un paño suave humedecido con
agua caliente y un detergente suave no abrasivo para el
hogar; luego seque con un paño.
Se puede limpiar el tambor de acero inoxidable con un
limpiador de acero inoxidable convencional, usado según
las especificaciones del fabricante. Nunca use limpiadores
abrasivos ni de lana metálica; pueden raspar o dañar la
superficie.
Limpieza alrededor y debajo de la secadora
Aspire la pelusa y polvo alrededor de la secadora y debajo
de ella con regularidad. Se debe revisar que el sistema de
conductos de ventilación no tenga acumulación de pelusa y
se debe limpiar una vez por año. Si se percibe una reducción
del flujo de aire o desempeño del secado notorios, revise
que el sistema de conductos no esté bloqueado ni tenga
obstrucciones.
Mantenimiento del sistema de conductos
Se debe revisar que el sistema de conductos de ventilación
no tenga acumulación de pelusa y se debe limpiar una
vez por año. Si se percibe una reducción del flujo de aire o
desempeño del secado notorios, revise que el sistema de
conductos no esté bloqueado ni tenga obstrucciones. Llame
a un técnico o proveedor de mantenimiento calificados.
-JNQJFFMGJMUSPEFQFMVTBDPOVOBTQJSBEPSP
4JFMGJMUSPEFQFMVTBTTFIBFOTVDJBEPNVDIPPTFIB
obstruido con suavizante de tejido, lávelo en agua
caliente jabonosa y déjelo secar completamente
antes de volverlo a colocar.
NOTA
NUNCA opere la secadora sin haber colocado antes el
filtro de pelusa. NUNCA haga funcionar la secadora
con un filtro de pelusas húmedo.
RESOLUCIÓN DE PROBLEMAS
35
RESOLUCIÓN DE PROBLEMAS
Antes de llamar a mantenimiento
Su secadora está equipada con un sistema de monitoreo de errores automático para la detección y el diagnóstico de
problemas en una etapa temprana. Si su secadora no funciona adecuadamente o no funciona en lo absoluto, revise
lo siguiente antes de llamar a mantenimiento.
$BVTBTQPTJCMFT
t&MGVTJCMFEFMIPHBSFTUÈ
quemado, el cortacircuitos se
ha accionado, o ha ocurrido una
interrupción eléctrica.
t"TFHÞSFTFEFRVFFMFODIVGFFTUÏDPOFDUBEPEFNBOFSB
segura en un tomacorriente con conexión a tierra, que se
corresponda con la placa de clasificación.
t3FBDUJWFFMEJTZVOUPSPDBNCJFFMGVTJCMF/PBVNFOUF
la capacidad del fusible. Si el problema se debe a una
sobrecarga de circuito, pida a un electricista calificado que
solucione el problema.
La secadora no
calienta
t&MGVTJCMFEFMIPHBSFTUÈ
quemado, el cortacircuitos se
ha accionado, o ha ocurrido una
interrupción eléctrica.
t4FIBBQBHBEPFMTVNJOJTUSPP
servicio de gas (solo modelos a
gas).
t3FBDUJWFFMEJTZVOUPSPDBNCJFFMGVTJCMF/PBVNFOUF
la capacidad del fusible. Si el problema se debe a una
sobrecarga de circuito, pida a un electricista calificado que
solucione el problema.
t$POGJSNFRVFMBWÈMWVMBEFDPSUFEFHBTEFMBWJWJFOEB
y la válvula de corte de gas de la secadora estén
completamente abiertas.
Manchas
de grasa o
suciedad en las
prendas
t4VBWJ[BEPSEFUFMBTVTBEP
incorrectamente.
t1SFOEBTMJNQJBTZTVDJBTTFDBEBT
juntas.
t$POGJSNFZTJHBMBTJOTUSVDDJPOFTQSPWJTUBTDPOTV
suavizador de telas.
t"TFHÞSFTFEFVTBSTVTFDBEPSBTPMPQBSBTFDBSBSUÓDVMPT
limpios, ya que los artículos sucios pueden ensuciar las
prendas limpias en la misma carga o en las subsiguientes.
tLas manchas en ropas secas son en realidad manchas que
no se eliminaron durante los procesos de lavado. Asegúrese
de que las ropas queden completamente limpias de
acuerdo con las instrucciones de su lavadora y detergente.
La secadora no
se enciende
t&MDBCMFFMÏDUSJDPOPFTUÈ
enchufado adecuadamente.
Soluciones
t1SFOEBTMJNQJBTZTVDJBTTFDBEBT
juntas.
La pantalla
muestra los
FSSPSFTU&PU&
t/PFTUÈGVODJPOBOEPFM
calefactor
t"QBHVFMBTFDBEPSBZMMBNFBNBOUFOJNJFOUP
Pelusa en las
prendas
t/PTFIBMJNQJBEPDPSSFDUBNFOUF tAsegúrese de limpiar el filtro de pelusa antes de cada carga.
Con algunas cargas que producen altas cantidades de
el filtro de pelusa.
pelusa, puede ser necesario limpiar el filtro durante el ciclo.
t"MHVOBTUFMBTQSPEVDFOQFMVTBTQPSFKFNQMPVOBUPBMMB
t1SFOEBTEFMBWBEPOP
de algodón peluda blanca) y deben secarse aparte de
clasificadas adecuadamente.
las prendas que atrapan pelusa (por ejemplo: un par de
pantalones de lino).
t0CTFSWFFMFYDFTPEFFTUÈUJDBFOMBTQSFOEBTEFTQVÏTEFM
t&YDFTPEFFTUÈUJDBFOMBT
secadora indicado de la sección más abajo.
prendas.
t%JWJEBMBTDBSHBTHSBOEFTFODBSHBTNÈTQFRVF×BTQBSB
t-BTFDBEPSBFTUÈTPCSFDBSHBEB
realizar el secado.
t1B×VFMPTEFQBQFMQBQFMFTFUD t3FWJTFMPTCPMTJMMPTNJOVDJPTBNFOUFBOUFTEFMBWBSZTFDBS
prendas.
dejados en los bolsillos.
Exceso de
estática en
las prendas
después del
secado
t/PTFVTBTVBWJ[BEPSEFUFMBPTF tUse un suavizador de telas para reducir la electricidad
estática. Asegúrese de seguir las instrucciones del fabricante.
usa incorrectamente.
t4PCSFDBSHBSVOBDBSHBEFMBWBEPQVFEFDBVTBSMB
t-BTQSFOEBTTFTFDBSPO
acumulacion de electricidad estatica. Programe los ajustes
por demasiado tiempo
y use un tiempo de secado menos prolongado; o use los
(excesivamente secas).
ciclos SECADO CON SENSOR (SENSOR DRY).
tSecado de telas sintéticas, planchado t&TUPTNBUFSJBMFTQVFEFODBVTBSBDVNVMBDJØOEFFTUÈUJDB
permanente o combinación de
Intente usar un suavizador de telas.
materiales sintéticos.
La pantalla
muestra el código
de error PS
t&MDBCMFEFBMJNFOUBDJØOFTUÈ
mal conectado.
t$PNQSVFCFMBDPOFYJØOEFMDBCMFEFBMJNFOUBDJØOBM
CMPRVFEFUFSNJOBMFT$POTVMUFMBTQÈHJOBTEFFTUF
manual.
ESPAÑOL
1SPCMFNB
36
RESOLUCIÓN DE PROBLEMAS
Antes de llamar a mantenimiento (cont.)
1SPCMFNB
Las prendas
están
arrugadas
$BVTBTQPTJCMFT
t-BTQSFOEBTTFTFDBSPO
por demasiado tiempo
(excesivamente secas).
t4FIBOEFKBEPMBTQSFOEBTFOMB
secadora por demasiado tiempo
una vez finalizado el ciclo.
Soluciones
t4FDBSFYDFTJWBNFOUFVOBDBSHBEFMBWBOEFSÓBQVFEF
provocar arrugas en las prendas. Intente secar por un
período menos prolongado y retire los artículos mientras
aún retienen una cantidad leve de humedad.
t3FUJSFJONFEJBUBNFOUFUPEPTMPTBSUJDVMPTEFMBTFDBEPSB
al final del ciclo. Use la opcíon CUIDADO DE ARRUGAS
(WRINKLE CARE) para continuar girando las prendas al
GJOBMEFVODJDMPQPSVOQMB[PNBYJNPEFIPSBT
El tiempo de
secado no es
constante
t-PTBKVTUFTEFDBMPSFMUBNB×P
de la carga o la humedad de las
prendas no son constantes.
t&MUJFNQPEFTFDBEPQBSBVOBDBSHBWBSJBSÈEFQFOEJFOEP
del ajuste de calor, tipo de calor utilizado (eléctrico,
natural, o gas LP), el tamaño de la carga, el tipo de tela,
el nivel de humedad de las prendas y la condición de los
conductos de escape y el filtro de pelusa.
Las prendas
tardan
demasiado
tiempo en
secarse
t-BDBSHBOPFTUÈDPSSFDUBNFOUF
clasificada.
t$BSHBHSBOEFEFUFMBTQFTBEBT
tSepare los artículos pesados de los livianos. Los artículos más
grandes y pesados requieren de mayor tiempo de secado.
tLas telas pesadas requieren de mayor tiempo de secado ya
que tienden a retener mayor humedad. Para ayudar a reducir
y mantener tiempos de secado más constantes para telas
pesadas y de mayor tamaño, separe estos artículos en cargas
más pequeñas de un tamaño sistemático.
t6TFMPTBKVTUFTEFDPOUSPMBEFDVBEPTQBSBFMUJQPEFDBSHB
que esté secando.
t/PTFIBOQSPHSBNBEP
adecuadamente los controles de
la secadora.
t4FOFDFTJUBMJNQJBSFMGJMUSPEF
pelusa.
t-PTDPOEVDUPTEFFTDBQFFTUÈO
bloqueados, sucios o el tendido
de los conductos es demasiado
largo.
t&MGVTJCMFEFMIPHBSFTUÈ
quemado, el cortacircuitos se
ha accionado, o ha ocurrido una
interrupción eléctrica.
t-BTFDBEPSBFTUÈTPCSFDBSHBEB
t)BZNVZQPDBDBSHBFOMB
secadora.
tAsegúrese de limpiar el filtro de pelusa antes de cada carga.
Con algunas cargas que producen altas cantidades de
pelusa, puede ser necesario limpiar el filtro durante el ciclo.
t$POGJSNFRVFFMTJTUFNBEFDPOEVDUPEFFTDBQFTF
encuentre configurado correctamente y no tenga
desechos, pelusa ni obstrucciones. Asegúrese de que los
reguladores de tiro exteriores abran adecuadamente y no
estén bloqueados, atascados ni dañados.
t3FBDUJWFFMEJTZVOUPSPDBNCJFFMGVTJCMF/PBVNFOUF
la capacidad del fusible. Si el problema se debe a una
sobrecarga de circuito, pida a un electricista calificado que
solucione el problema.
t%JWJEBMBTDBSHBTHSBOEFTFODBSHBTNÈTQFRVF×BTQBSB
realizar el secado.
tSi está secando una carga muy pequeña, añada algunos artículos
adicionales para asegurar una acción de giro apropiada.
Las prendas
encogen
t/PTFTJHVFOMBTJOTUSVDDJPOFT
de la etiqueta de la prenda.
t1BSBFWJUBSRVFMBTQSFOEBTFODPKBOTJHBDVJEBEPTBNFOUF
las instrucciones de cuidado de telas correspondiente a
su prenda, ya que algunas telas encogen naturalmente
cuando se lavan. Otras telas se pueden lavar, pero
encogen cuando se secan en una secadora. Use un ajuste
de calor bajo o sin calor.
La luz de
VERIFICAR
FILTRO (CHECK
FILTER) esta
encendida
durante el ciclo
de secado
t&MGJMUSPEFQFMVTBFTUÈDBTJ
atascado o lleno.
t1BVTFFMDJDMPEFTFDBEPZMJNQJFFMGJMUSPEFQFMVTB
ESPECIFICACIONES
37
Antes de llamar a mantenimiento (cont.)
Problema
Causas posibles
&MWJTVBMJ[BEPS
NVFTUSB
iEwiEw
t*OTUBMFVODPOEVDUPNÈTDPSUPPNÈTEFSFDIP-FBMBT
*OTUSVDDJPOFTEF*OTUBMBDJØO
t-BUVCFSÓBTFEFCFSÈDPOUSPMBSMJNQJBSEFJONFEJBUP
QBSBFMJNJOBSMBQFMVTBBDVNVMBEBZPUSPTCMPRVFPT-B
TFDBEPSBTFQVFEFVTBSQFSPTVGVODJPOBNJFOUPZFGJDBDJB
TFWFSÈOSFEVDJEPTEFGPSNBJNQPSUBOUF
t4JFMTJTUFNB'-084&/4&5.EFUFDUBSFTUSJDDJPOFTEF
TBMJEBFMJOEJDBEPSQFSNBOFDFSÈFODFOEJEPEVSBOUFEPT
IPSBTUSBTGJOBMJ[BSFMDJDMP4JBCSFMBQVFSUBPQVMTBFM
CPUØO&/$&/%*%0"1"("%0108&3
TFBQBHBSÈMB
QBOUBMMB
t-PTDPOEVDUPTFTUÈOCMPRVFBEPT tNo utilice la secadora hasta que el sistema de escape
BM_BQSPYJNBEBNFOUF
no haya sido limpiado y/o reparado.6UJMJ[BSMBTFDBEPSB
FMDØEJHPEFFSSPSiEwPiEw
DPOVOFTDBQFHSBWFNFOUFSFTUSJOHJEPFTQFMJHSPTPZ
TPMPTFWJTVBMJ[BEVSBOUFIPSBT
QPESÓBDPOMMFWBSVOJODFOEJPVPUSPTEB×PTBMBQSPQJFEBE
t4JTUFNBEFFTDBQFEPNÏTUJDP
t$PNQSVFCFMBWFOUJMBDJØOFYUFSOBEFMBTFDBEPSBDVBOEP
CMPRVFBEP
MBNJTNBFTUÈGVODJPOBOEPQBSBBTFHVSBSTFRVFFMGMVKPEF
BJSFFTQPUFOUF
t4JFMTJTUFNBEFFTDBQFFTFYUSFNBEBNFOUFMBSHPIÈHBMP
SFQBSBSPEFTWJBS
t.BOUFOHBMB[POBBMSFEFEPSEFMBTFDBEPSBMJNQJBZMJCSF
EFEFTPSEFO
t$PNQSVFCFMPTEB×PTFOMBDBNQBOBEFMBWFOUJMBDJØOPFM
BUBTDPEFQFMVTBT
t"TFHÞSFTFRVFMB[POBBMSFEFEPSEFMBDBNQBOBEF
WFOUJMBDJØOFTUÈEFTQFKBEB
ESPECIFICACIONES
Modelos de Secadoras
DLE1001W DLG1002W
%FTDSJQDJØO
4FDBEPSBDPOWBQPS
3FRVJTJUPTFMÏDUSJDPT
$POTVMUFMBQMBDBEFDMBTJGJDBDJØOQBSBJOGPSNBDJØOFOEFUBMMFT
3FRVJTJUPTEFHBT
(BTOBUVSBMB2/QVMHBEBTBDN
8$
-1BQVMHBEBTBDN
8$TPMPFONPEFMPTBHBT
%JNFOTJPOFT
wBODIP
9/wQSPGVOEJEBE
9/wBMUP
/w%DPOMBQVFSUB
BCJFSUB
DNBODIP
9DNQSPGVOEJEBE
9DNBMUP
DNDPO
MBQVFSUBBCJFSUB
1FTPOFUP
&MFDUSØOJDPMCLH
(BTMCLH
$BQBDJEBEEFTFDBEP
$JDMPEFOPSNBM
*&$QJFTDVCJDPTMCLH
ESPAÑOL
-BMV[EF'-08 t-BUVCFSÓBFTEFNBTJBEP
4&/4&5.FTUB
MBSHBPQPTFFNVDIPTHJSPT
FODFOEJEB
SFTUSJDDJPOFT
EVSBOUFFMDJDMP t#MPRVFPTJHOJGJDBUJWPEFMB
EFTFDBEP
UVCFSÓBQPSBDVNVMBDJØOEF
QFMVTBPFTDPNCSPT
t&MFMFDUSPEPNÏTUJDPIB
EFUFDUBEPVOBPCTUSVDDJØO
FOMBWFOUJMBDJØOFYUFSOBEFMB
TFDBEPSB
Soluciones
38
UTILIZACIÓN DEL SMARTDIAGNOSISTM
UTILIZACIÓN DEL SMART DIAGNOSIS™
Si tuviera algún problema con su secadora, la misma posee la capacidad de transmitir datos a un teléfono inteligente
utilizando la aplicación Smart Laundry de LG o mediante el teléfono al Centro de atención telefónica de LG.
SMART DIAGNOSIS™ no puede ser activado a menos que su secadora esté encendida pulsando el botón de
ALIMENTACIÓN(POWER). Si su secadora no puede encenderse, tendrá que localizar y solucionar los problemas sin
utilizar SMART DIAGNOSIS™.
Diagnóstico sonoro
SMART DIAGNOSISTM
(DIAGNÓSTICO INTELIGENTE)
mediante su teléfono inteligente
SMART DIAGNOSISTM
(DIAGNÓSTICO INTELIGENTE) a través
del Centro de atención telefónica
%FTDBSHVFMBBQMJDBDJØO4NBSU-BVOESZ-BWBEPJOUFMJHFOUF
de LG en su teléfono inteligente.
-MBNFBM$FOUSPEFBUFODJØOUFMFGØOJDBEF-(BMUFMÏGPOP
-(&&66
-($BOBEÈ
"CSBMBBQMJDBDJØO4NBSU-BVOESZ-BWBEPJOUFMJHFOUF
EF
LG en su teléfono inteligente. Presione el botón de flecha
derecha para avanzar a la siguiente pantalla.
$VBOEPBTÓTFMPJOEJRVFFMPQFSBEPSEFM$FOUSPEFBUFODJØO
telefónica, mantenga el micrófono de su teléfono sobre el
logotipo SMART DIAGNOSISTM de la secadora.
4PTUFOHBFMUFMÏGPOPBOPNÈTEFVOBQVMHBEBDN
EF
distancia de la secadora (pero sin tocarla).
1SFTJPOFFMCPUØO(3"#"33&$03%
EFTVUFMÏGPOP
inteligente y mantenga el micrófono del teléfono inteligente
cerca del logotipo de SMART DIAGNOSISTM de la secadora.
NOTA
$POFMUFMÏGPOPVCJDBEPFOFMTJUJPNBOUFOHBQVMTBEPFM
botón de CONTROL DE TEMPERATURA (TEMP. CONTROL)
durante tres segundos.
No pulse ningún otro botón ni ícono de la pantalla de
visualización.
5. Mantenga el teléfono en el sitio hasta que la transmisión del
UPOPIBZBUFSNJOBEP&TUPUPNBVOPTTFHVOEPTZMBQBOUBMMB
de la secadora mostrará la cuenta regresiva del tiempo.
.BOUFOHBQVMTBEPFMCPUØOEF$0/530-%&5&.1&3"563"
(TEMP. CONTROL) durante tres segundos.
$VBOEPMBHSBCBDJØOIBZBGJOBMJ[BEPWFBFMSFTVMUBEPEFM
diagnóstico presionando el botón Siguiente (Next) del
teléfono.
NOTA
Smart DiagnosisTM (Diagnóstico Inteligente) es una función
de resolución de problemas diseñada para asistir, y no para
reemplazar, al método tradicional de resolución de problemas
a través de llamadas de servicio técnico. La efectividad de
esta función depende de diversos factores, entre los cuales
se incluyen, la recepción del teléfono celular utilizado para la
transmisión, cualquier ruido externo que pueda presentarse
durante la transmisión, y la acústica de la habitación donde está
ubicada la secadora.
Por lo tanto, LG no garantiza que Smart DiagnosisTM (Diagnóstico
Inteligente) resuelva con precisión cualquier cuestión dada.
.BOUFOHBFMUFMÏGPOPFOFMTJUJPIBTUBRVFMBUSBOTNJTJØOEFM
UPOPIBZBUFSNJOBEP&TUPUPNBVOPTTFHVOEPTZMBQBOUBMMB
de la secadora mostrará la cuenta regresiva de tiempo.
5. Una vez que la cuenta regresiva haya finalizado y los tonos se
hayan detenido, reanude la conversación con el operador del
Centro de atención telefónica, quien será capaz de ayudarlo
en el uso de la información transmitida para su análisis.
GARANTÍA
39
-(&-&$530/*$4*/$
("3"/5¶"-*.*5"%"%&-"4&$"%03"-(o&&66
1&3¶0%0%&("3"/5¶"
$».04&"%.*/*453"&-."/5&/*.*&/50
."/0%&0#3" Un año desde la Fecha de compra.
.BOUFOJNJFOUPFOFMIPHBSi*O)PNFw
1*&;"46OB×Pdesde la Fecha de compra.
Guarde la factura fechada del distribuidor o la boleta
de entrega como evidencia de la Fecha de compra
como prueba para la garantía, y entregue una copia
de la factura al técnico de mantenimiento al momento
que se presta el mantenimiento.
Las unidades de reemplazo y piezas de reparación
podrían ser nuevas o refabricadas.
Las unidades de reemplazo o piezas de reparación están
garantizadas por la porción restante del período de
garantía de la unidad original.
-MBNFBMZFTDPKBMBPQDJØOBEFD
VBEBQBSBVCJDBSBTV$FOUSPEF.BOUFOJNJFOUP
"VUPSJ[BEP-(NÈTDFSDBOP
O visite nuestro sitio Web en: http://www.lgservice.com.
&45"("3"/5¶"3&&.1-";"$6"-26*&3053"&913&4"0*.1-¶$*5"*/$-6:&/%04*/-*.*5"$*»/
$6"-26*&3("3"/5¶"%&$0.&3$*"-*;"$*»/0"%&$6"$*»/1"3"6/1301»4*50%&5&3.*/"%0
&/-".&%*%"3&26&3*%"103-"-&:$6"-26*&3("3"/5¶"*.1-¶$*5"4&-*.*5"&/467*(&/$*""-
1&3¶0%0%&("3"/5¶"&913&4"*/%*$"%0.«4"33*#"/*&-'"#3*$"/5&/*&-%*453*#6*%03%&-04
&&664&3«/3&410/4"#-&4103%"º04*/$*%&/5"-&4$0/4&$6&/$*"-&4*/%*3&$504&41&$*"-&4
016/*5*704%&$6"-26*&3/"563"-&;"*/$-6:&/%04*/-*.*5"$*»/1²3%*%"%&("/"$*"40
*/(3&4040$6"-26*&3053"$-"4&%&%"º04$0/53"$56"-&4&953"$0/53"$56"-&40%&
$6"-26*&35*10Algunos estados no permiten la exclusión o limitación de daños incidentales o consecuen
ciales o limitación en la duración de una garantía implícita, de modo que la exclusión o limitación indicada
anteriormente podría no aplicar en su caso. Esta garantía le brinda derechos legales específicos y podría también
tener otros derechos que varían según el estado.
&45"("3"/5¶"-*.*5"%"/0"1-*$""
t7JBKFTEFNBOUFOJNJFOUPEFTEFTVIPHBSQBSBFOUSFHBSFDFQDJØOZPJOTUBMBDJØOEFMQSPEVDUPJOTUSVDDJØOPSFFN
plazo de fusibles del hogar o cableado adecuado o corrección de reparaciones no autorizadas.
t-PTEB×PTPQSPCMFNBTPQFSBUJWPTRVFSFTVMUFOEFMBOFHMJHFODJBFOFMVTPFMBCVTPFMGVODJPOBNJFOUPGVFSB
de las especificaciones medioambientales o inconsistentes con los requisitos de precauciones establecidos en
la Guía de funcionamiento, accidente, insectos, incendio, inundación, instalación inadecuada, casos de fuerza
mayor, modificación o alteración no autorizada, corriente o voltaje incorrectos, o uso comercial, o uso diferente al
indicado.
El costo de reparación o reemplazo bajo estas circunstancias excluidas será responsabilidad del cliente.
/Á.&304%&$&/5304*/'03."$*»/%&$-*&/5&
1BSBPCUFOFS"TJTUFODJBQBSBFMDMJFOUF
JOGPSNBDJØOEFMQSPEVDUPPNBOUFOJNJFOUPP
EJTUSJCVJEPSBVUPSJ[BEP
1"3"$0/5"$5"3"-(&-&$530/*$4
103$033&0
($VTUPNFS*OGPSNBUJPO$FOUFS10#PY
+BNFT3FDPSE3PBE
)VOUTWJMMF"MBCBNB"55/$*$
-MBNFBMIPSBTBMEÓBEÓBT
al año),
y seleccione la opción adecuada a partir del menú.
0WJTJUFOVFTUSPTJUJP8FCFOIUUQXXXMHTFSWJDFDPN
IrInformación de registro del producto
.PEFMP
/ÞNFSPEFTFSJF
'FDIBEFDPNQSB
El modelo y número de serie figuran en la placa de
especificaciones técnicas en la parte interior de la
puerta frontal de la secadora.
ESPAÑOL
Su secadora LG será reparada o reemplazada, a discreción de LG, si se comprueba que existe un defecto en el material o la mano
de obra bajo condiciones de uso normales, durante el período de garantía (“Período de garantía”) establecido más abajo, vigente
desde la fecha (“Fecha de compra”) de la compra del cliente original de producto. Esta garantía es válida únicamente para el com
QSBEPSPSJHJOBMEFMQSPEVDUPZDVBOEPTFVTBFO&&66JODMVZFOEP"MBTLB)BXBJJZMPTUFSSJUPSJPTEFMPT&&66FYDMVTJWBNFOUF
40
41
ESPAÑOL
42
43
ESPAÑOL
LG Customer Information Center
1-800-243-0000 USA
1-888-542-2623 CANADA
Register your product Online!
www.lg.com