1
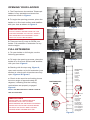
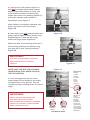
Use and Care Instructions for the
EasyAccess Telescopic Ladder
IMPORTANT
READ ALL INSTRUCTIONS CAREFULLY BEFORE
ATTEMPTING TO USE THE LADDER
WARNING!
DO NOT OPEN THE LADDER FROM THE TOP UNLESS
EXTENDING TO FULL HEIGHT. IT MAY COLLAPSE!
ATTENTION!
FOR VISUAL INSTRUCTIONS,
PLEASE GO TO OUR YOUTUBE VIDEO
With proper use and care, your EasyAccess Innovations
Telescopic Ladder will provide you with a safe and reliable
service. Please read and follow these instructions carefully.
Save this booklet for future reference.
[email protected]
www.easyaccessinnovations.com
OPENING YOUR LADDER
1. The EasyAccess Innovations Telescopic
Ladder is very portable and should be
carried as shown in Figure 1
2. To begin the opening process, place the
ladder on a firm level surface and stabilize
with your foot as shown in Figure 2
IMPORTANT:
Figure 1
Figure 2
DO NOT OPEN LADDER FROM THE TOP
UNLESS OPENING TO THE FULL HEIGHT.
SECTIONS MAY NOT PROPERLY LOCK
AND YOU COULD BE INJURED
3. There are two (2) ways to OPEN your
ladder. Full extension or extension to any
interim height.
FULL EXTENSION
Figure 3
1. To open ladder to full height, use the
following procedure:
Figure 4
a. To begin the opening process, place the
ladder on a firm level surface and stabilize
with your foot. Figure 2
b. Starting with the top rung, Figure 3,
open each section to its full extension (one
section at a time) until all sections are fully
open. Figure 4 & Figure 5
c. Check to be sure the red locking levers
are at an angle of approximately 60
degrees, indicating that the locking
mechanisms are properly engaged.
Figure 6
Red Locking
Levers:
Locked
position
for all red
levers
except
bottom
pull rings.
Figure 5
BOTTOM PULL
RINGS
NOTE: THE BOTTOM PULL RINGS LOCK IN
THE UP POSITION.
IMPORTANT:
NEVER USE THE LADDER BEFORE
ASSURING THAT THE LOCKING
MECHANISMS ARE PROPERLY ENGAGED.
NEVER PULL BOTTOM LOCKING RINGS
OR PUSH UP ON ANY RED LOCKING
LEVERS WHEN LADDER IS IN USE.
UNLOCKED
POSITION
DOWN
LOCKED
POSITION
UP
Figure 6
Always ensure
that the red
locking
mechanism
have fully
engaged
by checking
that the red
locking levers
have dropped
to an angle of
approximately
60 degress
CLOSING THE LADDER
Care should be taken when closing the
ladder. Unlocking and closing is quite
simple when done carefully.
Pulling down rings
one at a time to
unlock ladder
IMPORTANT:
DO NOT LOWER THE LADDER TO INTERIM
HEIGHTS. ALWAYS CLOSE LADDER
COMPLETELY AND THEN RE-OPEN TO
DESIRED HEIGHT.
To close the ladder, refer to Figure 7
and proceed as follows:
1. Hold the ladder upright and firmly grasp
one of the open vertical tubes with one hand.
IMPORTANT:
NEVER PUT ANY PART OF YOUR BODY,
INCLUDING YOUR HANDS, FINGERS OR
THUMBS ON OR BETWEEN THE RUNGS
WHEN CLOSING THE LADDER.
2. With your other hand, pull down the
ringed locking levers ONE AT A TIME, to
release the bottom locks. (Sometimes it is
Figure 7
IMPORTANT:
USE CARE. NEVER PULL BOTH RINGS
SIMULTANEOUSLY
3. When the bottom locks are released,
the ladder is easily closed by CAREFULLY
and SLOWLY telescoping each section
down, keeping your hands on the tubes,
NOT ON THE RUNGS. The ladder will
unlock itself automatically as you lower
each section.
4. Store the ladder indoors.
necessary to pull the first ring a second time)
INTERIM HEIGHT EXTENSION
a.For opening ladder to any interim height,
always open from the ladder rung of your
desired height chosen.
After you have chosen your desired height
or chosen ladder rung height, grasp the
outside edges of the rung chosen and pull
up. Figure 8
Figure 8
b. Open each section one at a time until all
sections are fully opened to your desired
interim height. Figure 9
Be sure all red indicator levers under each
ladder rung and pull rings under bottom
ladder rung are in locking position before
climbing ladder. Refer to figure 6
Figure 9
IMPORTANT:
DO NOT START INTERIM HEIGHT BY
BEGINING WITH BOTTOM RUNG BUT ONLY
IF THAT IS THE CHOSEN DESIRED HEIGHT
c. (Important) If the chosen height is in
fact not the height desired and need to
adjust height either higher or lower, you
must reset the ladder by lowering the
ladder back down into starting position by
pulling the release rings located on
first/bottom rung. Figure 7
Allow ladder to completely descend with
each rung stack onto one another.
Figure 10
d. Now select your new desired height and
grasp outside edge of newly chosen rung
(height) Figure 11 and pull up to fully
extend all rungs below. Figure 12
Figure 10
Make sure that all red locking levers are in
their locking positions and bottom rung
pull rings are in their locking positions.
Figure 12
IMPORTANT:
THIS STEP IS REQUIRED TO ASSURE
SAFE OPERATION FOR INTERIM
Figure 11
HEIGHTS
NOTE THAT THE BOTTOM LOCKING
LEVERS WITH PULL RINGS LOCK IN
THE UP POSITION.
Figure 12
Locked
position
for all red
levers
except
bottom
pull rings.
e. If any locking levers are not at the
proper angle, lift the ladder by the tubes
and gently tap on the ground. This will
normally bring the locking levers to correct
angle.
IMPORTANT:
NEVER USE THE LADDER BEFORE
ASSURING THAT THE LOCKING
MECHANISMS ARE PROPERLY ENGAGED.
NEVER PULL RINGED LOCKING LEVERS
WHEN LADDER IS IN USE.
Red Locking
Levers:
UNLOCKED
POSITION
DOWN
LOCKED
POSITION
UP
BOTTOM PULL RINGS
Always ensure
that the red
locking
mechanism
have fully
engaged
by checking
that the red
locking levers
have dropped
to an angle of
approximately
60 degress
SAFETY PROCEDURES
DO NOT
DO
Check to ensure all locking mechanisms are
properly engaged before climbing the ladder
gain extra height. Always have a firm level base
DO
Always open and close the ladder in a slow and
careful manner
DO
Treat the ladder with care. It is a precision built
product. If tubes are dented or damaged in any
way, the ladder may be difficult to open or close,
or may completely malfunction
DO
Always lean ladder against top rungs, never
against tubes, as they may become damaged
DO
Keep your ladder clean occasionally wipe tubes
with a clean, dry cloth. Paint should be cleaned
off immediately as it will impede telescoping
action If stiffness develops, wipe tubes with a
clean clothand apply a small amount of silicone
spray wiping any excess with a clean cloth
DO
Store your ladder indoors to avoid damp
conditions which could make the ladder difficult
to operate
DO
Read and follow additional safety information
labels provided on your ladder
SAFETY PRECAUTIONS
DO NOT
Climb ladder at incline less than 75°
DO NOT
Place your hands, fingers or thumbs on or
between rungs when closing the ladder
DO NOT
Use your ladder if there is any doubt about the
locks being properly engaged, as this is an
unsafe condition
DO NOT
Pull ringed locking levers or tamper with other
locking levers when ladder is in use
IT MAY COLLAPSE
DO NOT
Carry, operate or use your ladder near electrical
wires or equipment
THIS LADDER CONDUCTS ELECTRICITY
Place a box or other objects under the ladder to
for ladder to stand on
DO NOT
Use the ladder in a horizontal position, such as
saw horse. Never open or use the ladder upside
down as it could cause damage to the product
or cause bodily injury
DO NOT
Use ladder as scaffold or plank
DO NOT
Use ladder as a bridge
POINTS TO REMEMBER
As with any tools, safety should always be the
first consideration when using your telescopic
ladder.
Always check locking levers for proper locked
position before climbing.
Do not stand or climb on the top three sections
of the ladder when fully extended.
Never pull ringed locking or tamper with other
locking levers while ladder in use.
Do not lower the ladder to other interim heights.
Always close ladder fully and then reopen to
desired height.
Always close your ladder in a careful, controlled
manner remembering to avoid placing hands,
fingers or thumbs on or between rungs.
When standing on the ladder, do not over reach
or push/pull ladder to change its position.
Always face the ladder and do not climb up the
side.
Whenever possible, the ladder should be
secured in position.
Special care should be used on a windy day
Keep your ladder clean.
Store indoors in the closed position.
EASYACCESS INNOVATIONS RESERVES THE
RIGHT TO ALTER OR IMPROVE THE
PRODUCTS WHEN THEY SEE FIT
WARRANTY
Your EasyAccess ladder is covered by a
12-month warranty. The Company
undertakes to replace or repair, free of
charge, any defect that the Company
considers to be due to faulty workmanship
or material within 12 months of the sale
date, except for:
• Defects arising from neglect, misuse
or unauthorized modifications.
• Damage caused by abuse, misuse,
dropping or other similar damage
caused by or as a result of failure to
follow transportation, storage, loading
or operation, instructions.
• Alterations, additions or repairs carried
out by persons other than the
Manufacturer or their recognized
distributors.
• Transportation or shipment costs to
and from the Manufacturer or their
recognized agents, for repair or
assessment against a warranty claim,
on any EasyAccess ladder or
component.
• Materials and/or labor costs to renew,
repair, or replace components due to
normal wear and tear.
• Faults arising from the use of
non-standard or additional parts, or
any consequential damage or wear
caused by the fitting or use of such
parts.
IMPORTANT
The Manufacturer and/or their recognized
agents, directors, employees or insurers
will not be held liable for consequential or
other damages, losses or expenses in
connection with, or by reason of, or the
inability to use the EasyAccess ladder for
any purpose.
MODIFICATIONS
If additional equipment or any third party
work, modifications or alterations are to be
carried out on the EasyAccess ladder
which will involve any welding, drilling or
any form of cutting or distortion of
materials, full written approval must be
obtained from the Manufacturer prior to
the work being carried out.
REPLACEMENT PARTS INFORMATION
For information on replacement parts, visit
our website where you can download
illustrations and part listings.
EASYACCESS INNOVATIONS
4850 Murrieta St,
Chino, CA 91710, USA
(800) 980-8841
www.easyaccessinnovations.com
EasyAccess Innovations GUARANTEE CARD
EasyAccess Innovations Telescopic Ladder
LADDER NUMBER:
PURCHASER NAME:
ADDRESS:
TOWN:
ZIP CODE:
DATE OF PURCHASE:
THE USE OF THE TELESCOPIC LADDER AS WELL AS ALL SAFETY
INSTRUCTIONS HAVE BEEN FULLY EXPLAINED TO ME.
PURCHASER’S SIGNATURE:
For EasyAccess Innovations use only
Place
Stamp
Here
EASYACCESS INNOVATIONS
4850 Murrieta St,
Chino, CA 91710
USA
EasyAccess Innovations GUARANTEE CARD
Your EasyAccess Innovations Telescopic Ladder is a quality product. Manufactured with
great precision using carefully selected materials. We guarantee this branded product for a
period of 12 months in the event of any defects which may be traced back to a fault in
material or manufacturing. The guarantee entitlement begins on the date of receipt of this
guarantee card by the main importer (date of postmark).
In addition to the statutory rights, this guarantee entitles EasyAccess Innovations to repair
or replace at their discretion.
The guarantee becomes null and void in the event of proven improper use.
EASYACCESS INNOVATIONS
4850 Murrieta St,
Chino, CA 91710
USA