1
Hidden Deck Fastening System
Installation Instructions – CAMO™ Marksman™
With the CAMO HIDDEN DECK FASTENING SYSTEM (CAMO System), you create a beautiful, fastener-free deck surface using
any treated wood, hardwood, cedar, composite or PVC deck board.
The CAMO Marksman is used to guide the CAMO screw into the side of the deck board into the joist. It can be used on any
nominal 1” x 6” solid deck board. No pre-drilling is necessary, and the Marksman provides automatic 3/16” spacing between deck
boards.
Before beginning installation of your deck, you will need the following:
–
–
–
–
–
CAMO Hidden Fasteners
CAMO Driver Bit (included with CAMO Hidden Fasteners)
CAMO Marksman Tool
Drill (set drill speed to highest setting for maximum driving efficiency)
®
Optional: “L brackets” or 2-1/2” x #7 Pro-Fit Platinum Series Trimhead Screws (for starter board)
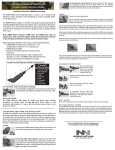
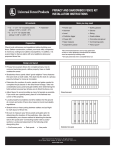
CAMO MARKSMAN SCHEMATIC:
Starter board:
To begin deck installation, lay your first deck board (the starter board) in position. If the starter board runs parallel to the house or
®
other structure, it may be necessary to face fasten the board (see options below). If so, we recommend using 2 ½” Pro-Fit
Platinum Series premium trim head screws.
TIP: You can secure the starter board in several ways:
(1) face fasten the first board or board and a half
(2) face fasten only the edge adjacent to the house/structure - to do this, lay out the location for the CAMO fasteners that will
be driven TOWARD the house/structure; with the Marksman tool in place on one end of the starter board, squeeze the Tool
Trigger and maintain slight downward pressure on the Tool Handle. Load one CAMO screw into the screw guide. No predrilling is necessary. Prestart the screw about ½ inch into the board; release the Trigger Handle to remove the Marksman;
continue the length of the board; position the deck board with the pre-started screws on the outside edge; with the board snug
to the house/structure, finish driving the CAMO screws. Finish the board by face fastening the inside edge of the board
(3) avoid face fastening by using “L brackets” to fasten the starter board from below the deck to the joists.
Once you have secured the starter board, proceed with installing the remainder of the deck boards using the CAMO System.
Hidden Deck Fastening System
Installation Instructions – CAMO™ Marksman™
set
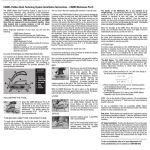
Beginning on one end of the deck board, set the CAMO Marksman tool over the deck board.
Squeeze the Trigger Handle allowing the Width Adjuster to contract and grip the deck board.
With the CAMO Marksman tool in place on the deck board, maintain slight downward pressure on
the tool and push the deck board snugly against the starter board. Make sure that the tool is flat on
the surface of the deck board and that the tool is centered over the joist. The Spacer automatically
creates a 3/16” gap between the boards.
Load
With the tool set on the board, place one CAMO hidden fastener into the screw guide. Note: if the
tool is not set on the deck board, the screw will slide out of the screw guide.
drive:
Set drill to highest speed. A high RPM drill is recommended.
Begin on the “outside edge” at the end of the unfastened deck board (the edge furthest away from the installed deck board or starter
board). No pre-drilling is required.
Start the CAMO screw with gentle pressure, running the drill at full speed throughout. The CAMO
screw is designed to spin and auger out material for approximately ½ inch to prevent splitting.
Once the screw is started, you may gently increase pressure and the screw will bite and drive
home quickly.
When the shoulder of the CAMO bit reaches the tool screw guide, the depth of drive is automatically set and you are finished driving
the fastener. You cannot over drive the screw.
TIP: LET THE SCREW DO THE WORK! You do not need to force the screw in.
Once you have fastened the first screw on the outside edge, you may drive the CAMO screw on the inside edge of the board
repeating the same drive instructions.
Move directly to the next joist and repeat the drive instructions; remember to start on the outside edge of the deck board. Continue
down the length of the deck board until the entire plank is installed. Do not skip any joists.
ATTENTION:
To ensure proper performance of the CAMO Marksman, it is important to regularly check the Screw Guide for deck material buildup. If material is present, use the CAMO driver bit to clear the Screw Guide. If you are installing IPE or other dense deck product,
you will want to perform this action more frequently.
Butt Joints: Follow deck board manufacturers’ suggested spacing and fastening installation method for butt joint situations. It may
be necessary to block joist at the butt joint depending on the type of decking you are installing.
45° Angle Installations: Position the Marksman over the edge of the “high side” of the joist so that the fastener remains completely
in joist when fully driven.
To view an installation video or for more information,
go to www.camofasteners.com or contact us at (800) 968-6245.