1
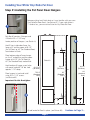
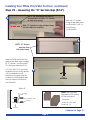
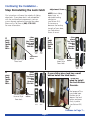
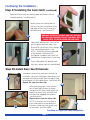
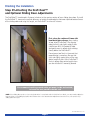
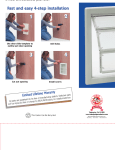
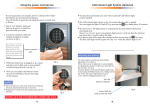
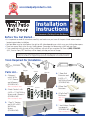
www.idealpetproducts.com
Installation
Instructions
For Standard & Tall Vinyl Patio Pet Doors
Before You Get Started...
Patent No. 7784430
• It is important to read all instructions carefully and make sure you have all the parts listed below before
beginning pet door installation.
• Your pet door may be installed on the right or left side depending on which way your sliding door opens.
• There are several lock styles for vinyl sliding doors. See page 6 to determine which lock you have.
• If you need help with any part of the installation, call one of our associates Toll Free at (800) 378-4385
(M–F, 9 am to 4 pm, PST) and they will be happy to help you free of charge.
As with any home improvement project, if you do not have the tools or skills to properly
install your pet door, we suggest using a professional handyman or licensed contractor.
Tools Required For Installation –
Parts List –
Hangers
Screws
Spacers
1. 2 Hangers*
with 4 (#10 x
1-1/2”) Screws
and 6 Spacers*
(POLY BAG #1)
*Parts color may be white
2. 2 Lock Catches* with
4 (#10 x 1”) Self Drilling
Screws and 4 Spacers *
(POLY BAG #2)
Lock Catch
Screws
Spacers
4. 1 Door Seal
Extension and
8 (#10 x 1”)
Self Drilling Screws
(POLY BAG #4)
5. 2 Door Seal
Extrusions
6. 2 Draft•Seal™
Flat Pieces*
*Parts color
may be
white
*Parts color may be white
3. 1 Top “H” Section
and 2 (#10 x 5/8”)
Self Drilling
Screws
(POLY BAG #3)
7. 1 Lock Button Override*
(see page 6)
(POLY BAG #2)
*Parts color may be white
Page 1
Installing Your White Vinyl Patio Pet Door
Step #1-Installing the Pet Panel Door Hangers
Remove existing Lock Catch plate as it may interfere with your new
Vinyl Patio Pet Door Panel. (see Picture #1) If your catch plate is
1” wide or less, you can reinstall into the Vinyl Patio Pet Door.
1
Poly Bag #1 contains 2 Hangers and
4 Screws #10 x 1-1/2” long.
2
Locate position of hangers. (see Sketch A)
Mark 2 lines inside door frame, the
lower at 5” and the upper at 84-1/2”
(for Tall Door) or, 69” (for Standard Door)
from bottom of track.
Place bottom edge of lower hanger
on the 5” marked line and the upper
hanger at 84-1/2” (for Tall Door) or,
69” (for Standard Door) marked line.
Sketch A
Mark location of hanger screw holes
91-3/16”
with pencil and drill 1/8” dia. hole
(Tall
Door)
approx. 1-1/2” deep.
84-1/2”
(Tall Door)
75-3/4”
(Standard
Door)
69”
(Standard
Door)
Place hangers in track and install
using #10 x 1-1/2” screws.
(see Picture #2)
Important: Do Not Overtighten
WALL
84-1/2”
(Tall Door)
69”
(Standard
Door}
3
5”
Lift and locate Pet Panel in place. (see Picture #3)
Page 2
5”
Continue to Page 3...
Installing Your White Vinyl Patio Pet Door (continued)
Step #2 – Measuring the “H” Section Gap (5/16”)
NOTE: Far end spring will have to
be held down to allow “H” Section
to slide over spring.
4
Slide “H” Section to edge of door frame.
(Do not slide into channel)
Insert top “H” section
on top of pet door panel
(see Picture #4) until it is
flush to frame.
(see Picture #5)
5
NOTE: “H” Section
must be flush
with outer frame.
Measure the distance from the
edge of pet door panel to edge
of “H” section. (see Picture #6)
This distance should be 5/16”.
If it is less than 5/16” you need
to determine how many spacers
will be needed to install
between the hangers and the
inside of the sliding patio door
frame to correct the distance.
(see Sketch B)
6
5/16”
Minimum
Patio Door Inside Frame
WALL
Sketch B
Note: You have been
provided with 6 spacers
of two thicknesses.
Hanger
2 (#10 x 1-1/2”)
Screws
There are...
4 each at 1/16” and
2 each at 1/4”
Spacers
Continue to Page 4...
Page 3
Continuing the Installation...
Step #3-Install the Top “H” Section
Slide Top “H”
Section over
top of springs
until it is flush
to frame,
making sure
that it is 5/16”
minimum
from the side
of door to
edge of
“H” Section.
(see Picture #7
and inset)
NOTE: Far end spring will have to
be held down to allow “H” Section
to slide over spring.
7
Slide “H” Section to edge of door frame.
(Do not slide into channel)
5/16”
Minimum
Step #4-Install Door Seal Extension
8
9
10
Your pet door
includes one Door
Seal Extension and
two Door Seal
Extrusions which
mount on the side
of the Vinyl Pet
Door Panel.
To properly
measure the Door
Seal Extension for
installation, measure
length from the top
outer edge track
(see Picture #8)
to the bottom
outer edge of the
door frame.
(see Picture #9)
Use this measurement to mark the
length on the Door
Seal Extension.
(see Picture #10)
11/2”w x 5/16”d
ribbed side fits
on pet door
11
Using a hacksaw, cut Door
Seal Extension to length.
(see picture #11)
12
Place cut Door Seal
Extension against door
panel. Extension rests on
outer edge of door frame,
top and bottom.
Insert the 8 (#10 x 1”)
Self Drilling Screws into
the 8 pre-drilled holes
and tighten securely.
(see Picture #12)
Page 4
Using a piece
of wood and
hammer, tap
lightly to install
Extension
Note: Extension
is a snug fit on
door frame
Continue to Page 5...
Continuing the Installation...
Step #5-Secure the Top “H” Section
13
Complete by installing
2 (#10 x 5/8”) Self
Drilling Screws through
the Top “H” Section into
the Vinyl Pet Door Panel
on the inside of door.
(see Picture #13)
Continue to Page 6...
Page 5
Continuing the Installation...
Step #6-Installing the Lock Catch
NOTE: Most sliding
doors have an
adjustable locking
mechanism
(see Picture #14).
To increase or
decrease the locking
strength of your door,
turn Adjustment
Screw in or out.
Our instructions will cover the majority of sliding
door locks. If your door lock is not compatible
with the enclosed lock components, you can
use an alternate method of securing your door.
Please call us Toll Free at (800) 378-4385
for more information.
...then
place
One Lock
Catch and
Spacer
like this.
If
your
lock
looks
like
this...
14
...then
place
Two Lock
Catches
and
Spacers
like this.
If
your
lock
looks
like
this...
Front
View
Single Hook-Style
Door Lock
Adjustment Screw
Side
View
Adjustment
Screw
Double
Hook-Style
Door Lock
Adjustment
Screws
Front
View
...then
place
Two Lock
Catches
and
Spacers
like this.
If
your
lock
looks
like
this...
Side
View
If your sliding door lock has a small
button below the latch hook...
...you will
need to install
the Lock Button
Override.
15
Double Hook
Reverse-Style
Door Lock
Adjustment
Screws
Front
View
Side
View
Peel paper off the
two-sided tape.
Position pin to
depress the lock
button and press
firmly in place.
(see Picture #15)
Continue to Page 7...
Page 6
Continuing the Installation...
Step #7-Installing the Lock Catch
(continued)
Place Lock Catch onto your existing door lock hook in the up
(locked) position. (see Picture #16)
16
Partially close your sliding door so
that you can mark the location of the
top edge of Lock Catch inside your
pet door frame. (see Picture #17)
WARNING: SCREWS PROVIDED ARE SELF-TAPPING,
NO DRILLING REQUIRED. DO NOT USE DRILL BITS
IN ANY PART OF INSTALLATION ON THIS PAGE.
17
18
Open door, relocate Lock Catch to line
up with pencil and mark holes (see
Picture #18). Install Lock Catch, through
vinyl into reinforced plate, using
#10 x 1” Self Drilling Screws provided
in Poly Bag #2. (see Picture #19)
Use Spacer if needed. Lock Catch has
slotted holes for adjustment if necessary.
19
If your sliding door has double hookstyle lock, repeat steps for second hook.
Step #8-Install Door Seal Extrusions
To properly measure the Door Seal Extrusions for
installation, close your sliding glass door against the
pet door and measure length from the top of slider
to the bottom sill of the door frame. (see Picture #20)
Repeat this step for other side.
20
21
After measuring length, use a hacksaw
to cut Door Seal Extrusions to length
(see picture #21) then, working from the
bottom up, press firmly and verify Seal
Extrusions are snapped into grooves.
(see Picture #22)
Repeat these steps for other side.
NOTE: In the event you are unable to
close slider against the pet door, the
Extrusions inside soft vinyl gaskets may
be removed. (see Picture #23)
22
23
Continue to Page 8 to finish installation...
Page 7
Finishing the Installation
Step #9-Attaching the Draft•Seal™
and Optional Sliding Door Adjustments
The Draft•Seal™ (combined in 2 pieces) attaches to the moving section of your sliding glass door. To install
the Draft•Seal™, measure the vertical distance, or height of exposed glass between top and bottom frames
of the sliding door and using this length, cut Draft•Seal™ to size with scissors.
24
First, clean the surface of frame with
household glass cleaner, then starting
at top, attach Draft•Seal™ by aligning
edge so that it rubs lightly against glass.
(see Picture #24) Pull paper off tape
and gently press in place while working
slowly down the Draft•Seal™.
Do not press too firmly in the event that
repositioning is necessary. Be sure that
vinyl rubs lightly against glass all the way
down length of glass. Press Draft•Seal™
firmly in place along entire length when
you are satisfied it is correctly placed.
We recommend caulking around entire pet panel, inside and outside,
to insure the best possible weather seal
NOTE: If the sliding door portion of your vinyl patio door is not plumb with the Vinyl Pet Door Panel, you may need to adjust the
bottom rollers on the sliding vinyl patio door. Please refer to the manufacturers adjustment instructions for your specific vinyl
sliding patio door style.
Part # 909 1042-Rev. U 212
Page 8