1
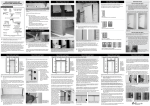
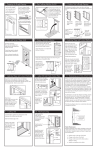
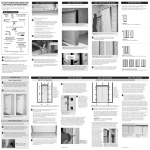
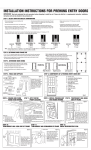
SECURITY DOOR UNIT INSTALLATION INSTRUCTIONS Step 1: Prepare Rough Opening Step 3: Prepare Door Unit Step 4: Place Door in Rough Opening Remove all packaging materials such as nails, staples and screws. Some dwelling designs/conditions may require special installation steps, consult your architect, design professional and/ or product manufacturer for additional guidance. Required Tools & Materials safety glasses 24" to 48" construction level gloves Figure 1: A clean, level, solid sub-floor area is essential to successful installation. 24" framing square claw hammer Ensure that the following conditions are met: Clean, clear work area measuring tape The rough opening (RO) is ideally 1" wider and 1/2" taller than the outside frame dimensions of the door unit. Units intended for installation in high velocity windstorm markets require less clearance between unit and RO (1/4" sides & top). The RO is plumb, square and level power screw gun with arrangement of screw bits and 1/8" drill bit and countersink bit too! caulking gun The old door frame has been completely removed in retro-fit installation The sub-floor area is clean, dry and level screw driver with arrangement of screw bits The existing sub-floor area is at least 6" deep for 4-9/16" frames and at least 8" deep for 6-9/16" frames. Figure 6: Place the sill in the opening first and then tilt the door up into the opening. Because a solid, level sub-floor is absolutely essential for proper door unit installation, do not proceed with the installation until the sub-floor is both solid and level. wedge shaped shims paint grade exterior caulk (latex, silicone or butyl) Figure 3: Some door units will be supplied with plastic covers over the bottoms of the jambs. These must be removed before installation. Door units featuring multiple door panels or glass inserts are heavier and more difficult to handle - do not attempt to handle without assistance. fiberglass blanket insulation Step 2: Caulk the Sub-Floor 2-1/2" minimum premium exterior wood screws corner seals Figure 4: Some door units may be supplied with a wood or cardboard skid plate located along the bottom of the door. Needs to be removed. finish nails suitable for attaching interior and exterior trim Critical Point: Although all steps are critical, this symbol identifies procedures requiring extra attention. 3 Check Your Work: This symbol identifies when the work should be checked for correctness before continuing with installation. Stand on the outside of the doorway. With the exterior side of the door unit facing you, tilt the door unit toward you (Figure 6). The brickmould (not supplied with all units) should rest up against the siding of the exterior wall (Figure 7) and should slide into the RO of a brick home (Figure 8). Variations in threshold design may require that the caulk lines be applied directly to the bottom of the door unit to ensure a necessary weather-seal. Inspect the bottom of door unit to confirm it features a flat surface before caulking the sub-floor area. PLEASE NOTE: Failure to install this unit in accordance with architect, design professional or product manufacturers instructions will have a direct effect on the units performance and/ or long term wear. Installer shall be experienced in performing work required and shall be specialized in installation work similar to that required for this project. Warranty claims are subject to site inspections by a qualified manufacturer’s representation to establish probable cause and proposed corrective action. 3 Figures 7 and 8: The exterior trim (brickmould) rests up against exterior sheathing or slides into the opening of exterior brick. Figure 2: Caulk is applied in three parallel lines running the width of the sill. Apply three 1/4" lines of caulk along the length of the sub-floor, the first line starting approximately 1" from the inside edge. The lines should be about 1" apart. If door unit is supplied without a clip or plug holding door aligned and closed, do not leave the door wide open during installation. The weight of the door may cause it to fall and cause injury. Figure 5: Install lock handle set per lock manufacture’s instruction located in the hardware box. Information Panel Step 5: Shim and Fasten Step 5: Shim and Fasten Step 5: Shim and Fasten How to Plumb the Door Step 5A: For single doors X Step 5A: For single doors Step 5B: For doors with sidelites For all door types, it is essential that the frame is in a straight vertical plane and is not twisted. Check alignment using this method: Stand on the outside of the door. Check that the weatherstripping on the latch side is evenly compressed along the entire height of the door slab without any pinching or gaps (Figures 9 and 10). DO NOT utilize the wall to square and level unit. Unit must be square and level to insure proper operation and performance. B C F D G G E F Note: Units intended for installation in high velocity windstorm regions may require additional points of attachment. See local retailer for installation sheet supplement. Ensure that there is an even gap across the top of the door slab. With the door closed and from the inside shim directly behind the vacant hinge screw hole in each hinge (Points D and E in Figure 12) until there is a consistent 1/8" gap between the hinge-side jamb and the door slab edge along the entire height of the door. Gap between the latch-side jamb and the door slab edge should be 1/8" at the top and bottom of the door only. Drive one of the 2-1/2" screws supplied through the vacant hole in each hinge, through the jamb, shims and into the stud or rough buck (Figure 11). 3 E 3 A Figure 12: Install the shims in the correct locations and in the correct sequence. Stand on the inside of the door and center the door in the opening. Shim tightly at the bottom corners of the door unit (Points A in Figure 12). This will keep the door centered and the frame tight against the sill. Shim the top of the door on the latch side (Point B in Figure 12). Install shims until there is a consistent 1/8" gap between the top of the door slab and the frame header. Shim the hinge-side of the frame (Point C in Figure 12). This will hold the door tight in its position relative to the frame. The door should operate freely with nothing but shims holding it in place. Figures 9 and 10: The weatherstripping on these doors is not evenly compressed. CAUTION: Do not open door panel greater than 30-degrees until 2-1/8" screws have been installed. (Points D, E, F & G in Figure 12). How to Fasten the Door After shimming, the door is fastened to the studs by installing screws through the jambs, shims and into the stud (Figure 11). Figure 14: Shims are placed above and below the dead bolt hole (points G in figure 12). Shims to be placed below and above at each strike locations. Mount frame strikes using the screws provided. Screws should go through the shims. Using a 1/8" drill bit, drill through the jamb and steel security jamb plate at each of the (4) frame strike locations. Countersink the holes slightly to accept the wood screw head. Shim behind each hole location and drive the 2-1/2" exterior wood screws (by others) in place. Countersink the screw heads slightly and cover them with paintable white caulk after the unit is completely installed. Shim behind the latch-side jamb (Points F in Figure 12) approximately 8" from the top and bottom of the frame. Install shims until there is an even 1/8" gap between the jamb and the edge of the door slab along the door. Shim behind the latch-side jamb (Points G in Figure 12) just above and below the dead bolt hole, maintaining the 1/8" gap (Figure 14). Pull the weatherstripping away from the jamb (Points F on Figure 12) and screw 2-1/2" installation screws (by others) through the jamb and shims into the stud (Figure 15). For units with only one non-operable panel attached on the latch side of the door: The second set of supplied screws are installed through the thin (rabbet) section of the jamb using the vacant hinge screw holes (Figure 16). Typically long security screws are used to install the dead bolt strike plate (Step 6). For units with only one non-operable panel attached on the hinge side of the door: The second set of supplied 2-1/2" screws are installed through the thin (rabbet) section of the jamb under the weatherstripping through the shim and into the stud approximately 8" from the top and bottom of the jamb (Figure 17). Shim just above and below the dead bolt hole and drive the supplied 2-1/2" installation screws through the dead bolt strike plate (Step 6). 3 When shims are properly installed, the frame should not move or twist at all when the screws are tightened and counter-sunk, thus maintaining the 1/8" gap. If there is any movement, loosen the screws and shim tighter to maintain the 1/8" gap, then re-tighten screws. Figure 16 and 17: The second set of supplied screws is installed in the vacant hinge holes or under the weatherstripping. Proceed to Step 6. Step 6: Insulate Screws located in hinge or strike position shall be placed in the thin (rabbet) section of frame, other screws shall be placed in thick (stop) section of frame. Wide frames should be attached with a screw in both sections of the frame to minimize rotation. 3 Score shims with a utility knife and snap the shims along the score. Trim any excess with the utility knife. Insulate around the top and sides of the door unit in the cavity between the jamb and the wall studs with fiberglass blanket insulation (Figure 18). Install the interior and/or exterior trim around the door. When shims are properly installed, the frame should not move or twist when the screws are tightened and counter-sunk, thus maintaining the 1/8" gap between the edge of door panel and frame. If there is any movement, loosen the screws and shim tighter to maintain the 1/8" gap, then retighten the screws. Figure 13: Proper position of shims at the bottom of the door (Points A). 3 Figure 11: Screws are installed through the jamb, shims and into the 2x wood studs or bucking. From the outside and with the door closed, ensure that the frame is in a straight vertical plane (not twisted). To do this check that the weather-stripping on the latch side is evenly compressed along the entire height of the door slab without any pinching or gaps (see Figures 9 and 10). Figure 15: Carefully install screws underneath the weatherstripping. Proceed to Step 6. Figure 18: Insulate between the jambs and the wall studs all around the door. Critical Point: The use of expandable type foam is not recommended as it may cause the door jambs to warp; this may leave the door inoperable or push the brickmould away from the jamb. Step 8: Adjust Sill Step 7: Caulk Doorway Some door units are supplied with adjustable sills, and these may be raised or lowered to form a tight seal with the fixed sweep on the bottom of the door. This adjustment requires a screwdriver with appropriate screw bit. To increase the height of the sill cap, turn screws evenly along the rail. Refer to the “Steps to test threshold seal”. (Figure 23). Caulk all four exterior corners and all around the brick or siding in the following sequence: caulk the sill on both latch and hinge sides from the edge of the sill crown along the edge where the sill and jamb or brickmould meet (Figure 19) caulk the front sill edge where the sill and the sub-floor meet (Figure 20) Step 9: How to Paint Exterior Doors Factory finished door units do not require any additional field finishing. A. How to start Requirements: Find a well-lit finishing location that is dust-free, well ventilated and within the climate conditions recommended by the coating manufacturer. Recommended temperature should be between 50˚ - 90˚F degrees fahrenheit. Doors can be painted either hanging in the opening or removed from the frame (recommended). Should you remove the door, take care to protect it from damage. Sidelites will need to be finished vertically. To remove the door from the frame, use a center punch and hammer. Strike the hinge pin from the bottom until it pops up (for outswing & self closing units – hinge leaf must be removed from the door). Drive the hinge pin as far as possible with the punch. Using a pair of pliers, grasp the hinge pin and, while twisting, pull the pin out. Remove all door hardware. You will need the following: Coatings and accessories: B. Preparing the door surface Mineral spirits or acetone Soapy water (mild detergent in warm water) Steps to test threshold seal Figures 19 and 20: Caulk the sill crown and the front of the sill. caulk the top corners where the header and jambs meet, starting at the weatherstripping and working to the face of the brick mould (Figure 21) caulk the perimeter where the exterior trim meets the brick or siding trim (Figure 22) If the door is center-hinged or has a sidelite, caulk around the mullions where the mullions contact the sill and header. 1. Close door on a piece of paper placed over the threshold. 2. Pull paper between the sweep of the door and the threshold. 3. If the threshold is properly adjusted, you should feel some tension, but if the paper tears, the door’s seal is too tight. If there is no tension on the paper, the door’s seal is too loose. To properly adjust the threshold seal if it is too tight. 1. Adjust rail by turning screws evenly a 1/2 turn. 2. Repeat seal test. If paper does not slide beneath door with a feeling of tension, repeat Step. Re-test seal. 3. Continue testing threshold until it is properly adjusted. To properly adjust the threshold seal if it is too loose. (WARNING: Do not increase height by more then 1/8") 1. Adjust rail by turning screws evenly a 1/2 turn. 2. Repeat seal test. If paper does not slide beneath door with a feeling of tension, repeat Step. Re-test seal. 3. Continue testing threshold until it is properly adjusted. IMPORTANT: For adequate paint adhesion the door surface must be free of dust, debris and other surface contaminants. Doors should be wiped clean with a solvent such as acetone or mineral spirits. Allow the cleaning solvent to dry completely – until there is no residual odor. Once wiped clean, the door must be lightly sanded with a 220-grit sandpaper. After sanding, the door must be washed with a mild detergent in warm soapy water, rinsed and then dried. One pair of rubber gloves Figure 23: Raise or lower the sill by adjusting the sill screws. Some sills may have covers over the adjusting screws. These covers must be removed prior to making any adjustments. Step 9: How to Paint Exterior Doors Stir sticks Masking tape Doors should be wiped clean with a solvent such as acetone or mineral spirits. Allow the cleaning solvent to dry completely – until there is no residual odor. Next, the door must be washed with a mild detergent in warm soapy water, rinsed and then dried. Safety razor blades 220-grit sandpaper Mask (tape) off all surfaces that will not be painted including all glass. Paint –– High-quality, oil-base or 100% acrylic waterbased latex paint of desired color –– Lacquer paints are not recommended 2-1/2" wide brush appropriate for type of paint (A natural bristle brush should be used with oil-based paint and a synthetic bristle brush should be used with latex paint.) C. Painting the Door Use exterior, high quality, oil-based or 100% acrylic water-based latex paint of desired color. High quality interior paint can be used on the interior surface of the door only. Lacquer paints are not recommended. Follow the manufacturer’s instructions for paint application by using either a brush or a handheld sprayer. Tools: Hammer Center punch Phillips screwdriver Pliers Safety glasses Air-less sprayer (optional) Note: Painting instructions specifically refer to the door and sidelite panels. Oil-based paint should not be used on wood frame components (jambs & brickmould). Please read and understand the entire painting procedures before attempting to finish the door. Be sure to follow the paint manufacturer’s detailed application instructions on the product label. Figures 21 and 22: Caulk the jambs and the exterior trim. Step 9: How to Paint Exterior Doors Step 9: How to Paint Exterior Doors Painting: Finishing with Spray Applicator: Put on gloves, safety glasses, and prepare your materials. Before starting, and occasionally throughout the project, stir the paint using smooth strokes until the texture is creamy – avoid creating bubbles. Follow the manufacturer’s instructions for thinning the paint; (i.e. thin latex paint with water or oil-based with solvent for better atomization and spraying results). Strain paint before filling the spray pot. Finishing with Brush Application: Dip the brush into the paint, then use the rim of the container to release any excess paint. Apply paint as evenly as possible while still wet. Brush strokes should follow the grain direction of the selected area. Start working on the panels and sticking (moulding profiles), then the vertical center mullion, next the horizontal rails, then the vertical stiles, and finally, the outside edges (stiles and top rail, see figure 1 for details). Doors that are outswing or have adjustable surface mounted sweeps will need to have the sweep removed and the bottom rail painted. The door can be painted in horizontal (recommended) or vertical position; however, the paint should be applied in continuous strokes extending six inches past the edges of the door. This will ensure uniformity across the entire surface of the door. Multiple light coats are better than one heavy coat. Avoid runs as a result of overspraying. Note: We recommend that all 6 sides (front and back faces plus all four edges) be sealed to eliminate moisture absorption. The bottom of your door panel(s) may contain a factory installed weatherstripping (sweep) which is sealed prior to installation. Failure to observe this recommendation may void the warranty. Warranty Step 10: Corner Seal (Foam Pad) Installation 1. Add a bead of caulk at both ends of sill cap where the cap meets the jambs. Warranties are available for most products. Please check with your dealer or distributor for current warranty terms and conditions. 2. On door lock-side of cap, affix latch seal vertically to jamb on top of caulk where jamb and cap meet. Push seal into caulk. 3. On door hinge-side of cap, affix hinge pad horizontally to jamb on top of caulk where jamb and cap meet. Push seal into caulk. For double doors: Test the threshold seal for the active and passive doors. Once threshold seal is properly adjusted, affix latch seal vertically so bottom of seal is resting where cap and both doors meet. Remember to install hinge pads on both jambs. Drying: IMPORTANT: Let the paint dry completely, following the manufacturer’s recommended drying time before handling the painted surface or applying a second coat. If possible, allow the door to dry in a horizontal position to minimize paint runs. High humidity and/or low temperatures may extend your drying time. Trouble Shooting Warning: Foam-filled doors painted with dark colors or with attached storm doors, may become very hot to the touch in direct sunlight. Do not paint the weather strip and do not close door until paint is dry (see paint manufacturer’s specifications on minimum drying time). To maintain product warranty: Paint the door, frame, header and brickmould within 45 days of installation. aligned Maintenance: 1. In the event that the door is scratched after finishing, the damaged area can be lightly sanded using 400-grit sandpaper (do not over-sand the surface). Follow the finishing procedures on the inside of this brochure. 2. Dirt and watermarks can build up on the surface of your finished door over time. Extend the life of the paint by cleaning the door a few times a year. Clean with warm soapy water, rinse and towel dry. 3. Repainting every 1 to 7 years will be required, depending upon weather exposure. Finishing Order: For wood-grain textured door finishing with brush. # 1Panels and sticking (moulding profiles) # 2Vertical center areas (mullions) # 3Horizontal areas (rails) no twist alignment-twist plumb-level square If it becomes apparent that there is some trouble with the operation of the unit, the first thing to check is the installation of the unit into the rough opening. Check to insure that 1/8" gap across the top edge of door panel and frame holds true for the entire width of the door opening AND that weatherstripping is evenly compressed the entire height of the door opening. Secondly, check that the two jambs are correctly aligned with each other and that incorrect nailing on shims have not twisted the jambs. Check all Critical Points to confirm that unit was installed correctly in proper rough opening. # 4Outside vertical areas (stiles) the beautiful door # 5Edges of door (includes both sides and top of door) Masonite and “Masonite. The Beautiful Door. ” are trademarks of Masonite International Corporation. Please check with your Masonite dealer or distributor for current warranty terms and conditions. 4/10 Printed in the USA ©2010 by Masonite International Corporation ® ® HMD101202 www.masonite.com 72458 Rev. A Date