1
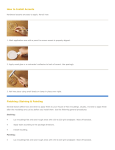
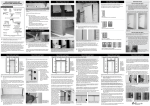
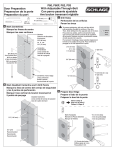
Atrium Patio Door
Field Service Manual
December 2005
Table of contents
Service Agreement
Release Agreement
Inspection form
Warranty
Replacing swing panel
Replacing sliding panel
Adjusting standard hinges
Adjusting adjustable hinges
Replacing a profrench astragal
Replacing a design french astragal
Replacing a center swing astragal
Replacing a sweep
Replacing glass
Replacing ACL bars
Replacing a sill cover
Replace weatherstrip channel at slider
Replacing a keyed cylinder on a swing door
Replacing a keyed cylinder on a sliding door
Replace handleset on a swing door
Replace handleset on a sliding door
Replace interlock weatherstripping
Replacing a multipoint lock- Swing
Adjusting multipoint lock- Sidelite
Adjusting rollers
Adjust Sliding lock
Pg 2
Pg 5
Pg 6
Pg 8
Pg 12
Pg 13
Pg 14
Pg 15
Pg 16
Pg 17
Pg 18
Pg 19
Pg 20
Pg 21
Pg 22
Pg 23
Pg 24
Pg 25
Pg 26
Pg 27
Pg 28
Pg 29
Pg 30
Pg 31
Pg 32
Caution: Panels, glass, etc can be quite heavy. Always lift appropriately. Follow
manufacturers instructions for safe use of hand and power tools.
Verify that all replacement parts match the original parts in color, size, etc, before
beginning any work.
Woodgrain Millwork Field SVC Manual 12/05
1
Woodgrain Millwork Field SVC Manual 12/05
2
Woodgrain Millwork Field SVC Manual 12/05
3
Woodgrain Millwork Field SVC Manual 12/05
4
Woodgrain Millwork Field SVC Manual 12/05
5
Woodgrain Millwork Field SVC Manual 12/05
6
Woodgrain Millwork Field SVC Manual 12/05
7
Woodgrain Millwork Field SVC Manual 12/05
8
Woodgrain Millwork Field SVC Manual 12/05
9
Woodgrain Millwork Field SVC Manual 12/05
10
Woodgrain Millwork Field SVC Manual 12/05
11
Replace Swing Panel
Standard Hinges:
1) Assure new panel matches the size, and handing of the existing panel.
2) Remove existing hardware.
3) Close Door
4) Remove pins from existing hinges starting at the bottom hinge, working your way up
the door.
5) Remove panel.
6) Transfer top and bottom hinges from existing panel to the new panel in the same hinge
location.
7) Install new panel in frame. Set top and bottom hinge pins.
8) Install center hinges on panel, set hinge pins.
9) Install hardware
Note: In case hinges do not line up, back hinge screws out 1/2 of a turn. The hinges can
then be moved slightly. RE TIGHTEN HINGES!!!
Caution: When installing screws do not over tighten!!!
Adjustable Hinge:
1) Assure new panel matches the size, and handing of the existing panel.
2) Remove existing hardware.
3) Support panel with wedge from bottom.
4) Remove hinge screws ON PANEL. Remove screws from the top hinge last.
5) Support new panel on wedge, and align hinges.
6) Install one screw in the center hinge.
7) Install one screw in remaining hinges.
8) Install all remaining screws.
9) Install hardware
10) Adjust hinges
Caution: When installing screws do not over tighten!!!
Woodgrain Millwork Field SVC Manual 12/05
12
Replace sliding panel
1) Assure new panel matches the size, and handing of the existing panel.
2) Slide panel open
3) Remove phillips head screws from head stop
Head stop must be
removed
4) Slide panel closed
5) Latch panel into strike
6) Remove remaining phillips head screws from head stop
7) Unlatch, tilt panel into room and remove. DO NOT SET PANEL ON ITS BOTTOM
RAIL!!!
8) Transfer hardware and any weatherstripping to new panel.
9) Set new panel into opening and latch into the strike
10) Follow steps 2 thru 6 in reverse to install head stop.
11) Adjust door height, lock, and latch.
Woodgrain Millwork Field SVC Manual 12/05
13
Adjusting standard hinges
To tighten reveal:
1) Remove hinge pin of the hinge that needs adjustment. Further adjustment of
adjacent hinges may be required!!!
2) Tape the jaws on a 6” or 8” crescent wrench.
3) Bend the barrels that are attached to the panel, towards the panel. A minimal
amount!!! 1/16” is too much!!! Too much causes the hinges to bind.
4) Reinsert the hinge pin
5) Close panel and check the reveal.
To increase the reveal:
1) Remove the two screws closest to the barrel.
2) Loosen the remaining screw.
3) Place cardboard drywall shims between the hinge and the jamb (As shown)
4) Tighten and reinstall screws.
5) Close panel and check reveal.
Woodgrain Millwork Field SVC Manual 12/05
14
Adjusting adjustable hinges
When adjusting – use a hand screwdriver. Adjust the vertical margins by
adjusting the center hinge. Adjust the horizontal margins by adjusting the
top and bottom hinges.
Top hinge adjusts
Center hinge adjusts
Bottom hinge adjusts
Woodgrain Millwork Field SVC Manual 12/05
15
Replace pro French astragal
1) Remove secondary panel from unit.
2) Remove plastic astragal cap from astragal.
3) Slide aluminum astragal cap off of astragal, may require some force
4) Remove screws that hold astragal on the panel.
5) Repeat steps 1 thru 4 in reverse order using new parts.
Woodgrain Millwork Field SVC Manual 12/05
16
Replace Design Series French Astragal
1) Open primary panel
2) Remove black head screws that hold the wood astragal on.
Open primary
panel and
remove these
screws on the
secondary panel.
3) The wood and aluminum astragals can then be removed.
4) Install new astragal with original screws.
Woodgrain Millwork Field SVC Manual 12/05
17
Replace center swing astragal
1) Open door
2) Insert flat screw driver between astragal and astragal cap as shown
3) Pry astragal cap off
4) Remove screws that hold the astragal on
5) Remove astragal
6) Repeat steps 1 thru 5 in reverse order to install.
Woodgrain Millwork Field SVC Manual 12/05
18
Replace Swing Door Sweep
1)
2)
3)
4)
5)
Remove panel by following panel replacement instructions.
Pull sweep off of the panel
Remove existing staples from the panel
Apply 2 beads of silicone to the bottom of the panel
Trim and/or notch sweep to fit door and not interfere with any hardware that is
installed.
6) Apply new sweep, make sure you install in same position as the original.
7) Staple or screw new sweep onto panel
7) Install panel
Caution : Do not use screws that will damage the sill/threshold.
Woodgrain Millwork Field SVC Manual 12/05
19
Replace glass
CAUTION: Be careful not to damage the wood portion of the door panel.
1) Remove Glazing bead carefully, MAY NEED TO BE REUSED.
2) Inspect opening to assure that no staples are showing. If so, remove them.
3) From exterior side, cut sealant with a razor knife or narrow and flexible putty
knife.
4) From the side of the door, begin working the glass loose from the top of the panel.
Support the inside of the glass with your opposite hand.
5) Remove existing silicone from metal glass shelf.
6) Apply ¼”bead of silicone to the metal glass shelf.
¼” Bead of
Silicone
7) Reinsert black spacers, at the bottom of the glass opening, in same location where
they were installed in the factory
8) Set glass in opening and seat against metal glass shelf.
9) Look thru glass to assure that silicone has sealed the glass fully against the glass
shelf.
10) Reinsert side and top black spacers in the same location where they were installed
in the factory.
11) Reinstall glazing bead, top, bottom, then the sides. Glazing bead may need to be
trimmed or sanded to fit.
12) Secure glazing bead with brads or staples. Caution: If the glass is hit with the
13) brads or staples, it WILL SHATTER!!!!
Woodgrain Millwork Field SVC Manual 12/05
20
Replace ACL Bars
1) Insert putty knife thru the double-sided tape that hold the bar onto the glass.
2) Gently pry bar off of the glass
3) Clean glass with razor blade and alcohol. GLASS MUST BE CLEAN AND DRY
or new bars will not stick.
4) Assemble bars.
5) Dry fit bar to glass, trim if necessary.
6) Remove blue tape backing from the first 3” of the ACL bar.
7) Place the ACL bar on the glass.
8) From the top of the ACL bar, begin peeling back the blue backing tape, removing
it from the bar.
9) Manually press HARD, the ACL bar onto the glass.
Woodgrain Millwork Field SVC Manual 12/05
21
Replace a sill cover
1) Determine if astragal needs to be removed as it may be resting on top of the sill
cover.
2) Insert narrow flat bar or wide tip flat screw driver between sill cover and sill. Pry
sill cover up to remove. If the sill cover releases, proceed to step 5.
3) Insert Phillips screw driver into weep
4) Tap screw driver to release the sill cover
5) Set sill cover into position on sill.
6) Apply ample pressure to snap sill cover into place.
Woodgrain Millwork Field SVC Manual 12/05
22
Replace bottom rail weatherstripping on an active slider
1)
2)
3)
4)
5)
6)
7)
8)
9)
Remove operable panel
Rest panel on its side stile
Remove existing screws
Remove weather stripping
Clean any tape residue off of the panel
Remove protective tape from adhesive tape on new weathestripping
Apply new weather strip to panel
Insert existing screws thru channel into the panel
Reinstall panel.
Woodgrain Millwork Field SVC Manual 12/05
23
Replacing a keyed cylinder on a swing door
1)
2)
3)
4)
Remove allen set screw on the exterior lever.
Remove interior escutcheon plate screws
Remove exterior escutcheon plate
From back side of the handleset. Remove bracket that holds the keyed cylinder in
place.
5) Remove keyed cylinder.
6) Repeat steps 1 thru 5 in reverse to reassemble.
2
1
2
4
1
5
3
3
Woodgrain Millwork Field SVC Manual 12/05
24
Replacing a keyed cylinder on a sliding door
1) Remove interior escutcheon plate screws. Hold escutcheon plate in place while
removing screws.
2) Remove exterior escutcheon plate
3) From back side of the handleset. Remove bracket that holds the keyed cylinder in
place.
4) Remove keyed cylinder.
Repeat steps 1 thru 5 in reverse to reassemble.
4
5
3
1
2
1
2
Woodgrain Millwork Field SVC Manual 12/05
25
Replace swing handleset
1)
2)
3)
4)
Remove allen set screw on the exterior lever.
Remove interior escutcheon plate screws
Remove handleset
Repeat steps 1 thru 3 in reverse to reassemble
.
2
1
2
1
3
3
Woodgrain Millwork Field SVC Manual 12/05
26
Replace Sliding handleset
1)
2)
3)
4)
Support handleset on the exterior of the unit
From the inside, remove screws that hold the faceplace on.
Remove handleset
Repeat steps 1 thru 3 in reverse to reinstall
1
1
Woodgrain Millwork Field SVC Manual 12/05
27
Replace interlock weatherstripping
Caution: Do not damage bottom weatherstripping!!!
1)
2)
3)
4)
5)
Remove operable sliding panel
Lay panel on lock side
Remove screws that hold the interlock in place
Remove existing interlock
Repeat steps 1 thru 4 in reverse.
Woodgrain Millwork Field SVC Manual 12/05
28
Replace multipoint lock (Primary panel)
1)
2)
3)
4)
5)
6)
Open panel
Remove handleset (See replacing swing handleset instructions)
Remove Phillip Head screws ONLY in the edge of the panel.
Remove lockest
Place new lockset into edge of door.
Place exterior trim assembly into lockset. THIS LOCATES THE LOCK IN THE
DOOR.
7) Replace Phillips head screws in the edge of the door. Leave the top two screws
out…
8) Lift handle to lock.
9) Extend the lock extension
Pull here to extend
latch bolt
10) Install the extension onto the top of the lock assembly
11) Install remaining screws
12) Reinstall Handleset (See replacing swing handleset instructions)
13) Operate lock assembly to assure it works.
Woodgrain Millwork Field SVC Manual 12/05
29
Adjust multi point lock (Sidelite)
1) Open panel
2) Insert allen wrench into roller pin.
3) Rotate wrench to adjust.
Insert allen
wrench and
turn to adjust
vertically and
horizontally.
Woodgrain Millwork Field SVC Manual 12/05
30
Adjusting roller:
1) Remove white caps on bottom of panel
2) Insert screw driver into roller
3) Turn screw driver to raise or lower rollers in panel, until panel and strike jamb are
parallel
4) Replace caps
From the inside of
the operating panel,
remove the white
caps and turn the
adjustment screws.
Woodgrain Millwork Field SVC Manual 12/05
31
Adjust sliding door latch
1) Open panel
2) Turn screw in edge of lock to move latch towards or away from the jamb
Turning the
screw in the
lockset moves
the latch closer
or farther away
from the panel.
Woodgrain Millwork Field SVC Manual 12/05
32