Transcript
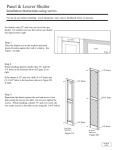
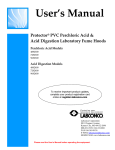
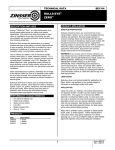
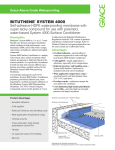
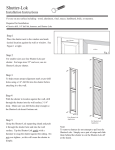
Installation Instructions
For use on any surface including: wood, aluminum, vinyl, stucco, hardboard, brick, or masonry.
Electric drill, 1/4" drill bit, 1/8" drill bit, screwdriver, screws
Note:
To prevent shutters from warping, proper installation must be followed.
If installing shutters on any type of masonry, wall anchors will be needed.
Step 1
Place the shutter next to the window and mark the desired
location against the wall or window. See figure at right.
Step 2
For sizes below 55" use four screws per shutter. For larger sizes,
55" and over, use six screws per shutter. See figures below for proper
screw placement and hole size. The 1/8" holes may be drilled into the
wall surface and used as pilot holes. The 1/4 holes are drilled only in
the shutter.
Note: If installing on masonry, transfer the holes in the shutter
onto the wall. Using a masonry drill bit, drill the holes
into the wall. Install the wall anchors according to the instructions
supplied with them and install shutters.
1/4" holes
Step 3
Use the enclosed screws to securely attach the shutter to the
wall surface. Do not over tighten the screws. The shutters
need freedom to expand and contract with changing weather
conditions.
1/8" holes
1/4" holes
Note: The above instructions use the 3 board shutter as an
example. The same techniques will be used for
shutters with more boards.
1/4" holes
1/4" holes
Four Screw
Application
For less than 55"
Six Screw
Application
For 55" or greater