Transcript
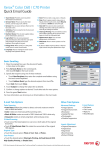
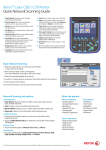
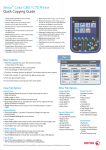
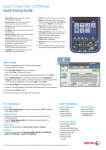
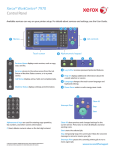
Xerox WorkCentre 7500 Series
Quick Email Guide
®
®
1. Touch Screen: Provides access to printer
information and functions.
2. Services Home: Press to access the main
services, such as copy, scan, and fax.
3. Services: Press to access Services Home or the
last used screen.
4. Job Status: Press to view the list of active and
completed jobs.
5. Machine Status: Press to view supplies status,
printer information, and so on.
6. Log In/Out: Press to access passwordprotected features, then enter the user name
and password using the touch screen
keyboard. Press again to log out.
7. Help: Press for information about the current
selection or service.
8. Language: Press to change the touch screen
language and keyboard settings.
9. Energy Saver: When printer is in low power
mode, press to enter normal mode.
Press while the printer is in normal mode to
enter low power mode.
2
1
6
7
ABC
3
14
4
5
16
8
DEF
1
2
3
GHI
JKL
MNO
4
5
6
PQRS
TUV
WXYZ
7
8
9
0
#
–
15
9
12
13
11
10
C
10. Start: Press to start a copy, scan, or fax job.
14. Alphanumeric Keys: Press to enter
alphanumeric information.
11. Stop: Press to pause a print, copy, scan, or fax
job. On the touch screen, touch Resume to
15. C: Press to delete numeric values or the last digit
continue or Delete to cancel the job.
entered using the alphanumeric keys.
12. Clear All: Press once to clear current job
16. Dial Pause: Press to insert a pause in a fax
settings. Press twice and touch confirm to
number.
reset all job settings to default.
13. Interrupt Printing: Press to hold the current
job to allow a priority job to process. Press
again to finish the interrupted job.
Basic Emailing
1. Place the originals face up in the document feeder,
or face down on the glass.
Ready to scan your job.
Guest
Advanced
Settings
E-mail
2. Press Services Home on the control panel,
then touch E-mail on the touch screen.
New
Recipient...
Layout
Adjustment
E-mail
Options
Address
Book...
From...
To:
[email protected]
Xerox WorkCentre...
3. Specify the recipient using one of these methods:
• Touch New Recipient, then enter the complete email address using
the touch screen keyboard.
Subject...
Scanned from a X...
• Touch Address Book, type the desired recipient, then touch Search.
Touch Add, then touch Close.
2-Sided
Scanning
1-Sided
Output Color
Auto Detect
Original Type
Photo & Text
4. Touch Subject to change the subject line as desired.
5. Confirm or change Email tab options such as Output Color and Original
Type. Also touch other tabs for more options.
6. Press the green Start button.
Email and Email Options Tabs
Other Tab Options
Email
• Output Color: Select Auto Detect, Black & White (100% black and 100% white only),
Grayscale, or Color.
• 2-Sided Scanning: Select 1-Sided, 2-Sided, or 2-Sided, rotate Side 2.
• Original Type: Select Photo & Text, Photo, Text, Map, or Newspaper/Magazine.
• Scan Presets: Select Sharing & Printing, Archival – Small file Size, OCR, High Quality
Printing, or Simple Scan. Touch View Details for descriptions of Scan Presets.
Advanced Settings
• Image Options
• Image Enhancement
• Resolution
• Quality/File Size
Email Options
• File Name: Change the file name of the scan.
• File Format: Select PDF, PDF/A, XPS, Multi-Page TIFF, TIFF (1 File per Page),
or JPEG (1 File per Page). PDF, PDF/A, and XPS Options are Image Only or Searchable,
which works with optical character recognition (OCR).
• Message: Add a message to the email.
• Reply To: Change the Reply To address of the email.
128E01620 © 2010 Xerox Corporation. All rights reserved.
Job
Assembly
Layout Adjustment
• Original Orientation
• Original Size
• Edge Erase
Job Assembly
• Build Job
Scan Presets
Sharing & Printing