1
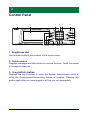
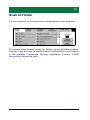
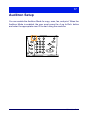
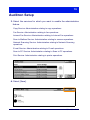
Quick Use Guide
User Guide
XT3008EN0-2
ME3612E4-1
© 2008 by Fuji Xerox Co., Ltd. All rights reserved.
Copyright protection claimed includes all forms and matters of copyrighted material and
information now allowed by statutory or judicial law or hereinafter granted, including without
limitations, material generated from the software programs which are displayed on the
screen, such as icons, screen displays, looks etc.
Xerox®, and all Xerox products mentioned in this publication are trademarks of Xerox
Corporation. Product names and trademarks of other companies are hereby acknowledged.
The information in this document is correct at the time of publication. Xerox reserves the right
at any time to change the information without notice. Changes and technical updates will be
added in subsequent editions of the documentation. For the latest information go to
www.xerox.com.
Products Subject To Ordinary Export Regulations
An export of this product is strictly limited in accordance with Laws concerning Foreign
Exchange and Foreign Trade of Japan and/or the export control regulations of the United
States. You must obtain, if you wish to export this product, any appropriate export license
from the Japanese Government or its agency and/or re-export approval from the U.S.
Government or its agency.
Products Subject To Supplementary Export Regulations
An export of this product is strictly limited in accordance with Laws concerning Foreign
Exchange and Foreign Trade of Japan and/or the export control regulations of the United
States. You must obtain, if you know the product is to be used, or was used for development,
manufacturing or use of any mass destructive weapons including nuclear weapon, chemical
weapon or biological weapon because of a dealing document such as legal contract or
information from the importer, any appropriate export license from the Japanese Government
or its agency and/or re-export approval from the U.S. Government or its agency.
NOTE: BLUE items are for IT administrator type personnel, GREEN for end users and RED
for machine maintenance. Depending on the configuration of the options, some User
Interface screens may vary.
Table of Contents
Control Panel
2
Tray Settings
5
Booklet Creation
7
ID Card Copying
9
Simple Scan to Mailbox
13
Scan to Home
14
Auditron Setup
16
Billing Meter
20
Replacing the Toner Cartridge
22
Replacing the Drum Cartridge
25
Quick Use Guide
2
Control Panel
1
2
3
4
5
6
7
8
9
10
17 16 15
14
13 12 11
1. Brightness dial
Use this dial to adjust the contrast of the touch screen.
2. Touch screen
Displays messages and the buttons for various features. Touch the screen
to access the features.
3. <Log In/Out> button
Displays the log-in screen to enter the System Administrator mode or
when the Authentication/Accounting feature is enabled. Pressing this
button again after you have logged in will log you out immediately.
Quick Use Guide
3
Control Panel
4. Numeric keypad
Press these buttons to enter the number of copies, passwords, and other
numerical values.
5. <Language> button
Changes the language on the touch screen.
6. <Energy Saver> button/indicator
When the machine is left idle for a certain period of time, it enters the
Energy Saver mode to reduce power consumption. This indicator lights up
when the machine is in the Energy Saver mode. To exit the Energy Saver
mode, press this button.
7. <Clear All> button
Press this button to reset the status of all services to the default settings.
The machine will return to the default state after it is switched on.
8. <Interrupt> button
Press this button to temporarily interrupt a copy or print job and give
another job a higher priority. This button lights up while the priority job is
being processed. Press this button again after the priority job is finished to
resume the job that was interrupted.
9. <Stop> button
Suspends or cancels a job. When multiple jobs are being processed, all
the jobs will be suspended or cancelled. Selecting [Stop] on the [Job
Status] screen stops only the selected job.
Quick Use Guide
4
Control Panel
10.<Start> button
Press this button to start a job.
11.<Speed Dial> button
Allows you to enter speed dial codes.
12.<C> (clear) button
Deletes a numeric value or the last digit entered, or replaces the current
value with a default value. It also cancels a suspended job.
13.<Dial Pause> button
Inserts a pause while dialing a fax number.
14.<Machine Status> button
Displays a screen where you can check the machine status, the billing
meter, and the status of consumables, or print various reports. Use this
button also when accessing the System Administrator mode.
15.<Job Status> button
Displays a screen where you can check the progress of active jobs, or
displays the detailed information of completed jobs.
16.<Features> button
Returns the display to the previous copy, fax, or scan feature screen when
the [Job Status] screen or [Machine Status] screen is selected.
17.<All Services> button
Displays a screen where you can access the services available on the
machine.
Quick Use Guide
5
Tray Settings
The machine can be equipped with various paper trays. Tray 1, Tray 2 and
the Two Tray module (Trays 3 and 4) can be loaded with stock of standard
and non-standard sized paper. The High Capacity Tandem Trays (Trays 3
and 4) allow you to load up to 2,000 sheets of paper. The bypass tray
(Tray 5) allows you to use a variety of paper types. A tray extension is
provided to accommodate larger sized paper. The High Capacity Feeder
(Tray 6) allows you to load up to 2,000 sheets of paper. You cannot load
custom size paper into the High Capacity Feeder. The Envelope Tray
(Tray 1) allows you to stack up to 43 mm of envelopes.
Some trays are optional, or may not be available for your machine. For
details, contact your System Administrator.
When a paper tray is opened, your machine assumes that more paper is
to be loaded. Depending on the machine setup, the touch screen displays
a pop-up window, giving the option to change the paper and its attributes,
or load more of the same paper.
Before loading paper into the paper trays, fan the edges. This procedure
separates any sheets of paper that are stuck together and reduces the
possibility of paper jams.
Quick Use Guide
6
Tray Settings
The tray information screen will be displayed on the touch screen. If the
tray information is correct, select [Close]. Alternatively change the paper
size or paper type by selecting [Change Settings] on the touch screen.
That completes the procedure for loading the paper tray.
Quick Use Guide
7
Booklet Creation
The Booklet Creation feature enables the production of booklets or multipage copies from single or double-sided originals. The machine will scan
your originals and automatically reduce and arrange the images in the
correct sequence on your selected copy paper so that a booklet is created
when the copy set is folded in half.
Some models do not support this feature, and some models need to have
an optional finisher installed in order to use this feature. For details,
contact your System Administrator.
The Booklet Creation feature is found on the [Output Format] tab.
When Booklet Creation is enabled, you need to tell the machine whether
your originals are single or double-sided. When you have made your
selection you must select [Save] so that you can program any other
features you may require from the control panel.
Enable Booklet Creation by selecting the [Output Format] tab, [Booklet
Creation] and [Create Left/Top Bound Booklet].
Quick Use Guide
8
Booklet Creation
There are 2 simple rules that must be followed when making booklets:
1. First select the tray that contains the paper you want to use.
2. Always load your documents with the long edge to the left.
Quick Use Guide
9
ID Card Copying
Whether needing to copy insurance cards, a driver's license, or any other
form of identification, the ID Card Copying feature offers a simple and
efficient way to save time.
Information on both sides of the ID Card can be copied onto one side of
one sheet of paper, without the need to reload the paper into the paper or
Tray 5 (Bypass).
Quick Use Guide
10
ID Card Copying
1. Pressing the <Clear All> button once will cancel any previous screen
programming selections.
Press the <All Services> button on the control panel, then select [Copy].
Quick Use Guide
11
ID Card Copying
2. The ID Card Copying option is found on the [Output Format] tab.
Access the ID Card Copying feature by selecting the [Output Format] tab,
then [ID Card Copying].
Quick Use Guide
12
ID Card Copying
3. Follow the instructions below to complete the ID Card Copy process:
Step 1.
Raise the document feeder or the document glass cover. Place the ID Card
on the document glass, aligned to the top left corner. Gently lower the
document feeder or the document glass cover.
Step 2.
Use the numeric keypad to enter the number of copies you require.
Step 3.
Press the <Start> button to begin scanning side 1.
Step 4.
Raise the document feeder or the document glass cover. Turn the ID Card
over to copy side 2. Gently lower the document feeder or the document glass
cover.
Step 5.
Press the <Start> button to begin scanning side 2.
Printing begins and copies are delivered into the output tray.
Quick Use Guide
13
Simple Scan to Mailbox
Some models do not support this feature, and some models need to have
optional kits installed in order to use this feature. For details, contact your
System Administrator.
1. Load the documents.
2. Select [Scan to Mailbox].
3. Select the appropriate Mailbox.
4. Select the Features.
If you need to change the scan settings, select the [General Settings],
[Advanced Settings], [Layout Adjustment], or [Filing Options] tabs, then select
the desired settings.
5. Press the <Start> button.
Once you have pressed the <Start> button, each document is scanned.
6. Access the scanned document in the Mailbox.
Access the electronic version of the document in the specified Mailbox at the
machine.
Quick Use Guide
14
Scan to Home
Scan to Home allows a user to scan hard copy originals at the machine
and send them to a destination on the network which is specified as their
“Home” destination.
Some models do not support this feature, and some models need to have
optional kits installed in order to use this feature. For details, contact your
System Administrator.
To use this option, the user must enter the Network Authentication login at
the machine. The machine displays one Scan to Home (@S2HOME)
template. The Username, Password and Home Directory, of the
authenticated user, are specified in the Scan to Home template. The
selected template sends the scanned data to the user's Home Directory.
Quick Use Guide
15
Scan to Home
It is not necessary for the repositories and templates to be configured.
The system administrators enable the feature using CentreWare Internet
Services. They also have to enable Network Authentication for this feature
to be available. Lightweight Directory Application Protocol (LDAP)
connectivity may also be used.
Quick Use Guide
16
Auditron Setup
To set up the Auditron you must first create user accounts and then enable
the Auditron. Users will then be required to enter the user ID setup with
their account to perform certain machine functions. You can create up to
1000 accounts.
All user accounts must have the following defined:
• User ID
• User Name
• Feature Access
• Account Limit
Once accounts are defined and created, enable the desired accounts to
begin Auditron usage. The user IDs and the user names must be unique
from other user IDs and user names.
Quick Use Guide
17
Auditron Setup
You can enable the Auditron Mode for copy, scan, fax, and print. When the
Auditron Mode is enabled, the user must press the <Log In/Out> button
and enter the appropriate user ID to start using the machine.
Quick Use Guide
18
Auditron Setup
1. To access the Auditron mode, select the [Tools] tab, then select
[Accounting].
Under [Group] heading, select [Accounting Type], then select [Local
Accounting].
2. Select [Auditron Mode].
Quick Use Guide
19
Auditron Setup
3. Select the services for which you want to enable the administration
feature.
Copy Service: Administration relating to copy operations.
Fax Service: Administration relating to fax operations.
Internet Fax Service: Administration relating to Internet Fax operations.
Scan to Mailbox Service: Administration relating to scanner operations.
Network Scanning Service: Administration relating to Network Scanning
operations.
E-mail Service: Administration relating to E-mail operations.
Scan to PC Service: Administration relating to Scan to PC operations.
Print Service: Administration relating to printer operations.
4. Select [Save].
Quick Use Guide
20
Billing Meter
The Billing Meter screen provides access to billing information. The meter
varies depending on your machine configuration and setup.
To access the Meter:
1. Press the <Machine Status> button.
Quick Use Guide
21
Billing Meter
2. Select the [Billing Information] tab.
3. Select [Billing Information]. The Meter is displayed.
Quick Use Guide
22
Replacing the Toner Cartridge
The toner cartridge is a customer replaceable unit. The touch screen will
display a message when the cartridge needs to be replaced.
If toner spills onto your skin or clothing, wash it off with soap and water.
If you get toner particles in your eyes, wash it out with plenty of water for at
least 15 minutes until irritation is gone. Consult a physician if necessary.
If you inhale toner particles, move to a fresh air location and rinse your
mouth with water.
If you swallow toner, spit it out, rinse your mouth with water, drink plenty of
water and consult a physician immediately.
Quick Use Guide
23
Replacing the Toner Cartridge
1. Make sure the machine is not in operation and open the front cover.
2. Pull the toner cartridge out until you can grasp the handle on top of
the cartridge.
3. Hold the handle and remove the cartridge from the machine.
Quick Use Guide
24
Replacing the Toner Cartridge
4. Remove the new toner cartridge from the box. Before removing the
cartridge from the bag, shake it from side to side to evenly distribute
the toner inside.
5. Insert the cartridge as shown below and slide it into the machine until
it clicks.
6. Close the front cover.
Quick Use Guide
25
Replacing the Drum Cartridge
The drum cartridge is a customer replaceable unit. The machine will
display a warning message before the drum reaches the end of its life.
When the message is displayed, order a replacement cartridge to ensure
continuous operation.
Quick Use Guide
26
Replacing the Drum Cartridge
1. Make sure the machine is not in operation and open the front cover.
2. Open Tray 5 (Bypass) and then Cover A while lifting up the release
lever.
3. Lift up the colored lever, and slide the drum cartridge out until you can
grasp the handle on top of the cartridge.
Quick Use Guide
27
Replacing the Drum Cartridge
4. Hold the handle and remove the cartridge from the machine.
5. Remove the new drum cartridge from the box.
6. Carefully remove the protective sheet from the cartridge by pulling up
the sealing tape.
7. Insert the cartridge as shown below and slide it into the machine until
it clicks.
Quick Use Guide
28
Replacing the Drum Cartridge
8. Pull the cartridge tape out straight without breaking it.
9. Push the cartridge again to ensure it is positioned correctly.
10.Close Cover A until it latches, and then close Tray 5 (Bypass).
11.Close the front cover.
Quick Use Guide