1
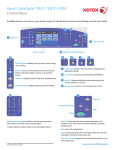
Xerox® ColorQube™ 9301/ 9302/ 9303
Machine Overview
Machine Overview
Features
Depending on the configuration of your
device, it is capable of the following:
1
7
6
4
Copy
E-mail
Internet Fax
Server Fax
Fax
Workflow
Scanning
8
5
3
2
1
Document Feeder
5
Tray 5 (Optional)
2
Paper Trays 1 and 2
6
Tray 6 (Inserter) (Optional)
3
Paper Tray 3
7
Control Panel
4
Tray 4 (Bypass)
8
High Volume Finisher (Optional)
Print
From...
Control Panel
6
8?
1
2
GHI
5
PQRS
ABC
D EF
JKL
MNO
TUV
W XYZ
7
3
11AC
!#
9
13
12
4
10
1
Services Home
8
Help
2
Services
9
Interrupt
3
Job Status
10
Start
4
Machine Status
11
Clear All
5
Touch Screen
12
Stop
6
Log In/Out
13
Energy Save
7
Numeric Keypad
More information
For more information, please refer to:
• User Guides
• http://www.support.xerox.com
XEROX®, XEROX and Design® and ColorQube® are trademarks of Xerox Corporation in the United States and/or other countries. ©
2010 Xerox Corporation. All rights reserved.
Xerox® ColorQube™ 9301/ 9302/ 9303
How to Load Paper
Trays 1, 2 and 3
Machine Overview
1. Open the tray.
2. Place the media face up in the tray.
Paper must not be loaded above the
maximum fill line.
6
3. Trays 1 and 2 only. Make sure that
the paper guides just touch the
paper.
4. Close the tray. The paper settings for
the tray are displayed on the touch
screen.
4
5. Check and confirm or change the
settings.
1
5
3
2
1
Tray 1
4
Tray 4 (Bypass)
2
Tray 2
5
Tray 5
3
Tray 3
6
Tray 6 (Inserter)
Tray 4 (Bypass)
Tray 5
1. Make sure the tray is in the down
position.
1. Press the button to open the door.
2. For larger media, use the tray extension.
3. Place media face down in the tray.
Paper must not be loaded above
the maximum fill line.
3. Place media face down in the tray. Paper
must not be loaded above the maximum
fill line.
4. Make sure that the paper guides just
touch the paper.
2. Wait for the paper tray to lower.
4. Close the door. The tray
automatically rises.
5. The paper settings for the tray are
displayed on the touch screen.
Tray 6 (Inserter)
1. Place the media face up in the tray
and check it is the correct orientation
for that media.
2. Paper must not be loaded above the
maximum fill line.
3. Make sure that the paper guides just
touch the paper. The paper settings
for the tray are displayed on the touch
screen.
4. Check and confirm or change the
settings.
6. Check and confirm or change the
settings.
More information
• User Guides
• http://www.support.xerox.com
• Paper weights and sizes are in the
User Guide
XEROX®, XEROX and Design® and ColorQube® are trademarks of Xerox Corporation in the United States and/or other countries. ©
2010 Xerox Corporation. All rights reserved.
Xerox® ColorQube™ 9301/ 9302/ 9303
How to Make a Copy
2
-!8
Preparation
1. Press the Clear All (AC) button twice and then Confirm to cancel
any previous screen programming selections.
2. Load the original documents face up in the document feeder or
face down on the document glass.
2
3
Copy
3. Press the Services Home button.
4. Select the Copy option. The Copy tab is displayed.
5. Make any programming changes that are required, such as Output
Color, Reduce / Enlarge, Paper Supply, 2-Sided Copying and Copy
Output.
6. Enter the copy quantity using the numeric keypad.
7. Press Start to scan the originals and process the copy job.
4
The copy job enters the job queue ready for processing.
More information
7
For more information, please refer to:
• User Guides
• http://www.support.xerox.com
XEROX®, XEROX and Design® and ColorQube® are trademarks of Xerox Corporation in the United States and/or other countries. ©
2010 Xerox Corporation. All rights reserved.
Xerox® ColorQube™ 9301/ 9302/ 9303
How to Send a Fax
2
-!8
Preparation
1. Press the Clear All (AC) button twice and then Confirm to cancel
any previous screen programming selections.
2. Load the original documents face up in the document feeder or
face down on the document glass.
2
3
Fax
3. Press the Services Home button.
4. Select the Fax option. The Fax tab is displayed.
5. Select the entry field and enter the fax number. Select Add to
add the number to the recipient list. Enter additional numbers as
required.
6. Make any programming changes that are required.
7. Press Start to scan the originals and process the fax job.
4
The fax job enters the job queue ready for processing.
More information
7
For more information, please refer to:
• User Guides
• http://www.support.xerox.com
XEROX®, XEROX and Design® and ColorQube® are trademarks of Xerox Corporation in the United States and/or other countries. ©
2010 Xerox Corporation. All rights reserved.
Xerox® ColorQube™ 9301/ 9302/ 9303
How to Send a Server Fax
2
-!8
Preparation
1. Press the Clear All (AC) button twice and then Confirm to cancel
any previous screen programming selections.
2. Load the original documents face up in the document feeder or
face down on the document glass.
2
3
Fax
3. Press the Services Home button.
4. Select the Server Fax option. The Server Fax tab is displayed.
5. Select the entry field and enter the fax number. Select Add to
add the number to the recipient list. Enter additional numbers as
required.
6. Make any programming changes that are required.
7. Press Start to scan the originals and process the fax job.
4
The fax job enters the job queue ready for processing.
More information
7
For more information, please refer to:
• User Guides
• http://www.support.xerox.com
XEROX®, XEROX and Design® and ColorQube® are trademarks of Xerox Corporation in the United States and/or other countries. ©
2010 Xerox Corporation. All rights reserved.
Xerox® ColorQube™ 9301/ 9302/ 9303
How to Send an Internet Fax
2
-!8
Preparation
1. Press the Clear All (AC) button twice and then Confirm to cancel
any previous screen programming selections.
2. Load the original documents face up in the document feeder or
face down on the document glass.
2
3
Fax
3. Press the Services Home button.
4. Select the Internet Fax option. The Internet Fax tab is displayed.
5. Select New Recipient. Check that To is displayed on the drop-down
menu. Enter the E-mail address and select Add. Add any additional
recipients as required and select Close.
6. Make any programming changes that are required.
7. Press Start to scan the originals and process the fax job.
4
The fax job enters the job queue ready for processing.
More information
7
For more information, please refer to:
• User Guides
• http://www.support.xerox.com
XEROX®, XEROX and Design® and ColorQube® are trademarks of Xerox Corporation in the United States and/or other countries. ©
2010 Xerox Corporation. All rights reserved.
Xerox® ColorQube™ 9301/ 9302/ 9303
How to use Print From...
Preparation
1. Press the Clear All (AC) button twice and then Confirm to cancel
any previous screen programming selections.
2
4
Print
3. Press the Services Home button.
4. Select the Print From... option. The Print Ready Saved Jobs are
displayed.
5. Use the up/down arrows to scroll and select the folder or job
required.
6. Make any programming changes that are required.
7. Enter the quantity required and select Print to print the job.
The print job enters the job queue ready for processing.
7
More information
For more information, please refer to:
• User Guides
• http://www.support.xerox.com
XEROX®, XEROX and Design® and ColorQube® are trademarks of Xerox Corporation in the United States and/or other countries. ©
2010 Xerox Corporation. All rights reserved.
Xerox® ColorQube™ 9301/ 9302/ 9303
How to Send an E-mail
2
-!8
Preparation
1. Press the Clear All (AC) button twice and then Confirm to cancel
any previous screen programming selections.
2. Load the original documents face up in the document feeder or
face down on the document glass.
2
3
E-mail
3. Press the Services Home button.
4. Select the E-mail option. The E-mail tab is displayed.
5. Select New Recipient. Check that To is displayed on the drop-down
menu. Enter the E-mail address and select Add. Add any additional
recipients as required and select Close.
6. Make any programming changes that are required.
7. Press Start to scan the originals and process the E-mail job.
4
The E-mail job enters the job queue ready for processing.
More information
7
For more information, please refer to:
• User Guides
• http://www.support.xerox.com
XEROX®, XEROX and Design® and ColorQube® are trademarks of Xerox Corporation in the United States and/or other countries. ©
2010 Xerox Corporation. All rights reserved.
Xerox® ColorQube™ 9301/ 9302/ 9303
How to use Workflow Scanning
2
-!8
Preparation
1. Press the Clear All (AC) button twice and then Confirm to cancel
any previous screen programming selections.
2. Load the original documents face up in the document feeder or
face down on the document glass.
2
3
Scan
3. Press the Services Home button.
4. Select the Workflow Scanning option. The Workflow Scanning tab is
displayed.
5. Select a template for the job from the templates displayed in the
list.
6. Make any programming changes that are required.
7. Press Start to scan the originals and process the scan job.
4
The scanned images are filed to the location specified on the template
ready for retrieval by the user.
More information
7
For more information, please refer to:
• User Guides
• http://www.support.xerox.com
XEROX®, XEROX and Design® and ColorQube® are trademarks of Xerox Corporation in the United States and/or other countries. ©
2010 Xerox Corporation. All rights reserved.
Xerox® ColorQube™ 9301/ 9302/ 9303
How to use the USB Port
3
Preparation
-!8
1. Press the Clear All (AC) button twice and then Confirm to cancel
any previous screen programming selections.
2. Insert the USB Flash Drive into the USB port located on the left
side of the device.
3
Scan
3. Load the original documents face up in the document feeder or face
down on the document glass.
4. Select the Scan to USB option. The Workflow Scanning tab is
displayed.
5. Make any programming changes that are required.
6. Press Start to scan the originals and process the scan job.
4
The scanned images are filed on the USB Flash Drive in the root
directory.
Print
7
7. Select the Print from USB option. The Print From... options are
displayed.
8. Use the up/down arrows to scroll and select the folder and Print Ready
job you require.
9. Make any programming changes that are required.
10. Enter the quantity required and press Start to print the job.
The print job enters the job queue ready for processing.
6/10
More information
For more information, please refer to:
• User Guides
• http://www.support.xerox.com
XEROX®, XEROX and Design® and ColorQube® are trademarks of Xerox Corporation in the United States and/or other countries. ©
2010 Xerox Corporation. All rights reserved.
Xerox® ColorQube™ 9301/ 9302/ 9303
Maintenance and Consumables
Ink Sticks
1
1. Load Solid Ink Sticks in the Ink Loading area, up to 6 Solid Ink Sticks
per color can be loaded while the device is running.
2. When loading Solid Ink Sticks, check that the correct color is loaded
in the correct ink loading slot.
3
Waste Ink Tray
3. The Waste Ink Tray accumulates ink debris resulting from printhead
maintenance.
4. The device will not work if the Waste Ink Tray is full, you must
empty the Tray. The waste ink is non-toxic and can be disposed of
through your normal refuse collection.
Cleaning Unit
5
5. The Cleaning Unit applies a Silicone Oil release agent to the print
drum.
6. Replace the unit using the instructions provided on the touch screen
and recycle the old unit as directed on the packaging or by your
local Xerox Representative.
Staple Cartridges and Hole
Punch Waste
Print Quality
Maintenance
7. If your device is equipped with the Office Finisher or High Volume
Finisher, you will be required to replace the Staple Cartridge or
Cartridges when the device displays a message instructing you to do
so.
There are a number of tasks which are performed
automatically by the device to maintain print
quality.
8. If your finisher has the optional Hole Punch Unit, you will also be
required to empty the Hole Punch Waste Container when prompted.
9. Detailed instructions are provided on the touch screen.
If a problem occurs the device may need to run
blank sheets through the paper path to clean the
system. These pages will be directed to the top
tray and should be discarded.
For additional options in correcting image quality
access the Tools section.
More information
For more information, please refer to:
• User Guides
• http://www.support.xerox.com
10. Press the Machine Status button. Select the
Tools tab.
11. Select Troubleshooting.
12. Select Fix Image Quality.
13. Select Light Lines, Smears or Advanced to
correct problems.
XEROX®, XEROX and Design® and ColorQube® are trademarks of Xerox Corporation in the United States and/or other countries. ©
2010 Xerox Corporation. All rights reserved.