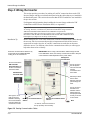
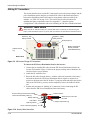
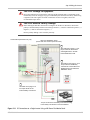
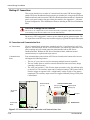
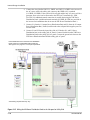
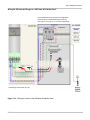
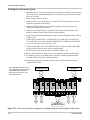
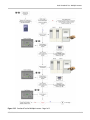
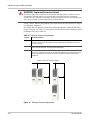
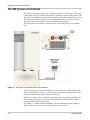
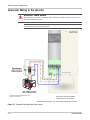
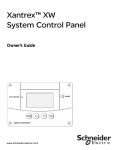
1
XW4024-120/240-60
XW4548-120/240-60
XW6048-120/240-60
Installation Guide
XW Power System
XW Power Distribution Panel
XW System Control Panel
XW Solar Charge Controller
XW Automatic Generator Start
XW Power System
Installation Guide
About Xantrex
Xantrex Technology Inc. is a world-leading supplier of advanced power electronics and controls with products from
50 watt mobile units to 2.5 MW utility-scale systems for wind, solar, batteries, fuel cells, micro turbines, and backup
power applications in both grid-connected and stand-alone systems. Xantrex products include inverters, battery chargers,
programmable power supplies, and variable speed drives that convert, supply, control, clean, and distribute electrical
power.
Trademarks
XW Power System is a trademark of Xantrex International. Xantrex is a registered trademark of Xantrex International.
Other trademarks, registered trademarks, and product names are the property of their respective owners and are used
herein for identification purposes only.
Notice of Copyright
XW Power System Installation Guide © May 2007 Xantrex International. All rights reserved.
Exclusion for Documentation
UNLESS SPECIFICALLY AGREED TO IN WRITING, XANTREX TECHNOLOGY INC. (“XANTREX”)
(a) MAKES NO WARRANTY AS TO THE ACCURACY, SUFFICIENCY OR SUITABILITY OF ANY TECHNICAL
OR OTHER INFORMATION PROVIDED IN ITS MANUALS OR OTHER DOCUMENTATION.
(b) ASSUMES NO RESPONSIBILITY OR LIABILITY FOR LOSSES, DAMAGES, COSTS OR EXPENSES,
WHETHER SPECIAL, DIRECT, INDIRECT, CONSEQUENTIAL OR INCIDENTAL, WHICH MIGHT ARISE OUT
OF THE USE OF SUCH INFORMATION. THE USE OF ANY SUCH INFORMATION WILL BE ENTIRELY AT THE
USER’S RISK; AND
(c) REMINDS YOU THAT IF THIS MANUAL IS IN ANY LANGUAGE OTHER THAN ENGLISH, ALTHOUGH
STEPS HAVE BEEN TAKEN TO MAINTAIN THE ACCURACY OF THE TRANSLATION, THE ACCURACY
CANNOT BE GUARANTEED. APPROVED XANTREX CONTENT IS CONTAINED WITH THE ENGLISH
LANGUAGE VERSION WHICH IS POSTED AT WWW.XANTREX.COM.
Due to continuous quality improvement and product updates, the illustrations shown in this manual may not exactly match
the unit purchased.
Date and Revision
May 2007, Revision A
Part Number
975-0239-01-01
Product Numbers
865-1000 (XW 6048-120/240-60)
865-1005 (XW4548-120/240-60)
865-1010 (XW4024-120/240-60)
Contact Information
Telephone: 1-800-670-0707 (toll free in North America)
Telephone: 1-360-925-5097 (direct)
Fax:
1-800-994-7828 (toll free in North America)
Fax:
1-360-925-5143 (direct)
Email:
[email protected]
Web:
www.xantrex.com
About This Guide
Purpose
The purpose of this Installation Guide is to provide explanations and procedures for
installing the XW Power System.
Scope
The Guide provides safety guidelines, detailed planning and procedures for installing
the XW Inverter/Charger and related system components (the “XW Power System”).
It does not provide details about configuration, operation, maintenance or
troubleshooting. See the Operation Guide or Owner’s Manual of each device for this
information. This Guide also does not provide details about particular brands of
batteries. You need to consult individual battery manufacturers for this information.
Audience
The Guide is intended for anyone who needs to install the XW Power System.
Installers should be certified technicians or electricians.
Organization
This guide is organized into four chapters and three appendices.
Chapter 1, “Introduction” lists and describes the components and basic features of the
XW Power System.
Chapter 2, “Inverter/Charger Installation” describes how to mount and install the XW
Inverter/Charger, and the XW Power Distribution Panel and XW Conduit Box.
Chapter 3, “Xanbus Network Installation” provides detailed information for planning
and installing the components necessary for network communication on a Xanbus
system.
Chapter 4, “XW Solar Charge Controller Installation” describes how to mount and
connect the XW Charge Controller as part of the XW System.
Chapter 5, “XW System Accessories Installation” describes how to mount and install
the XW System Control Panel and the Automatic Generator Start.
Appendix A, “Specifications” provides the electrical and environmental specifications
for the XW Series.
Appendix B, “Wiring Diagrams” illustrate the most basic configurations and are for
reference only. Specific installations may require additional equipment to meet
national or local electric codes. Ensure all safety requirements are strictly followed.
Appendix C, “Alternate System Configurations” provides wiring diagrams for
inverter/charger installations that do not require use of the power distribution panel
and the XW Conduit Box.
975-0239-01-01
iii
About This Guide
Conventions Used
The following conventions are used in this guide.
WARNING
Warnings identify conditions or practices that could result in personal
injury or loss of life.
CAUTION
Cautions identify conditions or practices that could result in damage to
the XW Power System components or other equipment.
Related Information
Additional information about operating the XW Inverter/Charger, see the XW
Inverter/Charger Operation Guide (975-0240-01-01).
For more information about related components, refer to:
•
•
•
•
XW Power System Intallation Overview (975-0238-01-01)
XW System Control Panel Owner’s Guide (975-0298-01-01)
XW Solar Charge Controller Owner’s Guide (975-0283-01-01)
XW Automatic Generator Start Owner’s Guide (975-0307-01-01)
These guides are available at www.xantrex.com. Printed copies should be included
with the components.
For more information about Xantrex Technology, Inc. as well as its products and
services visit www.xantrex.com.
iv
975-0239-01-01
Important Safety Instructions
WARNING
This chapter contains important safety and operating instructions as required by UL and
CSA standards for inverters used in residential applications. Read and keep this
Installation Guide for future reference.
1. Before using the inverter, read all instructions and cautionary markings on the
unit, the batteries, and all appropriate sections of this manual.
2. Use of accessories not recommended or sold by Xantrex Technology Inc. may result in
a risk of fire, electric shock, or injury to persons.
3. The inverter is designed to be permanently connected to your AC and DC electrical
systems. Xantrex recommends that all wiring be done by a certified technician or
electrician to ensure adherence to the local and national electrical codes applicable in
your jurisdiction.
4. To avoid a risk of fire and electric shock, make sure that existing wiring is in good
condition and that wire is not undersized. Do not operate the inverter with damaged or
substandard wiring.
5. Do not operate the inverter if it has been damaged in any way. If the unit is damaged,
see the Warranty and Product Information section at the end of this manual.
6. This unit does not have any user-serviceable parts. Do not disassemble the inverter
except where noted for connecting wiring and cabling. See the Warranty Section in the
XW Inverter/Charger Operation Guide and other component manuals for instructions
on obtaining service. Attempting to service the unit yourself may result in a risk of
electrical shock or fire. Internal capacitors remain charged after all power is
disconnected.
7. To reduce the risk of electrical shock, disconnect both AC and DC power from the
inverter before attempting any maintenance or cleaning or working on any
components connected to the inverter. Turning off controls will not reduce this risk.
8. The inverter must be provided with an equipment-grounding conductor connected to
the AC input ground.
9. Do not expose this unit to rain, snow, or liquids of any type. This product is designed
for indoor use only. Damp environments will significantly shorten the life of this
product and corrosion caused by dampness will not be covered by the product
warranty.
10. To reduce the chance of short-circuits, always use insulated tools when installing or
working with this equipment.
11. Remove personal metal items such as rings, bracelets, necklaces, and watches when
working with batteries.
975-0239-01-01
v
Important Safety Instructions
Limitations on Use
WARNING: Limitations on Use
The XW Power System is not intended for use in connection with life support
systems or other medical equipment or devices.
Explosive Gas Precautions
1. Working in the vicinity of lead acid batteries is dangerous. Batteries generate
explosive gases during normal operation. Therefore, you must read this guide and
follow the instructions exactly before installing or using your inverter/charger.
2. To reduce the risk of battery explosion, follow these instructions and those published
by the battery manufacturer and the manufacturer of the equipment in which the
battery is installed.
FCC Information to the User
This equipment has been tested and found to comply with the limits for a Class B digital
device, pursuant to part 15 of the FCC Rules. These limits are designed to provide
reasonable protection against harmful interference in a residential installation. This
equipment generates, uses and can radiate radio frequency energy and, if not installed and
used in accordance with the instructions, may cause harmful interference to radio
communications. However, there is no guarantee that interference will not occur in a
particular installation. If this equipment does cause harmful interference to radio or
television reception, which can be determined by turning the equipment off and on, the
user is encouraged to try to correct the interference by one or more of the following
measures:
•
•
•
•
vi
Reorient or relocate the receiving antenna.
Increase the separation between the equipment and the receiver.
Connect the equipment to a circuit different from that to which the receiver is
connected.
Consult the dealer or an experienced radio/TV technician for help.
975-0239-01-01
Contents
Important Safety Instructions - - - - - - - - - - - - - - - - - - - - - - - - - - - - - - - - - - - - - - - - - - - - - - - - -v
Limitations on Use - - - - - - - - - - - - - - - - - - - - - - - - - - - - - - - - - - - - - - - - - - - - - - - - - - - - - - - - - - - - vi
Explosive Gas Precautions - - - - - - - - - - - - - - - - - - - - - - - - - - - - - - - - - - - - - - - - - - - - - - - - - - - - - - vi
FCC Information to the User - - - - - - - - - - - - - - - - - - - - - - - - - - - - - - - - - - - - - - - - - - - - - - - - - - - - - vi
1
Introduction
System Overview - - - - - - - - - - - - - - - - - - - - - - - - - - - - - - - - - - - - - - - - - - - - - - - - - - - - - - - - - - - 1–2
System Diagram - - - - - - - - - - - - - - - - - - - - - - - - - - - - - - - - - - - - - - - - - - - - - - - - - - - - - - - - - - 1–2
System Components and Accessories - - - - - - - - - - - - - - - - - - - - - - - - - - - - - - - - - - - - - - - - - - - - - - 1–3
XW Inverter/Charger - - - - - - - - - - - - - - - - - - - - - - - - - - - - - - - - - - - - - - - - - - - - - - - - - - - - - - 1–3
XW Conduit Box - - - - - - - - - - - - - - - - - - - - - - - - - - - - - - - - - - - - - - - - - - - - - - - - - - - - - - - - - 1–3
XW Power Distribution Panel Panel and XW Conduit Box - - - - - - - - - - - - - - - - - - - - - - - - - - - - - 1–4
XW Connection Kit for INV2 - - - - - - - - - - - - - - - - - - - - - - - - - - - - - - - - - - - - - - - - - - - - - - - - 1–5
XW Solar Charge Controller - - - - - - - - - - - - - - - - - - - - - - - - - - - - - - - - - - - - - - - - - - - - - - - - - 1–6
XW System Control Panel - - - - - - - - - - - - - - - - - - - - - - - - - - - - - - - - - - - - - - - - - - - - - - - - - - - 1–6
XW Automatic Generator Start - - - - - - - - - - - - - - - - - - - - - - - - - - - - - - - - - - - - - - - - - - - - - - - - 1–7
2
Inverter/Charger Installation
Pre-Installation - - - - - - - - - - - - - - - - - - - - - - - - - - - - - - - - - - - - - - - - - - - - - - - - - - - - - - - - - - - - - 2–2
Location - - - - - - - - - - - - - - - - - - - - - - - - - - - - - - - - - - - - - - - - - - - - - - - - - - - - - - - - - - - - - - - 2–2
Knockout Preparation - - - - - - - - - - - - - - - - - - - - - - - - - - - - - - - - - - - - - - - - - - - - - - - - - - - - - - 2–2
Clearance Requirements - - - - - - - - - - - - - - - - - - - - - - - - - - - - - - - - - - - - - - - - - - - - - - - - - - - - 2–3
Mounting - - - - - - - - - - - - - - - - - - - - - - - - - - - - - - - - - - - - - - - - - - - - - - - - - - - - - - - - - - - - - - 2–3
Step 1: Installing the Mounting Plate - - - - - - - - - - - - - - - - - - - - - - - - - - - - - - - - - - - - - - - - - - - - - - 2–4
Step 2: Mounting the Inverter - - - - - - - - - - - - - - - - - - - - - - - - - - - - - - - - - - - - - - - - - - - - - - - - - - - 2–6
Step 3: Mounting the XW Power Distribution Panel and XW Conduit Box - - - - - - - - - - - - - - - - - - - - - 2–7
Step 4: Wiring the Inverter - - - - - - - - - - - - - - - - - - - - - - - - - - - - - - - - - - - - - - - - - - - - - - - - - - - - - 2–8
Batteries - - - - - - - - - - - - - - - - - - - - - - - - - - - - - - - - - - - - - - - - - - - - - - - - - - - - - - - - - - - - - - - 2–9
Battery Bank Requirements - - - - - - - - - - - - - - - - - - - - - - - - - - - - - - - - - - - - - - - - - - - - - - - 2–9
Battery Cable Requirements - - - - - - - - - - - - - - - - - - - - - - - - - - - - - - - - - - - - - - - - - - - - - - - 2–9
Torque Values for the XW Series Inverter/Charger - - - - - - - - - - - - - - - - - - - - - - - - - - - - - - 2–10
Torque Values for the XW Power Distribution Panel - - - - - - - - - - - - - - - - - - - - - - - - - - - - - 2–11
Inverter Grounding - - - - - - - - - - - - - - - - - - - - - - - - - - - - - - - - - - - - - - - - - - - - - - - - - - - - - - - 2–11
Backfeed Protection Requirements - - - - - - - - - - - - - - - - - - - - - - - - - - - - - - - - - - - - - - - - - - - - 2–11
Wiring the Inverter to the XW Power Distribution Panel - - - - - - - - - - - - - - - - - - - - - - - - - - - - - 2–12
Grounding the DC System - - - - - - - - - - - - - - - - - - - - - - - - - - - - - - - - - - - - - - - - - - - - - - - 2–12
Installing the Battery Temperature Sensor - - - - - - - - - - - - - - - - - - - - - - - - - - - - - - - - - - - - 2–13
Making DC Connections - - - - - - - - - - - - - - - - - - - - - - - - - - - - - - - - - - - - - - - - - - - - - - - - - - - 2–14
Making AC Connections - - - - - - - - - - - - - - - - - - - - - - - - - - - - - - - - - - - - - - - - - - - - - - - - - - - 2–16
AC Connections and Communication Ports - - - - - - - - - - - - - - - - - - - - - - - - - - - - - - - - - - - 2–16
975-0239-01-01
vii
Contents
Accessing the AC Terminal Block and AC Ground Bar - - - - - - - - - - - - - - - - - - - - - - - - - - - 2–17
Grounding the AC System - - - - - - - - - - - - - - - - - - - - - - - - - - - - - - - - - - - - - - - - - - - - - - - 2–18
AC Wiring to the Inverter AC Distribution Panel - - - - - - - - - - - - - - - - - - - - - - - - - - - - - - - - 2–19
AC Wiring to the XW Power Distribution Panel - - - - - - - - - - - - - - - - - - - - - - - - - - - - - - - - 2–19
Wiring the XW Inverter/Charger to a XW Power Distribution Panel - - - - - - - - - - - - - - - - - - - 2–21
Generator Wiring to the XW Inverter/Charger using a XW Power Distribution Panel - - - - - - - 2–22
AUX Port - - - - - - - - - - - - - - - - - - - - - - - - - - - - - - - - - - - - - - - - - - - - - - - - - - - - - - - - - - - - - 2–23
AUX+12V Voltage Supply - - - - - - - - - - - - - - - - - - - - - - - - - - - - - - - - - - - - - - - - - - - - - - 2–23
AUX-RPO: User Remote Power Off (RPO) - - - - - - - - - - - - - - - - - - - - - - - - - - - - - - - - - - - 2–24
User Line Wiring - - - - - - - - - - - - - - - - - - - - - - - - - - - - - - - - - - - - - - - - - - - - - - - - - - - - - 2–24
AUX Port Terminal Assignments - - - - - - - - - - - - - - - - - - - - - - - - - - - - - - - - - - - - - - - - - - 2–24
Basic Functional Test - Single Inverter - - - - - - - - - - - - - - - - - - - - - - - - - - - - - - - - - - - - - - - - - - - - 2–25
Confirm All Connections - - - - - - - - - - - - - - - - - - - - - - - - - - - - - - - - - - - - - - - - - - - - - - - - - - - 2–25
Applying DC Power to the Inverter - - - - - - - - - - - - - - - - - - - - - - - - - - - - - - - - - - - - - - - - - - - - 2–25
Enable the Inverter - - - - - - - - - - - - - - - - - - - - - - - - - - - - - - - - - - - - - - - - - - - - - - - - - - - - - - - 2–26
AC Voltage Check - - - - - - - - - - - - - - - - - - - - - - - - - - - - - - - - - - - - - - - - - - - - - - - - - - - - - - - 2–27
Confirming Battery Charger Operation - - - - - - - - - - - - - - - - - - - - - - - - - - - - - - - - - - - - - - - - - 2–27
Step 5: Installing Additional Inverters - - - - - - - - - - - - - - - - - - - - - - - - - - - - - - - - - - - - - - - - - - - - - 2–29
Installation Steps - - - - - - - - - - - - - - - - - - - - - - - - - - - - - - - - - - - - - - - - - - - - - - - - - - - - - - - - 2–29
Parts List for Dual-Inverter Configurations - - - - - - - - - - - - - - - - - - - - - - - - - - - - - - - - - - - - - - - 2–30
Converting a Single-Inverter Power Distribution Panel to a Dual-Inverter Power Distribution Panel 2–30
DC Wiring for a Dual-Inverter System - - - - - - - - - - - - - - - - - - - - - - - - - - - - - - - - - - - - - - - 2–30
AC Wiring for a Dual-Inverter System - - - - - - - - - - - - - - - - - - - - - - - - - - - - - - - - - - - - - - - 2–32
Parts List for a Triple-Inverter Configuration - - - - - - - - - - - - - - - - - - - - - - - - - - - - - - - - - - - - - 2–34
Converting a Single-Inverter Power Distribution Panel to a Triple-Inverter Power Distribution Panel 2–34
DC Wiring for a Triple-Inverter System - - - - - - - - - - - - - - - - - - - - - - - - - - - - - - - - - - - - - - 2–34
AC Wiring for a Triple-Inverter System - - - - - - - - - - - - - - - - - - - - - - - - - - - - - - - - - - - - - - 2–36
Xanbus and AC Sync Cable - - - - - - - - - - - - - - - - - - - - - - - - - - - - - - - - - - - - - - - - - - - - - - - - - 2–38
Basic Functional Test - Multiple Inverters - - - - - - - - - - - - - - - - - - - - - - - - - - - - - - - - - - - - - - - - - - 2–39
3 Xanbus Network Installation
Xanbus-enabled Devices- - - - - - - - - - - - - - - - - - - - - - - - - - - - - - - - - - - - - - - - - - - - - - - - - - - - - - - 3–2
The Xanbus System - - - - - - - - - - - - - - - - - - - - - - - - - - - - - - - - - - - - - - - - - - - - - - - - - - - - - - - - - - 3–2
Network Components - - - - - - - - - - - - - - - - - - - - - - - - - - - - - - - - - - - - - - - - - - - - - - - - - - - - - - 3–3
Ordering Network Components - - - - - - - - - - - - - - - - - - - - - - - - - - - - - - - - - - - - - - - - - - - - - - - 3–5
Network Layouts - - - - - - - - - - - - - - - - - - - - - - - - - - - - - - - - - - - - - - - - - - - - - - - - - - - - - - - - - 3–5
Multi-Drop Backbone Layout - - - - - - - - - - - - - - - - - - - - - - - - - - - - - - - - - - - - - - - - - - - - - - 3–5
Daisy Chain Layout - - - - - - - - - - - - - - - - - - - - - - - - - - - - - - - - - - - - - - - - - - - - - - - - - - - - 3–6
Installing the Network - - - - - - - - - - - - - - - - - - - - - - - - - - - - - - - - - - - - - - - - - - - - - - - - - - - - - - - - 3–7
Before You Begin the Installation - - - - - - - - - - - - - - - - - - - - - - - - - - - - - - - - - - - - - - - - - - - - - - 3–7
Installation Tools and Materials - - - - - - - - - - - - - - - - - - - - - - - - - - - - - - - - - - - - - - - - - - - - - - - 3–7
Guidelines for Routing the Xanbus Cables - - - - - - - - - - - - - - - - - - - - - - - - - - - - - - - - - - - - - - - - 3–7
Mounting a Network Connector - - - - - - - - - - - - - - - - - - - - - - - - - - - - - - - - - - - - - - - - - - - - - - - 3–8
Installing Xanbus-Enabled Devices - - - - - - - - - - - - - - - - - - - - - - - - - - - - - - - - - - - - - - - - - - - - - 3–9
Completing the Multi-Drop Backbone Layout - - - - - - - - - - - - - - - - - - - - - - - - - - - - - - - - - - - 3–9
Completing the Daisy Chain Layout - - - - - - - - - - - - - - - - - - - - - - - - - - - - - - - - - - - - - - - - 3–10
viii
975-0239-01-01
Contents
4
XW Solar Charge Controller Installation
Installing the Charge Controller - - - - - - - - - - - - - - - - - - - - - - - - - - - - - - - - - - - - - - - - - - - - - - - - - - 4–2
PV Array Requirements - - - - - - - - - - - - - - - - - - - - - - - - - - - - - - - - - - - - - - - - - - - - - - - - - - - - - - - 4–2
Array Size - - - - - - - - - - - - - - - - - - - - - - - - - - - - - - - - - - - - - - - - - - - - - - - - - - - - - - - - - - - - - - 4–2
Array Voltage - - - - - - - - - - - - - - - - - - - - - - - - - - - - - - - - - - - - - - - - - - - - - - - - - - - - - - - - - - - 4–2
Array Current - - - - - - - - - - - - - - - - - - - - - - - - - - - - - - - - - - - - - - - - - - - - - - - - - - - - - - - - - - - 4–2
MPPT Voltage Range - - - - - - - - - - - - - - - - - - - - - - - - - - - - - - - - - - - - - - - - - - - - - - - - - - - - - - 4–3
Mounting - - - - - - - - - - - - - - - - - - - - - - - - - - - - - - - - - - - - - - - - - - - - - - - - - - - - - - - - - - - - - - - - - 4–3
Choosing a Location - - - - - - - - - - - - - - - - - - - - - - - - - - - - - - - - - - - - - - - - - - - - - - - - - - - - - - - 4–3
Removing the Wiring Terminals Cover - - - - - - - - - - - - - - - - - - - - - - - - - - - - - - - - - - - - - - - - - - 4–5
Removing Knockouts - - - - - - - - - - - - - - - - - - - - - - - - - - - - - - - - - - - - - - - - - - - - - - - - - - - - - - 4–5
Mounting the Controller - - - - - - - - - - - - - - - - - - - - - - - - - - - - - - - - - - - - - - - - - - - - - - - - - - - - 4–6
Grounding - - - - - - - - - - - - - - - - - - - - - - - - - - - - - - - - - - - - - - - - - - - - - - - - - - - - - - - - - - - - - - - - 4–8
Wiring - - - - - - - - - - - - - - - - - - - - - - - - - - - - - - - - - - - - - - - - - - - - - - - - - - - - - - - - - - - - - - - - - - - 4–9
DC Terminal Connector Locations - - - - - - - - - - - - - - - - - - - - - - - - - - - - - - - - - - - - - - - - - - - - - 4–9
Wire Size and Over-current Protection Requirements - - - - - - - - - - - - - - - - - - - - - - - - - - - - - - - - - 4–9
Connecting the XW Solar Charge Controller to the Distribution Panel - - - - - - - - - - - - - - - - - - - - 4–12
Commissioning - - - - - - - - - - - - - - - - - - - - - - - - - - - - - - - - - - - - - - - - - - - - - - - - - - - - - - - - - - - - 4–14
Configuration Screens - - - - - - - - - - - - - - - - - - - - - - - - - - - - - - - - - - - - - - - - - - - - - - - - - - - - - 4–14
Commissioning Units Using a XW System Control Panel - - - - - - - - - - - - - - - - - - - - - - - - - - - - - 4–14
5
XW System Accessories Installation
The XW System Control Panel - - - - - - - - - - - - - - - - - - - - - - - - - - - - - - - - - - - - - - - - - - - - - - - - - - 5–2
Materials and Tools Required - - - - - - - - - - - - - - - - - - - - - - - - - - - - - - - - - - - - - - - - - - - - - - - - - 5–3
Choosing a Location - - - - - - - - - - - - - - - - - - - - - - - - - - - - - - - - - - - - - - - - - - - - - - - - - - - - - - - 5–3
Mounting the XW System Control Panel - - - - - - - - - - - - - - - - - - - - - - - - - - - - - - - - - - - - - - - - - 5–3
Verifying the Installation - - - - - - - - - - - - - - - - - - - - - - - - - - - - - - - - - - - - - - - - - - - - - - - - - - - - 5–7
The XW Automatic Generator Start - - - - - - - - - - - - - - - - - - - - - - - - - - - - - - - - - - - - - - - - - - - - - - - 5–7
Preparing an Installation - - - - - - - - - - - - - - - - - - - - - - - - - - - - - - - - - - - - - - - - - - - - - - - - - - - - 5–7
Materials and Tools Required - - - - - - - - - - - - - - - - - - - - - - - - - - - - - - - - - - - - - - - - - - - - - - 5–7
Choosing a Location - - - - - - - - - - - - - - - - - - - - - - - - - - - - - - - - - - - - - - - - - - - - - - - - - - - - 5–8
Routing the Connections - - - - - - - - - - - - - - - - - - - - - - - - - - - - - - - - - - - - - - - - - - - - - - - - - 5–8
Installing the XW Automatic Generator Start - - - - - - - - - - - - - - - - - - - - - - - - - - - - - - - - - - - - - - 5–9
Mounting the Unit - - - - - - - - - - - - - - - - - - - - - - - - - - - - - - - - - - - - - - - - - - - - - - - - - - - - 5–10
Wiring to the 20-contact Connector - - - - - - - - - - - - - - - - - - - - - - - - - - - - - - - - - - - - - - - - - 5–10
Connecting the Generator - - - - - - - - - - - - - - - - - - - - - - - - - - - - - - - - - - - - - - - - - - - - - - - - 5–12
Connecting the Thermostats (optional) - - - - - - - - - - - - - - - - - - - - - - - - - - - - - - - - - - - - - - - 5–13
Connecting an External Shutdown (optional) - - - - - - - - - - - - - - - - - - - - - - - - - - - - - - - - - - 5–13
Connecting an External Manual ON/OFF Switch (optional) - - - - - - - - - - - - - - - - - - - - - - - - - - - 5–14
Connecting an External ON/OFF LED - - - - - - - - - - - - - - - - - - - - - - - - - - - - - - - - - - - - - - - 5–15
Connecting the Wiring Harness to the XW Automatic Generator Start - - - - - - - - - - - - - - - - - 5–16
Connecting the XW Automatic Generator Start to the Xanbus Network - - - - - - - - - - - - - - - - 5–17
Verifying Power Is Available - - - - - - - - - - - - - - - - - - - - - - - - - - - - - - - - - - - - - - - - - - - - - - - - 5–18
975-0239-01-01
ix
Contents
Appendix A Specifications
Electrical Specifications - - - - - - - - - - - - - - - - - - - - - - - - - - - - - - - - - - - - - - - - - - - - - - - - - - - - - XW Series Overload Capability - - - - - - - - - - - - - - - - - - - - - - - - - - - - - - - - - - - - - - - - - - - - - Output Power Versus Ambient Temperature - - - - - - - - - - - - - - - - - - - - - - - - - - - - - - - - - - - - - XW Series Efficiency - - - - - - - - - - - - - - - - - - - - - - - - - - - - - - - - - - - - - - - - - - - - - - - - - - - - Inverting Efficiency (Typical) - - - - - - - - - - - - - - - - - - - - - - - - - - - - - - - - - - - - - - - - - - - - Charging Efficiency (Typical) - - - - - - - - - - - - - - - - - - - - - - - - - - - - - - - - - - - - - - - - - - - Sell Mode Efficiency (Typical) - - - - - - - - - - - - - - - - - - - - - - - - - - - - - - - - - - - - - - - - - - - Mechanical Specifications- - - - - - - - - - - - - - - - - - - - - - - - - - - - - - - - - - - - - - - - - - - - - - - - - - - - Accessories- - - - - - - - - - - - - - - - - - - - - - - - - - - - - - - - - - - - - - - - - - - - - - - - - - - - - - - - - - - - - - -
Appendix B
Wiring Diagrams
Single-Inverter System (Backup only)- - - - - - - - - - - - - - - - - - - - - - - - - - - - - - - - - - - - - - - - - - - - Single-Inverter System Renewable Energy (Solar) - - - - - - - - - - - - - - - - - - - - - - - - - - - - - - - - - - - Single-Inverter System Renewable Energy (Wind or Hydro) - - - - - - - - - - - - - - - - - - - - - - - - - - - - Dual-Inverter System Renewable Energy (Solar) - - - - - - - - - - - - - - - - - - - - - - - - - - - - - - - - - - - - Dual-Inverter System Renewable Energy (Wind or Hydro) - - - - - - - - - - - - - - - - - - - - - - - - - - - - - -
Appendix C
B–3
B–4
B–5
B–6
B–7
Alternate System Configurations
DC Grounding for Single-Inverter Systems - - - - - - - - - - - - - - - - - - - - - - - - - - - - - - - - - - - - - - - - Battery Connections for Single Inverter Systems - - - - - - - - - - - - - - - - - - - - - - - - - - - - - - - - - - - - AC Grounding for Single-Inverter Systems - - - - - - - - - - - - - - - - - - - - - - - - - - - - - - - - - - - - - - - - AC Output Wiring to the Inverter AC Distribution Panel - - - - - - - - - - - - - - - - - - - - - - - - - - - - - - - Generator Wiring to the Inverter - - - - - - - - - - - - - - - - - - - - - - - - - - - - - - - - - - - - - - - - - - - - - - - Utility Wiring to the Inverter Input - - - - - - - - - - - - - - - - - - - - - - - - - - - - - - - - - - - - - - - - - - - - - - Wind or Hydro DC Sources- - - - - - - - - - - - - - - - - - - - - - - - - - - - - - - - - - - - - - - - - - - - - - - - - - - -
x
A–2
A–3
A–4
A–4
A–4
A–5
A–5
A–5
A–6
C–2
C–3
C–4
C–5
C–6
C–7
C–8
975-0239-01-01
Figures
Figure 1-1
Figure 1-2
Figure 1-3
Figure 1-4
Figure 1-5
Figure 1-6
Figure 1-7
Figure 1-8
Figure 2-1
Figure 2-2
Figure 2-3
Figure 2-4
Figure 2-5
Figure 2-6
Figure 2-7
Figure 2-8
Figure 2-9
Figure 2-10
Figure 2-11
Figure 2-12
Figure 2-13
Figure 2-14
Figure 2-15
Figure 2-16
Figure 2-17
Figure 2-18
Figure 2-19
Figure 2-20
Figure 2-21
Figure 2-22
Figure 2-23
Figure 2-24
Figure 2-25
Figure 2-30
Figure 2-31
Figure 2-32
XW Power System Installation Diagram Example - - - - - - - - - - - - - - - - - - - - - - - - - - - - - 1–2
XW Inverter/Charger - - - - - - - - - - - - - - - - - - - - - - - - - - - - - - - - - - - - - - - - - - - - - - - - - 1–3
XW Conduit Box - - - - - - - - - - - - - - - - - - - - - - - - - - - - - - - - - - - - - - - - - - - - - - - - - - - 1–3
Power Distribution Panel and XW Conduit Box - - - - - - - - - - - - - - - - - - - - - - - - - - - - - - - 1–4
XW Connection Kit for INV2 - - - - - - - - - - - - - - - - - - - - - - - - - - - - - - - - - - - - - - - - - - - 1–5
XW Solar Charge Controller- - - - - - - - - - - - - - - - - - - - - - - - - - - - - - - - - - - - - - - - - - - - 1–6
XW System Control Panel - - - - - - - - - - - - - - - - - - - - - - - - - - - - - - - - - - - - - - - - - - - - - 1–6
Automatic Generator Start - - - - - - - - - - - - - - - - - - - - - - - - - - - - - - - - - - - - - - - - - - - - - 1–7
Clearance Requirements - - - - - - - - - - - - - - - - - - - - - - - - - - - - - - - - - - - - - - - - - - - - - - - 2–3
Mounting Plate Dimensions - - - - - - - - - - - - - - - - - - - - - - - - - - - - - - - - - - - - - - - - - - - - 2–4
Mounting the Bracket for the XW Inverter/Charger or Distribution Panel- - - - - - - - - - - - - - 2–5
Mounting the XW Inverter/Charger - - - - - - - - - - - - - - - - - - - - - - - - - - - - - - - - - - - - - - - 2–6
Installing the XW Conduit Box - - - - - - - - - - - - - - - - - - - - - - - - - - - - - - - - - - - - - - - - - - 2–7
Routing Communications Cables - - - - - - - - - - - - - - - - - - - - - - - - - - - - - - - - - - - - - - - - - 2–8
DC Grounding Using a Power Distribution Panel - - - - - - - - - - - - - - - - - - - - - - - - - - - - - 2–12
Battery Temperature Sensor (RJ11) Port Location and Installation - - - - - - - - - - - - - - - - - 2–13
XW Inverter/Charger DC Connections - - - - - - - - - - - - - - - - - - - - - - - - - - - - - - - - - - - - 2–14
Battery Cable Connection - - - - - - - - - - - - - - - - - - - - - - - - - - - - - - - - - - - - - - - - - - - - - 2–14
DC Connections to a Single Inverter Using a XW Power Distribution Panel - - - - - - - - - - - 2–15
XW Inverter/Charger AC Connections and Communications Ports - - - - - - - - - - - - - - - - - 2–16
AC Terminal Block - - - - - - - - - - - - - - - - - - - - - - - - - - - - - - - - - - - - - - - - - - - - - - - - - 2–17
Grounding the AC System using the Distribution Panel- - - - - - - - - - - - - - - - - - - - - - - - - 2–18
Wiring the XW Power Distribution Panel to the Sub-panel or Utility Grid - - - - - - - - - - - - 2–20
Wiring the Inverter to the XW Power Distribution Panel- - - - - - - - - - - - - - - - - - - - - - - - 2–21
Generator Wiring Using a XW Power Distribution Panel- - - - - - - - - - - - - - - - - - - - - - - - 2–22
AUX Port Location - - - - - - - - - - - - - - - - - - - - - - - - - - - - - - - - - - - - - - - - - - - - - - - - - 2–23
Power-up Display - - - - - - - - - - - - - - - - - - - - - - - - - - - - - - - - - - - - - - - - - - - - - - - - - - 2–25
Enable the Inverter - - - - - - - - - - - - - - - - - - - - - - - - - - - - - - - - - - - - - - - - - - - - - - - - - 2–26
Checking AC Voltage - - - - - - - - - - - - - - - - - - - - - - - - - - - - - - - - - - - - - - - - - - - - - - - 2–27
Checking Charging Operation - - - - - - - - - - - - - - - - - - - - - - - - - - - - - - - - - - - - - - - - - - 2–27
Functional Test for Single Inverter Systems- - - - - - - - - - - - - - - - - - - - - - - - - - - - - - - - - 2–28
DC Connections to Dual Inverters - - - - - - - - - - - - - - - - - - - - - - - - - - - - - - - - - - - - - - - 2–31
Dual Inverter AC Breaker Arrangement and Wiring Enlargement with
Multiple AC Input Sources - - - - - - - - - - - - - - - - - - - - - - - - - - - - - - - - - - - - - - - - - 2–32
AC Wiring for Dual-Inverter Systems- - - - - - - - - - - - - - - - - - - - - - - - - - - - - - - - - - - - - 2–33
DC Connections for a Triple-Inverter System - - - - - - - - - - - - - - - - - - - - - - - - - - - - - - - 2–35
Triple-Inverter AC Breaker Arrangement and Wiring Enlargement with
Multiple AC Input Sources - - - - - - - - - - - - - - - - - - - - - - - - - - - - - - - - - - - - - - - - - 2–36
Triple-Inverter AC Breaker Arrangement and Wiring Enlargement with a
Single AC Input Source - - - - - - - - - - - - - - - - - - - - - - - - - - - - - - - - - - - - - - - - - - - 2–37
Wiring an External Bypass Switch for a Triple-Inverter Configuration- - - - - - - - - - - - - - - 2–37
Installing the AC Sync Cable - - - - - - - - - - - - - - - - - - - - - - - - - - - - - - - - - - - - - - - - - - 2–38
Functional Test for Multiple Inverters - Page 1 of 2 - - - - - - - - - - - - - - - - - - - - - - - - - - - 2–41
975-0239-01-01
xi
Figure 2-26
Figure 2-27
Figure 2-28
Figure 2-29
Figures
Figure 2-33
Figure 3-1
Figure 3-2
Figure 3-3
Figure 3-4
Figure 3-5
Figure 3-6
Figure 3-7
Figure 3-8
Figure 3-9
Figure 4-1
Figure 4-2
Figure 4-3
Figure 4-4
Figure 4-5
Figure 4-6
Figure 4-7
Figure 4-8
Figure 5-1
Figure 5-2
Figure 5-3
Figure 5-4
Figure 5-5
Figure 5-6
Figure 5-7
Figure 5-8
Figure 5-9
Figure 5-10
Figure 5-11
Figure 5-12
Figure 5-13
Figure A-1
Figure A-2
Figure B-1
Figure B-2
Figure B-3
Figure B-4
Figure B-5
Figure C-1
Figure C-2
Figure C-3
Figure C-4
Figure C-5
Figure C-6
Figure C-7
xii
Functional Test for Multiple Inverters - Page 2 of 2 - - - - - - - - - - - - - - - - - - - - - - - - - - - 2–42
Network-Managed Power System - - - - - - - - - - - - - - - - - - - - - - - - - - - - - - - - - - - - - - - - 3–2
Xanbus Cable and RJ45 Connector Pin Numbers - - - - - - - - - - - - - - - - - - - - - - - - - - - - - - 3–4
Network Terminators- - - - - - - - - - - - - - - - - - - - - - - - - - - - - - - - - - - - - - - - - - - - - - - - - 3–4
3-Way Network Connector (sample configuration)- - - - - - - - - - - - - - - - - - - - - - - - - - - - - 3–4
Multi-Drop Backbone Layout - - - - - - - - - - - - - - - - - - - - - - - - - - - - - - - - - - - - - - - - - - - 3–6
Daisy Chain Network Layout - - - - - - - - - - - - - - - - - - - - - - - - - - - - - - - - - - - - - - - - - - - 3–6
Recommended Mounting Orientation for Network Connector - - - - - - - - - - - - - - - - - - - - - 3–8
Options for Completing a Multi-Drop Backbone Layout - - - - - - - - - - - - - - - - - - - - - - - - - 3–9
Completing a Daisy-Chain Layout - - - - - - - - - - - - - - - - - - - - - - - - - - - - - - - - - - - - - - - 3–10
Minimum Clearance Requirements - - - - - - - - - - - - - - - - - - - - - - - - - - - - - - - - - - - - - - - 4–4
Removing the Wiring Terminals Cover - - - - - - - - - - - - - - - - - - - - - - - - - - - - - - - - - - - - 4–5
Dimensions and Knockout Locations - - - - - - - - - - - - - - - - - - - - - - - - - - - - - - - - - - - - - - 4–5
Knockout Dimensions - - - - - - - - - - - - - - - - - - - - - - - - - - - - - - - - - - - - - - - - - - - - - - - - 4–6
Mounting the XW Solar Charge Controller - - - - - - - - - - - - - - - - - - - - - - - - - - - - - - - - - - 4–7
XW Solar Charge Controller Safety Ground Connector- - - - - - - - - - - - - - - - - - - - - - - - - - 4–8
DC Connection Terminals - - - - - - - - - - - - - - - - - - - - - - - - - - - - - - - - - - - - - - - - - - - - - 4–9
Connecting Solar DC Sources in the Power Distribution Panel - - - - - - - - - - - - - - - - - - - - 4–13
XW System Control Panel Xanbus Port Locations - - - - - - - - - - - - - - - - - - - - - - - - - - - - - 5–2
Inserting the Mounting Plate - - - - - - - - - - - - - - - - - - - - - - - - - - - - - - - - - - - - - - - - - - - - 5–4
Securing the Mounting Plate - - - - - - - - - - - - - - - - - - - - - - - - - - - - - - - - - - - - - - - - - - - - 5–4
Connecting the Network Cables - - - - - - - - - - - - - - - - - - - - - - - - - - - - - - - - - - - - - - - - - 5–5
Securing the XW System Control Panel - - - - - - - - - - - - - - - - - - - - - - - - - - - - - - - - - - - - 5–5
Surface Mounting the XW System Control Panel - - - - - - - - - - - - - - - - - - - - - - - - - - - - - - 5–6
Connecting the AGS Communications Cable to the XW Series - - - - - - - - - - - - - - - - - - - - 5–7
XW Automatic Generator Start External Connections - - - - - - - - - - - - - - - - - - - - - - - - - - - 5–9
XW Automatic Generator Start Wiring Harness - - - - - - - - - - - - - - - - - - - - - - - - - - - - - - 5–11
External On/Off Switch and LED Wiring Diagram - - - - - - - - - - - - - - - - - - - - - - - - - - - - 5–15
XW Automatic Generator Start External Connections - - - - - - - - - - - - - - - - - - - - - - - - - - 5–16
Connecting the SCP- - - - - - - - - - - - - - - - - - - - - - - - - - - - - - - - - - - - - - - - - - - - - - - - - 5–17
Verifying Power is Available - - - - - - - - - - - - - - - - - - - - - - - - - - - - - - - - - - - - - - - - - - 5–18
XW Series AC Overload Capability - - - - - - - - - - - - - - - - - - - - - - - - - - - - - - - - - - - - - - A–3
Output Power Versus Ambient Temperature - - - - - - - - - - - - - - - - - - - - - - - - - - - - - - - - A–4
Single-Inverter System (Backup only) - - - - - - - - - - - - - - - - - - - - - - - - - - - - - - - - - - - - B–3
Single-Inverter System Renewable Energy (Solar) - - - - - - - - - - - - - - - - - - - - - - - - - - - - B–4
Single-Inverter System Renewable Energy (Wind or Hydro) - - - - - - - - - - - - - - - - - - - - - B–5
Dual-Inverter System Renewable Energy (Solar) - - - - - - - - - - - - - - - - - - - - - - - - - - - - - B–6
Dual-Inverter System Renewable Energy (Wind or Hydro) - - - - - - - - - - - - - - - - - - - - - - B–7
DC Grounding for an Inverter only - - - - - - - - - - - - - - - - - - - - - - - - - - - - - - - - - - - - - - C–2
DC Connections to a Single Inverter - - - - - - - - - - - - - - - - - - - - - - - - - - - - - - - - - - - - - C–3
Grounding the AC System - - - - - - - - - - - - - - - - - - - - - - - - - - - - - - - - - - - - - - - - - - - - C–4
AC Output Wiring to the Inverter AC Distribution Panel - - - - - - - - - - - - - - - - - - - - - - - - C–5
Generator Wiring directly to the Inverter- - - - - - - - - - - - - - - - - - - - - - - - - - - - - - - - - - - C–6
Utility Wiring to the Inverter Input- - - - - - - - - - - - - - - - - - - - - - - - - - - - - - - - - - - - - - - C–7
Connecting Wind or Hydro DC Sources - - - - - - - - - - - - - - - - - - - - - - - - - - - - - - - - - - - C–8
975-0239-01-01
Tables
Table 2-1
Table 2-2
Table 2-3
Table 2-4
Table 2-5
Table 2-6
Table 2-7
Table 2-8
Table 2-9
Table 2-10
Table 2-11
Table 3-1
Table 3-2
Table 3-3
Table 4-1
Table 4-2
Table 4-3
Table 4-4
Table 4-5
Table 5-1
Table 5-2
Table 5-3
Table 5-4
Table 5-5
Table 5-6
Table A-1
Table A-2
975-0239-01-01
Mounting Plate Fastener Recommendations- - - - - - - - - - - - - - - - - - - - - - - - - - - - - - - - - 2–4
Recommended Battery Cable Size Versus Length- - - - - - - - - - - - - - - - - - - - - - - - - - - - 2–10
Battery Cable (in conduit) to Maximum Breaker/Fuse Size - - - - - - - - - - - - - - - - - - - - - 2–10
Torque Values for AC Wiring (AC Terminals and Ground Bar) - - - - - - - - - - - - - - - - - - 2–10
Torque Values for the Chassis Ground Lug - - - - - - - - - - - - - - - - - - - - - - - - - - - - - - - - 2–10
Torque Values for the Inverter Battery Terminals - - - - - - - - - - - - - - - - - - - - - - - - - - - - 2–10
Torque Values for AC Disconnects and AC Breakers - - - - - - - - - - - - - - - - - - - - - - - - - 2–11
Torque Values for the Ground Bus, AC Neutral Bus, DC Negative Bus, and
DC Positive Bus in the XW Power Distribution Panel - - - - - - - - - - - - - - - - - - - - - - - - - -2–11
Torque Values for the Power Distribution Bars in the XW Power Distribution Panel - - - - 2–11
Torque Values for the Battery Cables to the DC Negative Bus, and
DC Positive Bus in the XW Power Distribution Panel - - - - - - - - - - - - - - - - - - - - - - - - - -2–11
User Connector Terminals and Functions - - - - - - - - - - - - - - - - - - - - - - - - - - - - - - - - - 2–24
T568A Standard Wiring - - - - - - - - - - - - - - - - - - - - - - - - - - - - - - - - - - - - - - - - - - - - - - 3–3
Xanbus Network Components and Part Numbers - - - - - - - - - - - - - - - - - - - - - - - - - - - - - 3–5
Minimum and Maximum Cable Length- - - - - - - - - - - - - - - - - - - - - - - - - - - - - - - - - - - - 3–8
MPPT Operational Window - - - - - - - - - - - - - - - - - - - - - - - - - - - - - - - - - - - - - - - - - - - 4–3
Minimum Clearance Requirements- - - - - - - - - - - - - - - - - - - - - - - - - - - - - - - - - - - - - - - 4–4
Recommended Circuit Breakers for the XW Solar Charge Controller- - - - - - - - - - - - - - - 4–10
One-Way Wire Distance and Wire Size for a 24 Vdc System - - - - - - - - - - - - - - - - - - - - 4–11
One-Way Wire Distance and Wire Size for a 48 Vdc System - - - - - - - - - - - - - - - - - - - - 4–11
Circuit Limitations- - - - - - - - - - - - - - - - - - - - - - - - - - - - - - - - - - - - - - - - - - - - - - - - - 5–10
Required Wiring Size Based on Length of Cable - - - - - - - - - - - - - - - - - - - - - - - - - - - - 5–11
Contact Numbers and Functions- - - - - - - - - - - - - - - - - - - - - - - - - - - - - - - - - - - - - - - - 5–11
Wiring for Connecting Thermostats - - - - - - - - - - - - - - - - - - - - - - - - - - - - - - - - - - - - - 5–13
Wiring for Connecting an External Shutdown - - - - - - - - - - - - - - - - - - - - - - - - - - - - - - 5–13
Wiring for Connecting an External Manual ON/OFF Switch - - - - - - - - - - - - - - - - - - - - 5–14
XW Power System Electrical Specifications - - - - - - - - - - - - - - - - - - - - - - - - - - - - - - - - A–2
XW Power System Mechanical Specifications - - - - - - - - - - - - - - - - - - - - - - - - - - - - - - - A–5
xiii
xiv
1
Introduction
Chapter 1, “Introduction” lists and describes the components and basic
features of the XW Power System.
For this Topic
See....
“System Overview”
page 1–2
“System Components and Accessories”
page 1–3
Introduction
System Overview
The XW Power System consists of several devices, components, and optional accessories
that, when installed together, create a renewable energy power system that can be
customized to suit nearly any application—off grid, grid tied, or backup. Up to three
inverters can be installed in parallel to create larger 120/240 V 3-wire, single-phase
systems allowing for increased capacity.
System Diagram
Figure 1-1 XW Power System Installation Diagram Example
1–2
975-0239-01-01
System Components and Accessories
System Components and Accessories
XW Inverter/Charger
The XW Inverter/Charger is a modular “building block” sine-wave inverter/charger that
can be used for both residential and commercial stand-alone, grid-backup, and grid-tie
applications with battery energy storage. The XW Series is a self-contained DC to AC
inverter, battery charger, and AC transfer switch. Up to three inverters can be installed in
parallel to create larger 120-240-volt, 3-wire, single-phase systems allowing for increased
capacity.
Figure 1-2 XW Inverter/Charger
A Battery Temperature Sensor (FGA # 808-0232-02) is also included with the XW
Inverter/Charger. The Battery Temperature Sensor monitors the temperature of the battery
bank and adjusts the charging accordingly. See page 2–13 for installation instructions for
this accessory.
XW Conduit Box
A conduit box (FGA # 865-1025) is available to enclose the bottom of the XW
Inverter/Charger and protect the cabling. Use of the conduit box may be required
depending on the local electrical code. Be sure to consult with the local electrical authority
to ensure the installation is code-compliant.
Figure 1-3 XW Conduit Box
975-0239-01-01
1–3
Introduction
The XW Conduit Box comes in two pieces and mounts directly to the bottom of the
inverter/charger with keyhole slots and screws. It is secured to the inverter by two
#10-32 screws and is secured to the wall by two screws (not provided).
Internal wire barriers (or raceways) are included to keep communications wires separate
from AC and DC power wires. The XW Conduit Box also includes multiple cable strap
points.
XW Power Distribution Panel Panel and XW Conduit Box
The XW Power Distribution Panel (FGA: 865-1015) includes a mounting plate and XW
Conduit Box. It is factory wired and labelled with everything to support a code-compliant
single-inverter installation. It is designed to mount on the right side of the inverter/charger,
but it can also be configured to mount on the left side. Internal wiring and breakers can be
added to expand the XW Power System with up to three inverters, four charge controllers,
or other equipment to support 120/240-volt, 3-wire, single-phase systems.
The XW Power Distribution Panel and XW Conduit Box interface with:
•
•
•
XW4024, XW4548, and XW6048 inverter/chargers
XW Solar Charge Controllers (requires customer supplied breakers and wiring)
C-Series Charge Controllers (requires customer supplied breakers and wiring).
Internal wire barriers (or raceways) are included to keep communications wires separate
from AC and DC power wires.
XW Power Distribution Panel
XW Power Distribution Panel includes:
•
Power Distribution Panel enclosure with a field-reversible panel door
•
Mounting Plate
•
XW Conduit Box
XW Conduit Box
Mounting Plate
The enclosure comes pre-wired with:
•
3x 60A, 120/240 Vac, 2-pole, Square-D, Type QOU, DIN-rail mounted
AC breakers (pre-wired to connect to one XW inverter)
•
1x GJ250A 160 Vdc, 3/8" stud DC breaker
•
1x Ground terminal bus bar
•
1x Neutral terminal bus bar
•
1 pair #4/0 AWG Battery Cables
The panel door can be mounted on the right or left side of the XW Power
Distribution Panel.
AC Knockout slots = 8 (for dual 60A Square D, type QOU breakers)*
DC Knockout slots = 8 small (for 60A DC breakers) and 3 large (for GJ breakers)
XW PDP Dimensions:
30" (761mm) H x 16" (406mm) W x 8 ¼" (210mm) D
Depth from the wall = 8 ¾" (223 mm)
*AC Breakers cannot exceed 60A.
Figure 1-4 Power Distribution Panel and XW Conduit Box
1–4
975-0239-01-01
System Components and Accessories
XW Connection Kit for INV2
The XW Connection Kit for Inv2 (FGA # 865-1020) is the extension kit required for
connecting a second or third XW Inverter/Charger in the same system.
XW Conduit Box
XW Connection Kit includes:
•
XW Conduit Box with raceway barriers and cable strap
connections points,
•
3x 60 A, 120/240 Vac, 2-pole, Square-D, Type QOU, Din-Rail
mountable, AC breakers (includes bypass plate)
•
#6 AWG AC wiring to connect the inverter to the AC breakers
(includes 4 conduit bushings)
•
4x Power Distribution Bars (replaces factory-installed bars)
•
1x GJ250A 160 Vdc, 3/8" stud DC breaker
•
1x Bus Bar for DC positive
•
1 pair #4/0 AWG battery cables
•
AC Sync and Xanbus cables (not shown)
60A, 120/240Vac AC
Breakers
AC Bypass Plate
Power Distribution Bars
#6 AWG AC Wiring
15/16" bushing for AC sync
and Xanbus knockouts
GJ250A DC breaker
1-3/8" bushings for AC
Wiring knockouts
#4/0 AWG battery cables
DC Positive Bus Bar
Figure 1-5 XW Connection Kit for INV2
975-0239-01-01
1–5
Introduction
XW Solar Charge Controller
The XW Solar Charge Controller (FGA # 865-1030) is a 60 amp charge controller with
integrated PVGFP and separate Battery Temperature Sensor. The XW Solar Charge
Controller can be used with 12-, 24-, 36-, 48-, and 60-volt DC battery systems. However,
the XW Inverter/Charger can only work at 24 or 48 volts depending on the model. When
the XW Solar Charge Controller is used with the XW Inverter/Charger, it is limited to 24or 48-volt battery banks. The XW Solar Charge Controller will automatically detect the
24- or 48-volt settings.
Figure 1-6 XW Solar Charge Controller
XW System Control Panel
The XW System Control Panel features a graphical, backlit liquid crystal display that
displays system configuration and diagnostic information for all devices connected to the
network. When installed as an XW Power System accessory, the XW System Control
Panel eliminates the need for separate control panels for each device and gives a single
point of control to set up and monitor an entire XW Power System.
FGA Number:
865-1050
Figure 1-7 XW System Control Panel
1–6
975-0239-01-01
System Components and Accessories
XW Automatic Generator Start
The XW Automatic Generator Start can automatically activate a generator to provide an
XW Series Inverter/Charger with power to recharge depleted batteries or assist with heavy
loads. The XW Automatic Generator Start adds intelligence to power management and
eliminates time spent monitoring batteries and inverter loads.
The XW Automatic Generator Start is compatible with popular generators, and can be
configured to start the generator in response to low battery voltage, thermostat operation,
or load size on the inverter battery. A quiet time setting prevents the generator from
starting at inconvenient times. LEDs display the status of the XW Automatic Generator
Start, while all user-defined settings are programmed through the XW System Control
Panel.
FGA Number:
865-1060
Figure 1-8 Automatic Generator Start
Generator
The generator should be a 120/240V, 2-wire or 3-wire generator with Auto Start capability.
Important: Do not use a 120-volt only generator. The inverter will not accept
power from a generator of this kind.
The generator should also supply a Generator Run signal. This signal is used by the XW
Automatic Generator Start to detect whether the generator is running. Some generator
manufacturers refer to this signal as the Hour Meter Signal or Switched B+.
Generator
Compatibility
The XW Automatic Generator Start supports most two and three-wire generator starters.
Some manufacturers include, but are not limited to, Onan (Quiet Diesel, gasoline, and LP),
Power Tech, Generac, Northern Lights, Fisher Panda, Westerbeke, Kohler, Honda, and
Yamaha. Check with the generator manufacturer to ensure the generator in question
includes automatic starting capabilities.
XW System Control
Panel
A XW System Control Panel is required to configure the XW Automatic Generator Start
and monitor generator starting and stopping activity.
The XW System Control Panel also provides real-time clock information for the XW
Automatic Generator Start Quiet Time and Exercise Time features.
975-0239-01-01
1–7
1–8
2
Inverter/Charger
Installation
Chapter 2, “Inverter/Charger Installation” describes how to mount and install
the XW Inverter/Charger, and the XW Power Distribution Panel and XW
Conduit Box.
For this Topic
See....
“Pre-Installation”
page 2–2
“Step 1: Installing the Mounting Plate”
page 2–4
“Step 2: Mounting the Inverter”
page 2–6
“Step 3: Mounting the XW Power Distribution Panel and XW page 2–7
Conduit Box”
“Step 4: Wiring the Inverter”
page 2–8
“Step 5: Installing Additional Inverters”
page 2–29
Inverter/Charger Installation
Pre-Installation
Before installing the XW Inverter/Charger, read all instructions and cautionary markings
located in this manual.
Important: Be sure to obtain the appropriate permits, if necessary, prior to
starting this installation. Installations must meet all local codes and standards.
Installations of this equipment should only be performed by skilled personnel
such as qualified electricians and Certified Renewable Energy (RE) System
installers.
WARNING: Personal Injury
The XW Inverter/Charger weighs approximately 120 pounds (54 kg). To prevent personal injury,
always use proper lifting techniques and have someone available to assist with lifting during
installation.
Location
The XW Inverter/Charger is certified for indoor (heated or unheated) installations only.
Close to battery
bank
Locate the inverter as close to the batteries as possible in order to keep the battery cable
length short. The maximum recommended battery cable length is 10 feet (3 m).
WARNING: Explosion and Corrosion Hazard
Do not locate the inverter directly above the batteries or in the same compartment as vented
batteries.
Locate any electronic equipment susceptible to radio frequency and electromagnetic
interference as far away from the inverter as possible.
Fire safety
Do not locate the inverter near readily flammable materials such as cloth, paper, straw, or
plastic sheeting. Flammable materials should be kept a minimum distance of 24 inches
(60 cm) from the top surface and 12 inches (30 cm) from either side surface and the front
of the XW Inverter/Charger.
Knockout Preparation
Remove your choice of knockouts from the chassis to facilitate conduit installation for
wire runs. Ensure no debris from this procedure remains inside the inverter enclosure.
Important: Do not drill, cut, or punch holes into the XW power distribution
Panel. Use only the knockouts provided for conduit entry.
2–2
975-0239-01-01
Pre-Installation
Clearance Requirements
Provide a minimum clearance of 6 inches (15 cm)—12 inches is preferred—around the top
and 6 inches (15 cm) at the bottom of the inverter for ventilation. There must be at least
three feet of clearance in front of the inverter. Ensure that the vents are not obstructed with
foreign objects and that the minimum clearances are met.
Figure 2-1 Clearance Requirements
Mounting
The XW Power System is designed to be mounted on a vertical surface. The supporting
surface must be strong enough to support a minimum of 500 pounds (227 kg). To facilitate
installation, a wall mounting plate (Xantrex p/n 210-0462-01-01) is provided for each XW
Inverter/Charger and XW Power Distribution Panel. The mounting plate and hardware on
the XW Inverter/Charger and XW Power Distribution Panel are designed to meet
standards for structural and seismic stability. When properly installed, the system also
meets Section 59 of UL 1741 for Static Loads.
975-0239-01-01
2–3
Inverter/Charger Installation
Step 1: Installing the Mounting Plate
Each XW Inverter/Charger and XW Power Distribution Panel requires a separate
mounting plate. This bracket is first attached to the wall, then the inverter/charger or
distribution panel is attached to the wall bracket.
The wall bracket is attached to the wall with lag bolts or other fasteners, provided by the
installer. A minimum of four ¼-inch diameter fasteners are required. The fasteners must
be sufficiently strong to support 500 pounds.
The wall bracket has mounting holes spaced 16 inches (40 cm) apart and is designed to
span two wall studs spaced 16 inches on-center. Additional mounting holes are also
provided for flexibility in mounting options. If the wall does not have 16-inch on-center
studs, the installer will need to provide adequate supports for the brackets. For example, a
sheet of plywood can be attached to the wall, and the wall brackets can then be attached to
plywood.
Both the XW Inverter/Charger and XW Power Distribution Panel use the same wall
bracket. The brackets are designed to interlock (as shown in Figure 2-3), so that additional
mounting plates are easily installed without additional measuring or levelling.
The type of fastener required to secure the mounting plate varies according to the vertical
surface and wall structure of your installation location.
Table 2-1 Mounting Plate Fastener Recommendations
Number of Screws
Per Bracket
Structure
Required Fastener
Wood studs at 16" (on center - O.C.)
1/4" Ø × 3 1/2" long lag screw Four
Wood studs not at 16" O.C. (3/4" minimum
plywood panel required)
1/4" Ø × 1" long wood screw
Steel studs at 16" O.C. (minimum 18 gauge) 1/4" Ø self-drilling screw
Six
Four
16 (406)
4 1/2 (115)
2 1/4
(57)
1 3/4 (45)
6 7/8
(175)
9 3/16
(233)
6 (153)
2 (49)
3/4 (19)
17 (432)
all measurements in inches
(millimeters)
Figure 2-2 Mounting Plate Dimensions
2–4
975-0239-01-01
Step 1: Installing the Mounting Plate
Wall studs 16" on center behind
wallboard
Side View
2 × 4 wall stud
Wallboard
Plywood
(optional)
mounting plate
Multiple mounting plates should fit together
as shown.
Add ¾" plywood if additional support is
needed.
60" (152.4 cm) from floor
puts the inverter display
panel at approx. 65"
high.
1
Locate the wall studs.
2
If necessary, enhance the support surface with a ¾" plywood panel
secured to the wall studs. Plywood should span at least three wall studs.
3
Use hardware sized to support a minimum of 500 lbs (not provided) to
secure the plywood to the wall.
4
Using a level, secure the first mounting bracket to the wall. Use
recommended anchoring hardware to secure the plate (see Table 2-1).
5
Mount the next bracket adjacent to the first one. The brackets are designed
to interlock, so additional mounting brackets are easily installed without
additional measuring or levelling.
Figure 2-3 Mounting the Bracket for the XW Inverter/Charger or Distribution Panel
975-0239-01-01
2–5
Inverter/Charger Installation
Step 2: Mounting the Inverter
3
2
1
1
Align the flange on the back of the XW Inverter/Charger with the bottom edge of the
mounting plate.
2
Lower the flange on the inverter onto the mounting plate.
CAUTION: Before releasing the full weight of the unit, ensure the inverter is seated
properly on the mounting plate.
3
Secure the top of inverter with two #10 self-tapping screws (supplied).
Figure 2-4 Mounting the XW Inverter/Charger
2–6
975-0239-01-01
Step 3: Mounting the XW Power Distribution Panel and XW Conduit Box
Step 3: Mounting the XW Power Distribution Panel and XW Conduit
Box
Mount the XW Distribution Panel on the mounting bracket following the same procedure
in Step 2.
When mounting the XW Conduit Box as shown in Figure 2-5, it is not necessary to attach
the front panel until all wiring is complete.
xantrex
1
Attach the back panel of the
XW Conduit Box to the bottom
of the inverter with two screws
through the keyhole slots under
the back panel top and the
corresponding holes in the
bottom of the inverter (A).
Secure the bottom edge of the
back panel to the wall using two
screws (B).
2
Attach the front panel of the XW
Conduit Box by sliding the
bottom lip of the front panel over
the lower edge of the back
panel. Align the two holes in the
front panel with the two holes in
the back panel. Use the two
#10-32 screws provided to
secure the front panel to the
back panel.
xantrex
NEUTRALS
?
AC
GND?
Gri d (AC1)
I nverti ng
Gen (AC2)
Flashing
Faul t /
Warni ng
Chargi ng
Equali ze
= sell
Batt ery
Mounting
Plate
AC
OU
T
Mounting
GE
UG
GE
Plate
AC
UG
N
OU
N
IN
IN OU
T
IN
T
Power Distribution
Block?
P
V
PVGFP O
U
T
Hybrid Inverter /Charger
P
V
I
N
DC
DC
OU
IN
T
Power Distribution Panel
NEUTRALS ?
GE
AC
UG
GE
AC
UG N
OU
OU
N
IN P Power
IN Distribution
OU
T
TP
IN
T
Block?
DC
V
V
DC
OU
PVGFP O
I
IN
T
U
N
T
A
DC
GND
?
B
xantrex
AC
GND?
xantrex
NEUTRALS
?
Gri d (AC1 )
Inverti ng
Fa
l shing =sell
Gen (AC2 )
F ault /
Warni ng
Equal i ze
Chargi ng
Batt ery
Mounting
Plate
AC
OU
T
Mounting
GE
UG
GE
AC
UGPlate
N
OU
N
IN
IN OU
T
IN
T
Power Distribution
Block?
P
V
PVGFP O
U
T
Hybrid Inverter /Charger
P
V
I
N
DC
DC
OU
IN
T
Power Distribution Panel
NEUTRALS ?
GE
AC
UG
GE
AC
UG N
OU
OU
N
OU
IN P Power
IN Distribution
T
TP
IN
T
Block?
DC
V
V
DC
OU
PVGFP O
I
IN
T
U
N
T
DC
GND
?
Figure 2-5 Installing the XW Conduit Box
975-0239-01-01
2–7
Inverter/Charger Installation
Step 4: Wiring the Inverter
This section provides procedures for making AC and DC connections between the XW
Inverter/Charger and the power distribution panel using the cables that are pre-installed in
the distribution panel. This section also assumes that the XW Conduit Box was installed in
the previous section.
For diagrams and information about installing the inverter/charger without the XW
Conduit Box and XW Power Distribution Panel, see Appendix C.
Important: Communication and signal cables must be segregated from all DC and
AC wiring. Therefore, a small raceway has been included in the design of both the
XW Power Distribution Panel and the XW Conduit Box to separate the
communications cables from the power cables. This is a small raceway run built into
the bottom of both the XW Power Distribution Panel and the XW Conduit Box and is
held in place by a single screw at the top of the raceway.
Installation Tip
Before making the AC or DC cable connections, route the communications cables through
the raceway, but do not connect them to their components until after all the inverter
connections are made. Once the AC and DC connections are made the run becomes
difficult to access. Use different colors for the communications cables (or cable tags) to
help make them easier to identify.
Route the communications cables for any
accessories being installed BEFORE
making AC or DC Connections.
IMPORTANT: When routing communications cables through the XW
Power Distribution Panel, the raceway conduit must be used to keep the
communications cables separate from the power cables.
XW System
Control Panel
Do not connect to the
XW Automatic
Generator Start until
all other connections
have been made.
Do not connect to
the XW System
Control Panel until
all other
connections have
been made.
XW Automatic
Generator Start
Raceway for Shunt
Sense cable*.
Raceway exits the
panel through the
back.
See Figure 2-12 on
page 2–16 for an
illustration showing
the Communications
Ports and where the
accessories connect.
Raceway for Communications
Cables*
Raceway for Communications
Cables*
Do not connect to
the BTS to the
batteries until the
battery bank has
been prepared and
is ready to connect
to the inverter.
BTS
*To remove, remove the screws at
the top (Or side) of the raceway.
Figure 2-6 Routing Communications Cables
2–8
975-0239-01-01
Step 4: Wiring the Inverter
Batteries
See the FAQs section of the Xantrex Web site for information on determining battery bank
requirements.
Consider the following recommendations for battery use.
•
•
•
Use only the deep discharge types for inverter applications.
Use the same battery type for all batteries in the bank.
Use only batteries from the same lot and date in your battery bank. This information is
usually printed on a label located on the battery.
CAUTION: Damage to Equipment
The XW Inverter/Charger is intended to operate with batteries as its source of DC power. Do not
connect DC power sources, such as PV arrays, wind turbines, or micro-hydro turbines, directly to
the XW Inverter/Charger without a battery. Connect DC power sources to a charge controller such
as the XW Solar Charge Controller instead. If DC power sources are connected directly to the
inverter, the DC rating of the inverter can be exceeded and the inverter can be damaged.
Battery Bank Requirements
The DC voltage of the inverter must match the nominal voltage of the system and all
battery-connected devices. If the inverter is a 24-volt inverter, then the battery bank and all
battery-connected devices in the system need to be configured for 24 volts.
Important: The minimum recommended battery bank is 100 Ah. The inverter is designed to
operate with batteries and should not be operated without them. Also, do not allow the battery
bank to become completely discharged. If the voltage of the battery bank falls below 10 volts, the
XW Power System will not operate.
Battery Cable Requirements
WARNING: Fire Hazard
Undersized cables can overheat and melt, creating a fire hazard when subjected to heavy (peak)
loads. Always use a cable of proper size and length, rated for the amperage of the inverter and
batteries.
Important: Use only fine-stranded copper cables for battery and inverter DC connections. Do
not use coarse-stranded wire, as the lack of flexibility may damage battery and inverter terminals.
Battery cable length
Runs should be kept as short as practical. Length should not exceed 10 feet (3 m). For best
performance, the positive and negative cables should run alongside each other. Avoid
cable loops.
Battery cable lugs
Battery cables must have crimped copper compression lugs or crimped and soldered
copper compression lugs. Soldered connections alone are not acceptable. Lugs must be
rated for use with fine-stranded cable.
Overcurrent
protection
For safety and compliance with regulations, battery overcurrent protection is required.
Fuses and disconnects must be sized to protect the wiring in the system and are required to
open before the wire reaches its maximum current carrying capability.
975-0239-01-01
2–9
Inverter/Charger Installation
Terminal covers
Color-coded snap-on DC terminal covers are provided to prevent accidental contact with
the terminals. Terminal covers are required for all installations, even if a XW Conduit Box
is used. It is also recommended that the shank of the ring terminals (cable lugs) be covered
with heat shrink or some other form of insulation.
Table 2-2 Recommended Battery Cable Size Versus Length
Inverter Model
Up to 5 Feet (1.5 m) (90°C wire)
Up to 10 Feet (3 m) (90°C wire)
XW4024
#4/0 AWG (120
XW4548
#2/0 AWG (70 mm2)
#4/0 AWG (120 mm2)
XW6048
#4/0 AWG (120 mm2)
#4/0 AWG (120 mm2)
mm2)
#4/0 AWG (120 mm2)
Important: The NEC/CEC requires both overcurrent protection and a disconnect switch for
residential and commercial electrical systems. These items are not supplied as part of the inverter,
but are included in the XW Power Distribution Panel.
Table 2-3 Battery Cable (in conduit) to Maximum Breaker/Fuse Size
Cable Size
Required
Maximum Breaker/Fuse
Size
#2/0 (00) AWG
175 amps
#4/0 (0000) AWG
250 amps
Torque Values for the XW Series Inverter/Charger
Table 2-4 Torque Values for AC Wiring (AC Terminals and Ground Bar)
Wire Size
Torque Value
AWG
In-lb
N-m
14–10
35
4
8
40
4.5
6–4
45
5
Table 2-5 Torque Values for the Chassis Ground Lug
Wire Size
Torque Value
AWG
In-lbs
N-m
6-4
45
5.1
3-2
50
5.6
Table 2-6 Torque Values for the Inverter Battery Terminals
Torque Value
2–10
Ft-lbs
N-m
15
20.4
975-0239-01-01
Step 4: Wiring the Inverter
Torque Values for the XW Power Distribution Panel
Table 2-7 Torque Values for AC Disconnects and AC Breakers
Wire Size
Torque Value
AWG
In-lb
N-m
16–10
45
5
8
45
5
6–4
45
5
Table 2-8 Torque Values for the Ground Bus, AC Neutral Bus, DC Negative Bus, and DC
Positive Bus in the XW Power Distribution Panel
Wire Size
Torque Value
AWG
In-lbs
N-m
14 - 10
35
4.0
8
40
4.5
6-4
45
5.1
3 - 2/0
50
5.6
Table 2-9 Torque Values for the Power Distribution Bars in the XW Power Distribution
Panel
Wire Size
Torque Value
AWG
In-lbs
N-m
14 - 10
35
4.0
8
40
4.5
6-4
45
5.1
3 - 2/0
50
5.6
Table 2-10 Torque Values for the Battery Cables to the DC Negative Bus, and DC
Positive Bus in the XW Power Distribution Panel
Torque Value
Ft-lbs
N-m
15
20.4
Inverter Grounding
Important: The grounding requirements vary by country and by application. All installations
must comply with national and local codes. Consult local and national codes for specific grounding
and bonding requirements for the desired installation.
Backfeed Protection Requirements
Important: Installers must make allowance for the amount of power that can
be fed into a distribution panel and the means and location for feed-in, in
accordance with NEC 2005 article 690.64 or similar requirements of the local
electrical code.
975-0239-01-01
2–11
Inverter/Charger Installation
Wiring the Inverter to the XW Power Distribution Panel
Important: If a XW Conduit Box is installed, communication and Battery Temperature Sensor
cables must run through the raceway at the rear of the XW Conduit Box. Before making AC and
DC connections, route all communication and Battery Temperature Sensor cables through the
raceways. The raceways becomes more difficult to access after all AC and DC wiring is completed.
Grounding the DC System
The inverter’s chassis ground bar (see Figure 2-7) is used to connect the chassis of the
inverter to the DC grounding system. The terminal accepts wires from #14 AWG to
#2 AWG.
A
See Table 2-5 on page 2–10
for torque values for the AC
Chassis Ground.
B
B
See Table 2-6 on page 2–10
for torque values for the
Ground bar in the XW Power
Distribution Panel.
A
Actual ground requirements may vary.
Figure 2-7 DC Grounding Using a Power Distribution Panel
2–12
975-0239-01-01
Step 4: Wiring the Inverter
Installing the Battery Temperature Sensor
The Battery Temperature Sensor (BTS) port is for connecting to the Battery Temperature
Sensor, which regulates battery charging based on battery temperature. Installing a sensor
extends battery life by preventing overcharging in warm temperatures and undercharging
in cold temperatures. This port is also considered part of the DC interface (see Figure 2-9).
To install the Battery Temperature Sensor:
1. Pass the end of the Battery Temperature Sensor cable through a conduit hole and insert
the Battery Temperature Sensor plug into the Battery Temperature Sensor port.
2. Route the cable to the battery enclosure and connect the ring terminal on the Battery
Temperature Sensor directly to a battery terminal (recommended), or use the adhesive
backing on the sensor back to attach the sensor to any side of the battery to be
monitored.
If using the adhesive backing, install the Battery Temperature Sensor on the side of the
battery below the electrolyte level. It is best to place the sensor between batteries and
place the batteries in an insulated box to reduce the influence of the ambient
temperature outside the battery enclosure.
Battery Temperature
Sensor Port (RJ11)
1
RJ11 jack
Note: If other Xanbus
connected components
supply a BTS or are BTS
enabled, it is not necessary
to install all of them at once.
Only one BTS needs to be
installed.
However, if multiple
battery-banks are being
used, multiple sensors can
be installed. In which case,
the system will use the
highest temperature from
all the input as it’s
operational parameter.
2
If using the adhesive backing, install
the Battery Temperature Sensor on
the side of the battery below the
electrolyte level.
Figure 2-8 Battery Temperature Sensor (RJ11) Port Location and Installation
975-0239-01-01
2–13
Inverter/Charger Installation
Making DC Connections
This section describes how to make DC connections between the inverter/charger and the
power distribution panel (using the pre-installed DC cables in the distribution panel),
between the distribution panel to the batteries (using battery cables provided by the
installer—see Table 2-2 on page 2–10). This section also provides procedures for
installing the battery temperature sensor. See Appendix C, “Alternate System
Configurations” if the installation will not be including an XW Power Distribution Panel.
WARNING: Shock Hazard
Ensure that all AC and DC breakers are switched OFF before connecting or disconnecting the
battery cables and that all sources of power (both AC and DC) are disconnected from the inverter.
Positive (+, red)
battery terminal
Negative (–, black)
battery terminal
BTS port (RJ11)
Battery Temperature
Sensor (included)
(FGA #808-0232-02)
Chassis Ground
Lug
Bottom View
Figure 2-9 XW Inverter/Charger DC Connections
To connect the XW Power Distribution Panel to the inverter:
1. Connect the pre-installed DC cables from the XW Power Distribution Panel to the
inverter DC terminals. Figure 2-10 shows the proper stacking order of hardware. Be
careful to observe proper polarity.
2. Attach the DC terminal covers.
3. Route the DC cables from the battery—with the cables not connected to the battery—
and connect them to the XW Power Distribution Panel: negative to negative bus,
positive to the input end of the DC breaker. To properly attach and torque the positive
cable to the DC breaker, you may need to temporarily remove the breaker from the
rail.
4. Perform the procedures in “Making AC Connections” before connecting the DC
cables from the XW Power Distribution Panel to the battery.
Ensure nothing is between the terminal
surface and the battery cable lug
Battery cable lug
Flat washer
Terminal surface
Shrink-wrap to color-code
the cable
Copper compression lug
Split-ring washer
3/8-15 x 5/8” bolt (supplied)
Figure 2-10 Battery Cable Connection
2–14
975-0239-01-01
Step 4: Wiring the Inverter
CAUTION: Damage to Equipment
Do not put anything between the battery cable lug and the terminal surface. Overheating of the
terminal may occur. Do not apply any type of antioxidant paste until after the battery cable wiring
is tightened. The same applies for all DC connections. Do not over-tighten; observe all
recommended torque values.
CAUTION: Reverse Polarity Damage
Before making the final DC connection or closing the DC breaker or disconnect, check cable
polarity at both the battery and the inverter/charger. Positive (+) must be connected to positive (+).
Negative (–) must be connected to negative (–).
Reverse polarity damage is not covered by warranty.
Actual cable requirements may vary.
XW Power Distribution Panel
(shown with door and front panel removed.)
B
See Table 2-8 on page 2–11 for
torque values for the Positive
and Negative Bus in the XW
Power Distribution Panel.
B
C
See Table 2-10 on page 2–11 for
torque values for the Battery
Connections to the Positive and
Negative Bus in the XW Power
Distribution Panel.
A
C
A
See Table 2-6 on page 2–10
for torque values for the
inverter battery connections.
Torque connections to the battery terminals according
to the battery manufacturer’s recommendations.
Figure 2-11 DC Connections to a Single Inverter Using a XW Power Distribution Panel
975-0239-01-01
2–15
Inverter/Charger Installation
Making AC Connections
This section describes how to make AC connections between the XW Inverter/Charger
and the XW Power Distribution Panel (using the pre-installed AC wiring in the XW Power
Distribution Panel) and between the XW Power Distribution Panel and the AC distribution
panel, or sub-panel (using wiring provided by the installer). See Appendix C, “Alternate
System Configurations” if the installation will not be including an XW Power Distribution
Panel.
CAUTION: Damage to the Inverter
The inverter’s AC output must never be wired to the utility or generator output. This will cause
severe damage to the inverter which is not covered under warranty.
Do not use a GFCI equipped AC source to power either the grid or generator inputs. The
AC input filters on the XW may cause nuisance tripping of ground fault protected outputs.
AC Connections and Communication Ports
AC Connections
The AC terminal block includes three terminals each (L1, L2 and Neutral) for AC Grid
input, AC Generator input, and AC Load connections. The neutrals are connected to each
other, requiring only one neutral connection when installed with an XW Power
Distribution Panel. Without the XW Power Distribution Panel, additional neutral
connections may be required at the input sources.
Communication
Ports
Four communications ports and one AUX Port are located on the bottom of the inverter
and support the following features.
•
•
•
The two AC sync ports are used for connecting multiple inverters in parallel.
The two Xanbus ports are used for network connections between inverters, charge
controllers, and accessories.
The AUX port provides 12 Vdc/250 mA output to control a relay, fan, indicator light
or other device. The auxiliary output can be configured (using a XW System Control
Panel) to trigger in response to low- or high-battery voltage or high- or low-battery
temperature. The auxiliary output can also be triggered manually using a XW System
Control Panel.
xantrex
Dual-knockouts
(¾"–1")
Communications Ports
AC sync ports
(RJ45) (×2)
Xanbus ports
(RJ45) (×2)
AC access
panel
AUX port
AC OUT
AC terminal
block
AC IN
AC IN
Bottom View
L1 N L2 L1 N L2 L1 N L2
GRID
GEN
AC
(AC1)
(AC2)
LOAD
Hybrid Inverter /Charger
Figure 2-12 XW Inverter/Charger AC Connections and Communications Ports
2–16
975-0239-01-01
Step 4: Wiring the Inverter
Accessing the AC Terminal Block and AC Ground Bar
All AC wiring connects to the AC terminal block located on the left-hand side of the
inverter beneath the AC access cover.
xantrex
Grid (AC1)
I nverti ng
Flashing
Gen (AC2)
Faul t /
Warning
Equalize
= sell
Charging
Battery
Recessed
edge
Hybrid Inverter /Charger
Remove the two screws on the AC
access cover and slide it to the left of
the inverter to remove it.
When replacing the AC access cover,
ensure its recessed edge slips inside
the edge of the front panel.
AC OUT
L1
N
AC IN
L2 L1
AC
LOAD
N
L2 L1
GRID
(AC1)
AC IN
N
AC Terminals
L2
GEN
(AC2)
AC Ground Bar
Figure 2-13 AC Terminal Block
975-0239-01-01
2–17
Inverter/Charger Installation
Grounding the AC System
Important: Place the Neutral-to-ground bond in a permanently installed AC distribution panel
that is part of the system. This may be a main panel or a sub-panel.
See Table 2-4 on page 10 for torque values for the AC terminal and AC Ground bar.
See Figure 2-8 on page 2–11 for torque requirements for the ground bar in the XW Power
Distribution Panel.
Actual ground requirements may vary.
In an off-grid installation (i.e., where no utility grid is available), the
generator can be connected to the breakers provided in the XW Power
Distribution Panel. No additional breaker is required.
* Depending on the location of the generator and
local code requirements, the generator disconnect
may be located in the power distribution panel.
Figure 2-14 Grounding the AC System using the Distribution Panel
2–18
975-0239-01-01
Step 4: Wiring the Inverter
AC Wiring to the Inverter AC Distribution Panel
An inverter AC distribution panel (also known as a sub-panel or inverter load panel) and
AC conduit must be installed before AC wiring is connected to the inverter.
Install the inverter AC distribution panel and conduit as follows:
1. Determine the location for the inverter AC distribution panel and install it according to
the manufacturer’s directions.
2. Install an AC conduit between the XW Power Distribution Panel and the inverter AC
distribution panel.
3. Determine which circuits the inverter will power and install the appropriate circuit
breakers into the inverter panel.
4. For On-Grid systems:
a) Disconnect all power to the main utility panel.
b) Determine which circuits will be backed by the inverter(s) and remove their wires
from the main panel.
c) Reroute these wires to the new inverter subpanel.
5. Remove unused breakers from utility panel. It is now safe to re-energize the main
utility panel.
6. Install a 60-amp maximum (disconnect) main circuit breaker in the inverter panel.
This will later be wired to the inverter’s output.
WARNING: Shock Hazard
Before making any electrical connections, ensure both the AC and DC disconnect devices are in the
OPEN (disconnect) position.
CAUTION: Equipment Damage
Verify that only one neutral/ground bond exists in the system. Having more than one neutral to
ground bond in a system violates local electrical codes, may create a shock or fire hazard, and may
cause some sensitive equipment to malfunction.
CAUTION: Damage to the Inverter
The inverter’s AC output must never be wired to the utility or generator output. This will cause
severe damage to the inverter which is not covered under warranty.
AC Wiring to the XW Power Distribution Panel
To connect the XW Power Distribution Panel to the inverter:
Important: The XW Inverter/Charger is provided with fixed disconnect limits for voltage and
frequency. These limits are fixed when the unit is exporting power to the grid. The unit shall not be
aggregated such that it can export more than 30 kW on a single point of common connection.
Important: Both lines of input power must be connected in order for the XW Inverter/Charger to
operate. For example, L1 and L2 of Grid Input and/or L1 and L2 of Gen Input need to be connected.
1. Connect the wires labelled “INV1 N-LOAD (SPLIT PHASE)”, “INV1 L1-LOAD,
and “INV1 L2-LOAD” (from the L1 and L2 terminals on the input (top) side of the
output breaker and the neutral bus) to the AC Load (L1-LOAD, N-LOAD, L2-LOAD)
terminals on the inverter. Connect the neutral wire first to the N-LOAD terminal.
975-0239-01-01
2–19
Inverter/Charger Installation
2. Connect the wires labelled “INV1 L1-GRID” and “INV1 L2-GRID” to the inverter. If
the AC source will be the utility grid, connect to the GRID (AC1) terminals
(L1-GRID, L2-GRID). If the system will be off-grid and the only AC source will be a
generator, these wires can be connected to the GEN (AC2) terminals (L1-GEN,
L2-GEN). No additional neutral connection is needed when using the XW Power
Distribution Panel. (Additional neutral terminals (N-GRID, N-GEN) are provided on
the inverter for installations that do not use the XW Power Distribution Panel.)
3. Connect L1 (from the L1 output Power Distribution Bar) and L2 (from the L2 output
Power Distribution Bar), Neutral, and Ground to the sub-panel that supplies power to
inverter loads.
4. Connect L1 and L2 from the input side of the AC1 Breaker (L1 and L2 Power
Distribution bars) to the utility grid AC Panel. Connect Neutral from the XW Power
Distribution Panel to the utility grid AC panel. Connect the ground wire between the
XW Power Distribution Panel and the utility grid AC panel.
Power Distribution bars in the XW Power Distribution
Panel accept up to a #2/0 AWG cable (maximum).
See Figure 2-9 on page 2–11 for torque requirements.
Actual wiring requirements may vary.
Figure 2-15 Wiring the XW Power Distribution Panel to the Sub-panel or Utility Grid
2–20
975-0239-01-01
Step 4: Wiring the Inverter
Wiring the XW Inverter/Charger to a XW Power Distribution Panel
Power Distribution bars in the XW Power Distribution
Panel accept up to a #2/0 AWG cable (maximum).
See Figure 2-9 on page 2–11 for torque requirements.
Actual wiring requirements may vary.
Figure 2-16 Wiring the Inverter to the XW Power Distribution Panel
975-0239-01-01
2–21
Inverter/Charger Installation
Generator Wiring to the XW Inverter/Charger using a XW Power Distribution Panel
CAUTION: Generators must be hard-wired to
the XW Power Distribution Panel.
In an off-grid installation (i.e., where no utility
grid is available), the generator can be
connected to the breakers provided in the XW
Power Distribution Panel. No additional
breaker is required.
Actual wiring requirements may vary.
Figure 2-17 Generator Wiring Using a XW Power Distribution Panel
2–22
975-0239-01-01
Step 4: Wiring the Inverter
AUX Port
The XW Series has a 12 Vdc auxiliary output that can be configured to trigger in response
to one of the following battery conditions:
•
•
•
•
•
low battery voltage
high battery voltage
low battery temperature
high battery temperature
any device fault
The auxiliary output can also be triggered manually.
The 12 Vdc output can be used to trigger a relay to disconnect batteries from the inverter/
charger when battery voltage or temperature are out of the ideal range.
The auxiliary output is designed to provide the following functions:
•
•
Auxiliary 12 Vdc power supply
Remote Power Off
AUX Port
Figure 2-18 AUX Port Location
AUX+12V Voltage Supply
DC voltage is available between JU-1 (AUX +12 V) and JU-3 (AUX-COM, signal return).
The power available at these terminals is 12 Vdc and maximum current is 0.25 Adc
(3 watts).
AUX+12 V and AUX-COM terminals can be used: to power a relay (3 watts maximum).
Additional fuses are not required, but may be required for some installations.
AUX +12 V voltage supply can be programmed for different tasks ON and OFF using the
XW System Control Panel.
Default status of AUX+12 V is OFF.
975-0239-01-01
2–23
Inverter/Charger Installation
AUX-RPO: User Remote Power Off (RPO)
Connecting JU-2 (AUX-RPO) and JU-3 (AUX-COM) terminals together through an
external switch (normal open contact) will provide the system shut off function if the
switch is closed.
The external switch if pressed overrides the control provided from the front panel.
If the external switch is cleared (not pressed), the system can be enabled back from the
front panel.
Select an external switch with normal open contact; consult your local system designer or
qualified technician for specific installation instructions.
User Line Wiring
Use twisted pairs of #24 AWG to #12 AWG for connections. Carefully route the wires
away from high power load cables to minimize noise effects on signal integrity.
AUX Port Terminal Assignments
Table 2-11 User Connector Terminals and Functions
2–24
Pin
Reference
Name
Function
JU-1
AUX+12V
+12 V User Voltage
Supply
+12 Vdc Voltage source: 0.25 Adc maximum
JU-2
AUX-RPO
Remote Power Off
Remote Power Off Logic Level: Active Low.
Connecting this signal shuts down system
operation.
JU-3
AUX-COM
Common Ground
Reference
Return Common Ground Reference for 12V,
Remote Power Off signals.
JU-4
Not Operational
Not Operational
Not Operational
JU-5
Not Operational
Not Operational
Not Operational
975-0239-01-01
Basic Functional Test - Single Inverter
Basic Functional Test - Single Inverter
The following steps will complete a basic functional test of the XW Inverter/Charger. If
any test fails, please refer to the Troubleshooting section in the XW Inverter/Charger
Operation Guide for assistance.
Confirm All Connections
Once the AC and DC wiring have been installed and connected, take a moment to go back
over all connections and make sure they are secure and have been installed correctly.
Applying DC Power to the Inverter
CAUTION: Reverse Polarity Damage
Before making the final DC connection or closing the DC breaker or disconnect, check cable
polarity at both the battery and the inverter/charger. Positive (+) must be connected to positive (+).
Negative (–) must be connected to negative (–).
Reverse polarity damage is not covered by warranty.
To apply DC power to the inverter:
1. Before applying DC power to the inverter, measure the voltage and polarity of the
cables (measure at the battery side of the disconnect or breaker).
Important: Voltage should be between 40 to 60 volts for a 48-volt
system, and 20 to 30 volts for a 24-volt system. If the DC voltage is low,
the battery bank needs to be charged externally. Charge the battery bank
and restart the functional test.
2. Apply battery (DC) power to the inverter by closing the battery bank DC disconnect.
The inverter will power up, the display will illuminate, but the inverter will remain in
the Standby Mode (as shown in Figure 2-19).
Note: If the inverter was
previously powered up then it will
power-up in the last operating
state (Operating or standby)
All LEDs temporarily illuminate.
ON/OFF Button
Figure 2-19 Power-up Display
975-0239-01-01
2–25
Inverter/Charger Installation
Enable the Inverter
CAUTION: Equipment Damage
Prior to activating the inverter, ensure that all AC loads are disconnected from the output of the
inverter.
By default, Invert Mode is enabled and the unit should start inverting upon transitioning
from Standby Mode. If Invert Mode is disabled, the display will show (---) once out of
Standby Mode. If the unit powers up in Standby Mode, prese the ON/OFF button
momentarily to change the mode from Standby to Operating.
To enable the inverter:
◆ Press the inverter ON/OFF button and the Equalize button at the same time. “En” is
briefly displayed on the inverter panel to indicate the inverter is enabled.
To disable the inverter:
◆ Press the inverter ON/OFF button and the Equalize button at the same time. “diS” is
briefly displayed on the inverter panel to indicate the inverter is disabled.
Equalize
Button
Equalize
Button
ON/OFF
Button
ON/OFF
Button
Briefly press the Equalize Button and the ON/OFF Button at the same time
to enable or disable the Invert Mode.
This display indicates the inverter
is disabled.
All LEDs temporarily illuminate.
Figure 2-20 Enable the Inverter
3. Monitor the INVERT (Green kW) LED to confirm which mode the inverter is in:
•
•
•
LED Off – Invert Mode is disabled. The inverter/Charger is not powering the AC
loads. However, if good AC is present, it is passed through to the loads.
One blink/sec – The inverter/charger is in the Search Mode and is looking for an
AC load greater than the Search Watts setting (default = 25 watts). The Display
shows Sch (Search) when this mode has been enabled.
LED On – The inverter/charger is on. The inverter is operating and is able to
provide power to the AC loads. This is the default mode on initial powerup once
the unit is taken out of Standby Mode.
If the inverter is not operating or the INVERT LED (kW) does not illuminate, check all
connections. Check the inverter’s DC voltage on the positive (+) and negative (–)
terminals. Check the Fault LED. If the fault LED is illuminated, check for a fault code on
the information panel. Correct the reported fault if possible and clear the fault. If the DC
voltage is low, the battery bank needs to be charged externally. Charge the battery bank
and restart the functional test.
2–26
975-0239-01-01
Basic Functional Test - Single Inverter
AC Voltage Check
Important: This test requires the use of a voltmeter.
To perform an AC voltage check:
1. With the inverter on (INVERT [green, kW] LED on solid), verify the AC voltage at
AC Loads block terminal L1-Load to N-Load.
2. Verify that neutral is bonded to ground in the system by measuring the hot and neutral
voltages relative to ground. Neutral-to-ground should equal zero (0) volts.
3. After confirming the correct AC voltage, turn on your AC output breaker and place a
load on the inverter (plug in a light or other load to an outlet the inverter is powering).
4. Confirm that the AC load that was just applied works properly.
AC OUT
L1
N
AC IN
L2 L1
AC
LOAD
N
L2 L1
GRID
(AC1)
AC IN
N
L2
GEN
(AC2)
Figure 2-21 Checking AC Voltage
Confirming Battery Charger Operation
To confirm battery charger operation:
1. Apply AC from grid or generator, confirm voltage.
2. Check LEDs (AC1 or AC2) on the front panel. One of them must be illuminated for
the unit to charge. Check the “A” LED. If the “A” LED is illuminated, the unit is
charging and the battery current is displayed on the information panel.
Amp LED
Figure 2-22 Checking Charging Operation
Important:
Unless the inverter/charger settings have been changed, the inverter will charge as
if it has a large (> 440 Ah) flooded battery bank (factory default setting). Therefore, ALL systems
may need to have the battery charging set points “fine tuned” to avoid damage to the batteries.
This completes the functional test. If all tests pass, the inverter is ready for use. If any of
the inverter’s internal set points need to be adjusted, consult the configuration chapter of
the operation guide.
975-0239-01-01
2–27
Inverter/Charger Installation
Figure 2-23 Functional Test for Single Inverter Systems
2–28
975-0239-01-01
Step 5: Installing Additional Inverters
Step 5: Installing Additional Inverters
Installation Steps
To install multiple inverters:
1. Disconnect all power from the system.
2. Mount additional inverter(s). See “Step 1: Installing the Mounting Plate” on page 2–4
and “Step 2: Mounting the Inverter” on page 2–6.
3. Install the XW Conduit Box. See “Step 3: Mounting the XW Power Distribution Panel
and XW Conduit Box” on page 2–7.
4. Install AC sync cable(s) as required. See “Xanbus and AC Sync Cable” on page 2–38.
5. Install a XW System Control Panel to configure programmable settings and to name
specific network components (e.g., XW1, XW2 etc.). See “The XW System Control
Panel” on page 5–2.
6. Convert the XW Power Distribution Panel to accommodate the extra inverter by
installing the additional breakers and components. See page 2–30 for instructions on
converting the XW Power Distribution Panel to a dual-inverter configuration. See
page 2–34 for converting the XW Power Distribution Panel to a triple-inverter
configuration.
7. Attach Bypass interlock plate to distribution panel cover.
8. Connect DC wiring. See Figure 2-24 on page 2–31 for dual-inverter configurations
and Figure 2-27 on page 2–35 for triple-inverter configurations.
9. Connect AC wiring. See Figure 2-26 on page 2–33 for dual-inverter configurations.
For triple-inverter Configurations, see Figure 2-28, “Triple-Inverter AC Breaker
Arrangement and Wiring Enlargement with Multiple AC Input Sources” on page 2–36
or Figure 2-29, “Triple-Inverter AC Breaker Arrangement and Wiring Enlargement
with a Single AC Input Source” on page 2–37.
975-0239-01-01
2–29
Inverter/Charger Installation
Parts List for Dual-Inverter Configurations
Installing an additional inverter using the power distribution panel requires an XW
Connection Kit (part number 856-1020), which contains the following components:
•
•
•
•
•
•
•
•
•
XW Conduit Box
Three 60 amp, 120/240 VAC, 2-pole, Square-D Type QOU, DIN-rail mount,
AC breakers for Inverter Input, Output, and Bypass
Four Power Distribution bars
Custom Bypass Interlock
#6 AWG AC wiring to connect the inverter to AC breakers
GJ250A, 160VDC, 3/8" Stud, DC Breaker with copper bus bar for DC positive
one pair #4/0 battery cables to connect the inverter to DC breakers
Xanbus and AC Sync Cable (CAT 5 cable with RJ45 connectors wired to T568A
standard).
Miscellaneous bushings
Important: When installing more than one inverter at a location, a XW
System Control Panel will be required to give each inverter (as well as other
Xanbus-enabled devices) a unique name and to modify the factory-installed
default settings to match and support the installed configuration.
Converting a Single-Inverter Power Distribution Panel to a Dual-Inverter Power
Distribution Panel
◆ Remove upper wire cover and lower wire cover on the XW Power Distribution Panel.
DC Wiring for a Dual-Inverter System
1. Remove positive distribution plate attached to bottom terminal on existing DC
disconnect/breaker.
2. Install second DC disconnect/breaker (supplied in 865-1020) next to existing DC
disconnect/breaker.
3. Replace the factory-installed DC positive bus bar with the larger positive bus bar
provided in the 865-1020. This larger DC positive bus bar supports up to three
GJ250 Adc disconnect/breakers.
4. Connect positive battery cable for second inverter (supplied in 865-1020) to top
terminal on second DC disconnect/breaker.
5. Connect negative battery cable for second inverter (supplied in 865-1020) to DC
negative distribution plate.
6. Connect positive and negative battery cables to second inverter.
7. Remove knockout on the lower cover for additional disconnect/breaker to fit through.
8. Re-install lower wire cover.
2–30
975-0239-01-01
Step 5: Installing Additional Inverters
AC Breakers shown in this illustration
represent the breaker arrangement for a
single AC source.
Torque connections to the
inverter DC terminals to
10-15 ft/lbs.
Actual cable requirements may vary.
Torque connections to the battery
terminals according to the battery
manufacturer’s recommendations.
Figure 2-24 DC Connections to Dual Inverters
975-0239-01-01
2–31
Inverter/Charger Installation
AC Wiring for a Dual-Inverter System
1. Disconnect the AC wires (from the utility grid or generator and to the sub-panel) and
remove the factory-installed distribution bars connected to top and bottom terminals
on the AC breakers.
2. Remove bypass interlock bracket.
3. Disconnect INV1 AC LOAD (INV1 L1-LOAD, INV1 L2-LOAD) wires from top
terminals on right-hand side breaker.
4. Add three additional dual-pole AC breakers (supplied in 865-1020) next to the
existing three dual-pole AC breakers.
5. Attach the four distribution bars (supplied in 865-1020) to top and bottom of AC
breakers as shown in dual-inverter system wiring diagrams.
6. Connect grid wiring and loads/subpanel wiring to the new distribution bars as shown
in Figure 2-26.
7. Connect INV1 LOAD (INV1 L1-LOAD, INV1 L2-LOAD), INV2 LOAD (INV2
L1-LOAD, INV2 L2-LOAD), and INV2 GRID (INV2 L1-GRID, INV2 L2-GRID)
wires to AC breakers as shown in Figure 2-26.
8. Connect neutral (INV2 N-LOAD (SPLIT-PHASE)) and ground (INV2 GROUND)
wiring as shown in dual-inverter system wiring diagrams.
9. Connect wiring at the inverter/chargers as shown in Figure 2-26.
10. Remove the knockouts on upper wire cover for additional breakers to fit through.
11. Re-install upper wire cover. Relabel the AC breakers with the appropriate labels
provided with the XW Power Distribution Panel.
12. Install bypass interlock plate with provided screws and nylon shoulder washers
(supplied in 865-1020).
GRID
BYPASS
GRID
BYPASS
INV 1 OUT
(AC LOADS)
INV 1 OUT
(AC LOADS)
INV 1 IN
(GEN)
INV 2 IN
(GEN)
TO AC2 ON INV2
INV 2 IN
(GRID)
FROM GENERATOR
DISCONNECT
TO AC2 ON INV1
INV 1 IN
(GRID)
TO AC1 ON INV2
FROM MAIN AC
DISTRIBUTION PANEL
TO AC1 ON INV1
Power Distribution bars in the XW
Power Distribution Panel accept up to
a #2/0 AWG cable (maximum).
See Figure 2-9 on page 2–11 for
torque requirements.
TO INVERTER AC
DISTRIBUTION PANEL
Figure 2-25 Dual Inverter AC Breaker Arrangement and Wiring Enlargement with Multiple AC Input Sources
2–32
975-0239-01-01
Step 5: Installing Additional Inverters
Power Distribution bars in the XW Power Distribution
Panel accept up to a #2/0 AWG cable (maximum).
See Figure 2-9 on page 2–11 for torque requirements.
Figure 2-26 AC Wiring for Dual-Inverter Systems
975-0239-01-01
2–33
Inverter/Charger Installation
Parts List for a Triple-Inverter Configuration
❐ 1 x XW Power Distribution Panel (PDP) and Accessory kit (mounts to first unit).
❐ 1 x 865-1020 PDP extension kit for second unit.
The following items are required for the third inverter (furthest from PDP) and should be
sourced and prepared prior to the installation. (Note that all wiring will have to be custom
cut to fit the third unit. Wiring supplied with the extension kit is intended for a second
inverter in a two inverter system).
❐ 1 x 865-1020 PDP extension kit.
❐ 2 x AC Distribution Bars (100-0661-01-01).
❐ 2.2 m (87”) x #6 AWG, 600 V, 105°C stranded white wire for neutral
❐ 2.2 m (87”) x #6 AWG, 600 V, 105°C Black stranded wire for L1 Grid (AC1).
❐ 2.2 m (87”) x #6 AWG, 600 V, 105°C Red stranded wire for L2 Grid (AC1).
❐ 2.3m (91”) x #6 AWG, 600 V, 105°C Black stranded wire for L1 Gen (AC2).
❐ 2.3 m (91”) x #6 AWG, 600 V, 105°C Red stranded wire for L2 Gen (AC2).
❐ 2.4 m (95”) x #6 AWG, 600 V, 105°C Black stranded wire for L1 Gen (AC Load).
❐ 2.4 m (95”) x #6 AWG, 600 V, 105°C Red stranded wire for L2 Gen (AC Load).
❐ 1.6m (62”) #4/0 AGW, 105°C, Red stranded with #4/0 x 3/8 lugs crimped at each end
for the positive battery cable.
❐ 1.6m (62”) #4/0 AGW, 105°C, Black stranded with #4/0 x 3/8 lugs crimped at each
end for the negative battery cable.
❐ External Bypass Switch - The XW Power Distribution Panel does not have enough
breaker locations to accommodate bypass breakers in a triple-inverter system.
Therefore, an external Bypass Switch may be needed. See Figure 2-30 on page 2–37
for an illustration of how to wire an External Bypass Switch.
Converting a Single-Inverter Power Distribution Panel to a Triple-Inverter Power
Distribution Panel
◆ Remove upper wire cover and lower wire cover on the XW Power Distribution Panel.
DC Wiring for a Triple-Inverter System
1. Install all three DC disconnect/breakers (two supplied in 865-1020 and one with PDP).
2. Install larger positive distribution plate (supplied in 865-1020).
3. Connect negative battery cable for first inverter (supplied with PDP) to DC negative
distribution plate.
4. Connect negative battery cable for second inverter (supplied in 865-1020) to DC
negative distribution plate.
5. Connect negative battery cable for second inverter (custom, see material list) to DC
negative distribution plate.
2–34
975-0239-01-01
Step 5: Installing Additional Inverters
6. Connect positive battery cable for first inverter (supplied with PDP) to top terminal on
first DC disconnect/breaker.
7. Connect positive battery cable for second inverter (supplied in 865-1020) to top
terminal on second DC disconnect/breaker.
8. Connect positive battery cable for third inverter (custom, see material list) to top
terminal on third DC disconnect/breaker.
9. Connect positive and negative battery cables to first inverter.
10. Connect positive and negative battery cables to second inverter.
11. Connect positive and negative battery cables to third inverter.
Power Distribution bars in the XW Power Distribution
Panel accept up to a #2/0 AWG cable (maximum).
See Figure 2-9 on page 2–11 for torque requirements.
AC Breakers shown in this
illustration represent the breaker
arrangement for multiple AC
source.
Torque connections to the
inverter DC terminals to
10-15 ft/lbs.
Actual cable requirements may vary.
Torque connections to the battery
terminals according to the battery
manufacturer’s recommendations.
Figure 2-27 DC Connections for a Triple-Inverter System
975-0239-01-01
2–35
Inverter/Charger Installation
AC Wiring for a Triple-Inverter System
1. Prepare power distribution bars (supplied in 865-1020) by cutting away one of the
four tabs, only three tabs per power distribution bar are required in a three inverter
system. A total of 6 distribution bars should be prepared.
2. Mount the nine breakers on the din rail and install power distribution bars as follows:
a) Two distribution bars, L1 and L2 at the input (top) terminals of the INV1, INV2
and INV3 Grid breakers.
b) Two distribution bars, L1 and L2 at the input (top) terminals of the INV1, INV2
and INV3 Gen breakers.
c) Two distribution bars, L1 and L2 at the output (bottom) terminals of the INV1,
INV2 and INV3 AC Load breakers.
3. Connect L1 and L2, AC wiring from each INV Grid breaker to the corresponding AC
Input (AC1) terminal on each of the three inverters.
4. Connect L1 and L2, AC wiring from each INV Gen breaker to the corresponding AC
Input (AC2) terminal on each of the three inverters.
5. Connect L1 and L2, AC wiring from each INV AC Load terminal from each of the
three inverters, to the corresponding AC INV Out breaker terminal in the PDP.
6. Connect L1 and L2, AC Load wiring to the INV Out (AC Load) power distribution
bar.
7. Connect L1 and L2, AC wiring from the Generator disconnect to the Gen breaker
power distribution bars.
8. Connect L1 and L2, AC wiring from the Utility Grid distribution panel to the Grid
breaker power distribution bars.
9. Connect neutral wiring from INV1 (supplied with PDP), INV2 (supplied in 865-1050)
and INV3 (custom, see material list) to the neutral distribution bar in the PDP.
10. Connect ground wiring from INV1 (supplied with PDP), INV2 (supplied in 865-1050)
and INV3 (supplied in 865-1050) to the ground distribution bar in the PDP.
TO AC1 ON INV3
INV 2 IN
(GEN)
INV 3 IN
(GEN)
INV 1 OUT
(AC LOADS)
FROM AC LOAD
ON INV3
TO AC1 ON INV2
INV 1 IN
(GEN)
INV 2 OUT
(AC LOADS)
INV 3 OUT
(AC LOADS)
TO AC2 ON INV3
INV 3 IN
(GRID)
TO AC2 ON INV2
INV 2 IN
(GRID)
TO AC2 ON INV1
INV 1 IN
(GRID)
FROM AC LOAD
ON INV2
FROM GENERATOR
DISCONNECT
FROM AC LOAD
ON INV1
FROM AC DISTRIBUTION
PANEL OR TRANSFER SWITCH
TO AC1 ON INV1
Power Distribution bars in the XW
Power Distribution Panel accept up
to a #2/0 AWG cable (maximum).
See Figure 2-9 on page 2–11 for
torque requirements.
TO INVERTER AC DISTRIBUTION
PANEL OR TRANSFER SWITCH
Figure 2-28 Triple-Inverter AC Breaker Arrangement and Wiring Enlargement with Multiple AC Input Sources
2–36
975-0239-01-01
Step 5: Installing Additional Inverters
FROM AC LOAD
ON INV3
INV 1 OUT
(AC LOADS)
INV 2 OUT
(AC LOADS)
INV 3 OUT
(AC LOADS)
TO AC1 OR AC2
ON INV3
TO AC1 OR AC2
ON INV2
TO AC1 OR AC2
ON INV1
INV1 IN
INV3 IN
INV2 IN
(GRID OR GEN) (GRID OR GEN) ( GRID OR GEN)
FROM AC LOAD
ON INV2
FROM AC SOURCE DISCONNECT
OR TRANSFER SWITCH
FROM AC LOAD
ON INV1
Power Distribution bars in the
XW Power Distribution Panel
accept up to a #2/0 AWG cable
(maximum).
See Figure 2-9 on page 2–11 for
torque requirements.
TO INVERTER AC DISTRIBUTION
PANEL OR TRANSFER SWITCH
Figure 2-29 Triple-Inverter AC Breaker Arrangement and Wiring Enlargement with a Single AC Input Source
Actual wiring requirements
may vary.
Figure 2-30 Wiring an External Bypass Switch for a Triple-Inverter Configuration
975-0239-01-01
2–37
Inverter/Charger Installation
Xanbus and AC Sync Cable
A Xanbus and AC sync cable is required for multi-unit installation. The AC sync cable
connects each inverter, and provides the necessary communication and control between
multiple units.
Install these cables, routing it through the XW Conduit Box raceway, prior to making the
AC and DC wiring connections. See Figure 2-31.
To install the AC Sync and Xanbus cables between inverters:
1 Remove the two
factory-installed raceways
for the communication
cabling by removing the
screw holding each
raceway in place.
3
Route the cable as shown. Route any additional
communication cables through the raceways.
Replace the wiring raceways, ensuring not to pinch
the cables. Secure the raceways to the XW Conduit
Box with the screw that was removed earlier.
IMPORTANT:
In a 2-inverter system, install an AC Sync Cable from
INV1 to INV2.
2
Insert the RJ45 jack
on the cable into
one of the two AC
Sync ports.
In a 3-inverter system, “daisy-chain” an AC Sync
Cable from INV1 to INV2 and from INV2 to INV3.
Do NOT install terminators in an AC Sync Port.
Figure 2-31 Installing the AC Sync Cable
2–38
975-0239-01-01
Basic Functional Test - Multiple Inverters
Basic Functional Test - Multiple Inverters
The following steps will complete a basic functional test of multiple XW Inverter/
Chargers. If any test fails, please refer to the Troubleshooting section in the XW Inverter/
Charger Operation Guide for assistance.
To perform a functional test on multiple inverters:
1. Check/verify all wiring and cable connections.
2. Measure DC voltage at the DC terminals on the inverter and confirm its within range
and has correct polarity. The acceptable range is >20 Vdc for 24 V system or >40 Vdc
for 48-V Systems.
3. Switch INV1 DISCONNECT to ON position.
4. Check inverter display for startup self-test during which all LED's will flash
momentarily. Once self-test is complete, inverter will display "Stb". (The Fault/
Warning LED may flash for a few seconds but eventually will turn off. If Fault/
Warning LED persists, check to ensure battery temperature sensor is connected. Also,
if the inverter has been pre-configured, it may go straight into normal operating
mode.)
5. Using the XW System Control Panel, set First (Master) Inverter Device Number
a) Go to the inverter’s Advanced Settings menu by pressing Down arrow + Enter
from System Status screen and then simultaneously pressing Enter + Up arrow +
Down arrow.
b) Select Multi Unit Config menu.
c) Change Dev Number from “00” to “01”. The inverter will now appear as
XW6048-01 in the device list.
d) Press Exit to go back to the System Status screen.
6. Switch INV2 DISCONNECT to ON position.
7. Check inverter display for startup self-test during which all LED's will flash
momentarily. Once self-test is complete, inverter will display "Stb". (If the inverter has
been pre-configured, it may go straight into normal operating mode or display F66
warning.)
8. Using the XW System Control Panel, set Second (Slave) Inverter Device Number and
Inverter Mode.
a) Select new inverter XW6048-00 in the device list.
b) Go to the inverter’s Advanced Settings>Multi-Unit Config menu.
c) Change Dev Number from “00” to “02” (or the next number that hasn’t been
used). The inverter will now appear as XW6048-02 in the device list.
d) Change Invtr Mode from “SplitPhMaster” to “SplitPhSlave”.
e) Press Exit until you see the System Status screen.
9. Check for faults. If fault condition(s) exist, correct and restart Functional Test.
10. If a third inverter is installed, repeat steps to configure it as a Slave.
11. Using the XW System Control Panel, enable the System
a) Go to System Settings menu
b) Change System Mode to “Operating”
c) Press Exit until you see the System Status screen.
975-0239-01-01
2–39
Inverter/Charger Installation
12. Confirm Master inverter displays “0.00” and Slave(s) displays “---” on their front
panels.
13. Check for faults. If fault condition(s) exist, correct and restart Functional Test.
14. Check voltage at AC LOAD terminals of the Master Inverter.
15. Switch the AC Load breakers ON.
16. Confirm operation of connected AC loads.
17. Disconnect AC LOAD breakers.
18. Using the XW System Control Panel, reduce Maximum Charge Rate.
a) From System Status screen, go to System Settings and enable Cascading (if not
enabled). With Cascading enabled, a change to a setting in one inverter will automatically ripple through to the other inverter(s) in the system.
b) Go to Advanced Settings>Charger Settings in one of the inverters.
c) Set Max Chg Rate to 10%.
d) Press Exit until you see the System Status screen.
19. Switch AC Input breakers ON. Note - all inverters in the system must be connected to
the same AC Input source before they will qualify the source.
20. Confirm both inverters start charging. Note -- With the Max Chg Rate set to 10% the
maximum charge rate is limited to 10 A on each inverter. Depending on the battery
bank’s state-of-charge, the output from one or more inverters may quickly drop to
zero. This is considered normal operation.
21. Check for faults. If fault condition(s) exist, correct and restart Functional Test.
If the Inverters pass the Functional Test, proceed to Commissioning procedure as defined
in XW Inverter/Charger Operation Guide.
2–40
975-0239-01-01
Basic Functional Test - Multiple Inverters
Figure 2-32 Functional Test for Multiple Inverters - Page 1 of 2
975-0239-01-01
2–41
Inverter/Charger Installation
Figure 2-33 Functional Test for Multiple Inverters - Page 2 of 2
2–42
975-0239-01-01
3
Xanbus Network
Installation
Chapter 3, “Xanbus Network Installation” provides detailed information for
planning and installing the components necessary for network
communication on a Xanbus system.
For this Topic
See....
“Xanbus-enabled Devices”
page 3–2
“The Xanbus System”
page 3–2
“Installing the Network”
page 3–7
Xanbus Network Installation
Xanbus-enabled Devices
The Xanbus™-enabled designation means that the product works on a Xanbus network.
Xanbus-enabled products are:
•
•
•
Easy to use. The Xanbus network simplifies operation and automates routine tasks.
Reliable. Software control eliminates errors due to analog signalling.
Accurate. Digital information is less susceptible to interference and line loss.
The Xanbus System
What is a network?
A network is a collection of devices that perform individual functions, but also
communicate and interact with the other devices. The network capability of the XW
Power System provides a robust, integrated product solution that simplifies and automates
the installation, configuration, control, monitoring, and integration of devices that deliver
and distribute AC or DC power.
Network
components
Each device is integrated into the network using cables, network connectors, and
terminators. An example of a network-managed power system is shown in Figure 3-1.
Figure 3-1 Network-Managed Power System
Network
configurations
3–2
The network can be installed in one of two configurations: as a multi-drop backbone (see
Figure 3-5) or as a daisy chain (see Figure 3-6).
975-0239-01-01
The Xanbus System
Network Components
A Xanbus network consists of the following components:
•
•
Xanbus-enabled devices—these include the XW System Control Panel, the XW
Inverter/Charger, XW Automatic Generator Start, and XW Charge Controller. The
maximum number of Xanbus devices connected to a single Xanbus network should
not exceed eight devices.
Xanbus power supply—the network must have at least one device with a power supply
to run the network. The total network current supplied by all the power-sourcing
devices must be greater than or equal to the total current drawn by the power
consuming devices. The power supply must be capable of providing 15 Vdc/200 mA
to each device. The XW Inverter/Charger can provide sufficient network power.
For example, in a system with an inverter/charger, a XW System Control Panel and an
Automatic Generator Start, the inverter/charger is a power-sourcing device capable of
providing 800 mA at 15 Vdc while the two other devices each consume a maximum of
200 mA for a total maximum consumption of 400 mA. In this example, the network is
properly configured from a power perspective because the power source is capable of
providing more current than is needed: 800 mA > 400 mA.
Important: See the specifications for each Xanbus device to determine how much power each
device consumes or supplies.
•
Xanbus cables—each Xanbus-enabled device is connected by a Category 5 (CAT 5 or
CAT 5e) cable, a standard cable available from Xantrex or any computer supply store.
The cable consists of eight conductors in four twisted pairs with an RJ45 modular
connector wired to the T568A standard.
CAUTION: Equipment Damage
Do not use crossover cable.
Table 3-1 contains the arrangements of wire colors to pin numbers for the T568A
standard.
Table 3-1 T568A Standard Wiring
Pin Number
975-0239-01-01
Conductor Name
CAT 5 Cable Insulation Color
CAT 5e Cable Insulation Color
1
NET_S
White/Green
White/Orange
2
NET_S
Green
Orange
3
NET_C
White/Orange
White/Green
4
CAN_L
Blue
Blue
5
CAN_H
White/Blue
White/Blue
6
NET_C
Orange
Green
7
NET_S
White/Brown
White/Brown
8
NET_C
Brown
Brown
3–3
Xanbus Network Installation
Pins:
8 7 6 5 4 3 2 1
Figure 3-2 Xanbus Cable and RJ45 Connector Pin Numbers
•
Network terminators (Figure 3-3)—the Xanbus network must be properly terminated
at each end with male or female network terminators to ensure the communication
signal quality on the network. If the network is not properly terminated, signal quality
is degraded and performance on the network is reduced. Permanent configuration
without terminators is not supported by Xantrex. The XW Series and other
Xanbus-enabled devices ship with one male terminator already installed. Depending
on your network layout, this terminator may need to be removed and inserted into
another device elsewhere in the network.
Female network terminator
Male network terminator
Figure 3-3 Network Terminators
•
Network connectors—The three-way connector houses three RJ45 inputs that provide
a device connection point on a multi-drop backbone layout (see “Multi-Drop
Backbone Layout” on page 3–5). All three inputs are wired identically and can accept
either Xanbus cables or terminators. One input is available for connecting to a
Xanbus-enabled device. The remaining inputs are reserved for connection to other
network connectors, a Xanbus cable terminated with a female terminator, or a male
terminator.
The network connector is mounted to a bulkhead or a wall, as shown in Figure 3-4.
To network connector
or teminator
To network connector
To device
Figure 3-4 3-Way Network Connector (sample configuration)
3–4
975-0239-01-01
The Xanbus System
Ordering Network Components
Table 3-2 provides a partial list of network components and part numbers. Ready-made
cables are available in standard lengths from 3 feet to 75 feet.
For the most up-to-date list, call an authorized Xantrex dealer or visit the Outlet Store at
www.xantrex.com.
Table 3-2 Xanbus Network Components and Part Numbers
Network Component
Part Number
Network termination — Male (2 per pack)
809-0901
Network termination — Female (2 per pack)
809-0905
3-way network connector
809-0903
Network cable 3 ft. (0.9 m)
809-0935
Network cable 5 feet (1.5 m)
809-0936
Network cable 7 feet (2.0 m)
809-0937
Network cable 10 feet (3.0 m)
809-0938
Network cable 14 feet (4.3 m)
809-0939
Network cable 25 feet (7.6 m)
809-0940
Network cable 50 feet (15.2 m)
809-0941
Network cable 75 feet (22.9 m)
809-0942
Network Layouts
Xanbus-enabled devices can be connected in one of two Xanbus network layouts:
multi-drop backbone or daisy chain. Each network layout has advantages and
disadvantages, depending on the application and/or environment. It is up to the installer or
system designer to decide which layout is best for the installation.
Important: Do not mix the two types of network layouts. Mixed configurations are not
supported by Xantrex.
Multi-Drop Backbone Layout
In a multi-drop backbone layout, each Xanbus-enabled device on the network is connected
by a drop cable to the network bus or backbone with a network connector, as shown in
Figure 3-5.
Terminators are required at both ends of the multi-drop backbone cable, as shown in
Figure 3-5. Therefore, the Xanbus-enabled devices do not require their own termination.
With only one terminator, the signal quality is degraded and performance on the network is
reduced. Permanent configuration with only one terminator is not supported by Xantrex.
If cables are placed at the end of the network, female terminators are required. Otherwise,
male terminators can be inserted directly into the open jack of each network connector at
the end of the network.
Advantages In this layout, Xanbus-enabled devices can be removed or replaced while
still keeping the network operating.
Disadvantage The main disadvantage of this layout is the cost of the network
connectors (a daisy chain layout uses no network connectors). Each device in this layout
requires its own network connector.
975-0239-01-01
3–5
Xanbus Network Installation
Terminate
network at
each end
with a female
terminator.
3-way
connectors
Terminate
network at
each end
with a female
terminator.
Figure 3-5 Multi-Drop Backbone Layout
Daisy Chain Layout
In a daisy chain layout, each device on the network is linked with separate lengths of
Xanbus cable, as shown in Figure 3-6. This layout does not require network connectors.
As in the multi-drop backbone layout, two terminators are required to ensure the
communication signal quality on the network. The Xanbus-enabled devices at each end of
the chain must have a male terminator inserted into their open network ports.
Advantage The advantage of this layout is that it is less expensive to install because
network connectors are not required.
Disadvantage The disadvantage of the daisy chain layout is that Xanbus-enabled
devices cannot be removed from the network without interrupting the network. To make
the network function after removing a device, you must connect the Xanbus-enabled
devices on either side of the missing device to each other or replace the device.
Male Terminator
Terminate the network at each end.
Male Terminator
Figure 3-6 Daisy Chain Network Layout
3–6
975-0239-01-01
Installing the Network
Installing the Network
Important: Do not mix the two types of network layouts. Mixed configurations are not
supported by Xantrex.
Important: Installing and replacing Xanbus-enabled devices in an existing system must be
performed with the XW Power System in Standby mode. For more information about Standby
mode, see the XW System Control Panel Owner’s Guide.
Before You Begin the Installation
•
•
Read the entire section before installing the network. It’s important to plan the
installation from beginning to end.
Assemble all the tools and materials required for the installation.
Installation Tools and Materials
Tools
The following tools may be required to install the Xanbus cables.
❐ Phillips screwdriver, appropriately sized
❐ Drill and 1/8" bit
Materials
The following materials may be required to complete your installation.
❐ CAT 5 or CAT 5e cables (available from Xantrex or computer supply stores)
❐ Network connectors, if installing multi-drop backbone layout
❐ # 6 screws, 2 per each network connector installed
❐ Terminators
Guidelines for Routing the Xanbus Cables
WARNING: Shock hazard
Do not route the Xanbus cables in the same conduit or panel as the AC and DC power cabling.
:
To ensure maximum performance of your network, follow these guidelines when routing
the Xanbus cables.
•
•
•
•
•
•
•
975-0239-01-01
Route the cables away from sharp edges that might damage the insulation. Avoid sharp
bends in the cable—no less than a 4-inch (100 mm) radius.
Allow at least 2 ¼ inches (57 mm) of space behind the wall to accommodate the depth
of the unit and allow room for the cables to bend.
Allow for some slack in the cable tension.
Keep the alignment of wire pairs inside the sheath as straight as possible.
Allow separation between data and power cables (data cables should only cross a
power cable at right angles).
Do not staple the cable with metal cable staples. Use appropriate hardware fasteners to
avoid damage to the cable.
Support horizontal cables using J hooks or cable trays.
3–7
Xanbus Network Installation
The total length of the network, including all connected Xanbus-enabled devices and the
XW Series, cannot exceed 130 feet (40 m). See Table 3-3.
Table 3-3 Minimum and Maximum Cable Length
Cable Length
Minimum
Maximum
Backbone or daisy chain
4 inches (10 cm)
130 feet (40 meters)
Total backbone length or daisy chain 4 inches (10 cm)
130 feet (40 meters)
Drop cable on backbone
10 feet (3 meters)
4 inches (10 cm)
Mounting a Network Connector
To mount a network connector:
1. Select an appropriate location with the connector in the recommended mounting
orientation, as shown in Figure 3-7.
Figure 3-7 Recommended Mounting Orientation for Network Connector
2. Mark the position of the mounting screws.
3. Pilot drill the two mounting holes.
4. Fasten the network connector to the mounting surface with two #6 screws.
3–8
975-0239-01-01
Installing the Network
Installing Xanbus-Enabled Devices
If you are installing a Xanbus-enabled device on an existing Xanbus System, put the
system in Standby mode using the System Settings menu on the XW System Control
Panel.
CAUTION: Equipment Damage
Connect only to other Xanbus compatible devices.
Although the cabling and connectors used in this network system are the same as ethernet
connectors, this network is not an ethernet system. Equipment damage may result from
attempting to connect Xanbus to different systems.
Important: Mount cables and network connectors in a dry location.
To install the Xanbus-enabled devices:
1. Determine and prepare the location for each device. Refer to the installation procedure
for each device elsewhere in this manual.
2. Determine and measure the required cable length, taking into consideration your
network layout, the routing, and strain relief requirements.
Do not exceed the total recommended cable length of 130 feet (40 meters).
3. Mount the devices according to the installation procedure elsewhere in this guide.
4. Use an appropriate length of Xanbus cable to connect each device and (if used) 3-way
network connector.
5. Terminate the Xanbus network according to “Completing the Multi-Drop Backbone
Layout” on page 3–9 or “Completing the Daisy Chain Layout” on page 3–10.
Completing the Multi-Drop Backbone Layout
To complete the multi-drop backbone layout:
◆ Attach a female terminator to the backbone cable at each end of the network (see
Figure 3-8)
Or
◆ Insert a male terminator into the open jack of the network connector at each end of the
network (see Figure 3-8).
Attach female terminator to
end of backbone cable.
To device
To previous
connector
Insert male terminator into
open jack of connector.
Figure 3-8 Options for Completing a Multi-Drop Backbone Layout
975-0239-01-01
3–9
Xanbus Network Installation
Completing the Daisy Chain Layout
To complete the daisy chain layout:
◆ Insert a male terminator into the open network port of the Xanbus-enabled device at
each end of the network. See Figure 3-9.
Figure 3-9 Completing a Daisy-Chain Layout
CAUTION: Unpredictable device behavior
After connecting the Xanbus-enabled devices and terminating the network, do not plug terminators
or other cables into any remaining open network ports on any Xanbus-enabled devices.
Do not connect one end of the network to the other to make a ring.
3–10
975-0239-01-01
4
XW Solar Charge Controller
Installation
Chapter 4, “XW Solar Charge Controller Installation” describes how to
mount and connect the XW Charge Controller as part of the XW System.
For this Topic
See....
“PV Array Requirements”
page 4–2
“Mounting”
page 4–3
“Grounding”
page 4–8
“Wiring”
page 4–9
“Commissioning”
page 4–14
XW Solar Charge Controller Installation
Installing the Charge Controller
This chapter describes installing the XW Solar Charge Controller with the XW Power
System, including the power distribution panel. For stand-alone installation, see the XW
Solar Charge Controller Owner’s Guide.
PV Array Requirements
Each Charge Controller must be connected to its own PV array. For optimum
performance, each individual array must be composed of the same type of solar panel,
with the same Voc and Vmp specifications.
Important: The following information provides only general guidelines. The installation and
rated performance of your PV array is subject to inspection and approval by the authority having
jurisdiction.
Array Size
For PV array sizing guidelines, use the XW Solar Charge Controller PV array sizing tool
accessible from www.xantrex.com/support.
Although the Solar Charge Controller can harvest a maximum of 3500 W, the PV array
size can be as large as 6720 W (based on 48 A × 140 Vdc = W).
Array Voltage
CAUTION; Equipment Damage
The PV array voltage must never exceed 150 Voc (open circuit voltage) under
any conditions.
The maximum PV array voltage for XW Solar Charge Controller MPPT operation is
140 Vdc.
When calculating PV array size for the XW Solar Charge Controller, consider the
expected Voc of the array under all possible conditions. Panel voltage increases with
decreasing temperature. The array needs to be sized so that 150 Vdc does not occur, even
at the lowest expected panel temperature during open circuit. The panel manufacturer
provides a Voc rating per panel, but it is usually rated at 25 °C (77 °F).
Array Current
Important: The Isc (short circuit current) rating of the array must not exceed
the 60 A input current rating of the XW Solar Charge Controller at any time.
Panels rated up to 48 A at 25 °C (77 °F) are recommended to allow for increases in Isc at
low panel temperatures and at solar noon. Ensure that the Isc rating under all conditions
does not exceed 60 A. A factor of 1.25 is applied to the rated Isc at 25 °C (77 °F) when the
panel is colder than -21 °C (70 °F).
4–2
975-0239-01-01
Mounting
MPPT Voltage Range
The XW Solar Charge Controller maximum power point tracking algorithm maximizes the
output power of PV arrays as long as the operating voltage is within the MPPT operational
window. Ensure that the PV array used in the system operates within the MPPT
operational window.
Effects of array voltages outside of the MPPT operational window are shown in Table 4-1.
Table 4-1 MPPT Operational Window
Voltage
Effect of Array Voltage
XW Solar Charge
Controller Mode
Voc < Battnom
(system battery voltage)
Charge Controller not operating.
Low Light
VMPP = Battnom to 120 Vdc
Maximum harvest of solar energy.
Charging
(MPPT window)
120 Vdc < VMPP < 140 Vdc
Charge Controller reduces the output
current limit to protect the unit from voltage
spikes.
Thermal Derating
VMPP > 140 Vdc
(or Voc > 140 Vdc)
Charge Controller shuts down. Unit may be
damaged if Voc > 150 V.
Over-voltage fault.
Mounting
The instructions in this section apply to an installation including the power distribution
panel. Installation procedures will vary according to your specific application. For special
applications, consult a qualified electrician or your Xantrex Certified Dealer.
Important: Installations must be compliant with all local electrical codes. Installation of this
equipment should only be performed by a qualified electrician or by a Certified Renewable Energy
(RE) System installer.
Choosing a Location
The XW Solar Charge Controller is designed to be mounted vertically to the side or the top
of the power distribution panel.
The XW Solar Charge Controller must be installed indoors in a dry, protected location
away from flammable materials, sources of high temperature, moisture, and vibration, and
direct sunlight. The location must also be sheltered from direct sunlight, rain, snow, and
wind-blown debris.
CAUTION: Equipment Damage
Never install the XW Solar Charge Controller where it is exposed to salt water spray. Exposure to
salt water will void the warranty and may cause a malfunction or a shock hazard.
975-0239-01-01
4–3
XW Solar Charge Controller Installation
WARNING: Explosion/Corrosion Hazard
To reduce the risk of fire or explosion, do not install the XW Solar Charge Controller in sealed
compartments containing batteries or in locations that require ignition-protected equipment.
To reduce the risk of corrosion from hydrogen-sulfide gas vented by batteries, do not install the XW
Solar Charge Controller in sealed compartments containing batteries.
If using “sealed” batteries, the controller can be mounted in the same enclosure as long as
it is adequately ventilated.
For optimal and safe operation, ensure there is adequate clearance around the XW Solar
Charge Controller. See Table 4-2. If clearances are reduced below these minimums, rated
performance may not be achieved.
Table 4-2 Minimum Clearance Requirements
Location
Minimum Clearance
Above
6 inches (150 mm) When units are mounted to the side of the power distribution
panel in a vertical stack, the topmost unit must maintain the minimum clearance to
the nearest surface.
In front
Sufficient room to allow for easy access to read the display, to prevent accidental
contact with the heat sink, and to perform maintenance.
On sides
6 inches (150 mm) on at least one side of the overall assembly. A maximum of two
units can be mounted side by side or side mounted against the power distribution panel.
In both configurations, the minimum clearance around the outermost unit must be
maintained.
6 inches (150 mm) on top and side(s)
Figure 4-1 Minimum Clearance Requirements
4–4
975-0239-01-01
Mounting
Removing the Wiring Terminals Cover
Before mounting, you must remove the wiring terminals cover to access the mounting
holes and the wiring terminals. The wiring terminals cover is secured with two Phillips
#8-32 × 2 ½-inch screws on the front cover of the unit. See Figure 4-2.
xantrex
Remove screws to access
the field-wiring terminals.
Figure 4-2 Removing the Wiring Terminals Cover
Removing Knockouts
Six dual and two single knockouts are provided for routing battery, PV array, BTS, and
network cables into the XW Solar Charge Controller. Bushings or conduits must be used
to protect the wiring from damage from rough edges around the knockout holes.
Keyhole slot for wall mounting
Side screws for power distribution
panel mounting
2 7/8"
(73 mm)
12 ¾"
(323 mm)
11"
(280 mm)
14 ½"
(368 mm)
Additional
mounting holes
¼"
(6.35 mm)
2 3/8"
2 1/16"
(60 mm)
1"
(25.4 mm)
(53 mm)
9/16"
4 5/8"
(118 mm)
(14 mm)
5 7/16"
(138 mm)
5 ¾"
(146 mm)
Figure 4-3 Dimensions and Knockout Locations
975-0239-01-01
4–5
XW Solar Charge Controller Installation
Single knockouts intended
for BTS and network cables
DUAL KNOCKOUT
34.52 (1 3/16) & 27.78 (1 1/16)
2 PL
DUAL KNOCKOUT
34.52 (1 3/16) & 27.78 (1 1/16)
2 PL
KNOCKOUT
27.78 (1 1/16)
KNOCKOUT
27.78 (1 1/16)
31.50 (1 ¼)
DUAL KNOCKOUT
34.52 (1 3/16) & 27.78 (1 1/16)
25.9 (1)
26.47 (1)
26.47
(1)
20.20
(¾)
50.00 (2)
50.80 (2)
25.0 (1)
50.80 (2)
50.00 (2)
Figure 4-4 Knockout Dimensions
Mounting the Controller
The XW Solar Charge Controller can be mounted to either the side or the top of the power
distribution panel. The power distribution panel has keyhole slots and screw holes for side
mounting, and two pairs of conduit holes for top mounting the XW Solar Charge
Controller.
To mount the XW Solar Charge Controller to the side of the power distribution
panel:
1. Back out the top side screw on the XW Solar Charge Controller by ¼-inch.
2. Remove the lower side screw on the XW Solar Charge Controller.
3. Holding the unit against the side of the power distribution panel, insert the top side
screw into one of the two keyhole slots on the side of the power distribution panel and
pull the unit down into the slot.
4. Insert the lower side screw through the hole on the inside of the power distribution
panel and into the side of the XW Solar Charge Controller.
5. Tighten the lower side screw to secure the XW Solar Charge Controller.
To mount the XW Solar Charge Controller to the top of the power distribution
panel:
1. Remove a pair of knockouts from the top of the power distribution panel.
2. Remove the bottom knockouts from the XW Solar Charge Controller.
3. Align the knockouts on the power distribution panel and XW Solar Charge Controller,
and secure the unit with two locking strain reliefs or threaded connectors.
In a stand-alone installation, the XW Solar Charge Controller is mounted using three #10
× ½-inch or #12 × ½-inch pan-head screws.
To mount the XW Solar Charge Controller away from the power distribution panel:
1. Remove the wiring terminals cover.
2. Mark the location of the keyhole slot on the wall.
3. Secure the top mounting screw in the location marked. Leave the screw head backed
out approximately ¼ inch (6 mm).
4. Place the controller onto the screw and pull it down into the keyhole slot.
4–6
975-0239-01-01
Mounting
5. Insert two screws in the two mounting holes provided to secure the unit to the wall.
6. Provide strain-relief clamps or conduit to prevent damage to the circuit board and
terminal block from pulling on the wires.
¼"
Place keyhole
slot over the
mounting screw.
xantrex
Solar Charge Controller
Secure with two more screws.
Figure 4-5 Mounting the XW Solar Charge Controller
975-0239-01-01
4–7
XW Solar Charge Controller Installation
Grounding
The XW Solar Charge Controller is designed to work only with negative-grounded
electrical systems. Grounding for both PV and battery circuits is provided inside the
wiring compartment. Each ground connection can accommodate up to #6 AWG wire size.
A fuse rated at 1 A, 600 V (accessible from inside the wiring compartment) grounds the
negative conductor of the PV array and provides PV ground-fault protection (PV-GFP).
Replace with Littelfuse KLKD 1 or equivalent.
Important: Only one Charge Controller is to have the PV-GFP fuse installed in
installations with multiple parallel XW Series. Before mounting and connecting the XW
Seriess, remove the PV-GFP fuse from each unit except one.
WARNING: Shock Hazard
Do not connect the battery negative to ground. NEC requirements specify that the battery
negative ground must be done only through the 1A PV-GFP fuse. Bonding the battery
negative to ground disables PV ground-fault protection. The battery compartment must
only be grounded if it is metal.
WARNING: Fire Hazard
Ensure there is no other ground connection in the DC
wiring or the PVGFP will be defeated and will not protect
the array from ground fault conditions.
xantrex
Solar Charge Controller
This symbol identifies the
protective conductor
(grounding) connection.
Chassis ground terminals.
The PVGFP fuse is located under the power
connector circuit board
Figure 4-6 XW Solar Charge Controller Safety Ground Connector
WARNING: Shock Hazard
Disconnect PV and battery circuits before removing the grounding connection or before removing
or installing the PV-GFP fuse.
4–8
975-0239-01-01
Wiring
Wiring
Important: Installations must meet all local electrical codes. Installations of this equipment
should only be performed by a qualified electrician or a Certified Renewable Energy (RE) System
Installer.
WARNING: Shock Hazard
Disconnect battery and PV sources before wiring.
DC Terminal Connector Locations
Terminal connectors for DC wiring are located inside the wiring compartment. The labels
above the DC wiring terminals and inside the wiring compartment identify all the
connection points. See Figure 4-7.
CONNECTIONS DIAGRAM
TERMINAL TORQUE REQUIREMENTS
15lbf.in (1.7 Nm) FOR #14-10 AWG WIRE
18lbf.in (2.0 Nm) FOR #8 AWG WIRE
20lbf.in (2.2 Nm) FOR #6 AWG WIRE
BATTERY BATTERY
+
-
PV
-
AUX
BTS XANBUS XANBUS
+-
PV
+
Figure 4-7 DC Connection Terminals
Wire Size and Over-current Protection Requirements
The wiring, over-current protection devices (fuses and circuit breakers), and installation
methods used must conform to all national and local electrical code requirements.
Wiring must be protected from physical damage with conduit or a strain relief clamp.
The BTS, auxiliary output, and network cables must pass through a different conduit than
the conduits used for PV wiring and battery cables. Pull the BTS cable through the conduit
first as the connector may not fit if other wires have been pulled first.
Current rating
The XW Solar Charge Controller is rated for 60 A maximum Isc. Since PV outputs can
vary due to the array size or sunlight striking it, the safe minimum wire size must be
chosen for maximum array short-circuit current. Consult PV array manufacturer
specifications.
Minimum wire
gauge
For installations where the PV array output is the maximum allowable 60 A Isc, the
minimum allowable wire gauge is #6 AWG (13.3 mm2) copper wire with a 90 °C (194 °F)
insulation rating. This wire gauge is determined by electrical code requirements regarding
conduit knockout sizes, wire bending radius, and space available within the XW Solar
Charge Controller wiring compartment.
No crimp-on terminals or lugs are required.
Over-current
protection
975-0239-01-01
Over-current protection must be installed for the battery and PV circuits to protect the XW
Solar Charge Controller from short circuits at its input and output. The NEC requires all
circuits to be protected with a device rated for 125% of the rating of the circuit.
4–9
XW Solar Charge Controller Installation
Table 4-3 Recommended Circuit Breakers for the XW Solar Charge Controller
Xantrex Part
Number
Description
865-1065
Master Pack - Qty 6, Breaker 250A, 160 Vdc, Stud Terminal, Panel
Mount, UL/CSA
865-1070
Master Pack - Qty 12, Breaker 80A, 125 Vdc, Panel Mount, UL/CSA
865-1075
Master Pack - Qty 48, Breaker 60A, 160 Vdc, Panel Mount, UL/CSA
Battery Circuit
The DC-rated fuse or circuit breaker between the battery and the XW Solar Charge
Controller must have a maximum size of 1.25 × 60 A (the maximum current rating of the
XW Solar Charge Controller). That is, the fuse or circuit breaker must be rated equal to or
above 75 A.
PV Circuit
The DC-rated fuse or circuit breaker between the PV array and the XW Solar Charge
Controller must be rated for the Isc of the array but will not exceed the 60 A rating.
Long-distance wire
runs
If there is a significant distance between the PV array and the XW Solar Charge Controller
or between the XW Solar Charge Controller and the battery, larger wires can be used to
reduce the voltage drop and improve performance. Refer to Table 4-4 or Table 4-5.
WARNING: Equipment damage
Do not connect an array capable of delivering over 60 A Isc to the XW Solar Charge Controller.
Wires larger than #6 AWG can be used only to reduce power loss in the wiring.
To use a larger size wire, use a splicer block (terminal block) approved and rated for this
application. This allows the larger cable size from the batteries to be “spliced” to the #6
AWG wire connected to the XW Solar Charge Controller. The splicer block must be
installed outside of the XW Solar Charge Controller wiring compartment.
Follow manufacturer’s recommendations for torque and mounting. Splicer blocks and
split-bolt kerneys are available from renewable energy suppliers.
Important: Local and national electrical codes must be followed for determining additional
installation requirements.
Larger wire sizes may be used to improve performance, but may not be installed directly into this
Charge Controller. Use a splicer block as previously described.
Maximum one-way
distance and wire
size
4–10
Refer to Table 4-4 or Table 4-5 and find the maximum current in the left column, and the
one-way distance from the PV array to the XW Solar Charge Controller (or the distance
from the XW Solar Charge Controller to the battery) on the same line, then read the wire
size required at the top of the column.
975-0239-01-01
Wiring
Table 4-4 One-Way Wire Distance and Wire Size for a 24 Vdc System
Maximum one-way wire distance for a < 3% voltage drop assuming 60 Adc charging current
For 24 Vdc systems
Distance in feet (meters)a
Distance in feet (meters)
Amps
12 AWG
10 AWG
8 AWG
6 AWG
4 AWG
3 AWG
2 AWG
1 AWG
1/0 AWG
10
17.6 (5.36)
28.0 (8.54)
44.4 (13.54)
70.6 (21.52)
112.2 (34.2)
141.8 (43.22)
179.2 (54.62)
225.0 (68.58)
283.4 (86.38)
12
14.6 (4.46)
23.2 (7.08)
37.0 (11.28)
58.8 (17.92)
93.4 (18.46)
118.2 (36.02)
149.2 (45.48)
187.4 (57.12)
236.2 (72.00)
14
12.6 (3.84)
20.0 (6.10)
31.8 (9.70)
50.4 (15.36)
80.2 (24.44)
101.2 (30.84)
128.0 (39.02)
160.8 (49.02)
202.4 (61.70)
16
11.0 (3.36)
17.4 (5.30)
27.8 (8.48)
44.2 (13.48)
70.0 (21.34)
88.6 (27.0)
112.0 (34.14)
140.6 (42.86)
177.2 (54.02)
18
9.8 (2.98)
17.6 (4.76)
24.8 (7.56)
39.2 (11.94)
62.4 (19.02)
78.8 (24.02)
99.6 (30.36)
125.0 (38.10)
157.4 (47.98)
20
8.8 (2.68)
14.0 (4.26)
22.2 (6.76)
35.2 (10.72)
56.0 (17.06)
70.8 (21.58)
89.6 (27.32)
112.4 (34.26)
141.8 (43.20)
25
11.2 (3.42)
17.8 (5.42)
28.2 (8.60)
44.8 (13.66)
56.6 (17.26)
71.6 (21.82)
90.0 (27.44)
113.4 (34.56)
30
9.4 (2.86)
14.8 (4.52)
23.6 (7.20)
37.4 (11.4)
47.2 (14.38)
59.8 (18.22)
75.0 (22.86)
94.4 (28.78)
35
12.8 (3.90)
20.2 (6.16)
32.0 (9.76)
40.4 (12.32)
51.2 (15.6)
64.2 (19.56)
81.0 (24.68)
40
11.2 (3.42)
17.6 (5.36)
28.0 (8.54)
35.4 (10.78)
44.8 (13.66)
56.2 (17.12)
70.8 (24.58)
45
15.6 (4.76)
25.0 (7.62)
31.4 (9.58)
39.8 (12.14)
50.0 (15.24)
63.0 (19.20)
50
14.2 (4.32)
22.4 (6.82)
28.4 (8.66)
35.8 (10.92)
45.0 (13.72)
56.6 (17.26)
60
12.6 (3.84)
18.6 (5.66)
23.6 (7.20)
29.8 (9.08)
37.4 (11.4)
47.2 (14.38)
a.These wire sizes are not approved by UL to be installed in the controller, but may be used external to the controller (using a splicer block) to reduce
voltage drop and improve performance.
Table 4-5 One-Way Wire Distance and Wire Size for a 48 Vdc System
Maximum one-way wire distance for a < 3% voltage drop assuming 60 Adc charging current
For 48 Vdc systems
Distance in feet (meters)a
Distance in feet (meters)
Amps
12 AWG
10 AWG
8 AWG
6 AWG
10
70.4 (21.44)
112.0 (34.16)
177.6 (54.16)
282.4 (86.80)
12
58.4 (17.84)
92.8 (28.32)
148.0 (45.12)
14
50.4 (15.36)
80.0 (24.40)
16
44.0 (13.44)
18
20
4 AWG
3 AWG
2 AWG
1 AWG
1/0 AWG
448.8 (136.8)
567.2 (172.88)
716.8 (218.48)
900.0 (274.32)
1133.6 (345.52)
235.2 (71.68)
373.6 (113.84)
472.8 (144.08)
596.8 (181.92)
749.6 (228.48)
944.8 (288.00)
127.2 (38.8)
201.6 (61.44)
320.8 (97.76)
404.8 (123.36)
512.0 (156.08)
643.2 (196.08)
809.6 (246.80)
69.6 (21.20)
111.2 (33.92)
176.8 (53.92)
280.0 (85.36)
354.4 (108.00)
448.0 (136.56)
562.4 (171.44)
708.8 (216.08)
39.2 (11.92)
70.4 (19.04)
99.2 (30.24)
156.8 (47.76)
249.6 (76.08)
315.2 (96.08)
398.4 (121.44)
500.0 (152.40)
629.6 (191.92)
35.2 (10.72)
56.0 (17.04)
88.8 (27.04)
140.8 (42.88)
224.0 (68.24)
283.2 (86.32)
358.4 (109.28)
449.6 (137.04)
567.2 (172.80)
25
44.8 (13.68)
71.2 (21.68)
112.8 (34.40)
179.2 (54.64)
226.4 (69.04)
286.4 (87.28)
360.0 (109.76)
453.6 (138.24)
30
37.6 (11.44)
59.2 (18.08)
94.4 (28.80)
149.6 (45.60)
188.8 (57.52)
239.2 (72.88)
300.0 (91.44)
377.6 (115.12)
35
51.2 (15.60)
80.8 (26.64)
128.0 (39.04)
161.6 (49.28)
204.8 (62.40)
256.8 (78.24)
324.0 (98.72)
40
44.8 (13.68)
70.4 (21.44)
112.0 (34.16)
141.6 (43.12)
179.2 (54.64)
224.8 (68.48)
283.2 (86.32)
45
62.4 (19.04)
100.0 (30.48)
125.6 (38.32)
159.2 (48.56)
200.0 (60.96)
252.0 (76.80)
50
56.8 (17.28)
89.6 (27.28)
113.6 (34.64)
143.2 (43.68)
180.0 (54.88)
226.4 (69.04)
60
50.4 (15.36)
74.4 (22.64)
94.4 (28.80)
119.2 (36.32)
149.6 (45.60)
188.8 (57.52)
a.These wire sizes are not approved by UL to be installed in the controller, but may be used external to the controller (using a splicer block) to reduce
voltage drop and improve performance.
975-0239-01-01
4–11
XW Solar Charge Controller Installation
Connecting the XW Solar Charge Controller to the Distribution Panel
WARNING: Shock Hazard
Whenever a PV array is exposed to light, a shock hazard exists at the output wires or exposed
terminals. To reduce the risk of shock during installation, cover the array with an opaque (dark)
material before making the connections. PV arrays generate voltage whenever light strikes the
surface of the array. Before connecting the XW Solar Charge Controller, cover the array to prevent
any current from being generated.
WARNING: Shock Hazard
Do not connect the battery negative to ground. Bonding the battery negative to ground disables PV
ground-fault protection.
To connect the XW Solar Charge Controller:
1. Connect the PV array’s positive (+) output to the PV array disconnect.
2. Route another (+) cable from the other end of the PV disconnect to the terminal
marked PV + in the XW Solar Charge Controller.
3. Connect the PV array’s negative (–) output to the terminal marked PV – in the XW
Solar Charge Controller.
4. Connect a positive (+) cable from the terminal marked BAT + to the battery disconnect.
5. Connect a second positive (+) cable to the other side of the battery disconnect and
connect to the positive (+) battery terminal.
6. Connect the negative (–) battery cable to the terminal marked BAT – in the XW Solar
Charge Controller.
7. Torque the Charge Controller terminals as follows.
• 15 inch-pounds (1.7 Nm) for #14–10 AWG wire
• 18 inch-pounds (2.0 Nm) for #8 AWG wire
• 20 inch-pounds (2.2 Nm) for #6 AWG wire.
Be careful not to overtighten. Allow some slack on the cables within the controller and
secure the wiring with strain reliefs or cable clamps.
See Figure 4-8.
4–12
975-0239-01-01
Wiring
Actual wiring requirements may vary.
Figure 4-8 Connecting Solar DC Sources in the Power Distribution Panel
975-0239-01-01
4–13
XW Solar Charge Controller Installation
Commissioning
During commissioning, the XW Solar Charge Controller prompts the installer to enter
important system information such as the nominal battery voltage, battery type, and
battery bank capacity. Ensure the system information is available prior to commissioning.
If a XW System Control Panel is present, the XW System Control Panel is intended to be
the configuration interface, so the prompt screens are suppressed. If you prefer to
configure using the prompt screens, disconnect the Xanbus cable connecting the XW
System Control Panel from the XW Solar Charge Controller before powering up for the
first time.
Configuration Screens
When power is first applied to the XW Solar Charge Controller, several configuration
screens prompt you to enter the following information:
•
•
•
•
A “DC out” (battery) connection, which enables the XW Solar Charge Controller to
read and share the same battery information with other Xanbus-enabled devices that
charge or invert from the same battery bank.
Battery type: Flooded (default), Gel, AGM, Custom.
If you select Custom, the settings for battery type match the default settings for
Flooded batteries until you reconfigure the settings on the Custom Battery menu.
Nominal battery voltage of the battery bank connected to the XW Solar Charge
Controller.
The XW Solar Charge Controller automatically detects battery voltages of 12 V, 24 V
and 48 V. If your nominal system voltage is 36 V or 60 V, enter the correct system
voltage on this screen.
Battery bank capacity, in amp-hours.
Commissioning Units Using a XW System Control Panel
In systems where an XW System Control Panel (SCP) is present, the SCP is intended to be
the configuration interface. For information about SCP navigation and menus, see
Appendix B, “XW System Control Panel Menus in the XW Inverter/Charger Operation
Guide.
Commissioning units using an SCP involves three separate procedures:
1. Setting the Device Numbers for all XW Solar Charge Controllers.
2. Configuring Connections and Charger Settings for the first XW Solar Charge
Controller.
3. Copying settings from the first unit to the other XW Solar Charge Controller.
To set the Device Numbers for all XW Solar Charge Controllers:
1. Ensure power is applied to the XW System Control Panel.
2. Close the DC disconnect or use a selector switch to apply battery power to all of the
XW Solar Charge Controllers at the same time. When the XW Solar Charge
Controllers are powered up, they will detect that an SCP is already operating on the
network, and be ready for configuration through the SCP. Do not apply PV power at
this point.
4–14
975-0239-01-01
Commissioning
3. From the Select Device menu on the SCP, select a XW Solar Charge Controller (each
unit should appear as “MPPT60 00” where the 60 stands for 60A, and the 00 is its
device number).
4. On the MPPT Setup menu, ensure the Advanced Settings item is displayed. If
Advanced Settings are not displayed (and Basic Settings appears as the last item on the
menu), press the up arrow, down arrow and Exit keys together. (See “Advanced menu”
on page B-7 of the XW Inverter/Charger Operation Guide.)
5. Select Advanced Settings, then select the Multi Unit Config menu. After entering the
Multi Unit Config menu, the LCD backlight on the XW Solar Charge Controller to be
configured will flash.
6. On the Multi Unit Config menu, select Dev Number and set it to a number other than
00.
The device number can be set to any number between 01 and 31. For the first XW
Solar Charge Controller, 01 is recommended. If you have two charge controllers,
simply set them to 01 and 02.
7. Press Exit until the Select Device menu is displayed.
The XW Solar Charge Controller now appears as MPPT60 01 on the menu.
8. Repeat steps 3 through 7 for the next XW Solar Charge Controller.
When you have set the device number for all XW Solar Charge Controllers, you can
configure Connections and Charger Settings for the first XW Solar Charge Controller.
To configure Connections and Charger Settings for the first XW Solar Charge
Controller:
1. On the Select Device Menu, select “MPPT60 01.”
2. Navigate to the Multi Unit Config menu and select Connections.
On the Connections menu, you can configure PV In (PV input) and DC Conn (DC
output, or the battery bank). If the system has only one battery bank, leave DC Conn at
the default setting. The PV In setting allows you to differentiate which array is going
to which XW Solar Charge Controller. This setting is used for status reporting only,
not for any internal controls. Setting PV In to a non-default value is optional.
3. Press Exit twice to leave the Connections menu and Multi Unit Config menu.
4. From the Advanced Settings menu, select Charger Settings.
5. Set the Battery Type, Battery Capacity, and any other charger settings required for
your system.
While in the Charger menu, ensure that the Nominal Battery Voltage is set correctly (it
is shown as Batt Voltage and appears as the last item on the menu). If you select
“Custom” for your Battery Type, you can further configure the Bulk, Absorption,
Float and other settings for the charge cycle.
The first charge controller should now be configured properly for your system.
If multiple charge controllers are installed, you can now copy the first unit’s
configuration over to other units.
To copy the XW Solar Charge Controller setup to another unit:
1. On the SCP, press Exit to leave the Advanced Settings menu and view the Select
Device menu.
2. On the Select Device Menu, select the next XW Solar Charge Controller for
configuration.
975-0239-01-01
4–15
XW Solar Charge Controller Installation
3. On the Advanced Settings menu, select Copy From, then select the XW Solar Charge
Controller you want to copy from. You should select the unit with the device number
that matches the first unit you configured.
4. Press Enter.
The settings are automatically copied from the selected unit.
Note: The Copy From command will not give you any indication that it has completed
its task. However, you can quickly check for yourself that the charger settings you have
chosen have been copied properly by viewing some of the settings you originally
configured.
5. Uncover the PV array and/or apply power with the disconnect or selector switch.
The XW Solar Charge Controller starts up in sleep mode and waits for a short period to
determine that the input voltage is greater than the output voltage. After the input voltage
exceeds the output voltage by the required margin for 10 seconds, the unit begins
operating.
4–16
975-0239-01-01
5
XW System Accessories
Installation
Chapter 5, “XW System Accessories Installation” describes how to mount
and install the XW System Control Panel and the Automatic Generator Start.
For this Topic
See....
“The XW System Control Panel”
page 5–2
“The XW Automatic Generator Start”
page 5–7
XW System Accessories Installation
The XW System Control Panel
The XW Series Inverter/Charger can be controlled remotely by connecting a XW System
Control Panel. The XW System Control Panel is optional for single inverter systems. The
XW System Control Panel is required for configuring systems with multiple inverters. The
XW System Control Panel allows access to programming features of the inverter and
allows the system to be modified to specific installation requirements.
The XW System Control Panel is connected to the inverter through one of two Xanbus
ports.
Figure 5-1 XW System Control Panel Xanbus Port Locations
The XW System Control Panel is designed to be wall mounted (see “Mounting the XW
System Control Panel” on page 5–3), and requires no connections other than the network
cables or terminators that plug into the back of the unit.
Because you cannot access the XW System Control Panel network inputs after the unit is
mounted, the network cables need to be routed through the wall and connected before
securing the XW System Control Panel.
See Chapter 3, “Xanbus Network Installation”, for more information about installing a
Xanbus-enabled device as part of a network-managed power system.
5–2
975-0239-01-01
The XW System Control Panel
Materials and Tools Required
You will need these materials and tools to complete the installation:
❐ Mounting template sticker (supplied)
❐ Mounting plate (supplied)
❐ mounting plate (supplied)
❐ Four #6 screws (supplied)
❐ Two #8 screws (supplied)
❐ Cable clamps or hardware fasteners
❐ Xantrex network cables or equivalent (CAT 5 or CAT 5E cable with RJ45 connectors
wired to T568A standard) A 7-foot cable is provided.
❐ Xantrex male network terminator (supplied).
❐ Phillips head screwdriver
❐ Jigsaw or small keyhole saw
❐ Power drill with 1/8" bit (optional)
Choosing a Location
Choose a location that is easily accessible. The XW System Control Panel should be
mounted where you can have unobstructed access to the screen and buttons.
The location should be indoors, dry, and free from corrosive or explosive fumes.
WARNING: Explosion hazard
The XW System Control Panel is not Ignition Protected. Do not install in areas requiring
Ignition-Protected equipment, such as areas containing gasoline engines, tanks, or fuel-line fittings.
Mounting the XW System Control Panel
The XW System Control Panel can be mounted three ways:
•
•
•
Flush mounted through an opening in a wall using the mounting plate
Surface mounted using the mounting plate
Flush mounted through an opening in a wall and secured with four #6 screws.
WARNING: Shock hazard
Before making an opening in a wall or panel, ensure there is no wiring or other obstruction within
the wall.
To flush mount the XW System Control Panel with mounting plate:
1. Using a jigsaw and the supplied template sticker as a guide, cut out the hole for the
mounting plate. The mounting plate fastens to walls up to 3/4 inch (19 mm) thick.
2. Route the network cable from the GT Inverter inside the wall and through the opening.
3. Insert the mounting plate with the two tabs in a vertical position into the hole (see
Figure 5-2).
975-0239-01-01
5–3
XW System Accessories Installation
Tabs in vertical position
Figure 5-2 Inserting the Mounting Plate
4. Secure the mounting plate by tightening the two screws to rotate the tabs to the
horizontal position (see Figure 5-3) and pull the tabs tight against the inner surface of
the wall. Be careful not to overtighten the screws and damage the wall.
Rotate tabs to
horizontal position
Figure 5-3 Securing the Mounting Plate
5. Connect the network cable(s) (and terminator if necessary) to either input on the back
of the XW System Control Panel. See Figure 5-4.
Connect a network terminator to the XW System Control Panel if it is the last device
at the end of a series-type network layout.
Important: To ensure communication signal quality, the network must be terminated at each
end with a terminator.
5–4
975-0239-01-01
The XW System Control Panel
Figure 5-4 Connecting the Network Cables
6. Place the unit into the mounting plate and secure it with four #6 screws.
Figure 5-5 Securing the XW System Control Panel
7. Peel off the protective plastic coating covering the screen and indicator light.
To flush mount the XW System Control Panel with no mounting plate:
1. Peel the backing from the supplied mounting template sticker and place it in your
chosen installation location. Use the template to mark the location for the area to be
cut out.
2. Pilot-drill the mounting holes (if necessary, depending on your mounting surface) and,
using a jigsaw, cut out the hole in which the XW System Control Panel will be
inserted.
3. Route the network cable(s) from other Xanbus-enabled devices inside the wall and
through the opening.
975-0239-01-01
5–5
XW System Accessories Installation
CAUTION: Equipment damage
Connect the XW System Control Panel only to other Xanbus-enabled devices.
:
Although the cabling and connectors used in this network system are the same as Ethernet
connectors, this network is not an Ethernet system. Equipment damage may result from
attempting to connect these two different systems.
4. Connect the network cable(s) (and terminator if necessary) to either input on the back
of the XW System Control Panel. See Figure 5-4.
Connect a network terminator to the XW System Control Panel if it is the last device
at the end of a series-type network layout.
5. Place the unit in the opening and secure it with four #6 screws.
6. Peel off the protective plastic coating covering the screen and indicator light.
To surface mount the XW System Control Panel:
1. Using the supplied template sticker as a guide, mark the locations for two mounting
screws and the access hole for the network cables.
2. Using a hole saw, cut out the access hole for the network cable(s).
3. Route the network cable(s) from other Xanbus-enabled devices inside the wall and
through the access hole.
4. Attach the mounting plate with two #6 screws.
5. Connect the network cable(s) (and terminator if necessary) to either input on the back
of the XW System Control Panel.
Connect a network terminator to the XW System Control Panel if it is the last device
at the end of a series-type network layout.
6. Place the unit into the mounting plate and secure it with four #6 screws. See Figure
5-6.
7. Peel off the protective plastic coating covering the screen and indicator light.
Figure 5-6 Surface Mounting the XW System Control Panel
5–6
975-0239-01-01
The XW Automatic Generator Start
Verifying the Installation
If network power (from an inverter/charger) is present, the backlight will come on and the
XW System Control Panel will show the startup screen (see the XW Inverter/Charger
Operation Guide), then show the System Home screen.
The XW Automatic Generator Start
Some generators allow automatic starting. Connecting an Automatic Generator Start to the
generator and to the Xanbus network is required for the XW System to benefit from
automatic generator start/stop capability.
WARNING: Shock Hazard
Auto-start generators can start automatically at any time.
Affix the warning labels (supplied with the XW Automatic Generator Start) regarding auto-start
generators on or near the main AC distribution panel and near the generator.
The AGS connects to:
• Inverter/Charger’s Xanbus port
• Generator
Automatic Generator Start
Figure 5-7 Connecting the AGS Communications Cable to the XW Series
Preparing an Installation
Before installing the XW Automatic Generator Start Module, consider how and where the
unit will be mounted. Pre-plan the connection routes between the XW Automatic
Generator Start, the generator, thermostats, and the XW Automatic Generator Start. Refer
to the XW AGS Owner’s Guide for additional information.
See Chapter 3, “Xanbus Network Installation”, for more information about installing a
Xanbus-enabled device as part of a network-managed power system.
Materials and Tools Required
The following tools and materials may be needed to install the XW Automatic Generator
Start:
❐ Mounting template (supplied)
❐ Wiring harness (Xantrex part number 809-0917, supplied)
❐ Four #6 screws, 1¼ inch (supplied)
975-0239-01-01
5–7
XW System Accessories Installation
❐ #16 or #18 AWG wire (see “Wire Size and Length” on page 5–11)
❐ Xantrex network cables or equivalent (Category 5)
❐ Network terminators (if required)
❐ Phillips screwdriver
❐ Wire cutters and wire strippers
Choosing a Location
The XW Automatic Generator Start should be installed in a location that meets the
following requirements:
Dry
The unit is intended for use in a dry location. The XW Automatic Generator Start
complies with UL458 Marine Supplement drip-test requirements, but the location
should be as dry as possible.
Cool
The XW Automatic Generator Start operates between -4 and 122 °F (-20 and
50 °C).
Safe
The XW Automatic Generator Start is not ignition protected. Do not install it in
areas requiring ignition-protected equipment, such as compartments housing
gasoline engines.
Close to
generator
Avoid excessive wire lengths and use the recommended wire lengths and sizes
(see “Wire Size and Length” on page 5–11). It is more important for the XW
Automatic Generator Start to be close to the generator than close to the inverter,
although for safety reasons, the XW Automatic Generator Start should not be
installed in the same compartment as a gasoline-powered generator.
Routing the Connections
WARNING: Explosion Hazard
This equipment is not ignition protected. To prevent fire or explosion, do not
install the XW Automatic Generator Start in locations that require
ignition-protected equipment. This includes any space containing
gasoline-powered machinery, fuel tanks, as well as joints, fittings, or other
connections between components of a fuel system.
Follow all relevant instructions exactly before installing or using your XW
Automatic Generator Start.
WARNING: Shock and Energy Hazards
Before making any connections to the generator, ensure that the generator’s
starter is disabled and the generator’s start battery is disconnected.
Connection Types
Because the XW Automatic Generator Start will be part of a Xanbus system, it is
necessary to consider how to route two types of connections:
•
•
connections to the generator, thermostats, and other external devices and switches,
using the 20-contact connector and wiring harness.
connections to other Xanbus-enabled devices, using network cables.
For information on designing and installing the network, see the XW Inverter/Charger
Operation Guide.
5–8
975-0239-01-01
The XW Automatic Generator Start
Network ports
20-contact
connector
Network cables to other
Xanbus-enabled devices
Wiring harness (connection
to generator, thermostats,
and external switches)
Figure 5-8 XW Automatic Generator Start External Connections
Installing the XW Automatic Generator Start
Installation
Overview
Installing the XW Automatic Generator Start involves the following steps:
1. Mounting the unit.
2. Connecting the wiring harness to:
•
•
•
•
the generator (page 5–12)
thermostats (optional) (page 5–13)
external shutdown switch (optional) (page 5–13)
external ON/OFF switch and LED (optional) (page 5–14)
3. Connecting the wiring harness to the 20-contact connector on the XW Automatic
Generator Start.
4. Connecting the XW Automatic Generator Start to the XW System Control Panel and
other network-enabled devices (page 5–16).
Important: Because each installation varies according to the location, the
type of generator, and the overall complexity of the Xanbus system, these
instructions can offer only general guidelines for the many installation options
available.
WARNING: Shock Hazard
Before installing the XW Automatic Generator Start as part of a pre-existing
Xanbus system, put the system in Standby in order to disable the electrical
operation of networked devices. See the Automatic Generator Start Owner’s
Guide for instructions on putting the System in Standby.
975-0239-01-01
5–9
XW System Accessories Installation
Mounting the Unit
The XW Automatic Generator Start is to be mounted vertically on a wall with the
connectors facing downwards.
To mount the XW Automatic Generator Start:
1. Hold the unit flush and square against the wall, panel, or horizontal surface.
•
If the mounting surface requires pre-drill holes for the screws, use the supplied
mounting template to mark, then drill, four holes.
2. With a Phillips screwdriver and the supplied #6 screws, secure each corner of the XW
Automatic Generator Start to the mounting surface.
Wiring to the 20-contact Connector
CAUTION: Shock Hazard
All installation wiring should be performed by a qualified installer or electrician.
WARNING: Fire, Shock, and Energy Hazards
The 20-contact connector is intended for connection to Class 2 ELV (Extra Low
Voltage) circuits only. Do not exceed the circuit limitations specified in the
following section.
ELV Circuits
ELV (Extra-Low Voltage) circuits have an open-circuit voltage of not more than 30 Vrms
or 42.2 VDC or peak, and are therefore not a shock hazard.
Class 2 Circuits
As per the US National Electrical Code (NEC) and the Canadian Electrical Code (CEC),
available power in Class 2 circuits is limited to 100 VA, usually by current limiting by
means of overcurrent protection or series resistance. The current is limited to 5 A for
circuits with open-circuit voltage of 20 V, and to I=100/Voc for circuits with open circuit
voltage between 20 V and 30 V.
Circuit Limitations
The relay contacts in the XW Automatic Generator Start are rated at 5 A maximum and all
circuits on the 20-contact connector are rated at 30 V maximum.
Ensure that all circuits connected to the 20-contact connector obey the following limits:
Table 5-1 Circuit Limitations
Circuit Parameter
Circuit Maximum
Open circuit voltage (Voc)
30 V maximum
Overcurrent protection
(fuse size for open circuit voltage up to 20 V)
5 A maximum
Overcurrent protection
(fuse size for open circuit voltage from 20 V to 30 V)
Wiring Harness
5–10
5 A to 3.33 A
(100/Voc amps
maximum)
Connections to the generator, thermostats, and external ON/OFF switches are made using
a wiring harness that plugs into the 20-contact connector (see Figure 5-8).
975-0239-01-01
The XW Automatic Generator Start
The wires on the wiring harness can be extended to meet installation requirements. When
extending the wire harness, ensure that the extension wires are the same color as the wires
on the harness.
To install the XW Automatic Generator Start using the wiring harness:
1. Connect each wire on the harness to its intended wire or contact on the generator,
thermostats, or external switches.
2. Plug the harness into the connector on the bottom panel of the XW
Automatic Generator Start.
Wire Identification
Each wire on the harness is identified by a number and a color. The wire numbers are
shown in Figure 5-9 and their colors and functions are described in Table 5-3.
Wire Size and
Length
Required wire sizes for the external connections to the wiring harness are:
Table 5-2 Required Wiring Size Based on Length of Cable
0–30 ft. (9 m)
Over 30 ft. (9 m)
18 AWG
16 AWG
When planning the routing for external connections, ensure that wire lengths are sufficient
to plug the wiring harness into the XW Automatic Generator Start once all the external
connections are complete.
Figure 5-9 XW Automatic Generator Start Wiring Harness
Table 5-3 Contact Numbers and Functions
975-0239-01-01
Wire
Number Function
Wiring Harness
Wire Color
1
Thermostat 1 input
Yellow
2
Thermostat 1 return
Gray
3
Thermostat 2 input
Orange
4
Thermostat 2 return
Gray
5
External shutdown input
White/Black
6
External shutdown return
Gray
5–11
XW System Accessories Installation
Table 5-3 Contact Numbers and Functions (Continued)
Wire
Number Function
Wiring Harness
Wire Color
7
External manual on input
White/Green
8
External manual off input
White/Red
9
External ON/OFF LED Indicator output
White/Blue
10
Constant 12/24 V B+ (battery positive) for External ON/OFF/LED
Indicator
Red
11
External ON/OFF/LED Indicator return (connected internally to
wire number 13)
Black
12
Generator run signal (switched B+) sense input
Violet
13
Generator run signal (switched B+) sense return (generator battery
negative)
Black
14
Relay 1 (Generator run/stop) Normally open contact
Blue
15
Relay 1 (Generator run/stop) Normally closed contact
White/Violet
16
Relay 1 (Generator run/stop) Common contact
Gray
17
Relay 2 (Generator start) Normally open contact
White
18
Relay 2 (Generator start) Common contact
Gray
19
Relay 3 (Preheat/cooldown) Normally open contact
Brown
20
Relay 3 (Preheat/cooldown) Common contact
Gray
Connecting the Generator
To connect the XW Automatic Generator Start to a generator, you must identify the start
wiring configuration of the generator you want to use. Generators must be auto-start
capable, and generators equipped with remote operation connections are ideal.
If the generator is equipped for remote operation, you must examine the wiring of the
remote cable and connector (or read your generator’s documentation, if available) and
identify the following wires:
Wiring
requirements
Generator types
5–12
• Ground
• Start
• Stop
• Generator run signal, also known as the Hour Meter or Switched B+ (battery positive)
To wire the XW Automatic Generator Start to the generator, you need #16 or #18 AWG
wire connected between contacts 12 to 20 on the wiring harness. How many of these wires
you connect and in which combination depends on your generator type.
The XW Automatic Generator Start has 13 preset generator configurations, or “Gen
Types” (see the XW Automatic Start Owner’s Guide for details on Generator Types). To
ensure that the XW Automatic Generator Start is compatible with your generator’s starting
circuitry, you must select your type of generator from the XW Automatic Generator Start
menu on the XW System Control Panel after completing the installation.
975-0239-01-01
The XW Automatic Generator Start
Important: You can only change GenType after you have put the system or the XW Automatic
Generator Start into Standby mode. See the XW Inverter/Charger Operation Guide for instructions
on putting the system in Standby Mode.
This section describes the generator configurations and provides diagrams for connecting
the wiring harness to the generator’s start wiring.
Important: For an explanation of the terminology used in the following section, refer to
Appendix B of the XW Automatic Generator Start Owner’s Guide. For more information about
XW Automatic Generator Start internal relay activity and timing, see the Automatic Generator
Start Owner’s Guide.
Connecting the Thermostats (optional)
Wires 1, 2, 3, and 4 on the wiring harness can be connected to two thermostats. Wires 1
(yellow) and 2 (gray) are intended for thermostat 1 and wires 3 (orange) and 4 (gray) are
intended for thermostat 2.
Table 5-4 Wiring for Connecting Thermostats
Function
Wiring Harness
Wire Color
1
Thermostat 1 input (12/24 V)
Yellow
2
Thermostat 1 return (ground)
Gray
3
Thermostat 2 input (12/24 V)
Orange
4
Thermostat 2 return (ground)
Gray
Wire Number
These wires connect to 12-volt/24-volt output signals from the thermostats. The XW
Automatic Generator Start will start the generator in response to these signals.
Thermostats can not be programmed using the XW Automatic Generator Start.
For specific information about thermostat wiring and where XW Automatic Generator
Start connections should be made, please consult your thermostat documentation or
contact the thermostat manufacturer.
Connecting an External Shutdown (optional)
The external shutdown input is a 12-volt/24-volt input used to assure that the XW
Automatic Generator Start keeps the generator off under conditions that may be potentially
hazardous. Wire 5 (white/black) and 6 (gray) on the wiring harness are intended for an
external switch or sensor (such as a moisture detector, carbon monoxide detector or coach
running signal) that produces an active high 12-volt or 24-volt output.
Table 5-5 Wiring for Connecting an External Shutdown
Wire number Function
975-0239-01-01
Wiring Harness
Wire Color
5
External shutdown input (12/24 V)
White/Black
6
External shutdown return (ground)
Gray
5–13
XW System Accessories Installation
Connecting an External Manual ON/OFF Switch (optional)
The external manual ON/OFF inputs (wires 7 and 8 on the wiring harness) are intended for
wiring to one or more remote ON/OFF switches for starting and stopping the generator
manually. The other contact of the switch should be connected to ground. In order for the
XW Automatic Generator Start to be able to detect these switches, wire the positive of the
generator battery to the constant 12-volt/24-volt generator battery positive (wire 10 on the
XW Automatic Generator Start wiring harness). See Figure 5-7.
If the generator battery does not have the required voltage, any 12-volt or 24-volt power
source will suit this purpose. If an alternate power source is used, the negative of the
power source must be connect to the other contact of the switch.
CAUTION: Equipment Damage
Do not connect the XW Automatic Generator Start to a 48-volt battery bank. The
XW Automatic Generator Start is limited to a 30V open-circuit maximum by its
regulatory approval and cannot be connected to a 48-volt power source.
Furthermore, tapping 12-volts or 24-volts from a 48-volt battery bank will
unevenly wear out the batteries and shortens the battery bank life.
Table 5-6 Wiring for Connecting an External Manual ON/OFF Switch
Wire Number Function
Wiring Harness Wire Color
7
External manual on input
White/Green
8
External manual off input
White/Red
9
External On/Off LED Indicator
output
White/Blue
10
Constant 12/24 V B+ for
External On/Off/LED Indicator
Red
11
External On/Off/LED Indicator
return
Black
Multiple control panels or simple contact closures can be wired to the external manual
ON/OFF inputs. The XW Automatic Generator Start detects if any of the contacts close
and will change its operating mode to External Manual On or External Manual Off (for
more information, see the XW Automatic Generator Start Owner’s Guide). The XW
Automatic Generator Start turns the generator on or off according to these inputs and the
resulting operating mode change.
The External Manual On and External Manual Off states are not affected by maximum
generator run time. See the XW Automatic Generator Start Owner’s Guide for additional
information.
5–14
975-0239-01-01
The XW Automatic Generator Start
Connecting an External ON/OFF LED
Wires 9 (White/Blue) and 11 (Black) on the wiring harness can be connected to an LED or
other light to accompany a remote external ON/OFF switch. This light turns on when the
generator run signal is active to visually indicate that the generator is running.
Important: With some generators, the generator run signal becomes active
during the preheat stage, before the generator is actually running. In this case, the
external ON/OFF LED (and the Generator On light on the XW Automatic
Generator Start) will turn on during the preheat stage and remain on when the
generator is running.
For some generators, these lights will also remain on for a period of time after the
generator has stopped.
2K
7
START PUSH BUTTON
8
STOP PUSH BUTTON
2K
5K11
9
10
EXTERNAL LED
12V OR 24V
EXTERNAL LED
11
XW Automatic Generator Start
13
GROUND
Figure 5-10 External On/Off Switch and LED Wiring Diagram
975-0239-01-01
5–15
XW System Accessories Installation
Connecting the Wiring Harness to the XW Automatic Generator Start
After all the external connections have been wired to the wiring harness, the connector on
the wiring harness must be plugged into the 20-contact connector on the XW Automatic
Generator Start.
To connect the wiring harness to the XW Automatic Generator Start:
◆ With the click-tab on the wiring harness connector on top (away from the mounting
surface), insert the wiring harness connector into the 20-contact connector on the XW
Automatic Generator Start until the tab clicks into place.
20-contact
connector
Click Tab
Wiring harness (connection to
generator, thermostats, and
external switches)
Figure 5-11 XW Automatic Generator Start External Connections
5–16
975-0239-01-01
The XW Automatic Generator Start
Connecting the XW Automatic Generator Start to the Xanbus Network
CAUTION: Equipment Damage
Connect only to other Xanbus-enabled devices.
Although the cabling and connectors used in this network system are the same as
Ethernet connectors, this network is not an Ethernet system. Equipment
damage may result from attempting to connect a Xanbus-enabled device to an
Ethernet system.
To connect the XW Automatic Generator Start to the Xanbus network, plug a
Category 5 network cable into one of the network ports on the bottom panel of the XW
Automatic Generator Start. Connect the other end of that same cable to any
Xanbus-enabled component that has an available network port. See Figure 5-8 on page
5–9 for the location of the ports on the XW Automatic Generator Start.
If the XW Automatic Generator Start is being installed on an existing Xanbus system, the
system must first be put into Standby. See the XW Automatic Generator Start Owner’s
Guide for instructions on putting the system in Standby.
Depending on the layout of the Xanbus system, the following options are available for
the other network connector on the XW Automatic Generator Start:
•
•
•
A second network cable (in a “daisy-chain” network layout)
A network terminator (in a “daisy chain” network layout where the XW Automatic
Generator Start is the last device at one end of the network)
Nothing (in a multi-drop backbone layout)
Connect 1 or 2 Category 5
network cables as required by
the installation configuration.
Figure 5-12 Connecting the SCP
975-0239-01-01
5–17
XW System Accessories Installation
Verifying Power Is Available
When the XW Automatic Generator Start has been installed properly, the Power and
Network indicator lights illuminate.
If one or both lights are out, check the network connections and ensure the network power
supply is on.
Verify Power and Network indicator
lights are illuminated.
Figure 5-13 Verifying Power is Available
5–18
975-0239-01-01
A
Specifications
Appendix A, “Specifications” provides the electrical and environmental
specifications for the XW Series.
Specifications
Electrical Specifications
Table A-1 XW Power System Electrical Specifications
Model
XW6048-120/240-60
XW4548-120/240-60
XW4024-120/240-60
Continuous Output Power
6,000 W
4,500 W
4,000 W
Surge Rating (10 seconds)
12,000 W
9,000 W
8,000 W
Surge Current
L-n: 105 Arms (7 sec)
L-L: 52.5 Arms (7 sec)
L-n: 75 Arms (20 sec)
L-L: 40 Arms (20 sec)
L-n: 70 Arms (7 sec)
L-L: 35 Arms (7 sec)
Waveform
Idle Consumption—invert mode, no load
True Sine Wave
28 W
26 W
24 W
Idle Consumption—search mode
<8W
AC Output Voltage
L-n: 120 Vac ±3%
L-L: 240 Vac ±3%
AC Input voltage range (Bypass/Charge
Mode)
AC Input Current (maximum 75%
imbalance between L1-n, L2-n)
L-n: 80–150 Vac (120 V nominal)
L-L: 160–270 Vac (240 V nominal)
L-n: 41.2 A
L-L: 27.5 A
AC Input Breaker
L-n: 30.9 A
L-L: 20.6 A
60 A double-pole
AC Input Frequency Range (Bypass/
Charge Mode)
55–65 Hz (default)
44–70 Hz (allowable)
AC1 voltage range—Sell Modea
(automatically adjusts when entering Sell
Mode)
L-n: 108–130 ±1.5 Vac
L-L: 214–260 ±3.0 Vac
AC1 Frequency range—Sell Modea
(automatically adjusts when entering Sell
Mode)
59.4–60.4 ±0.05 Hz
AC Output Current (maximum 75%
imbalance between L1-n, L2-n)
L-n: 27.5 A
L-L: 18.3 A
L-n: 37.5 A
L-L: 25.0 A
AC Output Breaker
L-n: 28.1 A
L-L: 18.8 A
L-n: 25.0 A
L-L: 16.7 A
60 A double-pole
AC Output Frequency
60.0 ±0.1 Hz
Total Harmonic Distortion
< 5%
Automatic Transfer Relay
60 A
Auxiliary Relay Output
0–12 Vdc, maximum 250 mA DC
CEC Weighted Efficiency
93.5%
93%
91%
CEC Power Rating
6,000 W
4,500 W
4,000 W
DC Input Voltage (Nominal)
50.4 Vdc
50.4 Vdc
25.2 Vdc
DC Input Voltage Range
44–64 Vdc
44–64 Vdc
22–32 Vdc
DC Current at Rated Power
127 A
95 A
171 A
Continuous Charge Rate at L-L voltage
100 A
85 A
150 A
Power Factor Corrected Charging
PF (0.98)
a.This unit or system is provided with fixed trip limits and shall not be aggregated above 30 kW on a single Point of
Common Connection
A–2
975-0239-01-01
Electrical Specifications
XW Series Overload Capability
Loads presented to the inverter are seldom constant. Typically, large loads are operated for
only short periods of time. In order to provide the maximum utility, Xantrex inverters are
allowed to operate at power levels that exceed their continuous power ratings. This graph
shows how loads that are larger than the inverter can sustain continuously can be operated
for useful periods of time.
The length of time that the inverter can operate at high power is limited by temperature.
When large loads are run, the inverter’s temperature increases. At the point where more
heat is created in the inverter than can be dissipated, its ability to operate becomes time
limited.
X W 6 0 4 8 A C O v e r lo a d c a p a b ilit y ( L 1 - L 2 ) 2 4 0 V
60
55
A C O u tp u t C u r r e n t [A r m s ]
50
45
40
35
30
25
20
15
10
5
0
1
10
100
1000
10000
t [S e c o n d s)
X W 6 0 4 8 A C O v e r lo a d c a p a b ilit y ( L 1 - n ) 1 2 0 V u n b a la n c e d A C lo a d
120
110
A C O u t p u t C u rre n t [ A rm s ]
100
90
80
70
60
50
40
30
20
10
0
1
10
100
1000
10000
t [S e c o n d s )
Figure A-1 XW Series AC Overload Capability
975-0239-01-01
A–3
Specifications
Output Power Versus Ambient Temperature
When the internal temperature of the XW Series exceeds its rated range, the unit reduces it
energy output to ensure maximum component ratings are not exceeded.
XW Series Power Derating
7000
6000
5000
4000
XW6048-Pwr_der
XW4548-Pwr_der
XW4024-Pwr_der
3000
2000
1000
-25
-15
0
-5
5
15
25
35
45
55
65
75
Figure A-2 Output Power Versus Ambient Temperature
XW Series Efficiency
Inverting Efficiency (Typical)
100
Efficiency (%)
95
90
85
80
75
0.0 0.5 1.0 1.5 2.0 2.5 3.0 3.5 4.0 4.5 5.0 5.5 6.0 6.5
Output Pow er (kW)
A–4
975-0239-01-01
Mechanical Specifications
Charging Efficiency (Typical)
100
Efficiency (%)
95
Power Factor
90
Efficiency
85
80
7
15
25
35
45
55
65
75
89
100
Battery Current (Amps)
Sell Mode Efficiency (Typical)
100
Efficiency (%)
97
94
91
88
85
0.0 0.5 1.0 1.5 2.0 2.5 3.0 3.5 4.0 4.5 5.0 5.5 6.0 6.5
Export Pow er (kW)
Mechanical Specifications
Table A-2 XW Power System Mechanical Specifications
Model
Supported Battery Types
Battery bank size
Non Volatile Memory
Display Panel
Multiple Unit Configurations
975-0239-01-01
XW6048-120/240-60
XW4548-120/240-60
XW4024-120/240-60
Flooded (default), Gel, AGM, Custom
100–2000 Ah
Yes
Status LEDs indicate AC In status, faults/warnings, equalize mode, battery level.
Three-character display indicates output power or charge current, fault/warning codes.
On/Off and equalize button
Up to 3 parallel units in 120/240 split-phase configuration
A–5
Specifications
Table A-2 XW Power System Mechanical Specifications
Model
XW6048-120/240-60
System Network
XW4548-120/240-60
Xanbus (publish-subscribe network, no need for hubs or special cards)
Emissions
FCC Class B
Regulatory approvals
Enclosure Type
XW4024-120/240-60
UL 1741 1st Edition: 2005 Version, CSA 107.1-01
NEMA Type 1 - Indoor (sensitive electronic components sealed inside enclosure)
Rated Temperature Range (meets all
specifications)
32–104 °F (0–40 °C)
Operational Temperature Range
-13–158 °F (-25–70 °C)
Storage Temperature Range
-40–185 °F (-40–85 °C)
Inverter Dimensions (H × W × D)
23 × 16 × 9" (580 × 410 × 230 mm)
Shipping Dimensions
28 x 22 ¼ x 10½" (711 x 565 x 267 mm)
XW Power Distribution Panel
Dimensions (H × W × D)
30 × 16 × 8 ¼" (761 × 406 × 210 mm)
Depth from the wall = 8 ¾" (223 mm)
XW Power Distribution Panel
Shipping Dimensions
36 x 21 ¼ x 13" (914 x 533 x 330 mm)
Inverter Weight
125 lb (57 kg)
115 lb (52 kg)
115 lb (52 kg)
Shipping Weight
132 lb (60 kg)
122 lb (55 kg)
122 lb (55 kg)
Accessories
Accessory
Part Number
Power Distribution Panel
865-1015
Conduit Box
865-1025
Inverter #2 Connection Kit
865-1020
XW-MPPT60-150 Solar Charge Controller
865-1030
XW System Control Panel (System Control Panel II)
865-1050
XW Automatic Generator Start
865-1060
Network cables
3 ft (0.9 m): 809-0935
5 ft (1.5 m): 809-0936
7 ft (2.0 m): 809-0937
10 ft (3.0 m): 809-0938
14 ft (4.3 m): 809-0939
25 ft (7.6 m): 809-0940
50 ft (15.2 m): 809-0941
75 ft (22.9 m): 809-0942
Network terminators
Male (2 per pack): 809-0901
Female (2 per pack): 809-0905
A–6
975-0239-01-01
B
Wiring Diagrams
Appendix B, “Wiring Diagrams” illustrate the most basic configurations and
are for reference only. Specific installations may require additional
equipment to meet national or local electric codes. Ensure all safety
requirements are strictly followed.
For......
See....
“Single-Inverter System (Backup only)”
page B–3
“Single-Inverter System Renewable Energy (Solar)”
page B–4
“Single-Inverter System Renewable Energy (Wind or Hydro)”
page B–5
“Dual-Inverter System Renewable Energy (Solar)”
page B–6
“Dual-Inverter System Renewable Energy (Wind or Hydro)”
page B–7
B–2
Wiring Diagrams
Single-Inverter System (Backup only)
Figure B-1 Single-Inverter System (Backup only)
975-0239-01-01
B-3
Wiring Diagram
Single-Inverter System Renewable Energy (Solar)
Figure B-2 Single-Inverter System Renewable Energy (Solar)
B-4
975-0239-01-01
Wiring Diagrams
Single-Inverter System Renewable Energy (Wind or Hydro)
Figure B-3 Single-Inverter System Renewable Energy (Wind or Hydro)
975-0239-01-01
B-5
Wiring Diagram
Dual-Inverter System Renewable Energy (Solar)
Figure B-4 Dual-Inverter System Renewable Energy (Solar)
B-6
975-0239-01-01
Wiring Diagrams
Dual-Inverter System Renewable Energy (Wind or Hydro)
Figure B-5 Dual-Inverter System Renewable Energy (Wind or Hydro)
975-0239-01-01
B-7
Wiring Diagram
B-8
975-0239-01-01
C
Alternate System
Configurations
Appendix C, “Alternate System Configurations” provides wiring diagrams
for inverter/charger installations that do not require use of the power
distribution panel and the XW Conduit Box.
Alternate System Configurations
DC Grounding for Single-Inverter Systems
See Table 2-4, “Torque Values for AC Wiring (AC Terminals and Ground Bar),” on
page 10.
See Table 2-5, “Torque Values for the Chassis Ground Lug,” on page 10.
See Table 2-6, “Torque Values for the Inverter Battery Terminals,” on page 10.
This illustrates an example only. Actual
ground requirements may vary.
Figure C-1 DC Grounding for an Inverter only
C–2
975-0239-01-01
Battery Connections for Single Inverter Systems
Battery Connections for Single Inverter Systems
Torque connections to the
inverter DC terminals to 1015 ft./lbs.
Torque connections to the battery
terminals per battery manufacturer’s
recommendations.
This illustrates an example only. Actual cable requirements may vary.
Figure C-2 DC Connections to a Single Inverter
975-0239-01-01
C–3
Alternate System Configurations
AC Grounding for Single-Inverter Systems
This illustrates an example only. Actual ground requirements may vary.
Figure C-3 Grounding the AC System
C–4
975-0239-01-01
AC Output Wiring to the Inverter AC Distribution Panel
AC Output Wiring to the Inverter AC Distribution Panel
Actual wiring requirements may vary.
Figure C-4 AC Output Wiring to the Inverter AC Distribution Panel
975-0239-01-01
C–5
Alternate System Configurations
Generator Wiring to the Inverter
WARNING: Shock Hazard
Before making any electrical connections, ensure both the AC and DC disconnect devices are in
the OPEN (disconnect) position.
Important: If the load is too big for the inverter to operate from battery power, do not install the
load in the inverter powered electrical panel.
Torque all inverter terminal block
connections to 25 inch-pounds.
This illustrates an example only. Actual wiring requirements may vary.
Figure C-5 Generator Wiring directly to the Inverter
C–6
975-0239-01-01
Utility Wiring to the Inverter Input
Utility Wiring to the Inverter Input
CAUTION: Damage to Equipment
The inverter’s AC LOAD terminals must never be wired to any AC source such as a generator
output or utility panel. This will cause severe damage to the inverter which is not covered under
warranty.
Actual wiring requirements may vary.
Figure C-6 Utility Wiring to the Inverter Input
975-0239-01-01
C–7
Alternate System Configurations
Wind or Hydro DC Sources
Actual wiring requirements may vary.
Figure C-7 Connecting Wind or Hydro DC Sources
C–8
975-0239-01-01
Index
A
G
AC Connections 2–16
AC sync cable 2–38
AC Terminal Block 2–17
Additional Inverters 2–29
Automatic Generator Start 1–7, 5–7
AUX Port 2–23
AUX Port Terminal Assignments 2–24
AUX+12V Voltage Supply 2–23
AUX-RPO
User Remote Power Off 2–24
generator run signal 5–12
Generator Wiring 2–22
Ground Bar 2–17
Grounding 2–11, 2–12, 4–8
Grounding the DC System 2–12
B
installation
mounting 5–3, 5–5
planning 5–3
Inverter Panel Mounting 2–19
B+ wires 5–12
battery bank requirements 2–9
battery cable lugs 2–9
Battery Cable Requirements 2–9
Battery Cable Size 2–10
Battery Temperature Sensor 2–13
Breaker/Fuse Size 2–10
C
Charge Controller 4–2
charge controller 1–6
Clearance 2–3
commissioning 4–14
Communication Ports 2–16
Conduit Box 1–4, 2–7
D
DC Connections 2–14
Dual-Inverter System Renewable Energy (Solar) B–6
Dual-Inverter System Renewable Energy (Wind or Hydro)
B–7
E
e Emergy (Wind or Hydro) B–5
external LED wire 5–12, 5–14
external on/off LED 5–15
external shutdown switch
connecting to wiring harness 5–13
input and return 5–11, 5–13
F
FCC information to the user ii–vi
Fire safety 2–2
functional test 2–25, 2–39
975-0239-01-01
H
Hydro C–8
I
K
Knockout 2–2
Knockouts 4–5
L
LED Status Indicators
Inverting 2–26
Location 2–2
lugs, battery cable 2–9
M
Mechanical Specifications A–5
Mounting 2–3
Mounting Bracket 2–4
mounting template 5–5
Mounting the Distribution Panel 2–7
Mounting the Inverter 2–6
O
overcurrent protection, requirements 2–9
P
PV Array Requirements
Array Voltage 4–2
MPPT Voltage Range 4–3
S
safety instructions ii–v
Single-Inverter System B–3
Single-Inverter System Remewab B–5
Single-Inverter System Renewable Energy (Solar) B–4
switched B+ wires 5–12
IX–1
Index
T
thermostat
connecting 5–13
inputs and returns 5–11, 5–13
U
User Line Wiring 2–24
V
verifying network power 5–7, 5–18
W
web site i–iv
Wind C–8
Wire Size and Over-current Protection Requirements 4–9
Wiring 4–9
Wiring the Inverter 2–8
X
Xantrex
web site iv, i–iv
XW Inverter/Charger 1–3
XW System Control Panel 1–6, 5–2
IX–2
975-0239-01-01
Xantrex Technology Inc.
800 670 0707 Tel Toll Free in North America
360 925 5097 Tel direct
800 994 7828 Fax Toll Free in North America
360 925 5143 Fax direct
[email protected]
www.xantrex.com
975-0239-01-01
Printed in China