1
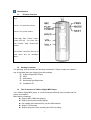
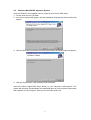
X-Micro Digital MP3 Player
User Manual
Copyright
Copyright 2004 by X-Micro Technology Corp., All rights reserved. No part of this
publication may be reproduced, transmitted, transcribed, stored in a retrieval system, or
translated into any language or computer language, in any form or by any means,
electronic, mechanical, magnetic, optical, chemical, manual or otherwise, without the prior
written permission of X-Micro Technology Corp.
Disclaimer
X-Micro Technology Corp. makes no representations or warranties, either expressed or
implied, with respect to the contents hereof and specifically disclaims any warranties,
merchantability or fitness for any particular purpose. Any software described in this
manual is sold or licensed "as is". Should the programs prove defective following their
purchase, the buyer (and not this company, its distributor, or its dealer) assumes the
entire cost of all necessary servicing, repair, and any incidental or consequential damages
resulting from any defect in the software. Further, X-Micro Technology Corp., reserves the
right to revise this publication and to make changes from time to time in the contents
hereof without obligation to notify any person of such revision or change.
All brand and product names mentioned in this manual are trademarks and/or registered
trademarks of their respective holders.
CONTENT
Introduction
1
1.1
Product overview
1
1.2
Package contents
1
1.3
The characters of X-Micro Digital MP3 Player
1
1.4
The index parameter
2
1.5
The system requirement of X-Micro Digital MP3 Player
2
Installation guide of X-Micro Digital MP3 Player
3
2.1
Windows 98 operation system
3
2.2
Windows Me/2000/XP operation system
5
2.3
MAC OS 9.X operation system
6
2.4
Linux 2.4 core operation system
.
6
Uninstall X-Micro Digital MP3 Player
7
3.1
Uninstall in windows 98
7
3.2
Uninstall in windows Me/2000/XP
7
3.3
Uninstall in MAC OS 9.X
8
3.4
Uninstall in Linux 2.4
8
Functions and guide
9
4.1
Power On/OFF
9
4.2
Playing music files
9
4.3
Repeat mode control
9
4.4
EQ mode
9
4.5
A-B replay
10
4.6
Volume control
10
4.7
Hold function
10
4.8
Main menu
11
4.9
System setting menu
11
4.10
Voice recording
12
4.11
Voice Directory select
13
4.12
File system operate
13
4.13
Voice playing
14
4.14
How to display the lyric synchronously
14
4.14.1 How to make lyric file
14
4.14.2 Lyric file display
15
Software using
15
4.15
4.15.1 Use the software to format your computer
4.15.2 Use the sound converter tool
4.15.3 Use the firmware update tool
.
15
16
17
Safety Precaution
18
FAQ
19
1
Introduction
1.1
Product Overview
Hold switch: for holding all function
keys
Volume -: for down the volume
Volume +:for up the volume
Power ON / Play / Pause / Stop /
Power OFF key : for Power ON /
Play / Pause / Stop / Power OFF
control
Prev /mode / Next key: the key for
enter menu and for next&prev
select.
1.2 Package Contents
The package should include the following accessories. Please contact the dealer if
any of the listed items are missing from the package.
; X-Micro Digital MP3 Player
; QSG
; AAA battery
; Neck strap type Earphones
; Installation CD
1.3 The Characters of X-Micro Digital MP3 Player
Your X-Micro Digital MP3 player is a multi-functional with high sound quality and low
power consumption.
Main feature contented:
◆ Support MP3, WMA files playing.
◆ Support lyric synchronously display.
◆ Can update the firmware freely via the USB interface.
◆ Support 7 EQ modes
◆ Support long time voice recording and VOX recording.
-1-
◆
◆
◆
◆
1.4
Support changing the contrast and EL display time of LCD displaying.
Can be used as a mass storage device.
Support series play modes and A-B replaying.
Can resume the playing state before turn off.
The index parameter
Index
Parameter specification
Hard disk
IBM PC, compatible PC, notebook with USB interface
Interface
Universal Serial Bus 1.0/1.1
Storage medium
Flash EMS memory
Power
Supply by USB interface without connect power, when
play songs, need 1xAAA
Transfer speed
Max. Writing: 1000KB/S, Max. Reading: 1000 KB/S
Operation System
Windows98/Me/2000/XP, MAC OS 9.x, Linux2.4 Core
Earphone Output
16 ohm earphone,10mW+10mW output
Record Time
Max 17 hours,128M
Bit Rate Support
MPEG1 Layer1:32K-448K bps;
MPEG1 Layer2: 32K-384K bps;
MPEG1 Layer3:32K-320K bps;
MPEG2/2.5 Layer1: 32K-256K bps;
MPEG2/2.5 Layer2: 8K-160K bps;
MPEG2/2.5 Layer3: 8K-160K bps;
Capacity
64MB/128MB/256MB/512MB
LCD Display
96×26 dots
Operating
Conditions
-20ºC~ +40ºC
Common
Conditions
-40ºC ~ +60ºC
Size
96.5mmx30mmx21mm
Life-span
Writing over one million times, reading doesn’t
influence the life; data can be stored over ten years
Driver
Installation only be needed under Windows98, other
operation systems don’t need to install, such as
Windows Me, Windows 2000 and above
(USB 1.0/1.1)
1.5 The system requirement of X-Micro Digital MP3 Player
1) PC Hard disk Requirements:
IBM PC, compatible PC, notebook with USB interface
2) Operator System Requirements
Microsoft Windows XP/2000/ME/98 or Mac OS 9.X, Linux 2.4 Core above or
other operator systems which support the protocol of USB Mass Storage
-2-
Installation Guide of X-Micro Digital MP3 Player
When the MP3 Player is connected to computer, the LCD will show the following
picture:
And when the MP3 Player is writing & reading data, the LCD will show the following
graphic:
You should not disconnect the MP3 Player from the PC while it’s reading or writing, or
else it will cause your data lost.
2.1 Windows98 Operation System
Under win98, this installation will install the driver & Tools for the player.
1) Put the driver CD into CD-ROM.
2) An Autorun interface will appear, click the Installation ICON and the follow window will
appear:
3)
Click the Next button and follow the install wizard steps, the following window will
appear:
-3-
4)
Click the Finish button; it will pop up a window as the follow.
5)
6)
Click the button Finish and the system will restart.
After the system is rebooted, insert the player into the USB port and a “Removable
disk” symbol will appear. That means you can use X-Micro Digital MP3 Player as a
hard disk.
-4-
2.2
Windows Me/2000/XP Operation System
Under win2000/XP, the installation will only setup the tools for the MP3 player.
1) Put the driver CD into CD-ROM.
2) An autorun interface will appear, click the Installation ICON and the follow window will
appear:
3) Click the Next button and follow the install wizard steps, the follow window will appear:
4) Click the Finish button; it will install the tools completely.
Insert the X-Micro Digital MP3 Player directly to your computer’s USB interface. The
system will recognize it automatically and meanwhile there is a driver symbol “Removable
Disk” appears on “My computer”. And you can use it like usual ones.
-5-
2.3 MAC OS 9.X Operation System
Insert X-Micro Digital MP3 Player directly to your computer’s USB interface. The system
will recognize it automatically and meanwhile there is a driver symbol “Untitled” appears
on the desktop. And you can use it like usual ones.
2.4 Linux2.4 core Operation System
For Linux system, you should use it as these steps:
1) Boot your computer, login as root.
2) Plug Player into USB interface of the computer.
3) Type in the order: “mount/dev/sda1/mnt“, this command will create a directory for
MP3 Player. And the flash disk will be mounted then you can use it freely.
Attention: The item “sda1“or the command “ mount/dev/sda1/mnt“, may be changed
due to the usage status of the computer or flash disk. Please operate according to the
Linux order regulations.
-6-
Uninstall X-Micro Digital MP3 Player
3.1
Uninstall in Windows98
1) Hardware uninstall: When you complete the using of X-Micro Digital MP3 Player, you
can pull it out from the USB interface if only the indicator light stops glinting. And the
symbol of “Removable Disk” will disappear automatically.
2) Driver uninstall: If you want to uninstall the driver of X-Micro Digital MP3 Player, insert
the install CD into the CD-ROM and click the installation button, it will show the follow
windows, Click Next button and follow the install wizard to finish your job.
3.2
Uninstall in Windows Me/2000/XP
1) Double click the icon “pull out or eject the hard disk” on right bottom of the taskbar, as
the follow picture:
2)
Choose the dialogue frame “USB Mass Storage Device”
-7-
3)
4)
Click “Stop”
Click “OK” when the system indicates “USB Mass Storage Device equipment can be
removed safely from the system”, and then you can pull out the X-Micro Digital MP3
Player safely.
3.3
Uninstall in MAC OS 9.X
1) Choose “Untitled” disk
2) Click the menu “others” and choose “pull out” then click;
3) when the system indication “Now you can pull the box-hardware from USB equipment,
because Macintosh has finished its management”, then click “OK” to pull out the
X-Micro Digital MP3 Player from the USB interface.
3.4
Uninstall in Linux 2.4 core
Before unplugging the MP3 Player,type in the order “umount /mnt “. The system
will release the flash disk and then you can unplug the device safely.
-8-
Functions and guide
In the menu mode, the mode key is for conform a selection and for enter or return to
the submenu.
4.1
Power ON / OFF
Press “Power on/Play/pause/Stop/Power off “( ) button 2-3sec to turn on.
Press “Power on/Play/pause/Stop/Power off” ( ) button 3-5sec to turn off while
playing.
In the standby mode, the player will shut down automatically when the machine is not
being operated for 30 seconds.
4.2
Play music files
If you turn on the MP3 Player, the player will enter the standby mode, press
the” ”button; Or when you connect the player to computer, Press ”mode” key, you
will activate the music play mode, as the following graphic:
In Play mode, press “
”or “
” button to select the next or previous song
In Play mode, press mode key to enter the play menu mode. There are 4 items in the
play menu as Repeat, Equalizer, Replay and Exit, the detail description of them
please see paragraphs 4.3, 4.4, 4.5, 4.6; For Exit, it’s just for exiting the play menu
mode.
4.3
Repeat mode Control
In the play mode, press the mode key to enter the play menu mode, as in the
following picture:
Press the mode key to enter the repeat setting submenu, as the following graphic:
Then you can change the repeat modes from Normal to Intro, Repeat All, Random or
”or “
” key. Press the mode key to confirm your
Repeat One by using the “
selection.
For Intro repeat mode, the MP3 Player will play each song for only ten seconds.
4.4
EEqquuaalliizzeerr M
Mooddee::
-9-
In the play mode, press the mode key to enter the play menu and choose the
Equalizer Select item, see the following illustration:
Press mode key to enter EQ setting mode, as in the following illustration:
The Equalizer has 7 EQ modes (Jazz, Rock, Classic, Pop, Soft, DBB and Natural).
You can change the EQ mode by using the “
”or “
” key.
44..55 A
A--B
BR
Reeppllaayy
In play mode, press the mode key to enter the play menu, select Replay and you can
replay the song or paragraph you select, see the following picture:
As you enter the A-B replay mode, when the letter A is blinking, press Next key to set
the start point; when the letter B is blinking, press Next key to set the end point. The
player will replay the song snippet you select.
To cancel the A-B replay mode, Please press the mode key.
44..66 VVoolluum
mee C
Coonnttrrooll
When MP3 is on standby or playing, press “VOL+” or “VOL -” button to control the
volume and the LCD will show the following graphics:
44..77 H
HO
OLLD
D FFuunnccttiioonn
Using the HOLD function can prevent a malfunction of the player by accidentally
pressing a wrong button. Move the HOLD switch on the side of the player to HOLD. A
lock icon on the LCD panel is displayed for the setting. Move the switch to HOLD OFF
and a lock icon on the display disappears, like this:
- 10 -
Note: If the machine is power off and locked, before you power on the machine, you
should unlock it.
44..88
M
Maaiinn M
Meennuu
You can press Mode key for 3-5 seconds to enter the main menu anytime. This
menu contains 5 items.
Press “
”or “
”to select the menu item, see illustration:
Enter the music directory to play MP3/WMA files,.
Select this item to enter record mode.
Select this item to enter the voice directory where
you can play voice recording files.
Select this item to enter the system setting menu.
Exit the main menu.
44..99
SSyysstteem
m sseettttiinngg m
meennuu
When you select the “sys function” item in the main menu, you will enter the system
setting menu:
”or “
There are 8 submenus in the system setting menu. You may use “
select the menu item and then press the mode key to confirm your selection.
the following illustration:
Here will show the odd record time as you select it.
- 11 -
”to
See
Change the back light time of the device. You can change the
back light lamp time from 0 to 30 seconds, increments of 5 seconds. When you
select the back light lamp time of 0 seconds, the back light will not activate if you
press any key.
Enable you to set the system language of the MP3 Player.
With this item you can set the power off time or sleep time
when there is no signal to the player. Using increments of 5 seconds you can change
the two item’s time from 0 to 60 seconds.
Allow you to change the contrast of the LCD from 0 to 15.
Check the memory information in the MP3 device.
Here you can check the firmware version of this machine.
Exit the system setting menu.
44..1100
VVooiiccee R
Reeccoorrddiinngg
In play mode, press the mode key for 3-5 seconds to enter the main menu and select
the “record” item. A recording mode select submenu will appear as the following
graphic:
You can change the record type as Long Rec, Fine Rec, Long VOR or Fine VOR by
- 12 -
press Next / Prev key, and then press the Play key, you can begin recording. You will
observe the following picture:
To pause recording please press the “
” button, see the following illustration:
To continue recording, please press the “ ” button again.
After recording is complete, press “ ” button 4-5 seconds to save the recording files,
the LCD will indicate a graphic file is building like this:
The recorded file is saved as “REC**.WAV” or “REC**.ACT” in the Voice Folder.
To exit the record mode, press mode key to access main menu, and select the music
or voice mode.
44..1111
VVooiiccee D
Diirreeccttoorryy sseelleecctt
In Voice recording standby mode, press the mode key to enter the record submenu,
there are two items in this menu as the following description:
You can use this item to select a directory that you hope the
voice files stored in such as root directory.
Exit the record submenu.
44..1122
ffiillee ssyysstteem
m ooppeerraattee
In the standby mode or pause mode, press the mode key to enter the file system
operate mode, the LCD will display the following graphic:
There are four items in this mode as Local folder, Delete file, Delete all, and Exit.
Please see the detail description as these:
You can use this item to select the music directory you want
to play such as root directory.
- 13 -
When you select this item it will enter a file select interface,
use “
”or “
”to select yes or no and use mode key to confirm your selection you
can delete the current MP3 file. And you can use the play key to cancel you delete
operation.
When you select this item it will enter a file select interface,
use “
”or “
”to select yes or no and use mode key to confirm your selection you
can delete all MP3 files in this machine.
Exit the file file system operate mode.
44..1133
VVooiiccee PPllaayy
Select Voice Play Mode by pressing “Mode” key for 3-5 seconds in the play mode to
access the main menu and select the voice item.
After selecting the desired file to play from the list, Press ” ” button to play the Voice
folder and press ” ” button again to stop playing, as illustrated in the following
picture.
44..1144
H
Hoow
w ttoo ddiissppllaayy tthhee llyyrriicc ssyynncchhrroonnoouussllyy
4.14.1
How to make lyric file:
There are two ways to make it:
(1) Use Word Pad to edit lyric.
(2) Use professional lyric software to edit.
The importance is that the lyric must be edited according to the playing time.
Format ” [mm:ss]” or ” [mm:ss.fff] ” (minute : sec)
mm: minute
ss: seconds
For example: Angel’s Tale
[00:00.00]Angel's Tale
[00:12.72]Here in my heart,
[00:17.55]Memories linger,
[00:22.23]I hold them sacred,
[00:28.61]Safe from all others,
[00:32.99]Angel's tale.
[00:42.56]A love such a this,
- 14 -
[00:47.54]Once in a lifetime,
[00:53.17]Lost in your beauty,
[00:58.99]Still dreaming of you,
[01:05.32]Angel's tale.
[01:12.58]You drove the sinner from me,
[01:19.57]And shone with such glary,
…………………………………
[04:49.74] make: xxy 2004.2.6
NOTE : Use Word Pad tool to edit, then save the file after finishing editing,
choose ALL FILES in file type, the file extension name must be *.lrc in the
saving dialog box.
File Name: XXX.lrc (please make sure to put .lrc as an extension)
File Type: All Files (please make sure to select All Files, not Text File)
4.14.2
Lyric file display
In mp3 player, the name of song must be the same as the name of lyric files, and also
they must be in the same folder. The extension of song files maybe *.mp3 or *.wma, while
the extension of lyric files must be *.lrc.
For example: yesterday once more.mp3 and yesterday once more. lrc
44..1155
SSooffttw
waarree uussiinngg
After you setup the software to your computer you can use the PC to manage your player:
4.15.1
Use the software to format your player:
1. If your MP3 Player is damaged, you may need to re-format the device using the MP3
Player’s Format Tool.
2. To select the MP3 Player Format tool, see below:
- 15 -
3. When you select the format tool, the following will appear and give you these options:
Drive: where you can select the
drive volume you want to format
Volume: the device’s volume
when you change to the string
you input for this item.
Quick: when you select this item
it will do a quick format for the
device.
Full: when you select this item it
will do a full format for the
device.
Low: when you select this item it
will do a low format for the
device.
Bootable: when you select this
item it will create a bootable disk
for you.
4. Select the item and press the Start button, this message will appear as the follow,
Click the YES button it will format the disk drive automatic.
5. If you select the bootable item and use this tool to format the player, it will create a
bootable disk for you , so that you can then use this Player to re-boot your computer.
W
Waarrnniinngg:: Please backup your data in the player before you want to do a format,
because it will erase all of your data when do a format. If you unplug the unit
when the device is doing a low format, the device will be damaged!
4.15.2
Use the sound converter tool:
This tool is used for converting rcd/rec/act file recorded by an MP3 player to WAV file.
1. Open the Sound Convert Tool.
2. It will appear as follows:
[Open]: Open a WAV, MP3 or rcd/rec/act
file. If it is a WAV or MP3 file you can play it
back directly. If it is an rcd/rec/act file you
should convert it to a WAV file before
playing it back.
[Convert] Do convert. Only enable when
selecting an rcd/rec/act file.
[Help] Shows this help dialog.
[Exit] Exit this tool.
- 16 -
3. Press the Open button and an explorer windows will appear. Select the file you
want to open.
4. If the file you opened is an MP3 or Wav file, you can use this tool to play it.
5. If the file you opened is a REC/RED/ACT file, you can use this tool to transform it
to a wav file.
4.15.3
Use the Firmware Update tool:
This tool is used for update the firmware of your MP3 Player.
1. Open the Firmware update Tool.
2. It will appear as follows and give you these operates:
Device Firmware information: in this area
it will show the current firmware in the
device.
Upgraded firmware information: it will
show the information of the firmware you
have upgraded.
Select new firmware file: it will appear a
explorer windows so that you can select a
firmware file(*.bin).
Upgrade Log: here will show the
upgraded log while you do a firmware
update.
3. Select a firmware file and Press the “begin upgrading” button, it will update your
firmware automatic and it will show the update information clearly.
Note: Please select the right firmware file to update, or else it will cause your machine
damaged and you can’t use it anyway.
- 17 -
SSaaffeettyy PPrreeccaauuttiioonn
See following precautions. Any violation of one or more of the following
precautions may cause damage to the player and will void the warranty.
- Please take out the battery when you will not use the machine for a long time.
- Conform that the lock switch is unlocked before you turn on the unit.
- Avoid exposure to heat, moisture and static electricity.
- Do not drop or place heavy objects on the player.
- Vibration or shock to the unit can cause damage.
- Do not place the player in or near any liquid.
- Avoid areas of high humidity, strong magnetic fields or high heat when storing the
unit.
- Do not use paint thinner, alcohol, or benzene when cleaning the unit. This may
change the color of the player or damage the surface. Use a soft towel to clean the
surface of the player.
- To avoid damage to the unit never open the case.
- Do not expose to excess heat (over +140°F). Avoid exposure to direct sun. Do not
leave in a warm car, especially during the summer season.
- We strongly recommend that as you uploading/downloading files from your PC,
please never disconnect the player from the computer until the blinking display stops.
If you unplug the unit when the display is blinking, data may be lost!
- We strongly recommend that you back up your data for safety.
- 18 -
FFA
AQ
Q
66..11 TThhee ppllaayyeerr ddooeess nnoott ttuurrnn oonn::
- Check if the player has the batteries installed.
- Turn on your computer, connect the player to the USB port and turn on the player.
- If the above step does not resolve the problem, then do a “Firmware upgrade” and
format the player, you can find and download the firmware from our website.
66..22 LLC
CD
D ddiissppllaayy ddooeess nnoott sshhoow
w aannyytthhiinngg::
- Press the Play/Pause button to turn on the player.
- If the above step does not resolve the problem, then do a “Firmware upgrade” and
format the player.
66..33 FFoorr tthhee W
C ddooeessnn’’tt rreeccooggnniizzee tthhee ppllaayyeerr..
Wiinnddoow
w 9988 uusseerr –– W
Whheenn PPC
- If your operating system is Windows 98, please connect the player to the USB port
of PC first and after it recognizes it as a new hardware, then install the driver.
- If your PC doesn’t recognize the player, please repeat #1 step.
- If the above step does not resolve the problem, then run the “Firmware Download”
program and format the player again.
66..44 W
Whheenn sshhaalll w
wee cchhaannggee tthhee bbaatttteerryy??
- The icon for coulometer on the LCD is empty and blinking.
- The player powers off by itself while playing or powers off quickly when you turn
on.
- 19 -
www.x-micro.com
- 20 -