1
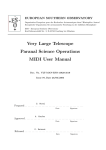
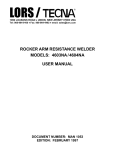
EVA 220 MP3 Player User Manual Ver: 1.0 Points to Note ..............................................................................................................3 About The Player.........................................................................................................3 Features ................................................................................................................3 Exterior View & Explanation of Keys/Buttons................................................4 LCD Screen ...........................................................................................................5 Basic Usage...................................................................................................................7 Power ON/OFF The Player.................................................................................7 Turning The Player ON................................................................................7 Turning The Player OFF ..............................................................................8 Main Menu Mode ..........................................................................................................8 Entering Main Menu ............................................................................................8 Main Menu Option 1 – Music...............................................................................9 Playing MP3/WMA Tracks............................................................................9 Pausing Tracks ..............................................................................................9 Stopping Tracks............................................................................................9 Selecting a Track .........................................................................................9 Fast-forwarding and Fast-Reversing ........................................................9 Submenu of the music mode—Play Way ................................................10 Menu Mode Option 2 – Voice............................................................................10 Replay Recorded Voice Files....................................................................10 Record The Voice.......................................................................................11 Menu Mode Option 3 – FM Tuner .....................................................................12 Enter into FM Tuner ..................................................................................12 Tune to Your Favorite Frequency............................................................12 Save Searched Frequency ........................................................................13 Review Saved Station ...............................................................................13 Record FM program ...................................................................................14 Menu Mode Option 3 – Settings .......................................................................14 Settings menu option 1—Equalizer.........................................................15 Settings menu option 2—Play Mode .......................................................15 1 Settings menu option 3—Auto Power Off ..............................................16 Settings menu option 4—Backlight.........................................................17 Settings menu option 5—Record Quality ...............................................18 Settings menu option 6—FM Bandwidth ................................................18 Settings menu option 7—Exit ..................................................................19 Menu Mode Option 4 – Delete Files ................................................................19 Menu Mode Option 5 – Language ....................................................................20 Menu Mode Option 6 – System Info. ...............................................................21 Menu Mode Option 7 – Exit ..............................................................................21 Other Convenient Function .....................................................................................22 Connect the player to your computer ...........................................................22 Connect the Player to the PC .................................................................22 Sending & Deleting Files between Player and the PC ........................22 Disconnecting the Player from the PC ..................................................22 Adjust the System Volume...............................................................................23 Language Learning function (A-B loop) .........................................................23 HOLD function....................................................................................................23 RESET Function ..................................................................................................24 2 Points to Note ® Set/move the HOLD switch to the OFF position (the opposite way from the arrow) before operation. ® If any failure occurred to the player, use a clip or a pin to click the Reset button on the back side, and then power on the system. ® To avoid damage that can be caused by static electricity, operate the player in a dry environment. ® Do not drop the player onto hard surfaces, as damage may be caused which may affect the performance of the player. ® The player must be charged in order for the player to function properly. Please charge the battery if: a. The ‘Low Battery!’ indicator appears; b. The player plays only briefly and then shuts off; c. There is no response when pressing the keys/buttons even after reinstalling the same battery. About The Player Features ® ® ® ® ® File formats supported includes MP3 & WMA Multi function blue backlight LCD display Digital volume control with Sound Fade in feature Integrated digital voice recorder with Microphone FM Tuner receiving & recording 3 Exterior View & Explanation of Keys/Buttons 4 1. : Recording 4. : Up 7. : Backward 2. : EQ selecting 5. : Forward 8. : Function Locked 6. : Down 9. : Main Menu mode 3. : Power on/off, play/ pause LCD Screen - Music mode: ‘ ’: EQ mode icon ‘ ’: Repeat mode icon ‘ ’: Volume value ‘ ’: Music mode status icon ‘ ’: Battery indicator ‘ ’: Music mode icon ‘ ’: Track number. (Take above picture for example: 003 for current track, 009 for total track number) ‘ ’: Play time (Take above picture for example: 00:30 for elapsed time of current track, 03:39 for total time of it). If play time more than 1 hour, screen will also display hour number such as 1:23:25. ‘ ’: Indicates the artist and track name of the music file being played (If current track has lyric, lyric scrolls through this line). - Voice replay mode: ‘ ‘ ‘ ‘ ‘ ‘ ’: EQ mode icon ’: Repeat mode icon ’: Volume value ’: Voice replay mode status icon ’: Battery indicator ’: Voice mode icon 5 ‘ ‘ ‘ ’: Voice file number. (Take above picture for example: 009 for voice file be playing, 009 for total voice number) ’: Play time (Take above picture for example: 09:00 for elapsed time of current track, 33:39 for total time of it). If play time more than 1 hour, screen will also display hour number such as 1:23:25. ’: System defined voice name - Voice Record mode: ‘ ’: Record mode status icon ‘ ’: Battery indicator ‘ ’: Voice mode icon ‘ ’: Record time (Take above picture for example: 0:00:05 for recorded time of current voice) ‘ ’: Record time (Take above picture for example: 3:17:26 for the record time can be recorded) ‘ ’: System defined voice name - FM mode: ‘ ’: Volume value ‘ ’: Battery indicator ‘ ’: FM mode icon ‘ ‘ ‘ ’: System current existing frequency. ’: The channel number of current frequency. ’: Frequency bar - FM record mode ‘ ’: Record mode status icon ‘ ’: Battery indicator 6 ‘ ‘ ‘ ‘ ’: FM mode icon ’: Record time (Take above picture for example: 0:00:24 for recorded time of current voice) ’: Record time (Take above picture for example: 3:16:17for the time can be recorded) ’: System defined voice name - FM recorded Voice Replay mode ‘ ’: EQ mode icon ‘ ’: Repeat mode icon ‘ ’: Volume value ‘ ’: Voice replay mode status icon ‘ ’: Battery indicator ‘ ‘ ‘ ‘ ’: Music mode icon ’: Voice file number. (Take above picture for example: 001 for voice file is playing, 009 for total voice number) ’: Play time (Take above picture for example: 00:39 for elapsed time of current track, 33:39 for total time of it). If play time more than 1 hour, screen will also display hour number such as 1:23:25. ’: System defined voice name Basic Usage After reading through this User Manual, you are ready to start using the player after inserting the required battery. Power ON/OFF The Player Turning The Player ON Press key in order to turn on the player. When it is ON, the LCD screen will display a blue backlight with X-MICRO displaying. 7 And player memorizes the last settings before last power off, including track number, elapsed time, EQ, Play mode & Volume etc. Screen displays like below: Turning The Player OFF While the player is ON, press and hold key several seconds in order to turn the power OFF. Prior to powering off the LCD screen displays power-off logo. Main Menu Mode Entering Main Menu 1. With the player power ON, press the key to enter into the Main Menu (PC-Link mode & recording process, this action is disabled). The Main Menu will then be displayed on the LCD screen. or 2. Scroll through the Main Menu by press desired option. The Main Menu options are: key in order to select the ® Music ® Voice ® FM Tuner ® Settings ® Delete Files ® Language ® System Info. ® Exit 3. After selecting the desired option from the Main Menu, press the in briefly once to confirm your selection. key Entering into Main Menu Mode when the player is playing music/voice, or receiving FM program, the playback or FM receiving remains. 8 Main Menu Option 1 – Music The Music option in Main Menu enables you to enter into music mode and enjoy music. Playing MP3/WMA Tracks 1. Press to enter into Main Menu when player doesn’t in Music mode. 2. Press key a second time to select Music mode. LCD displays like following: 3. Use or key to select track, press key to start playing. Once the player is powered on, also can press the directly. key to play music Pausing Tracks While playing a track, press the key briefly until the Pause symbol ( ) appears in the top right corner of the LCD screen. Stopping Tracks key steadily for a moment, While playing or pausing a track, press the until the Stop symbol ( ) appears in the up right corner of the LCD screen. Selecting a Track Press or key to navigate to subsequent or previous tracks until you find the track that you want to play. Fast-forwarding and Fast-Reversing Hold or playing. key to fast-forward or fast-reverse the current track during 9 Submenu of the music mode—Play Way In music mode, press key to enter into the music mode submenu, which enables you to select the way of track playing---Direct Play & Select by Folder. Access the Submenu of Music mode as follows: 1. In music mode, press key to enter into the music mode submenu (suppose in music stop mode). System last used play way is highlighted and screen displays like following: or key to scroll through Direct Play, Select by Folder & Exit. 2. Press Suppose select ‘Direct Play’. 3. Press key to confirm your selection. 1. Difference between two play ways: ® ® Direct Play: Play all music (MP3, WMA & recorded files) on device. Select by Folder: Play all music in current directory, including sub-folders 2. When ‘Select by Folder’ is chosen: ® ® ® Use the Plus or Minus keys to scroll through folders/tracks. to exit and return upper folder. Previous key Press key to confirm your selection, and the player will start playing the track. Menu Mode Option 2 – Voice The Voice option enables you to record voice and replay these voice tracks directly onto the player. Replay Recorded Voice Files To access the Voice menu and replay the voice track, do the following: 1. With the player power ON, press the key to enter into the Main Menu (PC-Link mode & recording process, this action is disabled). 2. Scroll through the Main Menu by press or key until ‘Voice’ appears in the LCD screen. 10 3. Press key to confirm your selection. 4. The LCD screen will display the last played voice track before last exiting Voice mode or Last power off. 5. Scroll through the voice files by press or key to select the voice that you want to hear. 6. Press key to listen to the selected voice file. The LCD screen will show something like the following example: ** If there is no recorded voice file, LCD will display like below: ** In Voice mode, not only recorded voice files are included, but also recorded FM program files contained. ** To pause/stop voice replaying, fast-forward/reverse, select next/last voice track, please refer to these operations taken in Music mode. Both of them are the same. Record The Voice To access the Voice menu and record the voice, do the following: key to confirm. 1. Select ‘Voice’ option in Main Menu, then press 2. Press key to start voice recording. The LCD screen will show something like following example: 3. Press key to pause recording, the Pause symbol ( ) appears in the screen. 4. To stop recording, press or key. System stores the voice automatically and names it as ‘Vxxx.WAV’. And the LCD screen will display like below: 11 System support voice recording in Voice replay stop/pause statue, but also can start recording directly in music stop mode by pressing key. ‘Disk Full!’ appears for 2 seconds when the player memory gets full during recording process, and player will stop recording. ‘Low Battery!’ prompts for 2 seconds when the battery power get low during recording process, the player will stop recording and auto store the voice. Menu Mode Option 3 – FM Tuner FM Tuner option in Main Menu enables you to receiving the FM broadcast as you please. Enter into FM Tuner To access the FM Tuner, do the following: 1. With the player power ON, press the key to enter into the Main Menu (PC-Link mode & recording process, this action is disabled). 2. Scroll through the Main Menu by press or key until ‘FM Tuner’ appears in the LCD screen. Screen displays like below: key to engage the FM Tuner, the player enters into FM Fine Tune 3. Press mode and begins to receive broadcast. LCD displays like following example: * System last visited frequency appears. Tune to Your Favorite Frequency Players supply two ways for the FM frequency tuning in FM Fine Tune mode. . ® Auto Tuning Press and hold or key for 2 seconds, the player can scan forward or backward per 100KHz. And Auto Tuning will not stop automatically until one or key manually. clear frequency is caught or press the corresponding 12 ® Fine Tuning Press or key once, the player can scan forward or backward 100KHz. Save Searched Frequency Over 20 stations can be saved separately in Standard band and Japan band (Standard/Japan band can be chosen in ‘FM Bandwidth’ in ‘Settings’ mode). To save searched frequency, do the following: 1. Search one desired frequency you want to save, then press key. The player enters into ‘Station Preset’ mode and LCD displays like following example: 2. Press 3. Press MEMORY: or key to select desired save channel number from P01 to P20. again to enter into ‘Station Memory’ mode, and player displays Press Previous key or Next key key to select one desired frequency. 4 .Press to confirm, and the station had been saved as your selected channel. . key to exit ‘Station Memory’ mode, and player will 5. Here you can press return back FM Fine Tune mode at the final stored station. Review Saved Station To review saved station, must enter into Station Preset mode, which allows you quick and easy access to your favorite saved station. To review saved station, do the following: 1. Enter into FM Fine Tune mode, then press key once directly without any other operation. Then the player enters into Station Preset mode, and screen displays like following example: 2. Press or key to find the saved station sequentially. 13 Record FM program This function enables you to record your favorite FM program and enjoy anytime. To record FM, do the following: 1. Enter into FM mode and select one desired station. 2. Press key to start recording. Screen displays like following: key to pause recording, the Pause symbol ( ) appears in the 3. Press screen. 4. To stop recording, press or key. System stores the voice automatically and names it as ‘Fxxx.WAV’. Menu Mode Option 3 – Settings Settings option enables you to change the settings of various aspects of the player (i.e. EQ mode, Play mode, Backlight, etc). Access the Settings option as follows: 1. Enter into Main Menu mode, and select ‘Settings’ option, LCD displays like below: key to confirm. 2. Press The first of the Settings menu options will appears in the LCD screen like below: The Settings menu options include the following: ® Equalizer ® Play Mode ® Auto Power Off ® Backlight Set ® Record Quality ® FM Bandwidth 14 ® Exit Settings menu option 1—Equalizer You can set any one of 7 different sound parameter settings by using Equalizer option. 1. Select ‘Equalizer’ in ‘Setting’ option of Main Menu mode. 2. Press key to confirm. LCD displays the equalizer mode, which is being used by the player at present, like following example: The EQ menu provides the following options: ® Normal ® Rock ® Jazz ® Classic ® Pop ® Bass ® Treble 3. Scroll through the EQ options by pressing or key until the desired setting appears in the LCD screen. key to confirm your EQ setting selection and return to the 4. Press Settings menu. Equalizer modes also can be set directly in play status of Music mode. During playing, press to set EQ mode. Every time the key is pressed, EQ mode changes once in sequential order: Normal, Rock, Jazz, Classic, Pop, Bass & Treble. Settings menu option 2—Play Mode The Play Mode option in Settings menu enables you to specify the way in which tracks are played, which not only takes effect in music mode, but also in voice replay mode. To set Play mode, do the followings: 1. Select ‘Settings’ option in Main Menu mode, then press key to confirm. 15 2. Press or key to select ‘Play Mode’, screen displays: 3. Press key to enter into ‘Play Mode’ setting. The certain play mode which is being used at present appears, like following example: The Play Mode provides the following options: Play Mode Symbol Description Normal Plays all of the tracks only once, in order, and then stops. Repeat Track Plays the currently selected track repeatedly. Repeat All Plays all tracks in order repeatedly until another operation is performed or specified. Shuffle Plays all the tracks at random and then stops. Repeat Shuffle Plays all the tracks repeatedly and randomly. 4. Scroll through the Play mode options by pressing or key until your desired play mode appears in the LCD. 5. Press key to confirm your selection and return back to the Settings menu. Settings menu option 3—Auto Power Off This option enables you to set the time (period) in which the player will automatically power-off. 1. Select ‘Auto Power Off’ option in the Setting menu, screen displays: 2. Press key to enter the Auto Power Off menu. System current used auto power off time is highlighted, screen displays like following example: 16 The Auto Power Off timings include: ® OFF ® 1min ® 2 min ® 5min ® 10min or key to select the timing desired for the Auto Power Off. 3. Pressing 4. Press key to confirm the new auto power off time desired and return to the Setting menu. Player can be configured to turn off power after the unit has been idle for a defined number of minutes. The unit is idle when playback is stopped or paused. It is not idle while the USB is connected, or while recording. Settings menu option 4—Backlight The Backlight option in the Settings menu enables you to specify the time (period) in which the backlight will automatically power-off. 1. Select ‘Backlight’ option in Setting menu, screen displays: key to enter into Backlight Set System current adopted 2. Press Backlight setting is highlighted, like following example: 3. Pressing or key to select the timing desired for the backlight. The time options available for this setting are the following: ® ® ® ® 5s 10s 20s ON 17 * Once connect the player with the PC, backlight will light on all the time. 4. Press key to confirm the specified backlight timing. Settings menu option 5—Record Quality Use the Record Quality option to select the record type. Access it as follows: 1. Select ‘Record Quality’ option in Setting menu, screen displays: key to enter into record quality selecting menu. System last 2. Press setting of Record Quality mode is highlighted, screen displays like following example: System provides following record type: ® EP ® SP ® LP 3. Pressing or key to select 4. Press key to confirm the new record quality type desired and return to the Setting menu. Settings menu option 6—FM Bandwidth The FM Bandwidth option enables you to select the receiving frequency band. 1. Select ‘FM Bandwidth’ option in Setting menu, screen displays: 2. Press key to enter into FM Bandwidth selecting menu. System last setting of FM Bandwidth is highlighted, screen displays like following example: 18 System provides two bandwidths: Standard & Japan. : 3. Pressing or key to select 4. Press key to confirm your selection and return to the Setting menu. Settings menu option 7—Exit The Exit option in the Setting menu enables you to exit Setting menu and return back the upper menu (Main Menu). Menu Mode Option 4 – Delete Files Use the Delete Files option to erase music tracks/voice files from the player. Access the Delete Files menu as follows: 1. Select ‘Delete Files’ in the Main Menu mode, screen displays: 2. Press key to enter into file delete mode. The first option of the Delete Files displays like following example: The Delete Files options menu includes the following: ® ® ® Music Files: deletes MP3, WMA, FM recorded files on device. Voice Files: deletes recorded voice files in the \voice\directory Exit: Exits Delete Files menu and return upper menu (Main Menu). 3. Scroll through the Delete Files menu by pressing or key in order to select the relevant option for the music track/voice file that you wish to delete. key to confirm your selection. 4. Press The name of the first music track/voice file of the type specified for deletion now appears in the LCD screen, and LCD screen will then prompt you to confirm deletion of the specified file, like following example: 19 Delete Files prompts are provided as follows: ® NO: refuse to delete this file/track ® Yes: Delete this file/track ® Exit: Exit Deleting menu ® All: Delete all file/track in the specified type 5. Scroll through the music tracks/voice files by pressing or key until the name of the track/file you wish to delete appears in the LCD screen. key to confirm your selection. 6. Press Read-only files can only be deleted via your computer; it is not possible to delete them directly from the player using the Delete Files option. To delete type of these files from the player, you must first change the File Properties for the track/file on the computer, then you can delete them from the player. Menu Mode Option 5 – Language The Language option enables you to set the player display language. 1. Select ‘Language’ option in Main Menu mode, screen displays: key to enter. The language which is being used at present 2. Press displays like following example: The Language options are provided as follows: ® ® English 繁體中文 ® 日本語 ® ® ® Deutsch French 20 ® ® 3. Scroll through the language options by pressing or desired language name appears in the LCD screen. 4. Press key to confirm your selection. key until the Menu Mode Option 6 – System Info. The System Info. option in the Main Menu mode allows you to view the memory capacity of the player, and it is accessed as follows: 1. Select ‘System Info’ option in Main Menu mode, screen displays: 2. Press key to enter. LCD screen will display memory capacity information relating to the player, including both Total Memory (shown as ‘Total’) in MB (megabytes) and the available Memory (shown as ‘Free’) in MB (megabytes). The player screen displays like following example: 3. Press menu. key to exit the System Info. mode and return to the Settings It is also possible to view the capacity of the player by connecting it to your computer using the USB extension lead provided in the Product Pack. Menu Mode Option 7 – Exit Use the ‘Exit’ option to exit the Main Menu and return to the previous mode. 21 Other Convenient Function Connect the player to your computer The player can be used like an extra disk drive for your PC to upload, download or delete file(s). Connect the Player to the PC 1. Make sure that the PC to which you are connecting the player supports USB devices. (Refer to your PC manual for the information about hardware). 2. Connect player to the PC using the USB cable provided in Product Pack. The LCD screen will display like below if connection is completed and ready to be used. 3. To check that the MP3 player has been recognized, open ‘My Computer’. You should see a new removable drive symbol. Sending & Deleting Files between Player and the PC After connected the player to the PC, then simply copy and paste (or drag or drop) the tracks/files you wish to put between the player and the PC. The player displays following screen during downloading process Below picture will display when the player is in uploading process Disconnecting the Player from the PC Each time you want to disconnect the MP3 player from the PC safely, you must doubt-click on the ‘Safely Remove Hardware’ icon located in the System Tray at the bottom right of the PC Window. 22 Safely remove from the PC, the player will auto power off. DO NOT disconnect the Player while a track/file is being transferred, as it may damage your player. All keys are disabled when the player is connected to the PC. Backlight will be lit on all the time when connecting to the PC. Adjust the System Volume System has totally 29 levels of volume (0~28). System supports Sound Fade In & Out function. When turning on the player, its volume increase gradually in playback mode to prevent the sudden loudness. Press or key to increase or decrease the system volume step by step. Language Learning function (A-B loop) This function enables users to listen to a particular section repeatedly during music or voice playback. With this function, users will be able to pay attention to the repeated loop and to achieve the result of language learning. 1. Press key once to define the start point of loop, ‘A-‘ appears. 2. Press key a second time to define the end point, ‘A-B’ appears. * The player starts to play the loop from A to B repeatedly until you cancel it. 3. Press key once more to cancel the repeat function, playback returns to normal. HOLD function To avoid accidental operation that may alter the current settings, just need to push the key ( ) to direction (= ‘ON’ position) to lock all keys. 23 To enable all keys on the player, push the direction of (= ‘OFF’ position). key ( ) to the reverse Once the HOLD function is enabled, all keys on the player become ineffectual. Any key is pressed, below picture will prompt: Even HOLD function is turned on, you also can execute file transferring/deleting on the player when connecting to the computer. RESET Function This player provides a Reset Button on the back side of device. Please note that you only need to use this button if the device does not response for several minutes. The button is like a power down button of the device. You can turn off the device by using a reset tip, such as a straightened paper clip. This is an advanced operation. Normal users are not recommended to perform it. Once you press Reset button, the adjustments you make during last operation will be gone. 24 25 www.x-micro.com