1
CD
(I%
CD
C,,
m
z
0
0
w
wm
D
ar
U)
C
v
0
oz
w0
0
IC
-I
__________________
POLARIZED PLUG CAUTION
To reduce the risk of electric shock, this appliance
has a polarized plug (one blade is wider than the
other). This plug will fit in a polarized outlet only
one way. if the plug does not fit fully in the outlet,
reverse the plug. If it still does not fit, contact a
qualified electrician to install the proper outlet. Do
not change the plug in any way.
OVERLOOK SEWING MACHINE
Record in space provided below the Serial No.
and Model No. of this appliance.
The Serial No. is located Rear of arm.
The Model No. is located Rear of arm.
Serial No.
Model No. 834DW
Retain these numbers for future reference.
iITANT SAFETY INSTRUcTIONS
When using an electrical appliance, basic safety precautions should always be
followed, including the following:
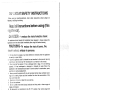
Read II instructions before using (this
INE——To reduce the risk of electric shock:
An appliance should never be left unattended when plugged in. Always unplug this
appliance from the electric outlet immediately after using and before cleaning.
WARNING——To reduce the risk of
scctrc shcck, or injury to persons:
1.
2.
3.
4.
5.
6.
7.
8.
9.
burns, fire,
Do not allow to be used as a toy. Close attention is necessary when this appliance
is used by or near children.
Use this appliance only for its intended use as described in this manual. Use only
attachments recommended by the manufacturer as contained in this manual.
Never operate this appliance if it has a damaged cord or plug, if it is not working
properly, if it has been dropped or damaged, or dropped into water. Return the
appliance to the nearest authorized dealer or service center for examination, repair;
eiectricai or mechanical adjustment.
Never operate the appliance with any air openings blocked, Keep ventilation open
ings of the sewing machine and foot controller free from the accumulation of lint,
dust, and loose cloth.
Never drop or insert any object into any opening.
Do not use outdoors.
Do not ;?erate where aerosol (spray) products are being used or where oxygen is
being administered.
To disconnect, turn all controls to the off (“0”) position, then remove plug from
outlet.
Do not unplug by pulling on cord. To unplug, grasp the plug, not the cord.
DANGER
1. Always unplug before relamping. Replace bulb with same type rated 15 watts.
2. Do not reach for an appliance that has fallen into water. Unplug immediately.
3. Do not place or store appliance where it can fall or be pulled into a tub or sink.
Do not place in or drop into water or other liquid.
WARNING
1.
2.
3.
4.
5.
6.
7.
sewing
Keep fingers away from all moving parts. Special care is required around the
machine needle.
break.
Always use the proper needle plate. The wrong plate can cause the needle to
s.
Do not use bent needle
it
Do not pull or push fabric while stitching. It may deflect the needle causing to
break.
needle
Switch the sewing machine off (“0”) when making any adjustments in the
etc.
foot,
area, such as threading needle, changing needle, or changing presser
,
ing
covers
remov
when
outlet
al
Always unplug sewing machine from the electric
the
in
ned
mentio
ents
ng
adjustm
servici
lubricating, or when making any other user
instruction manual.
gs
Never operate on a soft surface such as a bed or couch where the air openin
may be blocked.
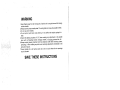
SAVE THESE INSTRUCTIONS
CONTENTS
1
-
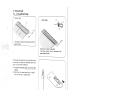
NAMES OF PARTS
1
2. OPERATION AND FUNCTION OF PARTS
2
3. PREPARATION FOR SEWING
4
3-rni. Connecting Power Cord
4
3-2. Setting Telescopic Thread Stand
5
3-3. Changing Threads
5
3-4. Replacing Needle
6
3-5. Threading
7
4. FOUR THRE.D OVERLOCK STITCH
4—1
USING 2 NEEDLES
Sefore Sewing
.
10
10
4-2. Setting the Fabric
10
4-3. Beginning and Ending of Sewing
10
4-4. Adjustment of the Presser Foot Pressure
1 1
4-5. Threscl Tnsion Chart
12
4-5. Thread Tension Adjustment
13
5. ADJUSTiNG BALANCE OF STITCH WIDTH AND CUTTING WIDTH
15
5. STITCH LENGTH ADJUSTMENT
15
7. DIFFERENTiAL FEED
16
3. CORDED OVERLOCK
17
1. SEWING FOR CURVED SEAMS
18
10. THREE THREAD OVERLOCK STITCH USING 1 NEEDLE
19
11. TWO THREAD OVERLOCK STITCH USING 1
20
I 1-1
-
NEEDLE
Conversion to 2-thread overlock
20
11-2. Stitch Selection Table
21
11-3. Thread Tension Adjustment
22
12. ROLLED EDGE
23
12-1. Three-thread Rolled Edge
23
12-2. Two-thread Rolled Edge
24
D
TUCKS
REPLACING LOWER CUTTER
25
26
15. CHANGING LIGHT BULB
26
16. LUBRICATION
26
17. ACCESSORIES
28
18. TABLE OF SEWING MATERIALS, NEEDLES AND THREADS
29
19. PROBLEM SOLViNG
30
20. SPECIFICATIONS
31
21. OPTIONAL ACCESSORY PRESSER FEET
32
I.
456
y
1
n
1.
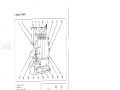
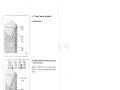
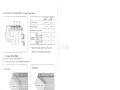
NAMES OF PARTS
L
\Y /
LL
Y
/iI;
1
1,
2.
3.
4.
5.
12
13
14
15
16
17
Presser foot lift
Spool pin
Ribbon cord quides
Pressure regulator screw
Telescopic thread stand
22
9Dfferentialfeeddial
11. Thread take up lever cover
2. Triread cutter
13. Cutting width adjusting dial
14. Presser foot
15,
16.
17.
18.
19.
20.
21.
22.
Front cover
Upper cutter
Cutter cover
Accessory cover
Front panel
Handwheel (Right side of machine)
Stitch finger knob
Stitch finger
19
18
Needle plate
20
21
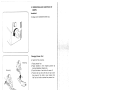
2. OPERATION AND FUNCTION OF
PARTS
Handwheel
Always turn handwheel toward you.
I
Changing Presser Foot
± Switch off the machine.
Attaching
1. Raise presser foot.
2. Raise needles to their highest position by
turning handwheel toward you.
3. Push red button A and foot will come off.
4. Position the new foot with the pin right under
the groove of the ankle. Lower presser foot
lifter so that holder catches the presser foot.
Re movi n ç
I
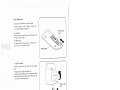
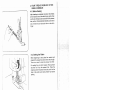
Opening Front Cover
To open front cover, push part B of cutter cover to
right and pull it down toward you.
Closing Front Cover
Push part B and close it.
+ Always close front cover when sewing.
)
—2—
Stitch Finger Knob
(Conversion from overlock to rolled edge)
÷ Raise needle to the highest position by
turning handwheel toward you.
For Overlock:
Push stitch finger knob to align it with the rear red
line © on needle plate.
For Rolled Edge:
t with
Pull stitch finger knob toward you to align
on needle plate.
front red line
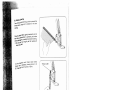
resser Foot Lifter
Raise tne presser foot lifter to lift up the presser
foot.
Presser foot lifter stops at position A.
When replacing presser foot or sewing very thick
materials, presser foot lifter can be lifted up one
more step to obtain wider gap.
Presser foot
lifter
Presser toot
Disengaging Upper Cutter
For ease in threading, push the upper cutter holder
side with the forefinger of your left
screw from
hand ± and grasp the right end of the holder
and turn it in the direction of arrow B with your
right hand.
I
.
+ Since the upper cutter is sharp, care should be
taken when moving this part.
Be sure to put cutter back down before sewing.
-Upper cutter
)
—3—
3. PREPARATION FOR SEW!NG
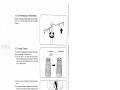
3-1. Connecting Power Cord
Connect foot control and power cord ®
Before plugging in your machine, be sure that the
voltage is same as that of your machine. (written
on a plate at back of machrne).
* Specifications vary from country to country.
1/
Press the switch on the machine to turn on the
power and the sewing light.
OFF
ON
* Always switch off or unplug machine when not
in use.
ij
The more you press the foot control, the faster the
machine runs.
When the power switch is turned off, the machine
will not operate even by pressure on the foot
control.
* DO NOT put anything on foot control.
$
—4—
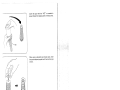
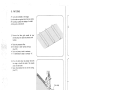
3-2. Setting Telescopic Thread Stand
Extend the telescopic thread stand to its full height,
then turn it until the shaft clicks into its locked
position.
I
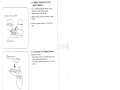
3-3. Changing Threads
Cut thread
The machine is supplied with thread but the follow
ing is an easy way to change them:
(1) Cut the thread in use near the cone spool
(behind the telescopic thread stand). Place the
new thread on the spindle and tie it to the end
of the original thread.
3
(2) Raise the presser foot lifter to lift up the presser
foot.
(3) Press down the tension release lever so that the
thread knot can pass through smoothly, draw
out the looper thread until the thread knot
comes to about 10 cm past the presser foot.
(4) When changing the needle thread, cut off
the thread knot before it reaches the eye of the
needle to avoid bending the needle as the knot
is pulled and caught in the needle’s eye.
—5—-
—
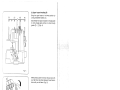
Tie threads
Cover the spool with the “NET” as needed to
prevent thread from slipping down on thread cones.
I
When using a standard type thread spool, insert
the spool adapter (supplied with the machine) (as
shown).
I
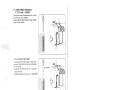
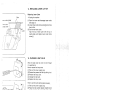
3-4. Replacing Needle
Left Needle
Replace needle in the following way:
Note: be sure to take out the power supply plug
before replacing needle.
(1) Bring needle to its highest position by turning
handwheel towards you.
(2) When replacing right needle, loosen right
needle clamp screw and remove needle. For
left needle replacing, loosen left needle clamp
screw.
(3) With the flat side away from you, insert the
new needle into groove of needle bar as far
as it will go.
Use SCHMETZ 130/705H NO: 80—90.
These are the same as for home-use sewing
machine.
Right Needle
Clamp Screw
Tighten
Loosen
—6—
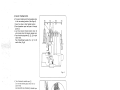
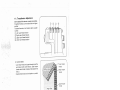
35. Threading
When threading the machine from the beginning,
threading must be carried out in the following
sequence:
First: Lower looper threading (A)
Second: Upper looper threading (8)
Finally: Needle threading (C, D)
(1) Lower looper threading (A)
(D)
(C)
(B)
(A)
Open front cover. (See Page 2)
Take the thread drawn from the spool and pass it,
through guide cj of the thread stand and then, in
order, through guides ©-- ©and thread tension
dial ©. (Fig. A)
Fig. A
,Vhiie pressing down the tension release lever with
your right hand, lay thread between thread tension
discs with your left hand. (Fig. B)
Bring the lower looper to the far left position by
turning handwheel towards you, and pass the
thread through lower looper thread guide
(Fig C)
0
Hook thread around part ® from back to front as
illustrated.
Then, move the lower looper slightly to the right
by turning the handwheel towards you.
Thread the hole of the lower looper ©, using
tweezers.
Cut the thread leaving about 10cm (4”) of spare
thread. (Fig. D)
—7—
(D)
(C)
(B)
(2) Upper looper threading (8)
Bring the upper looper to its lowest position by
turning handwheel toward you.
(A)
Draw thread from spool and pass it, through guide
of the thread stand and then, in orde through
guides © ©.(Fig. A)
c
—
Fig. A
While pressing down the tension release lever with
your right hand, lay thread between thread tension
discs with your left hand. (Fig. B)
Fig. B
Thread the hole of upper looper 0 using tweezers.
Cut the thread leaving about 10cm (4”) of spare
thread.(Fig. C)
Close the front cover.
—8—
(3) Needle Threading (C) (D).
1.
2.
3.
4.
For ease in threading, turn the moveable cutter
to the non-operating position. (See Page 3).
Raise the needles to their highest position.
Draw thread from spool and pass it through
guide®.
Lay thread between thread tension discs ©
while pressing down the tension release lever.
Pass thread through guides ©, ®, © for right
needle thread.
Pass thread through guides ©, © for left
needle thread. (Fig A)
(D)
(C)
(B)
(A)
Fig. A
-I
5. Then thread each needle’s eye 0.
Cut the thread leaving about 10cm (4”) of
spare thread.
Use tweezers for easy threading to needle’s eye.
Preparation for Sewing and Checking
7-
Check that no thread slips off guides, or breaks.
Confirm that the upper cutter moves against the
lower cutter correctly by turning the handwheel
slowly towards you. If it is not correct, check if
there is any fabric or waste thread between cutters.
Turn the handwheel towards you with your right
hand to check that the thread winds around the
stitch finger of the needle plate.
If the thread doesn’t wind around the stitch finger
of the needle plate, check if any threads are
threaded incorrectly.
—9—
4. FOUR THREAD OVERLOCK STITCH
USING 2 NEEDLES
4-1. Before Sewing
After threading is completed, and when the threads
are not wound around the stitch finger, gently draw
out the four threads under and behind the presser
foot, and turn the handw heel towards you by hand
two or three times to make stitch form on the stitch
finger.
7
4-2. Setting the Fabric
When beginning to sew, place the material just
ahead of the presser foot and it will be fed through.
There is no need to raise the presser foot lifter.
For setting the very thick material; Raise presser
foot lifter to lift up the presser foot. Place the
material under the presser foot and push it to the
front of the cutter and lower presser foot before
sewing.
I
4-3. Beginning and Ending of Sewing
(1) Beginning to sew
Place the material under the toe of the presser foot
and begin sewing slowly.
—10--
sewing
(2) EndIng of
to prevent the
terial forming a chain
Sew oft th
for the next
e
mtying and to prepar
4
thread
sewing.
fabric gently backwards and to
oraw me shed
machine is operating and make
the ‘eft a* me
.
This is called chain-stitch sewing
chain-Stith
will
it out roughly as the needle
* oo not pufl
bead nd break.
with thread cutter behind
Cut the hfltit ted, leaving about 5 cm
illustra
presser toot s
from the end of fabric.
ifl$tit
(2”) ctI
Presser Foot
pistment of the
PreSsure
justed for
toot pressure is pre-ad
me presset
ss.
thickne
rd)
(standa
y medium
necessary only when you work on
thick materials.
very thr ery thinner materials with less
sew
more pressure.
thAcker materials with
foot by
presser
the
pressure of
screw.
adjustment
4
—11—
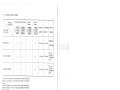
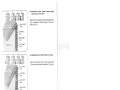
3. Thread Tension Chart
Left Needle Right Needle
THREAD
TENSiON
‘j3l
PTT;:NN
STITCHES
Upper
Looper
‘f3l
L
Lower
Loope
3
I
STITCH
CUTTING STITCH
LENGTH WIDTH
FINGER
..
NORMAL
OVERLOOK
4
4
4
4
2.5-5 mm
5-6 mm
POSITION
:
PULL
ROLLED EDGE
NARROW EDGE
—
—
4
4
4
4
,e tension for each of the thread tension dials should be
.fferent according to the pattern stitches as in the chart
‘Dove.
3ince the figures in the chart are for average strength of
nread tension, it may be necessary to adjust the thread
.ension slightly.
rhread tensions will differ according to the kind of fabric
.mnd the thread.
The differential feed ratio is normally ‘N”. (See P16)
—12--
8
4
1-1.5 mm
1-1.5 mm
5-6 mm
5-6 mm
LEVER
TOWARD
YOU
PULL
LEVER
TOWARD
YOU
N
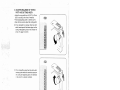
4-6. Thread Tension Adjustment
Set the balance of the tension as weak as possible.
To tighten the tension, turn tension dial to a higher
number.
To loosen the tension, turn tension dial to a lower
number.
® Left needle thread tension
© Right needle thread tension
© Upper looper thread tension
© Lower looper thread tension
J
(1) Correct tension.
Lower looper thread and upper thread should be
well balanced with same tension. (Both looper
threads should make crosses at the edge of the
fabric.)
Needle thread should not be slacken, or pulled.
N
7-
thread
Right needle
thread
.Upper looper
thread
Right Side
Left needle
thread
(2) Unbalanced upper looper thread wraps
round and over the back:
Tighten the thread tension of the upper looper (Dial
©)or loosen the thread tension of the lower looper
(Dial ©).
—13—
CD
0
0
0
0
0
CD
CD
CD
0
CD
(0
0.
C,
CD
z
C
(51
(1)CD
::j-
ö-z
CD
C,)
0
0
0
0
0)
0
CD
CD
CD
CD
CD
0
CD
C,
z
0
0)
0)
C
-
0
0
P
CD
0
z 0
oc
00
CD
c.
:,-
(D
0)
hi
o-
C,)
0-
0)
CD
0
C’
CD
DCD
CD—
0 0-
0-CD
0)
.
0
z
BC
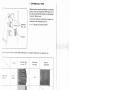
5. ADJUSTING BALANCE OF STITCH
WIDTH AND CUTTING WIDTH
Adjust the cutting width from 5.2(0.2”) to 7.0mm
(0.28”) according to the kind of material.
The standard cutting width is 5.5mm (0.21”).
Open the front cover to adjust the cutting width.
(1) If the cutting width is narrower than the stitch
width, leaving loops off the fabric edge, turn the
cutting width adjusting dial to the direction of
arrow. (To a bigger number)
4
(2) If the cutting width is wider than the stitch width,
causing a pucker within the overlock seam,turn
the cutting width adjusting dial to the direction
of the arrow. (To a smaller number)
6. STITCH LENGTH ADJUSTMENT
The machine is pre-set to a 2.5mm stitch length for
regular seaming and overlock. You may adjust the
stuch length from 1mm (Narrow rolled edge) to
5mm by one-touch of the stitch length dial.
+ For normal overlock set the stitch length from
2.5mm to 5mm. A stitch length less than 2.5mm
is used only for rolled edge.
4
I
/
Stitch
length dial
Indicator
—15—
7. DFFERENTAL FEED
Differential feed prevents stretching or puckering
fabrics, since two independent feed dogs, one in
front and one behind the needles, can be adjusted
to feed at different ratio.
p
This function produces a neat finish of overlock for
stretchable and lightweight fabrics.
+ “N” indicates the normal position.
Differential
1i
icr to the cnart below and test stitch performance on a scrap of material you are going to use.
.
Differential feed
ratio is set N
—
—anrin
—---H--
,,
obaole
dte
,,
Knit
ersPy
Differential
feed ratio
N 2
_
_
Medium
I
i
ma riols
‘oven
aorics
N
rri id’tclt
07N
—16—
Result of
adjustment
OVERLOCK
8. CORDED
can be used to strengthen and
Corded overlock
when joining elastic materials
stabIlZe stitches
fabrics.
such as knitted
ted.
nrrow cord or ribbon as illustra
I
Thread
J
ways of corded overlock.
There re two
Narrow cord or ribbon (about 3mm)
(1) place the
the foot and back under the
into the hole in
the right needle stitching
with
then sew
rough the cord.
cord, positioning it on the
Sew over a narrow
cked stitch.
edge of the overlo
cz
—17—
9. SEWING FOR CURVED SEAMS
For a neat and clean finish of curved seams:
For inside curves, guide the fabric gently with the
trimming line of the fabric under the right front of
the presser foot, applying pressure to the fabric with
your left hand, at the same time, apply a little
pressure in the opposite direction with your right
hand to hold it against the cutter as shown.
For outside curves, apply pressure in the opposite
directions of the above.
—18—
10. THREE THREAD OVERLOCK
STITCH USING I NEEDLE
Though this machine is made mainly for 4 thread
stitch overlock using 2 needles.
To sew three-thread stitch overlock using 1 needle
simply remove 1 needle.
ii
,jjj1,
V
N
(1) By removing the right needle.
iI
l1
lJi,
I
Three-thread overlock stitch using 1 needle for as
wde as a 4-thread overlock stitch using 2 needles
can be achieved.
This stitch
Use the left thread tension. (DiE I
is about 6mm wide.
The differential feed ratio is norm illy “N”. (See R16)
/t needle
.
—
(2) By removing the left needle.
The right needle sews with a narrow width. Use the
naht thread tension (Dial ©). The stitch is about
arnm wice.
The differential feed ratio is normally “N”. (See P.16).
Riaht needle
1/
..—1
.
—
—1 9—
-7
11. 2-THREAD OVERLOCK STITCH
USING I NEEDLE
1. Use 1 needle thread (left needle or right
needle) and lower looper thread.
Remove upper looper thread.
2-Thread overlcc convertor
2. Attach 2-thread overlock convertor to upper
looper.
* Store the removed needle in the convertor
case.
Convertor case
ii
11-1. Conversion To 2-Thread Overlock
(1) Open front cover.
Bring upper looper to its lowest position by
turning handwheel toward you.
Put 2-thread overlock convertor on the upper
looper.
J
(2) Push the projection ; of convertor and insert
the tip EJ of convertor into the eye ( of
upper looper.
)
11-2.
Stitch SelecUon Tabie
\\
\
THREAD
1
TEN
SION
Left
Needle
MATERIAL
(see P24)
I3l
PA
\
STITCHEfl
a
__
__
__
Light
2 -T h r e a d
Ock
o
1
ver
(Wide)
Il3I
[{[
—
Light
Medium
Heavy
Medium
Heavy
Lower
Looper
4lI
—
1-2
1
—
2
—
—
>1J
EI1
6
—
2.5
2-Thread
Roled edge
Medium
—
—
—
4
—
4
—
Heavy
—
—
Normal
position
5.5
2
—
—
3
>1
—
—
I
5-6
2.5 —3
2
2
Normal
position
5.5
4
4
.
—
1 —1.5
—
Light
Stitch
Finger
1
f
Th
4
—
2-3
—
Cutting
j Width
Ajusting
Dial
J
1-2
1
Stitch
Length
Dial
3’
I
—
Heavy
Light
2-Thread
Narrow edge
—
Medium
•
Upper
Looper
—
__
2-Thread
Overlock
(Narrow)
Right
Needle
—
—
5
5
—
I
5.5
,j
>1111
1
1.5
J__L_l
Pull
lever
towards
you
Pull
lever
towards
you
5.5
The tenson for each of the threa
d tension dials should be different
according to the pattern stitches
the chart aoove.
as in
Since the figures in the chart are
for average strength of threa
d tension, it may be nec
aDJUSt the thread tension slightly.
essary to
Thread tensions will differ according
to the kind of fabric and the threa
d.
The differential feed ratio is norm
ally “N’, (See P16)
—
—
—21—
—
\
t’J
CD
---
(j)
4__;__
.
0)FJ
O-_.
.-
CD
0
0
0
—
-
D
-
0
D
-
0.
CD
CD
CD
—
C)
CD
(0D
-_CI)
g
i
o_-
-
DO0(0
icD
0
D
CD
Dj
::r
D(D
D
•
£
-
0(0
D—
-‘
CD
Pi-
O
——
DD
0
DD
COO
o
—
T
0
-‘
0(0
D
0-
t
:3
3
Ch
0-
-‘
CD
CD
o
5
CD—
(D
o
0
\
-n
c0
CD
:3
—
CD
0
C)
CD
z
—
—
U)
0
cn
CD
-
-
—I
)
12. ROLLED EDGE
12-1. 3-Thread Rolled Edge
Narrow edge
Roiled Edge
©
The fabric is overlocked with upper and lower
\.joper thread.
I
The fabric is roiled by adjusting
the thread tension and is overlocked with
upper looper thread.
Rolled edge is achieved by rolling the fabric and
overlocking, the 2 types as illustrated above are
deal for use with thin materials.
/
(1) Remove the left needle. (Sew only with the right
needle)
(2) Pull stitch finger knob toward you to align it
with front red line on needle plate.
-
(3)At the beginning of sewing, gently pull the
end of the thread chain.
—23—
isDARD CHART FOR ROLLED EDGE
(3-Thread Rolled Edge)
ROLLED
EDGE
NARROW
EDGE
CUflING WIDTH
5-6 mm
5-6 mm
STITCH LENGTH
1-1.5 mm
1-1 5 mm
N
N
RIGHT
©
NEEDLE THREAD
3-5
3-5
UPPER OOER
THREAD
3-5
3-5
LOWER LOOPER
THREAD
7-9
3-5
DIFFERENTIAL FEED RATIO
THREAD
TENSION
+ Adjust as needed according to the kind of
-J
the fabric and the threads. (See. P.29)
.2. 2-Uiread Rofled Edge
Thnvert to 2-threac overiock (See P.20)
* n ngh needS only and pull stitch finger toward you
3TANDARD CHART FOR ROLLED EDGE
(2-Thread Rolled Edge)
ROLLED
EDGE
NARROW
EDGE
5.5mm
55mm
1-1.5 mm
1.1.5 mm
DIFFERENTIAL FEED RATIO
N
N
©
2
4
Ci
rNG NIDTrI
STITCH LENGTH
RIGHT
-
LOWER LOOPER
THREAD
.
r
—24—
13. PN TUCKS
Pin tucks are overlocked on the edge.
Use the cutter as a guide but do not cut your fabric.
Pin tucking is suited to the design of a child’s
clothing and a lady’s blouse.
(1) Remove the left or right needle for your
desired pintuck width. (Sew only with the one
needle.)
* Raise the presser foot lifter.
(2) The tension is set for normal over lock.
(See P12)
* Mark and press pin tucks in advance.
The differential feed ratio is normally “N”.
J
(3) Place the fabric under the presser foot with
Ide edge in line with the side of the needle
plate and start to sew.
+ Make chain-stitch at the end of the sewing.
(See P.11)
(4) The tuck is ironed to one side when your
Dewing 5 finished
—25—
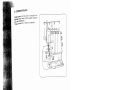
14. REPLACING LOWER CUTTER
Replacing Lower Cutter
Align
Unplug the machine
.ower cutter holder
cutter
(1) Open front cover and disengage upper cutter.
(See page 3)
(2) Loosen lower cutter clamp screwJand remove
lower cutter.
(3) Set the new lower cutter.
Align the top of lower cutter with the top of
needle plate, and tighten lower cutter clamp
screw(j.
15. CHANGING LIGHT BULB
When the light does not come on even though
it is switched on:
How to remove the lamp cover.
(1) Take out the power supply plug.
(2) Remove the presser foot lifter by pulling it out.
(3) Remove the lamp cover.
(4) Change the light bulb.
(5) Replace the lamp cover.
How to use the bulb catcher (plastic sheath).
(1) Take out the power supply plug.
(2) Place the bulb catcher (plastic sheath) found
in the accessory box around the bulb in the
turn it in the direction
direction of arrow
of arrow ©, and remove the bulb.
(3) Replace the new bulb in the reverse steps
of (2).
,
16. LUBRICATION
Although Lubrication is not required often for this
machine since the important parts are all made of
a special oil impregnated sintered metal, one or two
drops of oil on moving metal parts will increase
durability.
—26—
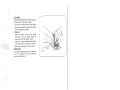
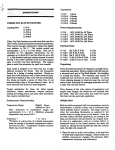
CLEANING
First disconnect machine from power supply by
removing plug from the electric outlet.
1. Open front cover and side cover. (See Page 3)
2. Using the brush provided, remove all the dust
and lint that has accumulated.
STORAGE
1. V’lhen the machine is not in use, please
disconnect it from the power supply by
removing plug from the electric outlet.
2. Using the vinyl cover provided please cover
your machine when you finish your sewing.
3. Store away from bright and damp places.
SERVICING
Any questions regarding service and or operation
are to be addressed to the store where the
machine was purchased.
—27—
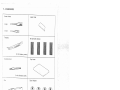
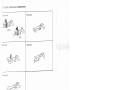
17. ACCES$OR1S
Screw drivers
Lower cutter
(large)
(small)
Tieezers
Net (anti-spill sleeves)
(In the Accessory cover.)
lcaning brush
Vinyl cover
n the Accessory cover.)
Spool Adapter
Needles
plastic sheath
S’’ H M EZ
H
0
Ii
80
...
.....
...
2-thread overlock convertor
Convertor case
(In the Accessory cover.)
(In the Accessory cover.)
—28—
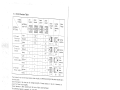
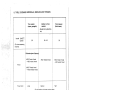
18. TABLE OF SEWING MATERIALS, NEEDLES AND THREADS
Thin material
(crepe, georgette)
Medium to thick
material
(Broadcloth, gabardine,
etc.)
80
80—90
90
#60/2 Twisted thread
#50/2 Twisted thread
60/2 twisted thread
Needle SCHMETZ
130/705H
Thick material
(thick denim)
(For home-use sewing
machine)
Poluester(spun, filament)
#60/2 Twisted thread
#80/2 twisted thread
—
—
Thread
(#80/3 Twisted thread
—#100/3 twisted thread)
Thread tension
Medium
Loose
Tight
(Set the balance of looper tensions weak)
(Needle thread)
Overedging width
(8etween left needle and
edce)
Stitch length
52—55mm
5.2—5.5mm
55—6mrn
2—2.5mm
2.5—3mm
2.5—3mm
Use ball point needles for Man-Made fibers or stretch fabrics.
—29—
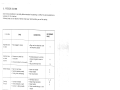
19. PROBLEM SOLVING
Under normal conditions, if you carefully follow instruction for operating,
no difficult or special adjustment is
necessary for this machine.
Toliowing cases are not failure of machine. Check your machine before
you call for service.
SQiLEM
CAUSE
Machine does
not sew
Machine does
•
not feed
Drccerlv
Not plugged in properly
•
Plug cord into electrical outlet
and machine properly
Pressure on presser foot
insufficient
•
Increase pressure by turning
pressure regulator screw to
right
11
•
Adlust differential feed
16
•
Insert new needle
Reset needle
Do not pull fabric
6
6
Differential feed not set correctly
I
Needle Breaks
Bent or blunt needle
Needle inserted incorrectly
Pulling fabric while sewing
S-caking
Threads
improper threading
Thread tension(s) too tight
Incorrect
3kipping
Stitches
REFERENCE
CORREc11ON
setting of needle
•
•
•
-
Re-thread machine
Reset thread tension(s)
7—9
12
•
Reset needle
•
Reset needle/change to new
needle
•
6
•
Insert new needle
Reset needle
a
Bent or blunt needle
Needle inserted incorrectly
Improper threading
•
Re-thread machine
irreaular
Stitcnes
•
Tension not adjusted properly
•
Check thread tensions
Bad needle
•
Change needle
13.14
6
Puckering
Needle thread tensions are too
tight
• Improper threading
• Need differential feed
•
Loosen needle thread tensions
13.14
•
Re-thread machine
Set differential feed 0.7
7—9
16
I
•
•
•
—30—
6
6
7—9
-
N
2
20. SPECIF!CA11ONS
4. 3. or 2 threads
Number of threads
2 Needles (1 needle)
Number of needles
Standard SCHMETZ 130/705H NO: 80—90
Needles
2mm
Width between two needles
Standard 5.5 mm (Range 5.27 mm)
Overlock width
r
1
Stitch length
.
Normal
.
Differential feed ratio
.
5mm
Raige
,
—
1500 RPM
Maximum sewing speed
Width 300mm
Depth 230mm (Max. 340mm)
Height 290mm (Max. 350mm-..555mm)
Machine dimensions
8.7 kg
Weight
—31--
N)
-n
m
m
m
0
rn
C),
C)
m
C,
C)
C)
L


![Manual Audition 4 [By Dr.J.]](http://vs1.manualzilla.com/store/data/005935757_1-4addafd8884e379cc6f9c4cc1fe5fdba-150x150.png)