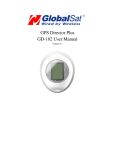
1
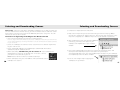
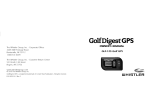
The Whistler Group, Inc. - Corporate Offices
3604 NW Frontage Road
Bentonville, AR 72712
1-800-531-0004
The Whistler Group, Inc. - Customer Return Center
551 North 13th Street
Rogers, AR 72756
www.whistlergroup.com
© 2010 The Whistler Group, Inc.
GolfDigest GPS is a registered trademark of Conde’ Nast Publications. All rights reserved.
P/N 505101
OWNER’S MANUAL
Model GLF-100 Golf GPS
Table of Contents
Introduction . . . . . . . . . . . . . . . . . . . . . . . . . . . . . . . . . . . . . . . . . . . . . . .2-3
Feature - Components . . . . . . . . . . . . . . . . . . . . . . . . . . . . . . . . . . . . . . . .4-5
Important Information . . . . . . . . . . . . . . . . . . . . . . . . . . . . . . . . . . . . . . . . .6
GPS Information . . . . . . . . . . . . . . . . . . . . . . . . . . . . . . . . . . . . . . . . . . . . . .7
Battery Installation . . . . . . . . . . . . . . . . . . . . . . . . . . . . . . . . . . . . . . . . . . . .8
Storing . . . . . . . . . . . . . . . . . . . . . . . . . . . . . . . . . . . . . . . . . . . . . . . . . . . . .9
Selecting and Downloading Courses . . . . . . . . . . . . . . . . . . . . . . . . . . .10-11
Power Up and Main Screen . . . . . . . . . . . . . . . . . . . . . . . . . . . . . . . . . .12-13
Icon Descriptions . . . . . . . . . . . . . . . . . . . . . . . . . . . . . . . . . . . . . . . . . .14-15
Setting Up . . . . . . . . . . . . . . . . . . . . . . . . . . . . . . . . . . . . . . . . . . . . . . .16-23
Unit of Measure
Time Zone
Time Format
Backlight
Auto Detect Function
Resetting Features
Delete Golf
Version
Green Range
Table of Contents
Using the Flip Up Belt Clip . . . . . . . . . . . . . . . . . . . . . . . . . . . . . . . . . .24-25
Get Ready to Play . . . . . . . . . . . . . . . . . . . . . . . . . . . . . . . . . . . . . . . . .26-27
Selecting a Golf Course
Select the Front or Back 9
Select the hole
Green Information . . . . . . . . . . . . . . . . . . . . . . . . . . . . . . . . . . . . . . . . .28-29
Specifications . . . . . . . . . . . . . . . . . . . . . . . . . . . . . . . . . . . . . . . . . . . . . . .30
Troubleshooting . . . . . . . . . . . . . . . . . . . . . . . . . . . . . . . . . . . . . . . . . .31-32
FCC Information . . . . . . . . . . . . . . . . . . . . . . . . . . . . . . . . . . . . . . . . . .33-34
Warranty . . . . . . . . . . . . . . . . . . . . . . . . . . . . . . . . . . . . . . . . . . . . . . . .35-38
Accessories . . . . . . . . . . . . . . . . . . . . . . . . . . . . . . . . . . . . . . . . . . . . . . . . .39
Introduction
Introduction
Dear Whistler Owner,
Thank you for purchasing a Golf GPS from the Whistler Group. If you have questions
concerning the operation of this Whistler product please call:
Customer Service
1-800-531-0004
Monday - Friday • 8:00 am - 5:00 pm CT
or visit our website
www.whistlergroup.com
Please keep the receipt in a safe place. For warranty verification purposes, a copy of your
dated store receipt must accompany any unit sent in for warranty work. If the unit is
returned without a dated store receipt, an out of warranty service charge applies.
Note: Your warranty period begins at the time of purchase. The warranty is validated only
by the dated store receipt. Record the serial number of the unit in the space provided in
the warranty section of the manual.
To fully acquaint yourself with the operation of your Golf GPS, we recommend reading this
entire manual or visiting our FAQ page on our website www.whistlergroup.com
Enjoy your Golf GPS.
Sincerely,
The Whistler Group, Inc.
Design and specifications could be changed without prior notice.
All intellectual property rights and copyrights for the manual, hardware, and related
software are protected by applicable law. This manual may not be copied, reprinted, or
reproduced in any manner without the written permission of the Whistler Group.
2
3
Features
3
Feature Descriptions
4
Whistler’s ergonomic and user-friendly design provides a new level of operating
convenience. Special features include:
5
2
6
1
8
7
10
9
4
11
USB Port - For connection to a PC for updates.
Backlit LCD Display - Offers easy-to-read display to indicate Green information.
GPS Antenna – Compact, high efficiency antenna receives GPS signals.
Power/Menu/ESC – Hold for 3 seconds to turn unit on or off. A short press enters the
Menu mode or escapes the current operation.
5. Up Button - Allows scrolling in menu mode.
6. Enter/OK/Mark Button- A short press confirms selection or switches front/back
distance to the fly distance. Hold for 3 seconds to mark a position.
7. Down Button – Allows scrolling in menu mode.
8. Battery Compartment - Compartment for 2 AAA Alkaline batteries.
9. Flip Up Belt Clip - Secures the unit to a belt. Allows the unit to flip up to be viewed
without removing the unit from the belt clip.
10. USB Cable - Connects the unit to a PC to download courses.
11. Batteries - 2 AAA batteries that power the unit.
1.
2.
3.
4.
5
Important Information
Warnings
Please read the guidelines below, since failure to do so may result in mis-use of the
equipment and may be dangerous or illegal.
• It is the user’s responsibility to use this product prudently and this unit should not be used
while driving any vehicle including golf carts. Always place the unit in a secure area to
avoid any impact which could cause damage to it..
• Any damage caused by incorrect battery placement or battery leakage is not covered
under this warranty.
• Contact with rain or water should be avoided.
• Should you experience any problems with your unit , please contact Customer Service
at www.whistlergroup.com or 800-531-0004. Do not attempt any repairs on your own
as this may void the warranty.
6
GPS Information
The Global Positioning System (GPS) is operated by the government of the United States,
which is solely responsible for its accuracy and maintenance. The system is subject to
changes which could affect the accuracy and performance of all GPS equipment..
Coverage/reception levels may be adversely affected by forests and/or buildings. Optimal
usage will be gained in wide open areas.
Note: Powering up, the unit will begin its search for satellites. During this time it may take
several minutes in order to receive satellite signals. It may take longer to receive signals if it
has been off for 4 or more hours, or if you traveled more than 100 miles away from when
the unit last received a satellite lock. When the unit has a lock, the clock will appear.
7
Battery Installation
Storing
Remove the battery compartment cover by sliding the cover to the edge of the unit and lifting up.
Observing correct polarity (+)
and (-), insert batteries as
shown.
Reinstall battery compartment
cover.
Storing
When the unit is not in use please consider the following steps:
1). When not using the GPS, please store it in a dry place and remove the batteries.
2). Do not place it in direct sunlight or extremely hot temperatures.
Note: As with all battery operated devices, remove the batteries when this unit will not be
used for an extended period of time. Damage caused by leaky or improperly charged
batteries is not covered under warranty.
Note:
• DO NOT mix battery types as this can damage the batteries.
• Use Alkaline batteries for best battery life.
Important: Ni-Cd batteries are not recommended. These batteries will not provide enough capacity to
be useful.
8
9
Selecting and Downloading Courses
Please note: Golf course map data is provided by GolfDigest GPS. In order to register the
GPS unit and receive the two free courses, you will exit Whistler’s website and enter a third
party website. From here you may purchase additional golf courses at any time. The GLF100 unit can store up to 32 courses.
Instructions for Registering the GolfDigest GPS Whistler GLF-100
1) Visit www.whistlerupdates.com and select “Golf Registration”.
Please note that you will be leaving Whistler’s site and going to GolfDigestGPS’ website when you click this link. You
are now at www.golfdigestgps.com and they will handle the golf course downloads and PC Software requirements
for your Golf GPS unit.
2) Select the “GolfDigest GPS Golf GPS Device” section for the PC Software requirements
for your Golf GPS unit.
3) Select "Download GolfDigest GPS MapManager" to download and install the
application program and device drivers.
4) Before proceeding, DO NOT turn your GPS device on. Open GolfDigest GPS
MapManager by clicking on the desktop icon. Once open, connect
your device via its USB cable to your PC.
Note: Batteries do not need to be installed to load maps.
5) When prompted, enter your email address and a password to create a
GolfDigest GPS account.
10
Selecting and Downloading Courses
6) Complete the Registration form and submit.
7) Map Search will open for you to search and select your two free maps by adding
them to your shopping cart and checking out. Your first two maps will appear as free
maps in the shopping cart. Additional maps can be purchased for a separate fee.
8) After completing your free map selections/additional
purchase(s), your map(s) will appear in your
GolfDigest GPS MapManager's upper left Maps
window.
9) Select maps to download to your device by checking the appropriate boxes and
clicking the Download Maps button on the toolbar or by selecting the
“File->Download Maps” menu item. Downloaded maps will appear in your GolfDigest
GPS MapManager lower left device window.
10) You are now ready to begin enjoying your
GolfDigest GPS by Whistler!
11
Power Up and Main Screen
Powering the unit
Press and hold the Power/Menu/ESC button for
approximately 3 seconds to turn on the unit. A
welcome image will first appear then change to
the golf course selection screen. See “Selecting
Golf Course” section for more information.
Power Up and Main Screen
Main Screen
This screen provides battery status, time and the available courses that are saved in the
unit’s memory. Use the UP and Down buttons to choose a course and press the enter
button to select that course.
Turning the unit off
NOTE: The time is only displayed when the unit has received a satellite lock.
Press the Power/Menu/ESC button for 3 seconds. The unit
will display a power off confirmation screen. Press either
the Up or Down button to select “YES” then the Enter
button to turn off the unit.
12
13
Icon Description
Icon Description
Icon
14
Name
Time Format
Description
Selects correct time zone
Center position of the green
Backlight
Selects backlight “on time”
Front of Green
Front position of the green
Auto Hole Detect
Back of Green
Back position of the green
Automatically switches to the current hole
when you enter tee area
Settings
Settings menu
Default
Resets unit to factory settings
Delete
Delete selected item
Version
Provides firmware release version
Unit of Measure
Meters or Yards
Name
Battery
Description
Bars indicate battery level
Center of Green
Icon
15
Setting Up
Setting Up
Setting Screen
The Setting menu lets you customize the unit to display information in the format that you
prefer.
To change a setting;
1) Press the Menu button to enter the Setting menu.
2) Press either the Up or Down buttons to advance to the next option.
3) Press the Enter button to select or save the option.
4) Press the Menu button to exit the setting menu.
Unit
Time Zone
Set the time zone in your area. Once time zone is set and the satellite reception is acquired,
time is automatically set and displayed on the unit.
Select the proper time (GMT). North America is generally
a minus (-) number.
Atlantic = -04
East = -05
Central = -06
Mountain = -07
Pacific = -08
Alaska = -09
Hawaii = -10
Set the unit of measurement for distance values on the
unit. You can set the unit to either of the following:
• Yard (y)
• Meter (m)
16
17
Setting Up
Setting Up
Auto Detect (Auto Hole Detect)
Time Format
Selects auto hole detection function. Selecting YES
enables the unit to automatically switch to the next hole
when exiting the green area. When disabled, you need
to manually switch to the next hole.
Set the time format to either of the following:
• 12 Hour
• 24 Hour
Backlight
Set the time to turn off the backlight after a period of inactivity. When backlight is off, press
any key to turn on backlight.
Set backlight time to any of the following options:
• 10 Sec.: Backlight is turned off when no keys are pressed
within 10 seconds.
• 30 Sec.: Backlight is turned off when no keys are pressed
within 30 seconds.
• 60 Sec.: Backlight is turned off when no keys are pressed
within 60 seconds.
• Always On: Backlight is always turned on.
18
Default - Resetting Features
Reset the unit back to its factory default settings. Selecting
YES returns the unit back to the original settings.
19
Setting Up
Setting Up
Del Golf
The unit supports up to 32 golf courses that is saved in its memory. If the memory is full,
delete existing data first before any new courses can be downloaded or saved.
Delete golf data by either of the following options:
• Del one
• Del All
Del One Course - Continued:
3. Press the up or down key to highlight Yes or No.
NOTE: To cancel, highlight No.
4. Press the Enter key to confirm.
5. Press the Menu key to cancel the current operation and
return to a previous screen.
NOTE: If there is no golf data in the unit’s
memory, it will show “No Data”.
Del One Course:
1. Press the up or down key to highlight the golf course
data to delete.
2. Press the Enter key to confirm selection.
20
Del All:
1. Press the up or down key to highlight Yes or No.
NOTE: To cancel, highlight No.
2. Press the Enter key to confirm.
3. Press the Menu key to cancel the current operation and
return to a previous screen.
21
Setting Up
Version
This screen displays the units firmware release version. Press the
Menu key to cancel the current operation and return to a
previous screen.
Green Range
The Auto Hole detection is adjustable to allow for flexibility. There are two settings:
approaching Into the green and Leave the green. These parameters allow the Auto Hole
detection to function. The default setting distances are: Into = 10 yards, Leave = 30 yards.
To modify these settings you can select a different zone for both the Into and Leave
settings in increments of 5 yards.
Setting Up
Green Range - continued
Once a range is selected there are several distance options to choose from.
To set the Into distance:
1. Select the Into option from the Green Range menu
2. Use the Up or Down buttons to scroll the optional distances.
3. Once a distance is selected, press enter to accept.
To set the Leave distance:
1. Select the Leave option from the Green Range menu
2. Use the Up or Down buttons to scroll the optional distances.
3. Once a distance is selected, press enter to accept.
To change distance:
1. Select field to adjust
2. Press enter to edit.
22
23
Setting Up
Setting Up
Using the Belt Clip with Flip Up feature
The Flip up feature allows easy viewing of the green without removing the unit from the
clip.
Using the Belt Clip with Flip Up feature - Continued
To install:
1. Slide the unit into the belt clip as shown
2. Unit will click and lock into place
3. Clip the assembled unit onto your belt.
Unit and clip attached to belt
Flip up to view screen
Release Tab
Slide unit into the belt clip
until it clicks into place
To remove:
1. Press the release tab in the direction shown
2. Unit will now slide out of the belt clip .
24
Press In
25
Get Ready to Play
Selecting a Golf Course
1. Press the Up or Down key to highlight the golf course.
2. Press the Enter key to select.
NOTE: If you are at the golf course, highlight Golf Auto to
let the device automatically detect the course information.
NOTE: The golf course names shown in this User Manual are for reference only. Actual
names may vary depending on the downloaded golf course data and your location.
Select Front or Back 9
1. Press the Up or Down key to highlight front or back 9 of
the golf course.
2. Press the Enter key to select.
26
Get Ready to Play
Select the hole
1. Press the up or down key to highlight the hole number.
2. Press the Enter key to select.
Auto Hole Detection - how it works
The Auto Hole detection feature requires that you complete a hole by successfully entering
then leaving two user selectable perimeters zones surrounding the Green area. These
zones are used to identify your proximity to the center of the green. The default zones are:
Into = 10 yards, Leave = 30 yards.
Example: Once you are within 10 yards of the center of the Green, you have successfully
entered the Green. Once you have then left the Green and are greater than 30 yards of the
center of the Green, you have successfully left the Green and the unit will automatically change
to the next hole. If you find that you often enter the Green and need to go back to the golf cart
for any item, you may satisfy the criteria for the auto hole to advance.
To correct this, you may wish to increase the Leave zone beyond the golf cart to 35 or 40 yards
such that trips back to the golf cart for any item will not result in a hole change until you cross
the larger zone. If for any reason you need to manually change the hole, press the up or down
arrow and the auto hole will now be in effect for the newly selected hole.
27
Green Information
Auto Hole
Detect Enabled
Green Information
Current Hole
Center of Green
Par of the Hole
y = Yards
Front of Green
Back of Green
Score of current
shot
28
Center of the Green
The screen image shown on the previous page displays information for the green. The
"Center" information is a calculation determining the geometric center of the green shape.
The cup location is not displayed.
The cup is frequently moved from one position on the green to another, sometimes on a
daily basis. To aid you in determining the approximate distance to the cup, you may refer
to the pin sheet or the use of colored pin flags provided by your golf course indicating the
location of the pin within the green. A Blue Flag may mean the hole is farther back on the
green, a White Flag may mean the hole is more central to the green, and a Red Flag may
mean the hole is forward on the green.
Fly Distance
29
Specifications
GPS Receiver
Acquisition Time
Weight
Size
Display
20 Parallel Channels- SiRF III
Reacquisition: < 0.1 sec (Average)
Hot Start: 1 sec
Warm Start: 36 sec
Cold Start: 42 sec
1.68 oz
2.83”x 1.96” x .80”
96x65 FSTN LCD with backlight
Battery Life
20 hours (good sat lock, no backlight)
Storage Temperature
-4 to 113 F (-20 C to +45C)
Operating Temperature
30
Troubleshooting
14 to 113 F (-10 C to +45C)
Your Whistler unit is expertly engineered and designed to exacting quality standards to
provide you with reliable, trouble-free operation. If your unit has been correctly installed
following the guidelines in this manual, but is not operating optimally, please refer to the
troubleshooting guide below.
Problem: Unit will not turn on.
•Check the proper installation of the batteries.
•Press and hold the Power/Menu/ESC button for 3 seconds
Problem: Clock doesn’t work or displays the wrong time.
•Position yourself in a clear area so the unit can obtain a satellite signal. Once a satellite
lock is established the clock will display the time. Unit will not automatically adjust the time.
Go into the setting menu and select your time zone to have the unit properly display the
correct time. See page 17.
Problem: Why are the distances shown incorrect for each hole?
•Check the Units setting in the set up menu to be sure the distance units (yard or meter)
are correct.
31
Troubleshooting
Problem: There are no golf course names listed in golf course selection.
• No golf course files are loaded on the device.
• Need to login and register before courses can be downloaded into the unit.
Question: Can I recharge my rechargeable battery through the unit?
• NO. The unit does not facilitate the recharging of batteries. You may use rechargeable
batteries, but battery chargers should not be connected to the unt.
Question: Will I lose my data when the power is turned off?
• Data stored in the unit will not be lost unless you delete the data.
FCC Information
This device complies with part 15 of the FCC rules. Operation is subject to the following
two conditions: (1)This device may not cause harmful interference, and (2)This device must
accept any interference received, including interference that may caused undesired
operation.
Note: This equipment has been tested and found to comply with the limits for a Class B
digital device, pursuant to part 15 of the FCC Rules. These limits are designed to provide
reasonable protection against harmful interference in a residential installation. This
equipment generates uses and can radiate radio frequency energy and, if not installed and
used in accordance with the instructions, may cause harmful interference to radio
communications. However, there is no guarantee that interference will not occur in a
particular installation.
If this equipment does cause harmful interference to radio or television reception, which
can be determined by turning the equipment off and on, the user is encouraged to try to
correct the interference by one or more of the following measures:
32
33
FCC Information
Warranty Information
-- Reorient or relocate the receiving antenna.
-- Increase the separation between the equipment and receiver.
-- Connect the equipment into an outlet on a circuit different from that to which the
receiver is connected.
-- Consult the dealer or an experienced radio/TV technician for help.
FCC Warning
This equipment may generate or use radio frequency energy. Changes or modifications to
this equipment not expressly approved by they manufacturer could void the user’s authority
to operate the equipment.
Whistlergroup Inc. GLF-100
The manufacturer hereby declares that this device is in compliance with the essential
requirements and other relevant provisions of Directive 1999/5/EC.
34
Consumer Warranty
This Whistler product is warranted to the original purchaser for a period of one year from the date
of original purchase against all defects in materials and workmanship.
This limited warranty is void if the unit is abused, modified, installed improperly, if the
housing has been removed, or if the serial number is missing.
There are no express warranties covering this product other than those set forth in this warranty. All
express or implied warranties for this product are limited to one year. Whistler is not liable for
damages arising from the use, misuse, or operation of this product.
Service Out of Warranty
Units will be repaired at “out of warranty” service rates when:
• The units original warranty has expired.
• A dated store receipt is not supplied.
• The unit has been returned without its serial number.
• The unit has been abused, modified, installed improperly, or had its housing removed.
35
Warranty Information
Service Under Warranty
During the warranty period, defective units will be repaired without charge to the purchaser when
returned with a dated store receipt to the address below. Units returned without dated store receipt
will be handled as described in section “Service Out Of Warranty.”
Warranty Information
IMPORTANT: Whistler will not assume responsibility for loss or damage incurred in shipping. Therefore,
please ship your unit insured with return receipt requested. COD’s will not be accepted!
2.
When returning a unit for service, please follow these instructions:
Whistler Repair Dept.
551 N. 13th St.
Rogers, AR. 72756
Please allow 3 weeks turn around time.
36
clude with your unit the following information, clearly printed:
• Your name and street address (for shipping via UPS), a daytime telephone number and
an e-mail address, if applicable.
• A detailed description of the problem (e.g., “Unit doesn’t get a satellite lock”).
• A copy of your dated store receipt or bill of sale.
Due to the specialized equipment necessary for testing this product, there are no authorized service
stations for Whistler products other than Whistler.
1. Ship the unit in the original carton or in a suitable sturdy equivalent, fully insured, with
return receipt requested to:
In
3.
Be certain your unit is returned with its serial number. For reference, please write your
unit serial number in the following space: _____________.
Units without serial numbers are not covered under warranty.
IMPORTANT: To validate that your unit is within the warranty period, make sure you keep
a copy of your dated store receipt. You may have registered your unit at
www.whistlergroup.com, however, for warranty verification purposes, a copy of your dated
store receipt must accompany any unit sent in for warranty work.
37
Warranty Information
Service Out of Warranty
The minimum out of warranty service fee for your Whistler product is $75.00 (U.S.). If you
require out of warranty service, please return your unit as outlined in the section “Service
Under Warranty” along with a certified check or money order for $75.00. Payment may also
be made by MasterCard, VISA or American Express; personal checks are not accepted.
In the event repairs cannot be covered by the minimum $75.00 service fee, you will be
contacted by a Whistler technical service specialist who will outline options available to you. If you
elect not to have your unit repaired, it will be returned to you along with your certified check
or money order.
IMPORTANT: When returning your unit for service, be certain to include a daytime telephone
number, and an email address (if applicable).
Accessories
These and other accessories can be ordered directly from Whistler by calling 1-800-531-0004
or visit our online store at www.whistlergroup.com
Order #
Description
Price
505105
Flip Up Belt Clip
$ 9.95
505104
USB cable
$ 5.95
Shipping and handling (per order) $5.00 Prices are subject to change without notice.
Customer Service
If you have questions concerning the operation of your Whistler detector, or require service
during or after the warranty period, please call Customer Service at:
1-800-531-0004.
Representatives are available to answer your questions
Monday - Friday from 8:00 a.m. to 5:00 p.m. (CT).
www.whistlergroup.com
38
39