1
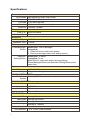
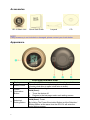
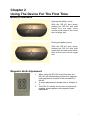
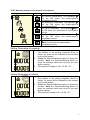
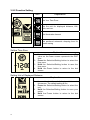
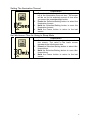
GPS Director
GD-101 User Manual
Version 1.1
CONTENT
Chapter 1_Functions and Specifications...........................3
Function and Features.................................................................... 3
Specifications .............................................................................. 4
Accessories ................................................................................ 6
Appearance ................................................................................ 6
Chapter 2 Using Your Device For The First Time ..............7
Battery Installation ........................................................................ 7
Magnetic North Adjustment .............................................................. 7
Chapter 3 Using The GD-101 ...........................................8
3-1 Your Heading Screen ................................................................ 8
3-1-1 Automatic Setting the Destination...........................................................................9
3-2 Main Setting Screen................................................................ 10
3-2-1 Manually Setting Your Destination’s Coordinates....................................................11
3-2-2 Function Setting ...................................................................................................12
3-2-3 Setting Data.........................................................................................................14
3-3 Adjusting E-Compass .............................................................. 15
3-4 Turning Off GD-101 ................................................................ 16
Chapter 4: Troubleshooting ...........................................17
World Time Zone Table ..................................................18
FCC Notices ...................................................................20
2
Chapter 1_Functions and Specifications
Functions and Features:
Up to 5 Destination Points
Display directions with Digital Arrow (Can display 16 directions)
Magnetic North Direction Indication
Manual Destination Coordinate Settings
Maximum Destination Distance Showing (0~999.99)
GPS Fix Status Indication
3 Kinds of Distance Units: km/mi/nm
Time Zone Setting/ Date
Uses (2) AAA Batteries
Battery Life Can Last Up To 18 Hours In Ideal Conditions. Battery life can be
Lengthened Using Power-Save Mode.
Illuminated Screen
3
Specifications
Power
GPS chipset
Frequency
C/A Code
Channels
Sensitivity
Display
Pixel H*W
Backlight Type
Electricity
Battery Type
Operation Time
Buttons
Power/Backlight
Button
Selection/
Setting Button
High sensitivity single chip solution
L1, 1575.42 MHz
1.023 MHz chip rate
48 channel all-in-view tracking
Tracking:-161dBm
96x65 dot Matrix
White
AAA X 2
9 hours
Short-click: Turn on backlight.
Long-click:
1. Power off device under main screen.
2. Return to last page under each setting screen._
Short-click: To select.
Long-click: To set.
Make GD-101 enter main screen by long clicking
Power/Backlight Button and Selection/ Setting Button at the
same time.
Appearance
Dimension
60 X 60 X 28 (mm)
Weight
45g, (Not including batteries)
COORDINATES SYSTEM
Coordinates Default_WGS-84
System
DYNAMIC CONDITION
Accelerate Speed Less than 4G
Height Limit 18,000 Meter
Speed Limit 515 m/sec
Vibration Limit 20 m/sec**3
GPS FIX TIME
Hot Start Average 1 second
Warm Start Average 38 second
Cold Start Average 42 second
Get GPS fix Again Average 0.1 second
Antenna
GPS antenna
12 X 12 mm, Patch Antenna
4
ACCURACY
Horizontal 10 meters, 2D RMS
Position 1-5 meters 2D RMS, WAAS corrected
Speed Accuracy 0.1 m/sec
Time Accuracy 1 micro-second synchronized to GPS time
Temperature
Operation
0°C ~ 50°C
Temperature
Storage
-20°C ~ 70°C
Temperature
Humidity Range
Operational up to 95% non-condensing
Certification
FCC USA (Covers requirements for CANADA ICES-003)
CE Europe
TAIWAN BSMI
5
Accessories
GD-101Main Unit
Quick Start Guide
Lanyard
CD
NOTE_
If any accessory is not included or damaged, please contact your local dealer.
Appearance
Front view and Back view
1
Display
2
Battery Cover
3
Power/
Illumination
Button
4
Selection/
Setting Button
6
Shows the GPS fix status, power level, heading and distance
Open the battery cover by rotating it according to the arrow
(counter clock-wise to open/ clock-wise to close).
Press: Turn on backlight.
Hold (2sec):
1. Turns the device off.
2. Returns to the last page under each setting screen.
Press: To select.
Hold (2sec): To set.
By holding The Power/Illumination Button and the Selection/
Setting Button at the same time the GD-101 will enter the
main settings screen.
Chapter 2
Using The Device For The First Time
Battery Installation
Opening the battery cover:
With the GD-101 face down,
holding the GD-101 with both
hands turn the back cover
counter clock-wise till the cover
can no longer turn.
Closing the battery cover:
With the GD-101 face down,
holding the GD-101 with both
hands turn the back cover clockwise till the cover can no longer
turn.
Magnetic North Adjustment
1.
2.
3.
When using the GD-101 for the first time, the
GD-101 will automatically perform the magneticnorth adjustment as seen in the screenshot to
the left.
To make adjustments, please refer to Chapter 32.
If the GD-101 shows an incorrect or inaccurate
heading, please perform the magnetic North
adjustment.
7
Chapter 3 Using The GD-101
3-1 The E-Compass Screen
Indication
Description
The GPS fix indication icon ( ) will stay SOLID when the GD101 gets a GPS fix. The GPS fix icon ( ) will FLASH when the
GD-101 does not have a GPS fix.
The distance between the GD-101 and your destination will only
be shown/ displayed when the GD-101 has a GPS fix.
The E-Compass screen will began to direct you to your
destination after the GD-101 has a GPS fix and has performed
the magnetic-north adjustment.
Battery power level:
75%~100%
50%~75%
25%~50%
Battery Is Low, Please Change/ Charge Your Batteries
8
3-1-1 Setting the Destination
Description
1.
While in the E-Compass mode, press the
Selection/Setting button to select and set the
following 5 destination coordinates.
2.
After the GD-101 has a GPS fix, hold the
Selection/ Setting button to save your present
coordinates as the selected destination’s
coordinates.
While The GD-101 is saving your coordinates, the GD101 will display the graphic shown to the left and then
return to E-Compass mode.
If you try to save your present coordinates with no GPS
fix, the GD-101 will display a graphic similar to the
image seen in the screenshot to the left and then return
to E-Compass mode.
9
3-2 Main Setting Screen
While in E-Compass mode, you can make the GD-101 enter the main screen by
holding the Power/Illumination Button and the Selection/ Setting Button at the same
time.
Screen and Operation Explanation:
Indication Function
Manually Set
Destination
Coordinates
Operation
Hold the Selection/Setting button to enter the setting
screen.
You could set the following 5 destination coordinates.
Hold the Selection/Setting button to enter the setting
screen.
You could set the following items.
Function
Settings
Time Zone
Distance Unit
Illumination Setting
Automatic Sleep Time
Hold the Selection/Setting button to enter setting
screen.
You could set the following items.
Data Setting
Date
Delete Memory
10
GPS Cold Start
3-2-1 Manually Setting Your Destination’s Coordinates
icon
Explanation
Set Home’s coordinates. The indication
will be ON when the destination’s
coordinates are set.
Set Building’s coordinates. The indication
will be ON when the destination’s
coordinates are set.
Set Car’s coordinates. The indication
will
be ON when the destination’s coordinates
are set.
Set Travel’s coordinates. The indication
will be ON when the destination’s
coordinates are set.
Set My Favorite’s coordinates. The indication
will be ON when the destination’s
coordinates are set.
Setting Destination’s Longitude
1.
2.
3.
The upper left corner is the selected destination.
The number is the setting longitude (East or
West). An arrow will be indicated to the number
on the initial screen.
Press the Selection/Setting button to select the
number. Hold the Selection/Setting button to
enter the selected value and move to the next
digit for setting.
The maximum setting is 180 ° 00 ’00 . 00 ”
Setting Destination’s Latitude
1.
2.
3.
The upper left corner is the selected destination.
The number is the setting longitude (North or
South). An arrow will be indicated to the number
on the initial screen.
Press the Selection/Setting button to select the
number. Hold the Selection/Setting button to
enter the selected value and move to the next
digit for setting.
The maximum setting is 90 ° 00 ’00 . 00 ”
11
3-2-2 Function Setting
Icon
Explanation
Set Your Time Zone
Set the unit for displayed distance, KM,
mile, and nm.
Set illumination timeout
Set preferred automatic sleeping time for
power-saving
Setting Time Zone
Explanation
1.
2.
3.
4.
You could set your time zone in this screen. The
value on the lower screen represents the GMT
time.
Press the Selection/Setting button to select the
time zone.
Hold the Selection/Setting button to save the
time zone.
Hold the Power button to return to the last
screen.
Setting Unit of Displayed Distance
Explanation
1.
2.
3.
4.
12
You could select the unit of displayed distance in
this screen. The default setting is km.
Press the Selection/Setting button to select the
unit.
Hold the Selection/Setting button to save your
option.
Hold the Power button to return to the last
screen.
Setting The Illumination Timeout
Explanation
1.
2.
3.
4.
The value in the lower portion of the image to the
left is the illumination time-out time. The screen
will be on for the selected amount of time after
you press the power/backlight button.
Press the Selection/Setting button to select the
illumination timeout.
Hold the Selection/Setting button to save the
illumination timeout
Hold the Power button to return to the last
screen.
Set Idle-timeout Time for Going to Sleep Mode
Explanation
1.
2.
3.
4.
Set idle-timeout time for going to sleep mode in
this screen. The value in the lower screen
represents the idle-timeout time.
Press the Selection/Setting button to select idletimeout-time.
Hold the Selection/Setting button to save idletimeout-time.
Hold the Power button to return to the last
screen.
13
3-2-3 Setting Data
Icon
Explanation
Displays the present time of the set time
zone.
Forces the GD-101 to do a cold start_
Deletes the setting coordinate of a
destination in the GD-101
Showing Date and Time
Explanation
1.
2.
3.
Displayed date and time is from satellite data. It
is not user-defined.
Press the Power button to return to the last
screen.
Hold the Selection/Setting button to go to the
main screen.
Cold Start
Explanation
1. This screen shows the GD-101 is performing a
GPS a Cold Start
2. The GD-101 will return to the E-Compass screen
after 1 second.
14
Deleting Coordinates of Destination Screen
Explanation
1. This screen shows the GD-101 is deleting the
coordinates of the destination.
2. It will return to the E-Compass screen after 1
second.
3-3 Adjusting E-Compass
Explanation
1.
2.
The GD-101 will display magnetic north after
adjusting the E-Compass.
The GD-101 will show the coordinates after
getting a GPS fix.
Adjusting the Electronic Compass
1.
2.
3.
4.
You can adjust the electronic compass in this
screen.
To adjust the magnetic North settings Hold the
Selection/Setting button and rotate the device in
a circular motion 1-2 times.
We highly suggest you perform the adjustment
outdoors to avoid interference with magnetic
anomalies.
The GD-101 will automatically return to the ECompass screen once the adjustments have
been completed.
15
3-4 Turning Off The GD-101
Explanation
1.
2.
16
To turn off the GD-101 press and hold the power
button till the GD-101 turns off.
The GD-101 will turn off 2 seconds after seeing
the image to the left.
Chapter 4: Troubleshooting
When GD-101 can not be turned on or does not work properly,
Please check if the battery is installed correctly.
Why does the GD-101 require more time to get a GPS fix while in
motion powering the GD-101 on? In order to shorten the “fix time”
please keep the GD-101 stationary while powering it on.
Keep GD-101 away from excessive moisture and extreme
temperatures. Do not leave it in the closed vehicles or put it under
direct sunlight for extended periods of time. Excessive moisture and
extreme temperatures may damage the GD-101.
If the date and time is not correct, please select the local time zone in
the time zone setting. Ie PST GMT -8 / Taiwan GMT +8
Do not place the GD-101 near electronic appliances or high-powered
magnets. Electronic appliances/ devices may cause the GD-101 to
give a wrong heading.
If the heading being given is inaccurate, this can be corrected by
going to the adjustments menu and select the E-Compass option .
17
World Time Zone Table
Time Code Description
Region
Time Zone
ACDT
Australian Central Daylight Time
Australia
+10:30
ACST
Australian Central Standard Time Australia
+ 9:30
ADT
Atlantic Daylight Time
- 3:00
AEDT
Australian Eastern Daylight Time Australia
+ 11:00
AEST
Australian Eastern Standard Time Australia
+ 10:00
AKDT
Alaska Daylight Time
North America
- 8:00
AKST
Alaska Standard Time
North America
- 9:00
AST
Atlantic Standard Time
North America
- 4:00
AWDT
+ 9:00
AWST
Australian Western Daylight Time Australia
Australian Western Standard
Time
Australia
BST
British Summer Time
Europe
+ 1:00
CDT
Central Daylight Time
Australia
+10:30
CDT
Central Daylight Time
North America
- 5:00
CEDT
Central European Daylight Time
Europe
+ 2:00
CEST
Central European Summer Time
Europe
+ 2:00
CET
Central European Time
Europe
+ 1:00
CST
Central Summer Time
Australia
+ 10:30
CST
Central Standard Time
Australia
+ 9:30
CST
Central Standard Time
North America
- 6:00
CXT
Christmas Island Time
Australia
+ 7:00
EDT
Eastern Daylight Time
Australia
+ 11:00
EDT
Eastern Daylight Time
North America
- 4:00
EEDT
Eastern European Daylight Time
Europe
+ 3:00
EEST
Eastern European Summer Time Europe
+ 3:00
EET
Eastern European Time
Europe
+ 2:00
EST
Eastern Summer Time
Australia
+ 11:00
EST
Eastern Standard Time
Australia
+ 10:00
EST
Eastern Standard Time
North America
GMT
Greenwich Mean Time
Europe
HAA
Heure Avancée de l'Atlantique
North America
- 3:00
HAC
Heure Avancée du Centre
North America
- 5:00
HADT
Hawaii-Aleutian Daylight Time
North America
- 9:00
HAE
Heure Avancée de l'Est
North America
- 4:00
HAP
Heure Avancée du Pacifique
North America
- 7:00
HAR
Heure Avancée des Rocheuses
North America
- 6:00
18
North America
+ 8:00
- 5:00
0:00
HAST
Hawaii-Aleutian Standard Time
North America
- 10:00
HAT
Heure Avancée de Terre-Neuve
North America
-2:30
HAY
Heure Avancée du Yukon
North America
- 8:00
HNA
Heure Normale de l'Atlantique
North America
- 4:00
HNC
Heure Normale du Centre
North America
- 6:00
HNE
Heure Normale de l'Est
North America
- 5:00
HNP
Heure Normale du Pacifique
North America
- 8:00
HNR
Heure Normale des Rocheuses
North America
- 7:00
HNT
Heure Normale de Terre-Neuve
North America
- 3:30
HNY
Heure Normale du Yukon
North America
- 9:00
IST
Irish Summer Time
Europe
+ 1:00
MDT
Mountain Daylight Time
North America
- 6:00
MESZ
Mitteleuroäische Sommerzeit
Europe
+ 2:00
MEZ
Mitteleuropäische Zeit
Europe
+ 1:00
MSD
Moscow Daylight Time
Europe
+ 4:00
MSK
Moscow Standard Time
Europe
+ 3:00
MST
Mountain Standard Time
North America
- 7:00
NDT
Newfoundland Daylight Time
North America
- 2:30
NFT
Norfolk (Island) Time
Australia
NST
Newfoundland Standard Time
North America
- 3:30
PDT
Pacific Daylight Time
North America
- 7:00
PST
Pacific Standard Time
North America
- 8:00
UTC
Coordinated Universal Time
Europe
0:00
WDT
Western Daylight Time
Australia
WEDT
Western European Daylight Time Europe
+ 1:00
WEST
Western European Summer Time Europe
+ 1:00
WET
Western European Time
Europe
WST
Western Summer Time
Australia
+ 9:00
WST
Western Standard Time
Australia
+ 8:00
+ 11:30
+ 9:00
0:00
19
FCC Notices
This device complies with part 15 of the FCC rules. Operation is subject to the
following two conditions:
(1) This device may not cause harmful interference, and
(2) This device must accept any interference received, including interference that
may cause undesired operation.
FCC RF Exposure requirements:
This device and its antenna(s) must not be co-located or operation in conjunction
with any other antenna or transmitter.
NOTE: THE MANUFACTURER IS NOT RESPONSIBLE FOR ANY RADIO OR TV
INTERFERENCE CAUSED BY UNAUTHORIZED MODIFICATIONS TO THIS
EQUIPMENT. SUCH MODIFICATIONS COULD VOID THE USER’S AUTHORITY
TO OPERATE THE EQUIPMENT.
20