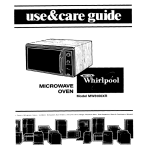
1
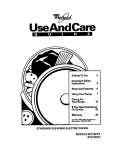
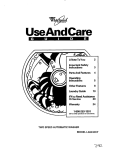
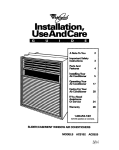
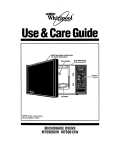
Use& CareGuide
/
Yodel and se&l number plate
(on frame bethi
door)
-
MICROWAVE
OVEN
MB7120XY
Auto cook
f4uw
Auto defrost
gulds
Contents
Page
........................ .3
Important Safety lnstrudlons
Precautbns To Avold Posslbls Exposure To
Excssslve Mlorowave Energy ......................... .4
Gettlng Acqualnted .......................................... .5
Microwave oven features ............................... .5
Control panel features ..................................... 6
Quick reference cooking guide.. ..................... .7
Uslng Your Mkrowave Oven ......................... 10
Microwave oven controls.. ............................. 10
Setting the dock ........................................... .1 1
Using the Minute Timer ................................ .l 1
Using STOP/CLEAR .................................... .12
Cooking with your microwave oven .............. .12
Cooking at high cook power ......................... .12
Cooking at lower cook powers ..................... .13
Using AUTO COOK ..................................... .14
Auto cook chart ............................................ .15
Defrosting ...................................................... 16
Auto defrost chart ......................................... .17
Cooking with more than one cook cycle.. ..... .16
One-Touch Cooking ..................................... .20
Using ADD MINUTE.. ................................... -21
Using PAUSE ............................................... .22
Using AUTO START .................................... .23
Uslng The Browner ....................................... .24
Preheating the Browner.. .............................. .24
To cook, preheat and brown.. ....................... .24
Browner chart ............................................... .25
lnstallatlon lnstructbns ................................. 26
Installing your microwave oven .................... .26
Grounding instructions ................................. -27
Carlng For Your MIcrowave Oven ................ .26
Cleaning the microwave oven ...................... .26
How Your Mlorowave Oven Works.. ............. .29
Operatlng Safety Precautions ...................... .30
Glass turntable ............................................. .32
General information ...................................... .33
Cooklng Guide ............................................... .34
Browner recipes ........................................... .34
Microwave cooking chart.. ............................ .36
Questlons And Answers ............................... .37
If You Need Servke Or Assistance .............. .36
Whlrlpool Mkrowave Oven Warranty .......... .40
0 1992 Whirlpool Corporation
2
Thank you for buylng a Whlrlpool appliance.
Please complete and mall the Owner Reglstratlon Card provldsd wlth thls product. Then
complete the form below. Have this information
ready if you need senr.be or call with a question.
. Copy model and serial numbers from plate
(behind the microwave oven door on the frame)
and purchase date from sales slip.
l Keep this book and the sales slip together in a
handy place.
Model Number
Serial Number
Purchase Date
Service Company Phone Number
Fill out and return the Mlcrowave Reglstratlon
Card Included with your mkrowave oven. If
the card is missing, please send the model and
serial number of your microwave oven, with your
name and address to ...
Whirlpool Corporation
Microwave Registration Department
Administrative Center
2000 M-63
Benton Harbor, Ml 49022
This information will help us reach you if there is
ever a need to pass along information about your
microwave oven.
IMPORTANT
SAFETY
INSTRUCTIONS
Mlcrowave ovens have been thoroughly tested for safe and effklent operatbn. However, as wlth
any appliance, there are special lnstallatbn and safety precautbns which must be followed to
ensure safe and satisfactory operatlon and prevent damage to the unlt.
To reduce the risk of fire, electrkal shock, InJury to persons, or
damage when uslng the mkrowave oven, folbw bask pre-tbns,
lncludlng the following:
l
l
l
l
l
l
l
l
l
l
l
l
l
Read all instrud’bns before using the microwave oven.
Read and folbw the specific “PRECAUTIONS
TO AVOID POSSIBLE EXPOSURE TO
EXCESSIVE MICROWAVE ENERGY found
on page 4.
This appliance must be grounded. Connect
only to properly grounded outlet. See
“GROUNDING INSTRUCTIONS found on
page 27.
Install or locate this appliance only in accordance with the provided Installation Instructions found on page 26.
Some products such as whole eggs and
sealed containers-for example, dosed glass
jars-may explode and should not be heated in
this oven.
Use this appliance only for its intended use as
described in this manual. Do not use corrosive
chemicals or vapors in this appliance. This
type of oven is specifically’designed to heat,
cook, or dry food. lt is not designed for
industrial or laboratory use.
As with any appliance, dose supervision is
necessary when used by children.
Do not operate this appliance if it has a
damaged cord or plug, if it is not working
properly, or if it has been damaged or
dropped. Electrical shock, fire or other
hazards may result.
This appliance should be serviced only by
qualified service personnel. Call an authorized
WhirlpooP” service company for examination,
repair or adjustment.
Do not cover or block any opening on the
appliance. Fire may result.
Do not store or use this appliance outdoors.
Do not use this product near water-for
example, near a kitchen sink, in a wet
basement, or near a swimming pool, and the
like.
Do not immerse cord or plug in water.
Electrical shock may result.
Keep cord away from heated surfaces.
Electrical shock may result.
* Do not let cord hang over edge of table or
counter. Electrical shock may result.
l See door surface and interior deaning instructions on page 28.
l To reduce the risk of fire in the oven cavity:
-Do not overcook food. Carefully attend
appliance il paper, plastic, or other cambustible materials are placed inside the oven to
facilitate cooking. Paper can char or burn, and
some plastics can melt if used when heating
foods.
-Do not deep fry in oven.
-Test dlnnerware or cookware before uslng.
See page 33. Some dishes (melamine, etc.)
absorb microwave energy, becoming too hot to
handle and slowing cooking times. Remove
wire twist-ties from paper or plastic bags
before placing bag in oven. Cooking in metal
containers not designed for microwave use
can damage the oven, as can containers with
hidden metal (twist-ties, foil lining, staples,
metallic glaze or trim.)
- tt materials inside the oven should ignite, keep
oven door closed, turn oven off, and disconnect the power cord, or shut off power at the
fuse or circuit breaker panel.
-Do not use the cavity for storage purposes. Do
not leave paper products, cooking utensils, or
food in the cavity when not in use.
l Read and follow “Operating Safety Precautions”
starting on page 30.
l 1. A short power-supply cord is provided to
reduce the risks resulting from becoming
entangled in or tripping over a bnger cord.
2. Longer cord sets or extension cords are
available and may be used if care is exercised in their use.
3. ff a bng cord or extension cord is used, (a)
the marked electrical rating of the cord set or
extension cord should be at least as great as
the electrical rating of the appliance, (b) the
extension cord must be a grounding-type,
3-wire cord, and (c) the bnger cord should be
arranged so that it will not drape over the
countertop or tabletop where it can be pulled
on by children or tripped over accidentally.
- SAVE THESE INSTRUCTIONS 3
You are responsible for:
Installing and leveling the oven on a surface
strong enough to support its weight, and where
it is protected from the elements.’ The microwave oven should be at a temperature above
50°F (10%) for proper operation.
l Property connecting the oven to electrical
supply and grounding it.’
l Operating the oven with the glass turntable in
place.
l Making sure the oven is not used by anyone
unable to operate it properly.
l Properly maintaining the oven.
l Using the microwave oven only as described in
this manual.
‘See the Installation Instructions on page 26.
l
PRECAUTIONS
TOAVOIDPOSSIBLE
EXPOSURE
TOEXCESSIVE
MICROWAVE
ENERGY...
Do not attempt to operate this oven with the door
open since open-door operation can result in
harmful exposure to microwave energy. lt is
important not to defeat or tamper with the safety
‘nterbcks.
k not place any object between the oven front
ace and the door or allow soil or cleaner residue
0 accumulate on sealing surfaces.
)o not operate the oven if it is damaged. lt is
)articularlv imoortant that the oven door close
xoperly and that there is no damage to the:
1) Door (bent),
2) Hinges and latches (broken or loosened),
3) Door seals and sealing surfaces.
4
Do not operate the microwave oven if the door
window is broken.
The microwave oven should be checked for
microwave leakage by qualified service personne
after a repair is made.
The oven should not be adjusted or repaired
by anyone except properly qualified service
personnel.
Do not operate the microwave oven with the
outer cabinet removed.
GettingAcquainted
Microwave oven features
Your microwave oven is designed to make your
cooking experience as enjoyable and productive
as possible. To help get you up and running
quickly, the following is a list of the oven’s basic
features:
1. One-Touch Boor Open Button. Push to open
door.
2. Door Safety Lock System. The oven will not
operate unless the door is securely closed.
3. Wlndow wlth Metal Shield. Shield prevents
microwaves from escaping. It is designed as a
screen to allow you to view food as it cooks.
4. Glass Turntable. This turntable turns food as
it cooks for more even cooking. tt must be in
oven during operation for best cooking results.
See pages 28 and 32 for more details.
5. Removable Turntable Support (under
turntable).
6. Control Panel. Touch pads on this panel to
perform all functions. See pages 6 and 7 for
more details.
7. Auto Defrost and Auto Cook Guide.
8. Light. Automatically turns on when door is
opened or when oven is operating.
9. Model and Serial Number Plate.
10. External Oven Alr Vents (on back). See
page 26 for more details.
11. Browner Element and Reflector. The
Browner allows you to brown food after
microwave cooking.
5
Control panel features
6
Your microwave oven control panel lets you
select the desired cooking function quickly and
easily. All you have to do is touch the necessary
Command Pad. The folbwing is a list of all the
Command and Number Pads located on the
control panel. For more information. see pages
1o-25.
Audible signals are available to guide you
when setting and using your oven. A programming tone will sound each time you touch a pad.
A single, long tone signals the end of a cooking
or Minute Timer function. lf you do not hear a
tone, it is because of incorrectly entered
instructions.
1. Display. This display indudes clock and
indicators to tell you time of day, cooking time
settings and cooking functions selected. See
page 10 for more information.
2. BROWNER. Touch this pad to begin
browning operation.
3. ADD MINUTE. Touch this pad to add an
extra minute, at 100% Cook Power, to your
cooking cycle. See page 21 for more
information.
4. POPCORN. Touch this pad when popping
popcorn in your microwave oven. The oven
will automatically heat for a preset time at a
preset wok power. See page 20 for more
information.
5. DINNER PLATE, Touch this pad when
heating a plate of food in your microwave
oven. The oven will automatically heat for a
preset time at a preset =k power. See page
20 for more information.
6. BEVERAGE Touch this pad when heating a
beverage in your microwave oven. The oven
will automatically heat for a preset time at a
preset cook power. See page 20 for more
information.
7. AUTO START/CLOCK. Touch this pad to
enter the correct time of day or to program
your oven to begin cooking automatically at a
designated time later in the day. See pages
11 and 23 for more information.
8. AUTO COOK Touch this pad to cook
common microwave-prepared foods without
needing to program times or cook powers.
See page 14 for more information.
9. AUTO DEFROST. Touch this pad followed
by Number Pads to thaw frozen food before
cooking. See page 16 for more information.
10. Number Pads. Touch Number Pads to enter
cooking times, Cook Powers, quantities or
weights.
11. TlMEFUPAUSE Touch this pad to set the
Minute Timer or to stop the oven between
cooking stages. See pages 11 and 22 for
more information.
12. STOP/CLEAR. Touch this pad once to erase
an incorrect command, cancel the Minute
Timer or stop the oven temporarily during
cooking. Touch it twice to cancel a program
during cooking or to clear the Display. See
page 12 for more information.
13. POWER LEVEL Touch this pad folbwed by
a Number Pad to set the amount of microwave energy released to cook the food. The
higher the number, the higher the power or
Heat.’ See page 13 for more information.
See the Microwave cooking chart” on page
36 for specific Cook Powers to use for the
foods you are ding.
14. START. Touch this pad after setting a
function on the microwave oven to start the
function. tf you open the door before the
oven bsgins to cook, retouch START.
Quick reference cooking guide
Your mlcrowave oven gives you a wkfe range of cookfng capabllltles. The followlng chart can be
used as a quick reference when cooklng. For more Indepth Informatlon, see the corresponding
sections In this Use and Care Guide.
Example . .
If you want to ...
You .I
Set the clock
Setting the clock to the correct
time of day lets you set start
times with the Auto Start
feature. The microwave clock
also provides an accurate
source of time for your kitchen.
1. Touch STOP/CLEAR.
2. Touch AUTO START/CLOCK.
3. Enter the correct time of day by
touching the necessary Number
Pads.
4. Touch AUTO START/CLOCK again.
Use the Minute Timer
The Minute Timer lets you time
any cooking activities in your
kifchen.
1. Touch Number Pads to enter the
desired time.
2. Touch TIMER/PAUSE.
Cook at hlgh power
High power cooking is perfect
for quick cooking of small items
and separate portions.
m
3. To clear the Minute Timer. touch
STOP/CLEAR.
m
1. Put food in the oven and close the
door.
2. Touch Number Pads for the cooking
time you want.
3. Touch START.
omm
m
Cook at lower powers
Cooking at bwer powers is
necessary for efficient cooking
of most foods. Failure to use
the correct Cook Power may
resuk in overcooking or
undercooking.
1. Put food in the oven and cbse the
door.
2. Touch Number Pads for the cooking
time you want.
3. Touch POWER LEVEL
4. Touch a Number Pad for the Cook
Power you want.
5. Touch START.
..-
m
omm
mm
l
continued on next page
l
l
..
...
If you want to ...
You ...
Cook wlth Auto Cook
Cooking with Auto Cook lets
you cook common mbrowave-prepared foods
without needing to program
times and Cook Powers.
1. Put food in the oven and close the
door.
2. Touch AUTO COOK.
3. Seled an Auto Cook setting. (See
settings listed by the AUTO COOK
Command Pad.) Touch the Number
Pad that corresponds to the type of
food being cooked.
4. Touch a Number Pad to enter the
quantity of food being cooked. See
chart on page 15.
5. Touch START.
DMOSt
Your microwave oven
automatically defrosts a
variety of ammon meats at
preset Cook Powers for
preset times.
1. Put food in the oven and close the
door.
2. Touch AUTO DEFROST.
3. Enter the desired Auto Defrost setting
by touching the correct Number Pad.
(See settings listed by the AUTO
DEFROST Command Pad.)
4. Touch Number Pads for the weight of
the item to be defrosted. See chart on
page 17.
5. Touch START.
Example ...
mm
1
l
ii
mm
Elm
Mm
Cooklng wlth more then
one cook cycle
Cooking with two or three
cydes lets you cook at
different Cook Powers, one
after another. Using this
function, you are able to
fine-tune your cooking for
better results.
Operate One-Touch
cooklng
One-Touch Cooking allows
you to pop popcorn, heal a
beverage or warm up a
dinner plate by touching just
one pad.
8
1. Put food in the oven and close the
door.
2. Touch Number Pads for the cooking
uum
time you want.
3. Touch POWER LEVEL twice for 1OO?G . ,
.
mm
Cook Power, or POWER LEVEL
followed by a Number Pad for a lower
Cook Power in the first cycle.
m
4. Touch TIMER/PAUSE if a pause is
desired.
obo
5. Touch Number Pads for the cooking
time you want in the second cycle.
.
mm
6. Touch POWER LEVEL and a Number
Pad for the Cook Power you want in
the second cycle.
.=
7. Touch START.
“mH
1. Put food or beverage in the oven and
close the door.
2. Touch the One-Touch Cooking
Command Pad of your choice.
If you want to ...
You ...
Add a minute to your
cooklng
Touching ADD MINUTE lets
you cook for a minute at
100% Cook Power.
1. Make sure food is in the
oven and the door closed.
2. Touch ADD MINUTE.
Pause durlng cooklng
Touching PAUSE allows you
to stop the oven between
cooking cycles to stir, turn
food over or add ingredients
during the cooking process.
1. Put food in oven and close
the door.
2. Touch the desired Number
Pads for the cooking time
you want for the first cyde.
3. Touch POWER LEVEL
twice for 100% Cook
Power or once followed by
a Number Pad for a lower
Cook Power.
4. Touch TIMER/PAUSE.
5. Enter programming for the
second cooking cycle.
Example ...
umm
m
u&m
.
mm
.=
6. Touch START.
“Em
Start cooklng automatkaljy
at a later time
The Auto Start feature is a
handy way to start cooking a
meal whenever you want,
even when you are not there.
1. Put food in oven and close
the door.
2. Touch Number Pads to
enter the desired start
time.
3. Touch AUTO START/
CLOCK.
4. Touch Number Pads to
enter the amount of
cooking time you want.
5. Touch POWER LEVEL
6. Touch the Number Pad for
the Cook Power you want.
7. Touch START.
umm
mm
l
’
l
mm
Use the Browner
The Browner lets you brown
foods cooked with microwave
power.
1. Put food in the oven and
close door.
2. Preheat oven, if desired.
See page 24.
3. Touch Number Pads for
the browning time desired.
umm
4. Touch BROWNER.
5. Touch START.
9
UsingYourMicrowaveOven
Microwave oven controls
There are three parts in the control section:
- Display/Clock and Indicators
-Command Pads
-Number Pads
Instructions for each control are covered on the
following pages. Read them carefully.
When you first plug in the oven, the Display will
flash ‘88:88”. Touch STOPCLEAR and ‘1 :OO”
will appear. If, after you set the Clock (page 1l),
the Display again shows all 8’s, it means your
elect&y was off for a while. Reset the Clock.
Display/clock and lndlcators
When you are not using the microwave oven, this
is an accurate clock.
When you are using the microwave oven, it
displays time settings, cook powers, and
Indicators.
Command pads
l Touch Command Pads to tell the microwave
oven what to do and in what order. A few
examples:
-CLOCK tells the oven you are going to set the
ChXk
l
l
-START tells the oven to start.
Each Command Pad (except START, STOP/
CLEAR, AUTO START/CLOCK and TIMER/
PAUSE) causes an Indicator to light when you
touch the Command Pad. While the oven is
running, an Indicator (or Indicators) will be on to
show what the oven is doing.
lf you touch two instructions into the same
cyde, the second set of instructions will cancel
the first.
Number pads
Once you’ve touched a Command Pad to tell the
oven what you want it to do, you’ll touch Number
Pads to tell if ...
- a time,
- a Cook Power.
Display messages
Messages will appear on the display to guide you
with your cooking. lf you attempt to enter
unacceptable instructions, ‘ERROR’ will appear
in the Display. Touch STOP/CLEAR and re-enter
the instructions.
10
Setting the clock
When the oven is first plugged in, the Display
flashes ‘33133”. lf the electric power ever goes
off, the Display will again flash all 8’s when the
power comes back on.
You can cook without setting the clock, but the
Display will be blank after cooking.
1. Touch STOP/CLEAR, then touch AUTO
START/CLOCK. The Display will show a ‘0”.
2. Touch Number Pads for the correct time of
day. The Display will show what numbers you
touched In the order you touched them. This
example shows 25 minutes after 3 o’dock.
3. Touch AUTO START/CLOCK. The Clock is
set.
lf you have touched in an incorrect time,
such as 12:65, ‘ERROR’ will show on the
Display. Touch STOPCLEAR, then touch
AUTO START/CLOCK and start over.
NOTE: To m
the clock, touch AUTO START/
CLOCK. The current time will show on the
Display. Continue to set the clock as shown
above.
Using the Minute Timer
Your microwave oven can be used as a kitchen
timer. Use the Minute Timer for timing up to
99 minutes, 99 seconds.
1. Touch Number Pads for the minutes and
seconds you want. The Display will show the
numbers you touched In the order you
touched them. This example shows 3
minutes.
2. Touch TIMER/PAUSE. The Display will count
down to show you how much time is left.
During the countdown the oven will be dark
and the fan will be off.
3. When the set time ends, a long tone will
sound. The Display will then show the time
of day.
NOTE:
l To see the time of day while the Minute Timer is
counting down, touch AUTO START/CLOCK.
l If you want to use other Command Pads while
the Minute Timer is counting down, touch
STOP/CLEAR to cancel the Minute Timer.
11
Usln Your Microwave Oven
Cont%ued
Using STOP/CLEAR
Touch STOP/CLEAR once to:
l Erase instructions if you make a mistake during
programming.
l Cancel the Minute Timer.
l Stop the oven temporarily during cooking.
Touch STOP/CLEAR twice to:
l Cancel a program during cooking.
NOTE: The oven may be stopped during a cycle
~T;~;;gr~~zror.
Close the door and touch
Cooking with your microwave
oven
Although a new rating method’ rates this oven at
800 watts, you may use a reliable cookbook and
recipes developed for microwave ovens previously rated at 700 watts.
Important thlngs to remember to get the best
cooklng results:
l ALWAYS cook food for the minimum recommended cooking time. lf necessary, touch ADD
MINUTE (see page 21 for more information).
Then check for doneness to avoid overcooking
the food.
l Stir, turn over or rearrange the food being
cooked about halfway through the cooking time
for most even doneness with all recipes.
l lf a glass cover is not available, use wax paper,
paper towels or microwave-approved plastic
wrap. Turn back a corner to vent steam during
cooking.
‘IEC-705 Test Procecbre. The IEC-705 Test Procedure
is an internationally recognized method of rating
microwave wattage out@ and does not represent an
actual d-iange to output power or cooking performance.
Cooking at high cook power
12
1
Follow these steps to cook at hlgh power:
1%Put food in the oven and close the door.
2. Touch Number Pads for the cooking time you
want. The Display will show the numbers you
touched In the order you touched them. The
example shows 1 minute, 30 seconds.
NOTE: tf programming more than one cycle, you
must touch POWER LEVEL twice for 100% Cook
Power. tf programming only one cycle, you do not
need to touch POWER LEVEL at all.
3. Touch START. The oven will automatically
cook at high Cook Power. The COOK Indicator
will come on to show that the oven is cooking.
The Display counts down the time to show
how much time is left in the cycle. When the
cooking time ends, a long tone will sound. The
Display will then show the time of day.
Cooking at lower cook powers
For best resutts, some recipes call for bwer Cook
Powers. The lower the Cook Power, the sbwer
the cooking. Each Number Pad also stands for a
different percentage of Cook Power. Many
microwave cookbook recipes tell you by number,
percent or name which Cook Power to use.
The folbwing chart gives the percentage of
Cook Power each Number Pad stands for, and
Cook Power name usually used:
automatic 100% of full power HffiH
9 P 90% of full power
8 = 80% of full power
7 I 70% of full power MED-HlGH
6 I 60% of full power
5 I 50% of full power MED
4 = 40% of full power
3 I 30% of full power MED-LOW
2 = 20% of full power
1 = 10% of full power LOW
0 I 0% of full power (fan and light will be on)
1. Put food in the oven and close the door.
2. Touch Number Pads for the cooking time you
want. The Display will show the numbers you
touched In the order you touched them. This
example shows 7 minutes, 30 seconds.
3. Touch POWER LEVEL The Display will show
=
m
la
l p-=m
4. Touch a Number Pad for the Cook Power you
want. The Display will show what you touched.
This example shows you touched Number Pad
5f~r50%offullpower.
m
7
5. Touch START. The COOK Indicator will come
on to show that the oven is cooking. The
Display counts down the time to show how
much cooking time is left in the cycle. When
the cooking time ends, a long tone will sound.
The Display will then show the time of day.
13
Usln Your Microwave Oven
Cont 9nued
Using AUTOCOOK
*...
m
Cooking with Auto Cook lets you cook common
microwave-prepared foods without needing to
program times and cook powers. Auto Cook has
preset times and cook powers for five major food
categories: Rolls, muffins; Casserole; Baked
potatoes; Fresh vegetables and Frozen vegetables. All you do is touch the Number Pad
assigned to the desired category and enter the
number of items being heated. Your microwave
oven does the rest.
1. Put the food in the oven and close the door.
2. Touch AUTO COOK. “FOOD” will flash on the
Display.
3. Touch a Number Pad (l-5) to select an Auto
Cook setting. To select the desired setting,
see the chart next to the AUTO COOK
Command Pad on the control panel. The
Display will show “CC’ (Computerized
Cooking) for the setting you selected and the
‘NO.’ or “CUPS Indicator will flash. This
example shows an entry of ‘1” for Rolls,
muff ins.
4. Touch a Number Pad to enter the amount of
items to be heated. The amount will appear on
the Display. This example shows an entry of
72’ for two items.
5. Touch START. The COOK Indicator will cOme
on lo show that the oven is cooking. When the
cooking time ends, a long tone will sound. The
Display will then show the time of day.
14
Auto cook chart
SElllNG
AMOUNT
PROCEDURE
1 Rolls, muffins
l-8 pieces
Arrange on a double layer of paper towels; cover with another
towel.
2 Casserole
l-4 cups
To reheat. flatten on plate or place in bowl. Cover with vented
plastic wrap. Stir before serving, if possible.
3 Baked potatoes
l-6 med. size
Prick; place on paper towel directly on turntable. After cooking,
remove from oven and let stand wrapped in foil 5 minutes.
4 Fresh vegetables
l-4 cups
Place in a microwave-safe container. For beans, carrots, corn,
and peas, add 1 tablespoon water per cup. For broccoli.
brussels sprouts, cabbage and caulifbwer, cook immediately
after washing with no additiinal water. tf you like tendercrisp
vegetables, set the Auto Cook quantity for half the amount of
vegetables you are actually cooking. For example, when
cooking 2 cups of vegetables, set Auto Cook for 1 cup. Cover
with lid or plastic wrap. After ccoking, remove from oven, stir,
cover and let stand 3 to 5 minutes before serving.
5 Frozen vegetables
l-4 cups
Place in a microwave-safe container. Cover with lid or plastic
wrap. After cooking remove from oven, stir, cover and let stand
3 minutes before serving.
NOTE:
If you enter an amount not shown in the chart above, ‘ERROR’ will appear. Auto Cook will only operate
with the amounts shown.
l When cooking a 10 oz package of frozen vegetables (this equals about 1V2cups), touch ‘1” for 1 cup of
“tender crisp’ vegetables (you cannot enter V2cup amounts) or touch “2’ for two cups of vegetables
more fully cooked.
l
15
gift
nFey Mkrowave
B
Oven
Defrosting
Your microwave oven automatically defrosts a
variety of common meats at preset cook powers
for preset times. The 3-stage Auto Defrost Cycle
Is programmed for: Roast beef, pork; Steaks,
chops; Ground meat; Chicken, whole; and
Chicken pieces. All you do is touch the Number
Pad assigned to the desired category and enter
the weight of the items being heated. Your
microwave oven does the rest.
1. Put frozen food in the oven and dose the
door.
2. TO&I AUTO DEFROST. The DEFROST
Indicator will cOme on and ‘FOOD’ will flash
on the Display.
3. Select an Auto Defrost setting by touching the
appropriate Number Pad. The Display will
show CD (Computerized Defrosting) for the
setting you selected and the ‘LBS.” Indicator
will flash. This example shows an entry of ‘2’
for Steaks, chops.
4. Touch Number Pads to enter the food’s
weight. The weight will appear on the Display.
This example shows an entry of “2.0” for two
pounds.
NOTE: If ‘ERROR’ appears on the display,
touch STOP/CLEAR and start over. See the
‘Auto defrost chart” on page 17 for weight
ranges available for each food category.
5. Touch START. The COOK Indicator will come
on to show that the oven is defrosting. The
Display will count down the time to show how
much defrosting time is left.
6. After the first stage is completed, the oven will
stop, 4 tones will sound, and directions will
appear on the Display. Open the door. turn
meat over and shield any warm portions. (The
Displays shown are just examples of directions you will see, depending on the type of
meat being thawed.) Close the door. ‘PRESS
START will appear.
7. Touch START. The Display will continue to
count down the second stage of the defrost
cycle.
16
8. After the second stage is completed, the oven
will stop, 4 tones will sound, and directions will
appear on the Display. Open the door, shield
any wan-n portions and cbse the door.
‘PRESS START will appear.
9. Touch START to complete defrosting.
10. After defrosting, the oven will stop and directions will appear on the Display. Open the door
or touch STOP/CLEAR. The Display will then
show the time of day.
Auto defrost chart
AMOUNT
SEITING
PROCEDURE
1 Roast beef, pork
2.5-8.0 lbs
After 1st stage, turn over and shield the warm portions with
aluminum foil.
After the 2nd stage, turn over and if there are warm portions, shield
with aluminum foil.
Stand, covered 30-60 minutes.
2 Steaks, chops,
fish
0.5-4.0 lbs
After the 1st stage, turn over and shield the warm portions with
aluminum foil.
After the 2nd stage, if there are warm portions, shield with aluminum foil.
Stand, 1O-15 minutes.
3 Ground meat
0.5-3.0 Ibs
Remove any thawed pans after each stage.
Stand, 5-l 0 minutes.
4 Chicken, whole
2.5-6.0 Ibs
Remove giblets before freezing poutlry for more uniform
defrosting.
After the 1st stage, turn over and shield the warm portions with
aluminum foil.
After the 2nd stage, if there are warm portions, shield with
aluminum foil.
Stand, covered 30-55 minutes.
5 Chicken pieces
0.5-3.0 Ibs
After the 1st stage, turn over and rearrange.
After the 2nd stage, if there are warm or thawed portions, rearrange or remove.
Stand, 1O-15 minutes.
NOTE:
lf you enter an amount not shown in the chart above, ‘ERROR’ will appear. Auto Defrost will only
operate within the weight ranges shown in the chart. Round weights of food items to the nearest half
l
pOWId.
l
TO defrost items not listed in Auto Defrost, use 30% Cook Power. See a reliable cookbook for defrosting
information.
17
Usln Your Mlcrowave Oven
Contkued
Cooking with more than one
cook cycle
For best results, some recipes call for one Cook
Power for a cerlain bngth of time, and another
Cook Power for another length of time. Your oven
can be set to change from one to another automatically.
1. Put food in the oven and close the door.
2. Touch Number Pads for the cooking time you
want. The display will show the numbers you
touched In the order you touched them. This
example shows 7 minutes, 30 seconds.
3. Select a Cook Power.
To cook at full (100%) power, touch POWER
LEVEL twice. The display will show “P-HI’. This
shows the oven is programmed to cook at full
power.
l
l
To select another Cook Power, touch POWER
LEVEL once, followed by a Number Pad for the
Cook Power you want in the first cyde. This
example shows you touched Number Pad 5 for
50% of full power.
4. Touch Number Pads for the cooking time you
want in the second cyde. The Display will show
the numbers you touched in the order you
touched them. This example shows 3 minutes,
25 seconds.
18
cyde. This example shows you touched
Number Pad 6 for 60% of full power.
6. Touch START. The Cook Indicator will come
on and the Display counts down the time to
show how much oooking time is left in each
cycle. When the cooking time ends, a long
tone will sound. The Display will then show
the time of day.
Changlng or addlng lnstructlons
You can change times, Cook Powers or add
cydes any time before or after touching START:
l Touch STOP/CLEAR twice.
l Enter your new instructions.
19
Usln Your Mkrowave
Conhued
Oven
One-TouchCooking
One-Touch Cooking allows you to pop popcorn,
heat a beverage or warm up a dinner plate by
touching just one pad. Before using One-Touch
Cooking, be sure the time of day is showing on
the Display. lf the time of day is not on the
Display, touch STOP/CLEAR once or twice.
m
1. Put food in the oven and close the door.
Touch the desired one-touch cooking item
Command Pad:
l Touch DINNER PLATE to heat a plate of
food. Place meat and bulky vegetables to
the outside of plate. Cover with wax paper.
2l
mm
l
Touch POPCORN to pop popcorn. This
setting works well with most 3.5 oz bags of
microwave popcorn. Cooking performance
may vary with brand. Try several brands to
decide which gives best popping results. For
best results, use fresh bags of popcorn. Do
not try to repop unpopped kernels. Do not
reuse popcorn bags.
NOTE: One-Touch Cooking is designed for
commercially bagged microwave popcorn. lf
you are using a microwave popcorn popper,
follow instructions with the popper for
cooking time.
Touch BEVERAGE to heat a halfcup of a
cooled beverage to a better drinking
temperature. Stir after heating.
3. The Display will count down the cooking time
and the COOK Indicator will appear on the
Display. When the cooking time ends, a long
tone will sound. The Display will then show the
time of day.
NOTE: BEVERAGE is programmed to reheat a
mug ‘/2-full of beverage with One-Touch. To
reheat a full cup, touch BEVERAGE twice
within one second. You cannot cook double
quantities with POPCORN or DINNER PLATE.
20
Using ADD MINUTE
ADD MINUTE allows you to add an extra minute,
at 100% Cook Power, to your cooking cycle. You
can also use it to extend cooking time in multiples
of one minute.
1. Make sure food is in the oven.
2. Touch ADD MINUTE.
3. To extend cooking time in multiples of one
minute, touch ADD MINUTE repeatedly during
cooking. When the cooking time ends, a long
tone will sound. The Display will then show the
time of day.
NOTE: ADD MINUTE can only be entered after
closing the door, after touching STOP/CLEAR,
during cooking or within one minute after cooking
with another function.
ADD MINUTE cannot be used:
-with One-Touch Cooking, AUTO COOK or
AUTO DEFROST.
-to start the oven if any program is on the
Display.
21
Usln Your Mkrowave
Cordnued
Oven
Using PAUSE
PAUSE allows you to stop the oven between
cooking cycles to stir, turn food over or add
ingredients during the cooking process.
1. Put food in the oven and close the door.
2. Touch in instructions for the first cooking
cyde. (See Pages 12-13.) The POWER
LEVEL Command pad must be touched
between cydes.
l Touch POWER LEVEL twice for full (100%)
Cook Power.
lf cooking at a lower Cook Power, touch
POWER LEVEL, then a Number Pad for the
Cook Power you want in the first cyde.
3. Touch TIMER/PAUSE.
4. Touch in instructions for the second cooking
cyde. (See pages 12-13.)
l
5. Touch START. The Display will count down
the time in the first cycle.
6. When the first cycle is over, 4 tones will sound
and ‘PAUSE’will show in the Display. Open
the door and stir the food. Close the door and
touch START for the second cooking cyde.
When the cooking time ends, a long tone will
sound. The Display will then show the time
of day.
22
Using AUTOSTART
AUTO START lets you program your oven to
begin cooking automatically at a designated time
of day. You can touch in up to 99 minutes, 99
seconds of delay.
1. Put in food and dose the door.
2. Make sure the dock is set to the correct time
of day.
3. Touch Number Pads to enter the desired start
time. This example shows a 4:30 start time.
4. Touch AUTO START/CLOCK.
5. Touch Number Pads to enter the amount of
cooking time you want.
6. Touch POWER LEVEL twice to cook at full
(100%) power or touch POWER LEVEL once
followed by a Number Pad for the Cook Power
you want.
7. Touch START. The oven will start at the time
you set and the Display will count down the
cooking time you have selected.
6. When the cocking time ends, a long tone will
sound. The Display will then show the time
of day.
NOTE: If you hear the fan start when you touch
START, you have not set the oven properly.
Touch STOP/CLEAR twice and start over.
AUTO START cannot be used with ADD
MINUTE, AUTO DEFROST or One-Touch
Cooking.
To avoM sickness and food waste when
uslng Auto Start:
l Do not uss foods that will spoil while
waltlng for cooklng to start, such as
dlshes wlth mllk or eggs, cream soups,
and cooked meats or flsh. Any food that
has to walt for cooklng to start should be
very cold or frozen before lt Is put In the
oven. MOST UNFROZEN FOODS SHOULD
NEVER STAND MORE THAN TWO HOURS
BEFORE COOKING STARTS.
l Do not use foods wntalnlng
baklng
powder or yeast when using Auto Start..
They will not rise properly.
l Do not allow food to remain In oven for
more than two hours after end of cooklng
cycle.
23
UsingTheBrowner
Brownw
The Browner allows you to brown foods after
microwave cooking. Preheating the Browner
shortens browning time and helps keep food
moist and juicy. Use utensils that are both oven
and microwave safe. Do not use wax paper,
plastic wrap, paper towels or plastic&yrofoam
containers. Uee oven mltto after browning
because containers will become hot. See
Opertating Safety Precautions on page 30.
Preheating the Browner
1. Touch Number Pads to enter the preheat time
desired. This example shows an entry of 2
minutes. Touch BROWNER. The BROWN
Indicator will come on.
2. Touch START. The COOK Indicator will come
on and the display will count down the time to
show how much preheating time is left. When
preheating ends, a long tone will sound. The
Display will then show the time of day.
To cook, preheat and brown
Your microwave oven can be programmed to
cook, preheat Browner and brown. You can
program a Pause after the cook cycle to allow
you to remove food during the Browner preheat.
Program another Pause after the preheat to allow
you to return the food to the oven for browning.
1. Put food in the oven and close the door.
2. Touch Number Pads for the cooking time you
want. The Display will show the numbers you
touched In the order you touched them.
3. Touch POWER LEVEL twice for 100% Cook
Power, or touch POWER LEVEL once and a
Number Pad for the Cook Power desired.
NOTE: If you do not wish to preheat the Browner,
skip steps 4-7. Add 2 minutes to the browning
time in step 6.
4. Touch TIMEWPAUSE.
5. Touch Number Pads to enter the Browner
preheat time desired. The Display will show
the numbers you touched In the order you
touched them.
6. Touch BROWNER. The BROWN Indicator will
corns on.
24
7. Touch TIMER/PAUSE to program a pause to
allow you to return the food to the oven for
browning.
6. Touch Number Pads for the browning time
you want.
9. Touch BROWNER.
10. Touch START. The COOK Indicator will
come on to show the oven is cooking. The
Display counts down the time to show how
much time is left in the cook cyde.
11. When cooking time ends, 4 tones will sound.
The Display will show PAUSE’. Open the
oven door and remove food while the
Browner preheats. Close the door. “PRESS
START will appear on the Display.
12. Touch START. The Display will count down
the preheat time. When preheat time ends,
4 tones will sound. The Display will show
‘PAUSE’. Replace food in oven. Close the
door. The Display will show ‘PRESS
START..
13. Touch START. The Display will count down
the time in the brown cycle. When browning
ends, a long tone will sound. The Display will
then show the time of day.
Browner chart
Preheat Browner 2 minutes.
MICROWAVE
TIYEITEMP.
BROWNER
llME
Breaded fish
sticks
Folbw package
directions
5-6 min
Chicken pieces
6 mitt/lb
High
15-20 min
Hamburgers
Microwave on double layer of paper
towels. Remove paper towels. Brown.
Microwave covered with wax paper.
Remove wax paper and drain. Brush with
melted butter. Brown.
Microwave covered with wax paper.
I Remove wax paper and drain. Brown.
Onion rings
1
Casseroles
t$
)
13-15 min
I
Appetizer idea
PROCEDURE
12-14 min
68 min
I
See reliable
cookbook
6-6 min
Microwave covered on a double layer of
1 K;owels.
Remove papertowels.
I
Microwave casserole. Sprinkle with
desired topping. Brown.
Add mayonnaise to moisten hamburger,
sausage, cheese or bacon. Spread on
party rye bread slices and top with
chopped onion, herbs or grated cheese.
Brown.
2!
InstallationInstructions
Before you begin operating the oven, carefully read
the following instructions.
Installing your microwave oven
1. Empty the microwave oven and dean inside it
with a soft, damp cloth. Check for damage such
as misaligned door, damage around the door or
dents inside the oven or on the exterior. If there
is any damage, do not operate the unit until it
has been checked by an authorized WhirlpoolSM
service technician and any repairs made.
2. Put the oven on a cart, counter. table or shelf
that is strong enough to hold the oven and the
food and utensils you put in it. (The control
side of the unlt Is the heavy side. Use care
when handllng.) The weight of the oven is
approximately 35 Ibs (15.75 kg).
3. Do not block the rear alr Intake openlngs or
exhaust vents. Allow a few inches of air
circulation at back of oven where intake
openings and exhaust vents are located.
Blocking the air intake openings and exhaust
vents can cause damage to the oven and poor
cooking results. Make sure the microwave oven
legs are in place to ensure proper airflow.
//IPower
\ supply cord
Alr intake openlngo
Exhauot VCWIIS
’
26
Product Damage Hazard
Do not Install the oven n&t to or over a heat
source (for example, a cooktop or range) or
ln any area where excessive heat and steam
are generated. Thls could damage the
) outslde of the cabinet.
Built-In klt
You can build-in your oven by using one of the
following kits:
-24” for MB71 20XY (Kit No. 4313646)
-2irfor MB712OXY (Kit No. 4313601)
These kits are available from your Whirlpool
Dealer. lf your dealer does not stock the kii it can
be ordered by writing to:
Whirlpool Corporation
Attention: Customer Service Dept.
1900 Whirlpool Drive
LaPorte, IN 46350
I
4.Electrical requirements
Observe all governing codes and ordinances.
A 120 Volt, 60 Hz, AC only, 15 or 20 amp fused
electrical suppfy is required. flmedelay fuse is
recommended.) lt is recommended that a
separate circuit serving only this appliance
be provided.
5.GROUNDING
INSTRUCTIONS
ElectrIcal Shock Hazard
Improper use of the groundlng plug can result In a rlsk of electrkal
shock DO NOT, UNDER ANY CIRCUMSTANCES, REMOVE THE
POWER SUPPLY CORD GROUNDING PRONG.
6. For your personal safety, this appliance must
be grounded. In the event of an electrical
short circuit, grounding reduces the risk of
electrical shock by providing an escape wire
for the electric current. This appliance is
equipped with a polarized 3-prong grounding
plug. lt must be plugged into a correctly
polarized mating 3-prong grounding type
wall receptacle, properly installed and
grounded in accordance with the National
Electrical code and local codes and ordinances. lf a mating wall receptacle is not
available or il you are not sure if the wall
receptacle is property grounded and
polarized, have it checked by a qualified
electrician.
lt is the personal responsibility and obligation of the customer to have a properly
grounded and correctly polarized 3-prong wall
receptacle installed by a qualified electrician.
Consult a qualified electrician if the grounding instructions are not completely understood.
or if doubt exists as to whether the appliance is
properly grounded.
It Is not recommended to use an extenslon cord wlth your microwave oven, but If
you flnd lt necessary to do so temporarily
(untll a properly grounded and polarbed 3prong receptacle ls Installed), use only a
heavy duty UL llsted 3-wire groundlng type
extenskn cord contalnlng three 16-gauge
(mlnlmum) copper wlres. lt must not be bnger
than 10 feet (cords bnger than 10 feet may
affect the cooking performance of your microwave oven). The plug on the extension cord
must fit into a 3-prong grounding type wall
receptacle (as shown on this page) and the
receptacle end of the extension cord must
accept the 3-prong grounding plug of the
microwave oven.
To test the oven, plug it into the
proper electrical outlet. Put about
one cup (250mL) of cold water in
a glass container in the oven.
Close the door. Make sure it latches. Follow
the directions on page 12 to set the oven to
cook for 2 minutes. When the time is up, the
water should be heated.
8. Thls mkrowave oven Is deslgned for use In
the household only and must not be used
for commercial purposes.
Do not remove the door, control panel or
cabinet at any time. The unit is equipped with
high voftage and should be serviced by an
authorized Whirlpool= service technician.
- SAVETHESE
INSTRUCTIONS
27
CaringForYourMicrowaveOven
Cleaning the microwave oven
Wipe often with warm, sudsy water and a sponge
or paper towel. The glass turntable may be
removed for deaning; however, this oven is
designed to operate with the turntable in place.
Do not operate the microwave oven when
turntable is removed for cleaning. See page 32
for further information about the turntable.
For stubborn soil, boil a cup of water in the oven
for 2 or 3 minutes. Steam will soften the soil.
,I-VI
@cz!J
Be sure to keep the areas clean where the
door and oven frame touch when closed. Use
only mild, nonabrasive soaps or detergents
applied with a sponge or paper towel when
cleaning surfaces. Rinse well.
Procluot Damage Hazard
Abraslve cleansers, steel wool pads, gritty
wash cloths, etc., can damage the control
panel, and the lnterlor and exterior oven
surfaces. Use a sponge wlth a mild detergent or a paper towel wlth spray glass
cleaner. Apply spray glass cleaner to paper
towel; do not spray directly on oven.
To clean turntable and turntable support,
wash in mild, sudsy water; for heavily soiled
areas use a mild deanser and scouring sponge.
The turntable and turntable support are dishwasher-safe.
Glass turntable
28
Browner element and reflector
The element is self cleaning. lf exa3ss grease
spatters on the reflector, wipe carefully after lt
has cooled completely.
HowYourMicrowaveOvenWorks
Microwave ovens are safe. Microwave energy is
not hot. lt causes fond to make its own heat, and
it’s this heat that nooks the food.
Microwaves are like TV waves or light waves.
;T cannot see them, but you can see what they
A magnetron in the microwave oven produces
microwaves. The microwaves move into the oven
where they contact food as if turns on the glass
turntable.
Glau
turntable
The glass turntable of your microwave oven lets
microwaves pass through. Then they bouncs off
a metal floor, back through the glass turntable
and are absorbed by the food.
Metal fkkr
Microwaves pass through most glass, paper and
plastics without heating them so food absorbs the
energy. Microwaves bounce off metal pans so
food does not absorb the energy.
Microwaves may not reach the center of a roast.
The heat around the outside is what cooks the
roast all the way through. This is one of the
reasons for letting some foods (roasts, baked
potatoes) stand for a while after cooking, or for
stirring some foods during the cooking time.
The microwaves disturb water molecules in the
food. As the molecules bounce around bumping
info each other, heat is made, like rubbing your
hands together. This is the heat that does the
cooking.
29
Operating
SafetyPrecautions
I
To reducs the rlsk of burns, flre, elsctrkal
shInjury to person* or damage when
uslng the mlcrowave oven, follow the
prscautlons on pages 30-S.
I
Never wok or reheat a whole egg. Steam buildup in whole eggs may cause them to burst and
bum you, and possibly damage the oven. Slice
hard-boiled eggs before heating. In rare instances,
poached eggs have been known to expbde.
Cover poached eggs and albw a standing time of
one minute before cutting into them.
Stir before
bdng
For best results stir any llquld several times
before hsatlng or rsheatlng. Liquids heated in
certain containers (especially cylindrical-shaped
containers) may become overheated. The liquid
may splash out with a bud noise during or after
heating or when adding ingredients (coffee, etc.)
resulting in harm to the oven and possible
personal injury.
Never lean on the door or allow a child to swing
on it when the door is open. Injury could result.
Use hot pads. Microwave energy does not heat
containers, but the hot food does.
NOTE: Heat from the Browner will cause
containers and oven park to become hot.
30
Do not do canning of foods in the oven. Closed
glass jars may explode resulting in damage to the
oven or possible personal injury.
Do not use the oven to sterilize objects (baby
bottles, etc.). ll is difficult to maintain the high
temperature required for safe steriliiatbn.
Do not deep fry in the oven. Microwavable
utensils are not suitable and it is diffiiuli to
maintain appropriate deep frying temperatures.
Do not use the oven for storage. Do not leave
paper products, books or cooking utensils in the
oven when not in use. Fire may result if someone
accidentally starts the oven.
Do not let food or container touch the top or
sides of the oven.
Do not heat, store or use flammable materials
in or near the oven. Fumes can create a fire
hazard or explosion.
Do not overcook potatoes. Fire could result. At
the end of the recommended cooking time
potatoes should be slightly firm because they will
continue cooking during standing time. After
microwaving, wrap potatoes in foil and set aside
for 5 minutes. They will finish cooking while
standing.
lf a fire should start in the oven cavity:
Do not open the oven door.
l Touch STOP/CLEAR to turn oven off.
l Unplug the oven or turn off the power at the
main power supply.
l
31
&?:3FaSafety
Precautions
Do not pop popuXn, except in a microwaveapproved popcorn popper or commercial package designed especially for microwave ovens.
Never try to pop popcorn in a paper bag not
designed for microwave oven use. Overcooking
may result in smoke and fire. For microwaving
bags of popcorn, see page 20 for instructions on
using the Popcorn feature.
Do not repop unpopped kernels.
Do not reuse popcorn bags.
Starting a microwave oven when it is empty is not
recommended. Product life may be shortened.
lf you practice programming the oven, put a
container of water in the oven.
lt is normal for the oven door to lode wavy after
the oven has been running for a while.
Do not use newspaper or other printed paper in
the oven. Fire could result.
Do not dry flowers, fruit, herbs, wood, paper,
gourds or clothes in the oven. Fire could result.
Do not try to melt paraffin wax in the oven.
Paraffin wax will not melt in a microwave oven
because it allows microwaves to pass through it.
Glass turntable
Do not operate the microwave oven unless the
glass turntable is securely in place and can rotate
freely. The turntable can rotate in either direction.
Make sure the glass turntable is correct-side up
in oven. Carefully place cookware on glass
turntable to avoid possible breakage.
Handle glass turntable wtth care when
removing from oven to avoid possible breakage.
lf glass turntable cracks or breaks, contact your
Whirlpool dealer for a replacement.
/
Glauturntabk
32
General information
II your electric power line or outlet voltage is less
than the normal 120 volts, cooking times may be
longer.
Jo
for safe usa. put it into the oven
with a cup of water beslde It Cook on 100%
Cook Power for one minute. If the dlsh gets hot
and water stays cool, do not use it. Some
dishes (melamine, etc.) absorb microwave
energy, becoming too hot to handle and slowing
cooking times.
Product Damage Hazard
Remove wlre twist-ties from paper or
plsstk bags before placlng bag In oven.
Cooklng In metal containers not deslgned
for mkrowave USBcan damage the oven,
as can oontalners with hldden metal (twlstties, foll Ilnlng, staples, metallic glaze
or trlm).
33
Cooking
Guide
Browner recipes
I
Nachoa Grand4
‘/z (12 oz) bag tortilla chips
‘h cup shredded Monterey Jack cheese
‘I3 cup shredded Cheddar cheese
Choose your favorites from:
Chopped green and/or red pepper
Sliced black olives
Chopped pepperoni
Chopped green chiles
Chopped onion
I
Spread tortilla chips on turntable. Sprinkle with your favorite toppings. Sprinkle with cheeses.
Preheat browner 2 minutes. Brown Nachos until cheeses melt. 5-6 minutes.
Reuben Casserole
16 oz can sauerkraut, drained and rinsed
% lb chopped, lean, cooked corned beef
2 cups Swiss cheese, shredded
% cup mayonnaise
% cup Thousand lsland or Russian salad dressing
2 medium tomatoes, sliced
2 tablespoons butler
1 cup dark bread crumbs
Makes 6 servings
In 2 quart casserole, layer sauerkraut, corned beef, cheese. Mix together mayonnaise and dressing.
Spread over cheese layer. Top with tomato slices.
Place bread crumbs in small glass casserole. Top with cut-up butter. Microwave at High (100%) about
1 minute or until butler is melted. Stir. Sprinkle browned crumbs on top of tomatoes.
Microwave ai Medium-High (70%) 13-15 minutes or until heated throughout and cheese is metted.
Remove casserole from oven.
Preheat Browner 2 minutes. Put casserole in oven. Brown 6 minutes.
Chicken Kabobs
1 lb chicken breasts. boned, skinned and cut into 1-inch cubes
‘I, cup soy sauce
2 teaspoons sugar
‘I2 teaspoon salt
‘13teaspoon garlic powder
‘18teaspoon ground ginger
dash of pepper
1 green pepper, cut into 1’ cubes
12 medium mushrooms
2 tablespoons butter, melted
Makes 4 servings
Mix chidcen pieces, soy sauce, sugar, salt, garlic powder, ginger and pepper. Let stand 1O-20 minutes.
Drain and discard marinade.
Alternate green pepper cubes, chicken cubes and mushrooms on four 12 inch bamboo skewers. Place
kabobs on roasting rack. Microwave at High (100%) 7-8 minutes. Remove from oven.
Brush with metted butter.
Preheat Browner 2 minutes. Return Chicken Kabobs to oven. Brown 10 minutes.
% cup li9ht brown sugar
% cup f bur
‘I2 cup rolled oats
‘I3 cup chopped walnuts
‘12teaspoon ground cinnamon
‘1, teaspoon ground nutmeg
% cup butter, softened
4 medium cooking apples, peeled, cored. and thinly sliced
Combine all ingredients except apples. Mix until crumbly.
Layer half of sliced apples into an &inch square glass dish. Sprinkle half of topping on apples. Repeat
layers.
Microwave at High (100%) 7-6 minutes until tender. Remove from oven.
Preheat Browner for 2 minutes. Return a&e criso to oven. Brown 6-7 minutes.
Lamb Chops h I’Orange
4 lamb rib chops, about 1‘I2 inches thick
‘1, teaspoon garlic salt
‘1, cup orange marmalade
Makes 4 servings
Sprinkle both sides of lamb chops lightly with garlic salt. Place in lo-inch square casserole with
meatiest portion toward outside of casserole. Spoon 1 tablespoon marmalade on each lamb chop.
Cover with wax paper.
Microwave at Medium (50%). until lamb chops are desired doneness (e-10 minutes). Remove from
oven. Remove wax paper. Preheat Browner for 2 minutes. Return chops to oven. Brown 5-6 minutes.
Brolled Tomatoes
‘12cup mayonnaise or salad dressing
‘I, cup grated Parmesan cheese
1 teaspoon dried basil leaves
% teaspoon dried onion flakes
2 medium tomatoes, cut into halves
salt and pepper
Makes 4 servings
Mix mayonnaise, cheese, basil and onion flakes in small bowl; set aside. Scoop out fleshy part of
tomatoes; discard seeds. Stir tomato pulp into mayonnaise mixture.
Sprinkle tomato halves with salt and pepper; spoon mayonnaise-tomato mixture into each. Place on pie
plate or turntable.
Preheat browner for 2 minutes. Brown tomatoes 5-6 minutes or until puffed and golden brown.
Meringue
3 egg whites
‘1, teaspoon cream of tartar
I V, teaspoon vanilla flavoring
1 ‘13cup sugar
Beat egg whites until foamy. Beat in cream of tartar and flavoring, beating to soft peaks. Slowly add
sugar. Beat until stiff.
Spread meringue over the top of precooked pie filling.
Preheat Browner for 2 minutes. Brown meringue 8-9 minutes.
35
Cooklng Gukle
Contlnued
Microwave cooking chart
POULTBY. FISH. SFAFOOD
Allow standing time after cooking.
FOOD
POWER
LEVEL
TIME
Food should be very hot (165°F). Stir before
serving, if possible.
POWER
LEVEL
TlME
FOOD
Bacon
100%
X-1 ‘1, minlslice
Meat slices
50%
Ground beef
for casseroles
(1 lb)
100%
4-6 min
Non-stirrable
casseroles
(1 serving)
(2 servings)
50%
Hamburger
patties (2)
100%
1st side 2 min
2nd side 1‘lz to
2’12min
Pie (1 slice)
100%
100%
1st side 21/2min
2nd side 2-3 min
SouP
(1 serving)
(2 servings)
100%
Hamburger
patties (4)
100%
13-19 min
Vegetables
(1 serving)
(2 servings)
100%
Meat baf
(1’12Ibs)
Chicken
100%
6-9 min/lb
pieces
Internal temperature should be 185°F after standing.
FOOD
l-3 minIserving
5-8 min
9-l 2 min
2040 seconds
2’12-3’1,min
41/2-511z
min
%-1 ‘I2 min
11/2-2’/2min
POWER
LEVEL
TlME
Turkey breast
100%
5 min
m 70% 8-12 min/lb
Internal temperature should be 185°F after standing.
Applesauce
(4 servings)
100%
7-10 min
Fish fillets
(1 lb)
100%
5-6 min
Baked apples
(4)
100%
4-6 min
Scallops and
shrimp (1 lb)
100%
3’&5X min
Chocolate
50%
(melt 1 square)
Eggs,
scrambled
YFGFTAEUES
Cook on 100% power level.
FOOD
TlME
3eans, green or yellow (1 lb)
6-12 min
3roccoli (1 lb)
6-l 0 min
:arrots (1 lb)
8-l 2 min
;aulifbwer (medium head)
6-9 min
Zorn on the cob
s;
4-9 min
6-l 6 min
‘otatoes. baked (4 medium)
13-19 min
Quash, summer (1 lb)
3-8 min
l-2 min
100%
1l/,-l Y, min
2-3 min
13
Hot cereals
(1 serving)
(4 servings)
100%
Nachos
[large plate)
50%
Water for
Wverage
(1 cup)
(2 cups)
100%
1’&5 min
4’&7 min
1’/~-2’/~ min
2’/,4 min
4’1,-6 min
Questions
AndAnswers
QUESTlONS
ANSWERS
Can I operate my microwave oven without the
turntable or turn the turntable over to accommodate a large dish?
No. lf you remove or turn over the turntable, you
will get poor cooking resutts. Dishes used in your
oven must fit on the turntable.
Can I use a rack in my microwave oven so that I
may reheat or cook on two levels at a time?
No. When you place a rack on the turntable,
cooking results will be uneven and unpredictable.
Can I use either metal or aluminum pans in my
microwave oven?
Useable metal includes aluminum foil for
shielding, (use small, flat pieces), small skewers
and shallow foil trays (if tray is % inch deep and
filled with food to absorb microwave energy).
Never allow metal to touch walls or door.
Is it normal for the turntable to turn in either
direction?
Yes. The turntable rotates clockwise or counterclockwise, depending on the rotation of the motor
when the cooking cycle begins.
Sometimes the door of my microwave oven
appears wavy. Is this normal?
This appearance is normal and does not affect
the operation of your oven.
What are the humming noises that I hear when
my microwave oven is operating?
You hear the sound of the magnetron tube
cyding on and off when cooking at less than
100% power.
Why does the dish become hot when I microwave
food in it? I thought that this should not happen.
As the food becomes hot it will conduct the heat
to the dish. Be prepared to use hot pads to
remove food after cooking and browning.
What does “standing time’ mean?
“Standing time’ means that food should be taken
out of the oven and covered for additional time
after cooking. This process allows the cooking to
finish, saves energy and frees the oven for
another purpose.
The first time I preheated the Browner I smelled
something and saw smoke. Why?
The Browner element was burning off the factory
coating used during manufacturing. This is
normal.
Can I pop popcorn in my microwave oven? How
do I get the best results?
Yes. Pop packaged microwave popcorn following
manufacturer’s guidelines or use the One-Touch
Cooking pad. Do not use regular paper bags.
Use the “listening test” by stopping the oven as
soon as the popping slows to a “pop’ every one
or two seconds. Do not try to repop unpopped
kernels. Use only special microwave poppers
being sure to follow manufacturer’s directions.
Do not pop popcorn in glass utensils.
37
If YouNeedServiceOrAssistance
n
n
n
We suggest you follow these
steps:
1. Before calling for assistance ...
Performance problems often result from little
things you can find and fix without tools of any
kind.
If nothlng operates:
Is the power supply cord plugged into a live
circuit with the proper voltage? (See Installation
Instructions.)
l Have you checked your home’s main fuses or
circuit breaker box?
l Have you checked the electric company for a
power failure?
If the mlcrowave oven will not run:
l Is the oven being used as a timer?
l Is the door firmly dosed and latched?
l Did you touch START?
l Did you follow the directions exactly?
l Did you touch STOP/CLEAR twice to cancel
previous programming?
l
ff the mkxowave cooklng times seem too
long:
l Is the electric supply to your home or wall
outlets bw or lower than normal? Your electric
company can tell you if the line voltage is low.
Your electrician or service technician can tell
you if the outlet voltage is low.
l Is the Cook Power at the recommended
setting?
. Are you allowing for more time when cooking
more food at one time?
38
lf the Display shows a time counting down but
the oven ls not cooklng:
. ls the oven door closed completely?
l Have you set the controls as a kitchen timer?
If you do not hear the Programmlng Tone:
Is the command correct?
l
If the fan seems to be runnlng slower than
usual:
l Has the oven been stored in a cold area? The
fan will run slower until the oven warms up to
normal room temperature.
H there has been a power Interruption, the
Dlsplay will flash ‘88:88”. Reset the clock.
(See page 11.)
2. If you need asslstanw*,.
Call Whlrlpool Consumer Assistance Center
telephone number. Dial free from anywhere In
the U.S.:
1400-253-1301
and talk with one of our trained consultants. The
consuttant can instruct you in how to obtain
satisfactory operation from your appliance or, if
service is necessary, recommend a qualified
service company in your area.
tf you prefer, write to:
Mr. William Clark
Consumer Assistance Representative
Whirlpool Corporation
2000 M-63
Benton Harbor, Ml 49022
Please include a daytime phone number in your
correspondence.
3. If you need servlcs*...
Whirlpool has a nationwide
- network of authorized
Whirtpool~ service wmpanies. Whirlpool service
technicians are trained to fulfill
the product warranty and proviie after-warranty
service, anywhere in the United States. To locate
the authorized Whirlpool service company in your
area, call our Consumer Assistance Center
telephone number (see Step 2) or took in your
telephone directory Yellow Pages under:
4. If you are not satldled wlth how the
problem was solved*...
l Contact the Major Appliance Consumer Actiin
Panel (MACAP). MACAP is a group of independent cOnsumer experts that voices consumer
views at the highest levels of the major appliance industry.
l Contact MACAP only when the dealer, authorized servicer and Whirlpool have failed to
resolve your problem.
Major Appliance Consumer Action Panel
20 North Wacker Drive
Chicago, IL 60606
l MACAP will in turn inform us of your action.
‘When requesting assistance, please provide:
model number, serial number, date of purchase, and a complete description of the
problem. This information is needed in order to
better respond to your request.
ELECTRCU
APPLIANCES- REPAJRNG
A PARTS
AwRN--S-QawcEAREPAIR
OR
WAspg.4u.4~~~
SERUCE~A~
xmsE-co
.-..
___.__.
lz(
-Apa
.._........... -
39
WHIRLPOOL”
MicrowaveOvenWarranty
MWw7
LENGTH OF WARRANTY
FULL ONE-YEAR WARRANTY
From Date of Purchase
WHIRLPOOL WILL PAY FOR
FSV replacement parts and repair labor to correct defects in
materials or workmanship. Service must be provided by an
authorized WhirlpoolsY service company.
UMfTED FOUR-YEAR
WARRANTY
Second Through Fifth Year From
Date of Purchase
FSP replacement magnetron tube on microwave ovens if
defective in materials or workmanship.
WHfRLPOOL WILL NOT PAY FOR
A. Service calls to:
1. Correct the installation of the microwave oven.
2. Instruct you how to use the microwave oven.
3. Replace house fuses or correct house wiring.
4. Replace owner accessible light bulbs.
B. Repairs when microwave oven is used in other than normal, single-family household use.
C. Pickup and delivery. This product is designed to be repaired in the home.
D. Damage to microwave oven caused by accident, misuse, fire, flood, acts of God or use of
products not approved by Whirlpool.
E. Any labor costs during limited warranty.
F. Repairs to parts or systems caused by unauthorized modifications made to the appliance.
WHIRLPOOL CORPORATlON SHALL NOT BE LIABLE FOR INCIDENTAL OR CONSEQUENTIAL
DAMAGES. Some states do not allow the exclusion or limitation of incidental or consequential damages,
so this limitation or exdusion may not apply to you. This warranty gives you specific legal rights, and you
may also have other rights which vary from state to state.
Outside the United States, a different warranty may apply. For details, please contact your authorized
Whirlpool distributor or military exchange.
Wyou need service, first see the “Service and Assistance’ section of this book. After checking “Service
and Assistance,’ additional help can be found by calling our Consumer Assistance Center telephone
number, 1-800-253-1301, from anywhere in the U.S.
@ Registered Trademark / SM Service Mark of Whirlpool Corporation
Part No. TINSEB029MRR0/4313707 Rev. A
0 1992 Whirlpool Corporation
Printed in U.S.A.