1
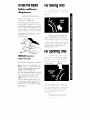
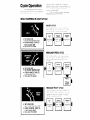
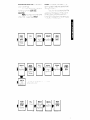
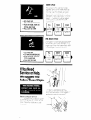
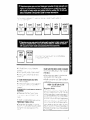
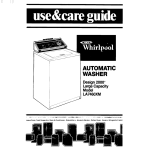
Model GLA7900XK
REGULAR CAPACITY
Whirlpool
AUTOMATIC WASHER
Use & Care
Guide
LAUNDRY INFORMATION
CENTER
LOAD SIZE SELECTOR
TEMPERATURE SELECTOR
CYCLE CONTROL KNOB
FABRIC SOFTENER
Copy
Your Model
Wien
you
a ‘question.
need
have
and Serial
Numbers
service.
or call
ttils lnformatlorl
with
ready
1 Complete
Model
and Serial Numbers
(from thms plate
under
the lid near the
hinge)
2 Purcf-use
date from sales slop [or date
mstallec)
Copy
this lrlformatlon
In these
spaces
Keep
this book
IP the Laundry
Informa~~lon
Center
w~?h your
Laundry
Guide sales slop and warranty
-~~-~~
Here
Before using
your Washer
Please read this booklet to be
sure your washer is Installed and used
properly It will help you get the best
results and longest life your washer was
designed to give.
You are personally
retponsibie for making sure that Your
washer...
l Is installed
by a qualtfied installer
l Is properly
installed and leveled on a
floor that can support the weight:
l Is connected
to the right kind of outlet,
electric supply, water supply and drain.”
l Is properly
electrically
grounded I
l Is used only for jobs normally
expected of home automatic washers
l Is properly
matntarned
l Is protected
from the weather.
l Is not run by chrldren
or anyone
unable to operate it properly
Remove the Consumer Buy
Guide label. It will be easier to remove
before the washer IS used.
You may want to wipe out the
basket with a damp cloth before using
to remove dust from storing or shipptng
SPECIAL INSTRUCTIONS: See the
Laundry Guide for tips on detergents, other laundry aids and
instructions
for washing special
items.
“See the Installation Instructtons for
complete information
CAUTION: Store laundry detergent and additives
in a cool, dry
place where children
can’t
reach them.
Contents
Before Using Your Washer
Loading Your Washer
Understanding
Your Washer
Lint Filter
Using Your Washer
Water Levels and Load Sizes,
Important
Detergent
Information
Liquid Bleach Dispenser
Fabric Softener Dispenser
For Rinsing Only
For Spinning Only.
Cycle Operation
SHORT
PERMANENT PRESS
REGULAR HEAVY
SOAK CYCLE
PRE-WASH
it You Need Service or Help
Before Calling for Service
If You Have a Problem
,2
.3
i
4
,5
'.' 6"
7
:.
8
8
8
.8
10
IO
10
10
12
loading
your
For best washing results and
energy savings, sortthe laundry
carefully.
1. Sort the laundry
into loads.
l Group the laundry
into loads that
can be washed and dried together.
See the Laundry Guide for information and samples of typical loads.
l Try to mix large
and small items for
best movement
in the washer.
2. Measure Detergent;
Add to
Washer Basket.
l See detergent
information
on page
6 and in Section IV of the Laundry
Guide.
l Add dry bleach
or water conditioner (not fabric softener] if used.
Follow the package
directions
carefully.
3. load the Washer.
l Spread
the load evenly. (Don’t put
all the towels on one side and a few
wash cloths on the other.] An unbalanced load can cause the washer to
shake during spinning.
l Load without
packing
so items can
move freely for best cleaning
and
least wrinkling.
4. Pour liquid Bleach into the
Dispenser.
l See page
5 and the “Laundry
Aids” section of the Laundry Guide for
more information.
5. Pour Diluted Fabric Sottener into
the Fabric Sottener Dlspenser.
a See page7 and the laundry aids
section of the Laundry Guide for more
information.
Understanding
your Washer
This automatic washer has five
cycles. Each is designed for a fabric
type.
The washer has a LOAD SIZE
SELECTOR that lets you adjust the water
level to match the size of the load.
It has a TEMPERATURE SELECTOR.
You can select the wash water temperature best for the amount of soil and
fabric type in each load.
Sections in this Use & Core Guide
go into detail on the “what and why”
of each setting, Read this and the Loundry Guide carefully to get the best
cleaning results.
MAGIC CLEAN@
lint filter
l The lint filter on your washer is selfcleaning and operates at all water
levels It filters the water used in your
washer during the wash and deep rinse.
The filter is cleaned automatically
during the drain periods and the lint or fuzz
collected in it is carried away.
l
If your washer drains into a laundry
tub, check the drain strainer for lint
accumulation
after washing a linty type
load. A lint accumulation
may prevent
proper drainage and cause the tub
to overflow.
Using your Washer
Your automatic washer is easy to
use. To make it even easier, read the
following steps before starting your first
load.
Start your washer after you put in
detergent, the load, and any other
laundry aids according to Information
on page 3 and page 6
1.
Set the LOAD StZE SELECTOR.
Select the water level that matches
the size of the load. See page 5 for
more information.
l
IMPORTANT: For the best cleaning
results with the least wrinkling, make
sure the load has enough water for
items to move freely.
2.
Set the TEMPERATURE SELECTOR.
Match the wash and rinse water temperatures to the type of fabrics and soils
being washed See the instructlons
under the washer lid and on page 14 In
your ioundry Gude
l
4
3. Select a Cycle and Start the
Washer.
l Push the Cycle
Control Knob in and
turn it to the right (clockwlse).
l Stop when the pointer
is on the number of minutes of washing you want
In the cycle you want.
l Instructions for which cycles
to use for
each fabric type are under the lid.
l To start the washer, pull the Cycle
Control Knob out. When the cycle IS
over, the washer will stop.
l To stop
the washer at any time
during a cycle, push the Control
Knob in. Pull it out to restart the washer.
l To change
a setting, push the Control Knob in to stop the washer. Then turn
the Control Knob to the right [clockwise]
to the setting you want. Pull the knob
out to start the washer.
l Pages 8-11 show what happens
in
each cycle.
Water levels and
load Sizes
The LOAD SIZE SELECTOR lets you
control the amount of water that fills
the washer
l
Washer will fill to selected level for
both the wash and deep rinse.
Approximate
Water Fill
Ex Small
9.1 gallons (35 liters)
H
11.6 gallons (45 liters]
n
14.5 gallons (58 liters)
Large
16.9 gallons (65 liters)
match
size.
To save water and energy,
the water level to the load
For the best cleaning results, the
load should move freely In the water.
Watch for rollover. An item (Irke a sock)
should sink in the middle and come
up later on the outside.
Be sure to read pages 11- 13 in
your Laundry Guide. You will find more
Information on loading and load sizes
usually based on soft water and
washers with normal-size tubs. Use
more detergent...
1 for hard water
Important
Detergent
Information
2. for heavy
oily soils,
greasy
3. if the detergent
Detergents and soaps clean
by loosening soil, and by holding it in
the water so it drains away. If not
enough detergent is used, soil and
lint can settle back on the items in
the load.
SOAP works best in soft water
(O-4 grains hardness). In harder water,
both the wash and rinse water should
be softened. Use enough soap to
make about 1% to 2 inches (‘3.8 to 5.5
cm) of suds.
DETERGENT works in hard or
soft water. Package directions are
or
is low
phosphate.
4. for cold-water washes.
DETERGENT SUDS. There are
high, normal and low sudsing powdered
detergents.
If the recom-
mended amount of detergent makes
too much suds, switch to a lower
sudsing brand DO NOT REDUCE THE
AMOUNT of detergent.
Use the following chart as
beginning suggestions for powdered
and
liquid
detergent
amounts.
See
your Laundry Guide for more information (pages 14-22).
WATER HARDNESS IN GRAINS
Powdered
Detergents
Low Suds
Normal
Suds
High Suds
No phosphate
Liquid Detergents
O-4 Grains
4-10 Grains
lo-20 Grains
% cup (175 mL)
I’/4 cups (250-300
mL1
1% cups (425 ml]
l’is-l’iz cups
(300-350 ml]
2-2% cups
(475525
ml)
2% cups (600 mL]
I’/4 cups (300 ml]
1-1’14cups
(300-350
‘14to 1 cup
amount of
2 cups (475 ml)
ml)
Follow package
recommendations
(60 to 250 ml], depending
on Ihe brand
soil. Follow package
recommendations.
^ These recommendations
do not apply...
l In areas
where phosphates
are banned.
l In areas with laws limiting
(by weight or percentage]
of detergent
used in a wash load.
liquid Bleach
Dispenser
The bleach dispenser IS under the
lid of the washer in the front corner. It
has the words, LIQUID BLEACH, on it. The
dispenser will hold enough liquid
bleach for one wash load.
l Before starting the washer, but after
loading it. add the bleach
l Use a measuring
cup with a pouring
spout to help avoid spilling or spattering
the bleach.
6
and
the amount
l Follow the directions
on the bottle for
the amount to use. Never use more
than 1 cup (250 ml) for a tull load.
Use less wlth lower water level
settings.
Use a standard
measuring
cup
with a pouring
spout to fill
dispensers.
l
Do not let any bleach run down
into the washer basket. Concentrated bleach can damage
any
fabric.
l
To use the liquid
fabric softener
dispenser
The fabric softener asperser
IS
used for cddlng
fabric softener automot~cally
to the deep rinse
1. After We load and detergent
have
been added
to the washer, f!t the dlspenser over the agitator
cap as shown
2. Pour the recommended
amount
of
fabric softener
Into a stanoard
measuring cup u~th a pouring
spcut Follow
package
recommendations
for the
amount to use
For Rinsing Only
bers In
HEAVY
or the
pointer
Control
agitate,
There IS a dot just after t?e numPERMANENT PRES5 REGULAR
and SHORT Cycles
If you push in
Cycle Control Knob, turn the
to one of those dots and pull the
Knob out, the wc;?er WIII fill,
drain a?d splr
For Spinning
IMPORTANT: Dilute fabric
softener with water.
3. Add hot or warm water to dilute the
fabric softener and fill dispenser
to the
FULL line Inark The diluted fabric softener will be dispensed
just before the
washer fills for the deep rinse
4. Clean dispenser
after each use with
warm water only [detergent
makes
fabric softener sticky and gummy)
NOTE: Do not stop washer, during the
first spin (after the wash period)
If you
do, the fabric softener dispenser
wtll
empty too soon This can result in stain1ng of fatzrics
Only
There may be tlrn?:s wFzr you
want t% drair
out ail the tidash +$ater
arId start over To s!op the washer at
an! time. ust pcsh IP or ?he Cqcie
CorItrol
KrIob
To set the washer ‘$0 It drains
and spins dater out of tr>e loo3
pus?
ln on ‘he Contra
<nor,
-cl’n tpe cllal ts
the right [c!ocKwise)
SC the pzirter
IS
touchng
tq?e bar just be’ore
OF; r
any cqcle
The washer will uran, spur out
water and stop automa!
tally
Cycle
utes you want the wa;her tc agitate
before it drains and fmlisfor the rinse Yoti
~111 want
longer agitat;on
Tin-es for
heovlly solled loads
You choose tre wasp water temDerature
you u/ant ~‘5 the
Operation
Your washer has five cvcles on
the Cycle Control DI~I The numbers In
each cycle are for the number of min-
WHAT HAPPENS IN EACH CYCLE:
. SET LOAD SIZE
. SET WATER TEMPERATURE
l
PUSH IN KNOB, TURN TO
CYCLE AND TIME
. PULL OUT TO START
uuu
. SET LOAD SIZE
. SET WATER TEMPERATURE
. PUSH IN KNOB, TURN TO
CYCLE AND TIME
l
PULL OUT TO START
REGULAR HEAVY CYCLE
,‘se for stJrdv ih,~te aId cc orfast
+ors aqd fczr ~a,\/
+.ork Zl=t’
agl+atlon
and sC:r’ steeds
%
*fie best clear- rg reslil*s
CO:
DRAIN
No
. SET LOAD SIZE
. SET WATER TEMPERATURE
. PUSH IN KNOB, TURN TO
CYCLE AND TIME
. PULL OUT TO START
Agitation
J
ls srxc~yed or +he
load to ilelc: rlr,se and remove
residue
TEMPERATURE SELECTOR. %nse ibaater s
RINSES. Ctz d water
UCl3 rl a” se** ngs
solnrirg
de’ergent
Y~L set +?e amount
fl
IS‘i-e
tJb’
u
+7 The
of water
ibat
LOAD SIZE
SELECTOR.
NOTE: ‘ix may wt,:x
:“lat
zf the SPIN ocies house SPRAY
’ y0::
some
tllii-
+O C C’yC!e
and
C+Ort
the
rvi”,b~er h,, f charige your mx! pdsh In
on ‘he Ckc’e Contrc~ KnoL and !um
‘0 +“le ilgb:t ,c/ockwise,) to :he sett ng you
‘went Tnem i3c!il out rc stmf
SOAK CYCLE
. SET LOAD SIZE
. SET WATER TEMPERATURE
. PUSH IN KNOB, TURN TO
CYCLE AND TIME
. PULL OUT TO START
This cycle IS not for :,ashlng
I+ soaks
agitates
spins out the tiater and stops
(no rinse‘1 Use It for staned
vellowed
grev or heavl’k solied iaundru ,vith a
cletergent
or pre-soak
pro&c?
Chlorine
bleacr
if “,.:.anted si-,‘;uld be added
to ?“e cvcle vow Jse after the SOAK
Cycle IS over
PRE-WASH CYCLE
Use for “leavll\
soiled Items fha’ may need
two washes
Lse enough
detergent
for a
stops acid
single wash Wher the NOSher
more detergent
and select a cvcle *
SET LOAD SIZE
SET WATER TEMPERATURE
l
PUSH IN KNOB, TURN TO
CYCLE AND TIME
. PULL OUT TO START
l
l
If You Need
Service or Help,
We suggest You
Follow These Steps:
IF YOUR WASHER DOES NOT FILL:
l
l
Before
calling
for service
,..
Problems are sometImes
caused
b\ litt e thlqgs you car correct
without
tools Check this list be’ore vow call
for service
Is the power supply cord piugged
Are both waier faucets
open?
113
l Is a fuse tIloi\r
or circuit-breaker
tripped?
l Are the
‘water supply Poses ki?ked’
l Is the Cyole
Control Knob se* a-d
pulled out’:
MAKE SURE THE DRAIN HOSE IS HIGHER
THAN THE WATER LEVEL IN THE WASHER.
IF IT ISN’T...
l The washer
may seem to be draining
during wash and rinse cycles
l Water
can siphon out [See lnstallatlon
Instructions
)
IF YOUR WASHER DOES NOT SPIN:
Is the IId closed’
Is the po!Ner supply cord plugged
l Is a fuse Llown
or clrcult-breaker
tripped?
l
l
rn3
IF WASHER FILLS AND DRAINS WITHOUT
RUNNING:
l Make
sure that the Cycle Sontroi
Knob IS golntlng
to a qumber I~ the
cycle
IF YOUR WASHER STOPS DURING THE
PERMANENT PRESS CYCLE.
l
Ternember,
the washer WI 1 stop for
about 1’2 mnutes after the par+ial clraln
during the cool-down
period 1~~this
cycle
WHEN YOU RETURN TO THE
UNITED STATES
Migratory
Policy
We realize
that you re purchcslng
a
Whirlpool
appliance
for what may be
a temporary
stay in a particular
area If
you are transferred
to the United States
ard find that your Whirlpool
appliance
requires service wtthin the warranty
period, simply contact
a Whirlpool
authorazed dealer
or service
agent
All he’ll
require IS proof of the purchase
date of
the appliance
Service WIII be supplied
at no ci?arge
Whlrlpool
Franchised
TECH-CARE8
Servlce Anywhere
In the Contlnental
Unlted States...
If your WHIRLPOOL” appliance
ever
needs service anywhere
in the United
States, help is just a phone call away
. ..to your nearest Whirlpool franchised
TECH-CAREe service representative.
Whirlpool maintains a nationwide
network of franchised TECH-CARE service companies to fulfill your warranty
and provide after-warranty
service and
maintenance
to keep your WHIRLPOOL
appliance
in peak condition.
You’ll find your nearest TECH-CARE
service company listed in your local
telephone book Yellow Pages under
APPLIANCES - HOUSEHOLD - MAJOR SERVICE & REPAIR. Should you not
find a listing, dial free, the Whirlpool
COOL-LINE 9 service assistance
telephone number.
When calling
from:
Michigan
.
(800) 632-2243
Alaska &
Hawaii . . .
.
(800) 253-I 121
All other
States
.
(800) 253-1301
NOTE: The parts to convert this
machine to 120 Volt, 60 Hz operation
are included in the console of the
machine. These parts must be
installed by an authorized Whirlpool
service agent.
If you move anywhere
in the United
States...To make sure that your
appliance
is correctly installed and to
insure its continued satisfactory
operation. please telephone your
nearest TECH-CARE@ service company
for installation or to get the name of a
qualified installer. (Installation cost will,
of course, be paid by you.)
TKirlpool
nome
Appliances
Helpful hlnts...You can help your
TECH-CARE service representative
give
you faster service if you include the
model and serial number of your
appliance
when requesting service.
Also, retain your sales slip and warranty
to verify your warranty status.
Remember...Your
TECH-CARE service
representative
is specially trained in the
expert repairing and servicing of your
WHIRLPOOL appliances.
He can help
you maintain the quality originally built
into your WHIRLPOOL appliance.
So why
not take the time, now, to look up his
telephone number and jot it down in the
space provided on the cover.
If you have a problem*
:
Call Whirlpool Corporation in Benton
Harbor at the COOL-LINE service
assistance telephone number [see Step
2) or write:
Mr. Guy Turner, Vice President
Whirlpool Corporation
Administrative
Center
2000 U.S. 33 North
Benton Harbor, Michigan 49022
‘If you must call or write, please
provide: your name, address,
telephone number, type of appliance,
brand, model, serial number, date of
purchase, the dealer’s name, and a
complete description of the problem.
This information is needed in order to
better respond to your request for
assistance.
FSP 1sa registered trademark
of Whirlpool Corporoi~on
for
quollty parts LoOk for this
symbol of qualltv whenever
FSP
you need a replacement
part
8
for your WhIrlpool appliance
FSP replacemenl
parts
will fit right and work right because they are
made lo the same exocllng speclhcotlons
used to build every new Whirlpool appllonce
0
Benlon Harbor. Michigan. Aulomalic Washers. Clolhes Dryers.
Freezers. Relrlgeralor-Freezers,
Ice Makers. Dishwashers,
Buill4n Ovens and Surlace Units. Ranges. Microwave Ovens,
COmgaClOfs. Room Au Condllioners,
Dehumidiliers,
Cenlral
Healing and Air Condilioning Systems.
Quality. Our way of life.
Part No. 383151Rev. A