1
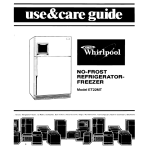
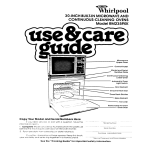
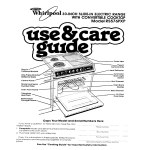
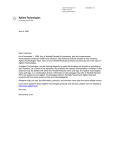
304NCH BUILT-IN MICROWAVE AND
SELF-CLEANING OVENS
v
Control
Microwave
Upper Oven
Cover
/
’
iL
\
J
Automatic
Panel
Panel
Oven
Broil Element
Model and Serl
Number Plate
n Rack Guides
Bake Element
lower
Oven
Fiberglass
Copy
Heat Seal
Your Model
If yo> need
informotlon
readv
servtct?
and Serial Numbers
or
cali
with
3
quest:.,,
Here
ia\?
-c,
Ihis
:ir;.: Y,. :!-’
1 Complete
Modei and Serial Numbers (from +?e piure just
behlnd the microwave
oven door on the oven .-:rle)
2 Purchase date from sales slip
Copy this lnformatlon
in these spaces Keep rhls Dook.
your warranty and sales slip together in a handy ;‘ace.
See the “Cooking
Guide”
tor Important
)(J
_
it- ,i i i i
safety
- ._( ;. I -: il
- :!:I ,’
information.
fit. :,,.e‘>r?I
b
Your responsibilities..
l
Proper installation
and safe use of the ovens are your personal
responsibilities.
Read this “Use and Care Guide”and
the “Cooking
Guide”carefully
for important
use and safety information.
Installation
You must be sure your oven is...
l installed
and leveled in a wall
that will hold the weight;
l installed
in a well-ventilated
area protected
from the
weather;
l
properly
connected
rect electric supply
Proper use
You must be sure your oven Is...
l used only for jobs expected
of home ovens;
l used only by people
who can
operate it properly:
l properly
maintained.
Contents
Your Responsibilities
......
Installation
Proper Use ...
..... : :
Safety .............
Precautions to Avoid Possible Exposul& to
Excessive Microwave
Energy .......
Using the Microwave
Upper Oven ..........
..............
Setting the Controls
...
Cook Power Chart ..............
Defrosting ............................
Keep Warm ........................
...
The Meal Sensor Temperature
Probe
Cleaning the Microwave
Oven ....
............
Important Information
How Microwave
Ovens Work ............
Bi-Level Oven Rack ....
: : : : : : : :,
Using Your Lower Oven ....
.......
::
Setting the Clock ...............
Using the Minute Timer ...................
The Lower Oven Controls ..................
...........
........
Baking or Roasting
Adjusting the Oven Temperature
Control
Using the Automatic
MEALTIMER- Clock
................................
Broiling
........
Broiling Chart .................
The Lights ................................
The Oven Vent ...........................
Cleaning
and Caring for Your Oven
: : : : 1: 1
Control Panel and Knobs ... .......
.....
The Lower Oven Self-Cleaning
Cycle
Cleaning
Chart ..........................
...................
The Optional Rotisserie
...........
If You Need Service or Assistance
...........
1. Before Calling for Assistahce
2. If You Need Assistance .................
...................
3. If You Need Service.
.................
4. If You Have a Problem
Page
2
2
2
3
4
4
5
5
5
5
6
t3
8
10
10
11
11
12
12
13
13
14
15
15
16
16
16
16
17
20
20
21
21
to the corand
3
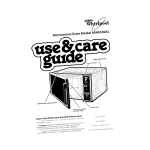
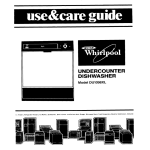
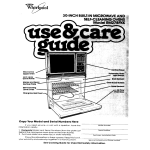
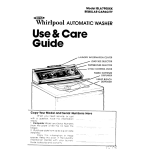
Using your microwave upper oven
‘Probe
Light
Slgnol
Meal
Probe
Sensor
Control
Digrtal
Timer
Cook
Power
Control
Start
To Stop the Oven:
1. Push in and turn the
timer knob counterclockwise
to OO:OO.
OR
2. Open the oven door.
To Restart the Oven:
1. Close the oven door.
2. Set timer (if needed).
3. Push the START Button.
Button
.Tmk
SETTING THE CONTROLS
17t-lSI 0 Y:XJ understand
the basics of mlcrclwave
oven cooking tefore yoti Start
F-IIIOW tr,e djrectlons
,1:1’t WI’-- reylpe.5 from vour MICRO MENL!S. Cookbook
.2’eful J
NEVER START THE OVEN WHEN IT’S EMPTY. lr’tt OLD-.-’:: .jn ~FJ ;:,xrqnqed
Frrr testjng
.it j :t ,zif I: c:d;~ of N/oter
Be sure you wve read and
understand
we dlrectlons
1.
Put ‘ood
‘he over
I? minutes :;y pushing in
tine timer kr ob and turnIng clockwrse
The oven
Ilght WI/I g: on To set time
f,lr es:, :h& 30 seconds
’ I- ?,rier [ 1st 30 sec,.‘II,L t’len lock to de:,,rp,j
~L~TIF
2.
C ose the aL>or Mace
sure t Qc’kj ‘he (:Le“
won’t work I! +he door !sn
closed tlghrly
than 1C mliutes by tclrning the timer knob and
wheel First set the knob
then move the wheel
6.
Push the START Button The
eve? light ~111stay :>n
vou wtll hear a fan -un“‘9 during oven operation
DEFROSTING
For defrosting
set ~G~JF.Potter Control to
1:EFROST (MED.LO I See the Defrost Guide
:?side the oven aoo~ or vokJr MICRO MENUS
Zookbooh
for suggested
defrost times
POWER CHART
i IF?5 in ‘)c’ ‘/11(3RO MENUS :. ook
j
Td i ,p “‘,:. h 1 .: me: setttngs from HI to
C1c~t-~~l)t?~ other books and maga!
, “I I”! ‘,l.J, :,$ 1-1
Itterent percentuges
I,.t3,-,b.
,. #,I:;;~ ~+zijr irle rolIr>wlng chart
+.,
,.‘I
HI -. 100% of full power
f\:liD-HI - 70% of full power
MED - 50% of full power
ME&-i.0 (1 EFROST) - 30% of full power
10 - 15% of full power
KE* 3 WARM 5% of full power
L
fm.
‘.?I Cook Power to
ieslrea setting from HI to KEEP
,~v:ziaKhlSome recipes require
;IPerent Cook Powers for
!:%I r”dk
[See chart
: p:, .V/l
When the set tlrne i up. the oven will shut off
automatically
vou will hear a bell, the light
will go off and the fan will stop
Example
!*) s: 2;: ‘TiriiJ?es 33 seconds
. Set 2 minute
30 seconds by pushing IF ancl
turning knot. se’, 2,‘ 17I.tutc ‘I n; oushln!: ,,p on wheel
--..-I
FOOK
! f?pr
3.
KEEP WARM
Hor. cookeu foc>tlj ,‘.c!I be barely kept warm
for 60 minutes
D Reset the timer II more time IS required. Keepinq ‘oods warm iorlger than about 1 hour, 40
minutes is not recommended.
The quality of
some foods WI!! suffer with extended
time
* Foods cookecl covereD should be covered
durlr;g KEEP WARM
l PUsfry Items
(ples turrnovers, eic 1 should be
Jncc.)vered aurlng KEEP WARM
l
Veals keP! warm 311 a plate should be covsred durr:?g ICECF’&ARM
5
l
’
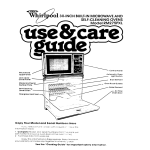
THE MEAL SENSOR’” TEMPERIUURE
PROBE
The MEAL SENSOR. Temperature
Probe helps take guesswork out of cooking roasts
and larger casseroles.
The probe is designed
to turn off the oven when it senses the
temperature
YOU want. See vour MICRO MENUS Cookbook
for helpful information
in
coo’king diffekent types of fobds
For casseroles, the tip of
the probe should be in
the center of the food. Stir
foods when recommended. Replace the
probe
( Cable
For Ilquids. balance
the
probe on a wooden spoon
or spatula so the tip of the
probe is in the center of
the liquid
For roasts, the tip of the
probe should be in the
center of the largest muscle, but not touchtng fat or
bone
“e,
I
Socket
1.
Insert at le:st 13 of the
temperalure
probe into
the food.
2.
Place food in the oven
and plug the probe into
the socket on the oven
wall. The Probe Signal
Light will come on.
3.
Make sure the probe does
not touch any part of the
oven Interior. Close the
door.
4.
Set the Cook Power if
desired
5.
Move the Meal Sensor
pointer to the final cooking temperature
you
want.
6.
Push the START Button.
When the probe senses
the cooking temperature,
a buzzer sounds, and the
oven turns off.
DO...
l
l
l
l
l
6
use hot pads when removing
probe from
food or food from oven.
unplug probe from socket to turn off oven
light.
stir foods during cookmg when
recommended.
stir soups, casseroles
and drinks before
serving.
cover roasts with foil and let stand a few
minutes after cooking. Remove foil if you
decide to cook it longer.
DON’T...
let probe or probe cable touch any part of
the oven interior.
l let probe
touch foil (if used). Foil can be
kept away from probe with wooden toothpicks. Remove foil if arcing occurs.
0 use paper, plastic wrap or plastic containers. They will be in the oven too long.
l use probe
in regular oven.
l force
probe into frozen food.
l use probe
for foods that need to simmer.
l
*lmk
MEAL SENSOR” TEMPERATURE PROBE GUIDE
Food
Cook Power
Setting
HIGH
Beverages
Canned
Food
HIGH
Meal Sensor
Setting
Tips
165-F to
170 F
170 F
Balance
probe
on wooden
spoon.
Use MEDIUM Cook Power for very thick
foods such as baked beans.
Casseroles
MEDIUM HIGH
170 Fto
175 F
Use MEDIUM Cook Power for very thick
mixtures. Stir once or twice.
Chowders
MEDIUM HIGH
180-F
Balance probe
once or twice.
Dips
MEDIUM
MEDIUM
HIGH
140 F
Meat Loaf
(beef)
Poultry
on wooden
spoon.
Stir
170 F
Sandwiches
Do not use the Meal Sensor probe when cooking poultry. Because of the
amount of bone and shape of poultry, there is no place where the meat is
thick enough to place the probe properly.
MEDIUM
110 F
Place sandwich
on paper napkin.
Insert probe from side so tip is in center
of filling.
Thick sandwiches
work best.
soup
HIGH
Balance probe
once or twice.
165 Fto
170 F
on wooden
spoon.
Stir
TIPS
Dry casseroles
l
l
do not work well.
l
Thaw frozen casseroles
and meats in the
microwave
oven before inserting the
probe.
l
l
in several of the items -all
not heat at the same rate.
Casseroles
cooked using the MEAL SENSOR
probe should be made from precooked
foods. Do not use raw meats, raw vegetables and cream sauces in casseroles.
l
If you are cooking individual
servings such
as mugs of soup, check the probe setting
CLEANING
l
Dry meat loaf mixtures
don’t work well.
Remember
that roasts may vary in size,
shape and composition.
Use the timings for
minutes per pound as a guideline
as well as
the MEAL SENSOR probe.
Starchy vegetables
SENSOR probe.
tend to stick to the MEAL
THE PROBE:
1. Remove probe from microwave
oven using hot pads.
2. Wipe probe with a hot sudsy cloth. Use a plastic scouring pad to remove
3. Probe may be placed
in the silverware
basket of the dishwasher.
4. Be careful not to kink the cable.
NOTE: Make sure you have the right probe for your oven. It will have”LO-Z”on
“Tmk
the mugs may
stubborn
foods,
the handle.
CLEANING THE MICROWWE
v
th
Cl soft
socpy
Be sure to clean the areas
where the door and oven
frame touch when closed.
Rinse well
For stubborn soil boil o cup
of water In the oven for 2 or 3
mtnutes Steam will soften
the soli
sript’ after wtn vYcrm silclsk
~crer ant I soft cloth or sponge
the cantrc
panel mav be
.!ii2Led
UVEN
cloth
-ai’: :y 3 15s clecr;er
Do not use abrasive
cleaners
or steel wool pads.
IMPOR’ICANT INFORMKTION
tle*ore
fog :turt tislng your mlcrowave
~or~~t~on
w/i help you ovoru
‘., .!KII , ‘i :T?et.ll r_?n:olners
can damage
the oven. SO
~23:~corhlners
with hldden
metal !-jvlst-ties foli-llnlrig
staples :netalllc glaze or
IrIm; Te 1 ~~7lnnerware 0’ cook
i+/?re bt= IrP ZJSlfhJ
L; :>er
117d
2’:
so’
ie
:nar
plastics
Jr
3ur!7
can
--;eit II I ,ed when heating
iooas If I more than 4
-Inute
domoye
oven, read this section
carefully.
TM
+o you: oven
Tc test o d,sh for safe use, put it
Into the oven with a cup of
water beslde it. Cook on high
Cook Power for one minute.
It the dish gets hot and the
water stays cool, do not
use It.
NEVER COOK OR REHEAT A
WHOLE EGG. Slice hard
boiled eggs before
heating. Steam build-up in
whole eggs may cause
them to burst and possibly
damage
the oven
NEVER start a microwave
oven when its empty. The
oven can be damaged
If
you experiment,
put a
container
of woter in the
oven
Don’t let anything touch
the top of the oven cavity
Contmued
next page
Rough or harsh cleaners
DO NOT store thlngs in the
can scratch or dull the
oven.
oven finish. DO NOT USETHE&l.
Overcooktng some foods
can cause them to scorch
or flame...especlalfy
krcjds
like potatoes, popc5m,
snacks, efc. See the
MICRO MENUS”
Cookbook.
*Tmk
Make popcorn only in
poppers designed for use
in microwave ovens.
Follow popper directions.
Resulfs are the popper
manufacturer’s
responsibility.
Liquids heated in certain
containers may overheat.
The tlquid may then splash
ouf wlm a loud noise. This
does nof harm the oven,
but you should nof use
such containers to heat
liquids agaln.
DO NOT OVERCOOK
POTATOES.At the end of the
recommended cooking
time they should be
slightly firm. Wrap In foil
and set aside for 5 minutes.
They will finish cooking
while standing.
USEWOTPADS.Microwave
energy does not heof
containers, but the hot
food does.
follow MtCRO MENUS’
Cookbook directions
carefully to properly
cook different types of
food. II using a different
cookboak, you may
need to experiment with
times and Coak Powers.
l Doublecheck
all
selth-igs.
l Use the oven only for
defrosting, cooking or
reheating.
It is normal for the inside of
the oven door to look wuvy
after the oven has been running for a while.
If your electric power line
voltage is less than fhe
normat 240 volts, cooking
times may be longer.
‘pnk
At times, an extra fan
automatically
ttims on to
help profect the microwave oven hbm exe
heat.; you may natice a
louder sound kwmt when
this fan is running.
9
HOW MICROVKVE OVENS WORK
Microwave
ovens are safe. Microwave
energy is not hot. It causes
make its own heat, and it’s this heat that cooks the food.
Mode Mixer
Magnetron
\
I
food to
Bottom
Oven Cavity
Metal
Mrcrowav?s
are lrke TV
waves or light waves You
can’t see them but you can
see what they do
A magnetron
produces
mrcrowaves
The microwaves
move into the oven where
they are scattered
around by
a stirrer (like a fan)
Mrcrowaves
bounce off
metal oven walls and are
absorbed
by food
The bottom of your microwave oven lets microwaves through. Then they
bounce
off the metal
floor, back through the
bottom, and are absorbed bv the food.
Micr0wavt.s
pass throuyh
glass. paper and plastio
wrthout heotlng them SC rood
absorbs th? energy’ Macrowaves bounce 3ff rneta! pans
so food doss not absorb the
enerqv
Microwaves
may not reach
the center of a roast The heat
around the outside is what
cooks the roast all the way
through. This is one of the
reasons for letting some
foods [roasts, baked potatoes] stand for a while after
cooking, or for stirring some
foods during the (cooking
time.
The microwaves
disturb
water molecules
in the food
As the molecules
bounce
around bumplng
into each
other, heat is made. like rubbing your hands together
Thus IS the heat that cooks
BI-LEVEL
Floor
OVEN RACK
{se the ISLevel Oven Rack to stack foods when cooking in more than one container
The rack can be turnea upside-down
to help fit taller containers
on the bottom of the
0 L -.+n
First Position: Use the rack only when heating
more than one container
of food.
Do not let a container
touch the top of the
oven.
SPECIAL CAUTIONS
l
l
Second Position: Turn rack upside-down
when using a taller container
on the bottom
of the over’
CLEANING
l
l
l
l
THE RACK
Wash by hand with a mild detergent.
Wash on the top rack of a dishwasher.
Do not use abrasive scrubbers or cleansers
10
l
l
l
l
Put food in containersthen
place containers on rack.
Do not cook foods directly on rack without
putting them in containers
first.
Do not use with browning
dish.
Use only in the microwave
oven.
Do not let food or container
touch the top of
the oven.
Do not store rack in the oven.
Use only when cooking foods in more than
one container.
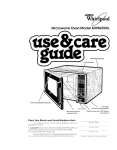
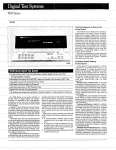
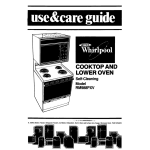
Ushg your lower oven
lower
Oven Controls
Stop
Time
Knob
Automatic
Minute
zl’l
-
MEALTIMER-
Clock
Timer
:“:“:-;‘h”‘[
Monuol
Oven
Light Switch
\
SETTING THE CLOCK
1.
Push in Mlnute Timer Knob and turn
clockwlse
until clock dlgits show the rlghr
time of da\.
‘Tmk
2.
Let the Mlnute Tlmer Knob pop out. Turn
counterclockwise
until the Minute Timer
dial shows OFF. The clock setting will
change if you push in when turnlng.
!I
1.
-.0
I!!! . I
Without
pushing
in the Minute Timer
Knob, turn it until the time showing II- t*-e
window IS longer than y?u \~ant
2.
Without
3.
When the tim;- 1s up a t)lJLie’:
To stop the bu:;er turn the dlo
without
PUSHING
IN AND
TURNING
THE KNOB
in, turn the knob back so
you want shows In ‘he ti!ndow
pushing
the setting
CHANGES
pushing
THE CLOCK
@AL
scour~c
to 2FF
in the knob.
SETTING.
THE LOWER OVEN CONTROLS
THE OVEN SELECTOR
Vith the Oven Selector on
-rvlED BAKE the MEALTIMER
With the Oven Selec:or cn
BROIL, only the top elemers’
heats (Rro~l~rq
~3
‘5’
THE OVEN TEMPERATURE CONTROL
Use the Oven Temperature
Control to set baking or roar.:
ing temperature
when the
Oven Selector IS on BAKE or
TIMED BAKE
12
When bt-)th ‘9 icyOven Seiector and Tempeiuture
Control
ore on BROIL colt? brotl elemen1 r-eats ~1’~“e trme Tre
Oven Temperature
Control
can be set on a temperature
for slower broiling (see Brorling page 75)
.Tmk
Rack(s) ihzLJ:! !je placed
so food can be centered
In
the oven Always leave at
least 1’ 2 to 2 inches (4-5 cm)
between the sides of the pan
-Ind the oven walls and pans
:or more InformatIon. see the
“CookIng Guide
Lift rack at front and pull out
Set the Oven Selector
BAKE
on
Put food jr- th, ::ven : “.r
rack kvCJ/i-;on YOCJiA! w ‘V!’
ADJUSTING
Control
Set the Oven Temperature
tc the SoKIng
‘emperatcrie
L.-II $h’r,r’
Let the oven preheat until the
Slgnai ilght goes off
6
7
During baking, the elements
will turn on and off to help
keep the oven terr,perature
at the setting. The Signal Light
will turn on and off with the
elements.
The top element helps heat
during baking, but does not
turn red.
.
THE OVEN TEMPERATURE CONTROL
Does yc .lr new over seem to be hotter or coider at the same
old oven- Ihe temoerctcrre
seit!ng in \/ou: d!~: oven may have
ally over :.ie year:. Thk? .lc(;u:ure sett:lq c-,8+
Y IL’ ?ew .)‘r’ep can
if you thin the ‘“,‘f+ te.rl;,erc-l’iire
needi ,~dl: ,stlr\q fellow fhese
OFF
1.
When baking is done, turn
both knobs to OFF
Pul! Out th! cw?er
of the Ove.1 TeTperature r ontrf->I
2.
iocwlng Screw
:,oser’ ?be I:-.,: L;
,'g
5,“Ov.
Tighten
the locking
settings than your
changed
graduseem different
steps
OFF
3
screw.
Tooth
Notches
rc Izwer the tern
3ernture
move
:Yai * ring so tooth
‘s closer to LO Each
nCtCh equals
nbout 10 F (5 C!
Repiace
the knob.
OFF
Tooth-
Ndtches
4. To raise the temperature, move
black ring so
tooth is closer to
HI. Each notch
equals about 10 F
{5 C]
13
USING THE AUTOMATIC
The Automat:c
at times you set
MEALTIMER
CLOCK
MEALTIMER Clcxck IS deslgripd
to turn the lower
even when you are not around
lo start and stop baklng
automatlcally:
1.
Put the lower oven rack(s)
where you want them
and place the food In the
oven
2.
Make sure the clock IS set
to the right time of day
4.
Push In and turn the Stop
firne Knob clockwlse
to the time you want the
oven to shut off
5.
Set the Oven Selector
TIMED BAKE
7.
After baking
hot’? kvc bs
IS done
to
OFF
:orr:
oven on and 017
8.
on
3.
6.
Push In and turn the Start
Time Knob clockwlse
to the time you want bakIng to start
Set the Oven Temperature
Control on the baking
temperature
you war3
lo stop the ?veq be+c!re
‘he preset tlrne turn bort>
kricbs to OFF
To stop baking automatically:
1. Pu+‘7e 0~ en -J:K, s) 3. k i-re ycu wan’
: *)fyn- d r’J(3 plJcc5 !be fa)cj ,ri the overt
2. Make sd:e ‘he cir:,ck ‘5 zet tc the rlqht +lrnp
0 f ‘Zc y
3. Pusr, ,rj IT,; iurn t’le Stcr, fime Knob clockwise +‘\ I?e r’me ,,~IL Ixln: the oven to shut oft
4.
5.
6.
7.
Se’ the Coven Sc‘lector 01~ TIMED BAKE
i;er the Oven Temperature
Control on the
baklng temperature
you want
After baking IS done turn both knobs to OFF
To stop the ove1i before +he preset time.
turn both knobs to OFF
SPECIAL CAUTION:
Use foods thal will not go bad or spoil
while waiting tor cooking
to start. Avoid
using dishes with milk or eggs, cream
soups, cooked
meats or fish, or any item
with baking powder or yeqst.
Smoked or frozen meats may be used;
so can vegetables,
fruits and casseroletype foods. Vegetables
can be cooked
in
14
o covered
baking dish with about a halfcup (118 ml) of water for 1 to 1’4 hours.
Any food that has to wait for cooking
to
start should be very cold or trozen before
it is put in the oven. MOST UNFROZEN
FOODS SHOULD NEVER STAND MORE THAN
TWO HOURS BEFORE COOKING STARTS.
BROILING
1.
Place the rock where
wont it for broiling.
4.,
Set the Oven Temperature
Control on BROIL [or on a
lower temperature
for
slower broiling).
YOU
’
2.
Put the broiler pan and
food on the rock.
3.
Set the Oven Selector
BROIL.
5.
During broiling, the oven
door must be portly
open. A built-in stop will
hold it there.
6.
When broiling is done,
turn both knobs to OFF.
For slower brolllng, set the Oven Temperature
Control on a temperature
instead of BROIL. The broil element will then turn on and off instead of staying
The lower the temperature
setting, the slower the broiling.
The Oven Selector
must be on BROIL and the door partly
Suggested
oven-rack
positions
open for all brolllng
and broiling
Food
Fish
Liver
Frankfurters
on.
temperatures.
times
Approximate
Beef Steaks
Rare
Medium
Well done
Beef Steaks
Rare
Medium
Well Done
Hamburgers
Lamb Chops
Medium
Ham slice, precooked
or tendered
Canadian
Bacon
Pork Rib or Loin Chop
Well done
Chicken
on
Description
1” (2.5 cm)
1” (2.5 cm)
l”(2.5 cm)
3” (8 cm]
3” (8 cm]
3” (8 cm)
7-9
9-l 1
II-13
3-5
4-7
5-7
1 12” (4 cm)
1 9” (4 cm]
1 Lz” (4 cm)
9” [ 1 cm]
4”-5”
4”-5”
4”-5”
3” (8
13-I 5
17-19
19-21
6-8
6-8
8-l 0
14-I 6
4-5
l”(2.5 cm)
1~~“-1”
(l-2.5 cm)
1/2”[I cm)
q4”-1 ”
(2-2.5 cm)
2-3 lb.
(l-l .5 kg]
cut in half
whole
fillets
1/z“_q41’
(l-2 cm)
3” (8 cm]
6-8
4-5
3” [8 cm)
3”(8 cm)
6-8
6
4-5
4
[ 1 O-l 3 cm)
[I O-l 3 cm)
(1 O-l 3 cm)
cm]
Temperature
1st slde
Minutesset to BROIL
2nd side
inches (cm] from top
of food to Broil Element
4”-5” (1 O-l 3 cm)
15
10
7 “-9” (18-23 cm)
3”(8 cm]
3” (8 cm)
25-30
II-16
7-8
1 O-l 2
9-14
5-7
3”(8 cm)
4”-5” (1 O-l 3 cm)
3
6-7
3
4-5
15
The lights
THE MICROWRVE OVEN LIGHT
The light In the microwave
oven comes on when the oven door is open, when
k NJ set the cooking time, when the oven is on. and when the temperature
probe
I’ plugged
into the socket.
THE LOWER OVEN LIGHT
‘.
t.,
rir- IHgh: ~111‘;c:m~~~or1 ri’rer, ‘p: u open the 3ven door or when you
Light switch a! th? nottr>Im of tie
control panel Close the oven
. ,L-”
: IZ~>1”~ Oven
? ’
To replace
- 1.’
jh
‘he
SWI?CC
Clgoln
II
>.bt!t
”
qf‘
the light bulb:
13. Remove the light bulb from
Its socket
6.
Turn the power back on
at the main power supply
The oven vent
biot 31r ana moisture get 0 J: ai
The lower oven through
a vent just above
the oven door
Do not block
+ ,‘;r baking
the vent.
can result
Cleaning and carhg for your oven
CONTROL PANEL AND KNOBS
1.
it?
First makr
sure
knobs are on OFF
then pull knob
straight
off.
2.
he tiara soapb
fiater a(7d a sop
cloth to Nipe tnc,
panel Rinse ant
rilpe drb
3. Wash knobs In warm
soapy water Rinse
well and drk
4. Push knobs straight
back on. Make sure
they are on OFF.
THE LOWER OVEN SELF-CLEANING
The lower oven self-cleaning
cycle uses very
soil. Before you start, make sure you understand
the cycle safely.
CYCLE
high heat to burn away
exactly how to use
BEFORE YOU START
1.
-
Clean areas that may not be cleaned
during the cycle. Use hot water and detergent or a soapy steel-wool pad on...
l the frame
around the oven
l the inside
of the door, especially
the
part outside the oven seal.
DO NOT try to clean the tlberglass
seal. DO
NOT move it or bend it.
2.
3.
4.
Remove any pots or pans you may have
stored in the oven. They can’t stand the
high heat.
Wipe out any loose soil or grease. This will
help reduce smoke during the cleaning
GFlz’sure
the motor socket cover is
Jr oven has a rotisserie
Door
SPECIAL CAUTIONS
DO NOT block
the gent
during the cleanng
cycle
Air must move freeiv ‘or
best results
DO NOT use commercial
oven cleaners In your oven
Damage
to the porcelain
finish may occur
DO NOT touch the oven
during the cleaning
Cycle
11 can burn vou
DO NOT force the Lock
Lever The lever IS designed
to stay locked until the
oven IS cool enough to
safely open
DO NOT use foil or other
liners in the oven During
the cleaning
cycle, foil
can burn or melt
SETTING THE CONTROLS
1.
Set the Oven Selector
CLEAN.
4.
7.
2.
Set the Oven Temperature Control to CLEAN.
3.
Make sure the clock and
start and stop time dials
all have the rrght time
of day.
Push in the Stop Time
Knob and turn the hand
clockwise
about two
or three hours [Two hours
for ltght solI, three or
more for heavrer so11]
5.
Lift the panel between
the oven doors.
6.
Move the Lock Lever o/l
the way to the rlghf The
Clean Lrght will come on
only when the lever IS
all the way over
The Lock Light
when the oven
above normal
temperatures.
Lever can’t be
when the Lock
8.
When the Lock Light
goes off, turn the Oven
Selector and Temperature Control to OFF
9.
Move the Lock Lever
back to the left Do not
force it. Wait until it will
move easily This turns off
the Clean Light
to
comes on
gets
baking
The Lock
moved
Light is on
I
10.
I
After the oven IS cool,
wipe off any residue
or ash with a damp
cloth. If needed, touch
up spots with cleanser or
soapy steel-wool pad
DO NOT TOUCH THE OVEN DURING THE CLEANING
18
CYCLE. IT CAN BURN YOU.
SPECIAL TIPS
1.
Keep tha kltchel v~t.3
venti1atc.a ,.lurinu th‘.l
cleanin : r-‘vf;le t:b he r
get rid c n(:lrTai 16.~:
sdors a-md smoke
2.
C!eal7 the 3vel :~efc rt:
I+gets heavily >olrer:
C!ea7lrg
3 ie:, s.. --.::
?VgT tares ‘>rllJ-!r .j: -!
re<~rlts 1~ Tlor1- -.‘nek+
”
,b,‘:
5
3.
I: the cleaning
cycle
aoesn’t get the oven as
!:lean as you
expected
the cycle
may not have been set
Ibng enough Set the
;leonrng
time longer
for heavier so11
;o stop tne cleaning
cycle after rt has
;:ClOt~!!
* Turo the Stop iime Knob clockwrse
Jnt’l tne nand points to the rrght time
of day
n r!.r,, the 3ver, Selector and Oven
ie-,lperature
Control tc OFF
D tit or the oyen cools move the Lock
Le, er bacK +o the left DO NOT FORCE
IT .Vait until II moves easily
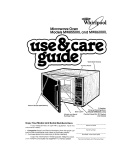
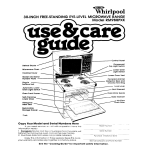
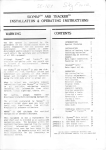
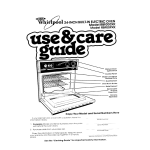
HOW IT WORKS
DL ,ng tne seif~ileaning
cy;.le
the Oven gets mucn hotter than It does
for bc:krng or broflrng
..approxrmately
57.5 F (468 C) Thus heat breaks
up g!“ase
and so11 and burns it off
The, groph shows approximate
temperatures
ana -rmes during a self..-leak ,rng cycle set tar twd hol.lrs
SELF-CLEANING
CYCLE
14ppror1mule
30
- TWO HOUR
Temperatures
;cnd
SETTING
TImesI
C.---y
530
c
0
:
427
C
6:
c
316 c
41
L
204
C
2:
F
93
c
ii4RT
7 hr
4 hl
*1
hri,
2 ‘Irr
2’ 2 hrs
STOP
19
CLEANING CHART
PART
Aluminum
broiler pan
and grid
WHAT TO USE
Warm, soapy water or
soapy steel wool pads
Control
Warm, sudsy water and
bristle brush
knobs
Control
panel
Oven
racks
Lower oben
door glass and
outsrde only of
mrcrowtrve
oven
Self-Cleonlng
Oven
l
l
l
l
Warm, soapy water
Commercral
glass cleaner
Self-Cleaning
Oven cycle
Warm, soapy water or
soapy steel wool pads
--~
Warm. soapy water or
plastic scrubbing
pad
Commercial
glass cleaner
l
l
l
l
l
l
HOW TO CLEAN
Wash with other cooking utensils.
Do not place in Self-Cleaning
Oven.
Wash, rinse and dry well.
Do not soak
Wash, rinse and dry with soft cloth
Follow directions
with cleaner.
Leave in oven during Self-Cleaning
cycle
Wash, rinse and dry Use soapy steel wool pads
for stubborn areas.
Make certain oven is cool Wash, rinse and dry
well with soft cloth
Follow directions
provided
with cleaner
Clean before using Self-Cleanrng
cycle to
prevent burn-on of soil.
l
Follow directions grven on page 17 The Lower
Oven Self-Cleaning
Cycle ”
l Do not use commercial
oven cleaners.
Do not use toil to line the bottom of your Self-Cleaning
Oven.
For areas outside Sell
Cleanrng area use warm.
soapy water or soapy steel
wool pads
l
THE OPTIONAL ROTISSERIE
If you would
!Forn your dealer
20
like a rotisserie
The kit includes
for your oven you can order
easy installation
Instructions
a kit (Part No. 261881
If you need service or assistance,
we suggest you follow these four steps:
1. Before
calling for assistance.. . .’
Performance
oroblems often result from
;;ttle things you can find and fix yourself wltQ(jut tools of any kind
If nothing operates:
Is the oven correctly
wired Into a live circuit
with the proper voltage?
(See Installation
Instructions.)
l
Have you che$;ked the main fuse or clrcu?
Dreaker box?
It the microwave
oven will not run:
* !s the timer set)
* Is the Cook Po?ver se+’
c is the door firmly closed and latched’
l Did you push the START Button’
l
Did you folloti the directions
on pages 5
and 6 exactly?
If microwave
cooking times seem too long:
l
Is the electric supply to your home low or
lower than normal7 Your electric company
can tell you if ‘he line voltage is low
l
Is the Cook Povver at the recommended
setting’
9 Are you allowrng for more time when cooking more food at one time7
If the microwave
oven turns off too soon or
not soon enough when using the probe:
l
Is at least 1 3of the probe in the food3
l
Is the probe tip in the center of the food7
b Is the probe tocrching bone or fat?
l
Have you allowed
roasts to stand for a few
mtnutes after cooking?
l
Is the probe plugged
tightly into its socket?
o Is the Cook Power set where it should be?
l
is the Meal Sensor. Probe Control se+ at the
end temperature
you want7
l
Tmk
If the lower oven will not operate:
Is the Oven Selector turned to a setting
(BAKE or BROIL, but not TIMED BAKE)?
l
Is the Oven Temperature
Control turned to a
temperature
setting?
If the Self-Cleanlng
cycle will not operate:
l Are the Oven
Selector and the Oven Temperature Control set to “CLEAN?”
l
Does the Start rime Dial show the correct
iime of day?
l
Is the Stop Time Dial set ahead to the time
vou want the cleaning
cycle to stop?
l
Is the Lock Lever all the way to the right7
[The Clean Light will come on.)
If cooking results aren’t what you expect:
Is the o;en level?
Are you using pans recommended
in the
Cooking Guide?
If baking, have you allowed I1 z to 2 inches
(4-5 cm] on all sides of the pans for air
circulation7
Does the oven temperature
seem too low or
too high7 See page13, “Adjusting the oven
temperature
control.”
Have you preheated
the oven as the recipe
calls for?
Are the pans the sire called for in the
recipe7
Are you following a tested recipe from a
rellable source7
See the Cooking Guide for more inf,ormation
on cooking problems and how to solve them.
l
21
2
l
3
Ifyou need assistance’. . . .
Call the Whlrlpool
COOL-LINE ’ service asslstance telephone
number. Dial free from:
Contlnental
U.S. . . . . . . . . (800) 25% 130 1
Mlchlgan
........ .
. . . (800) 632-2243
Alaska & Hawaii .
. . (800) 253- 4 121
and talk tiith one of our trained Consultants
The Consultant
can Instruct vou in how to oo
tain satisfactory
operation
from your applrante or, ofservice IS necessary,
recommend
a
qualtfied
service company
tn your arec
Ifyou need service’:. . .
l
Whirlpool
nationwide
-A
has a
net-
vice
Companies
TECH-CARE service
technicians
are
FRANCHISED
SERVICE
trained to fulfill the
product
warranty
and provide
aftern;rron?y
selvlce,
anywhere
in the United
Slate< To locate TECH-CARE service
In your
‘Irea call our COOL-LINE service assistance
‘elephone
number (see Step 2) or look in your
+cssep:one directory
Yellow Pages under
APPLIANCESHO”S,EHOLD
MAJOR
.:
_.
1 I.
SERVICL
2,
I ‘,
,.
ELkCTRICAL
MAJOR
& REPAIR
OR
.. ..p.,
.a+,
APPLIANCES--REPAIRING
L PARTS
hi’.,
&h
1: i! 3
:;r
)II.
WASHING
MACHINES.
DRYERS
S NROHERS
~SERVlClNG
4
l
Ifyou have a problem
...
“311
.-,
our C(.)UL-LINE service assistance
telep’lone number [see Step 2) and talk with one
: i c)~: Consultants, or if you prefer, ,wrlte to.
r~lr Guy Turner, Vice President
iiVrirlpool Corporation
ndrrrrlistratlve
Center
iOO0 US-33 North
” doci mus: CL!,I cr hrrlte please provide
model
r,.lmber, seric:I number date 0: purchase,
and
o complete
description
of the problem.
This
inlormatlon
-5 needed
in order to better rescion3 to yoL?r request f3r assistance
22
Notes
23
FSP is a registered
trademark
of Whrrlpool
Corporation
for
quality parts. took for this
FSP
symbol of quality whenever
you need a replocemenl
part
’ for your Whirlpool
appliance.
FSP replacement
parts
will fit right and work right, because
they are
made lo the same exacting
specifications
used to build every new Whirlpool
appliance
0
Benlon Harbor. Michrgan. Automatic Washers, Clolhes Dryers.
Freezers, Refrigerator-Freezers.
Ice Makers. Dishwashers.
BurlI-rn Ovens and Surtace Llnils. Ranges. Microwave Ovens.
Compaclors. Room Air Conditioners, Dehumidllierr,
Central
Heatrng and Air Condilioning Systems.
Part No. 312411
Printed in U.S.A.