1
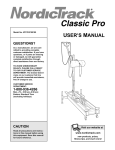
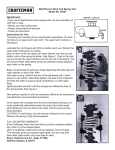
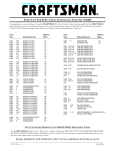
¨
Olympic Expansion Kit
Model No. 831.150780
QUESTIONS? If you have questions, or if there are missing or damaged parts, please call our toll-free
HELPLINE at 1-800-736-6879, Monday through Saturday, 7 a.m. until 7 p.m. Central Time (excluding holidays).
Assembly Instructions
Place all parts in a cleared area and remove the packing materials. Do not dispose of the packing materials until
assembly is completed. Assembly requires two adjustable wrenches
.
WARNING:
To reduce the risk of serious injury, read the following important precautions
before using the weight bench.
1. Read all instructions in this manual before
using the olympic expansion kit.
2. The weight bench does not include weights.
The weight bench is designed to support a
If you own the 831.150740 (WEIDER PRO 800), follow
steps 1 through 6 below and on page 2 to install the
olympic expansion kit. If you own the 831.150760
(WEIDER PRO 900), follow steps 1 through 6 on page
3 and the back cover.
maximum of 510 pounds, including the user, a
weight bar, and weights. Do not place more that
310 pounds, including a weight bar and weights,
on the weight rests. Do not place more that 150
pounds on the leg lever or the lat tower.
1
E
B
1. Detach the Crossbar (A) from one of the Upright
Bases (B) by removing the four M10 x 81mm Bolts
(C), the Support Plates (D), and the four M10 Nylon
Locknuts (E). Lay the Upright Base on its side to
keep it from falling.
2. Detach the Frame (F) from the Crossbar (A) by
removing the two M10 x 81mm Bolts (C), the Small
Support Plate (G), and the two M10 Nylon Locknuts
(H).
A
D
C
E
D
C
2
B
E
Note: It may be helpful to have a second person
hold the remaining Upright Base (B) to keep it
from falling.
C
G
F
A
H
3. Detach the Crossbar (A) from the other Upright Base
(B) by removing the remaining M10 x 81mm Bolts
(C), Support Plates (D), and M10 Nylon Locknuts
(E).
3
E
D
E
C
B
Attach the Olympic Crossbar (I) to the Upright Base
(B) with four M10 x 81mm Bolts (C), two Support
Plates (D), and four M10 Nylon Locknuts (E).
A
C
D
Store the standard Crossbar (A) in a safe place.
I
4. Attach the Frame (F) to the Olympic Crossbar (I) with
two M10 x 81mm Bolts (C), a Small Support Plate
(G), and two M10 Nylon Locknuts (H).
4
E
C
G
F
I
H
5. Attach the other side of the Olympic Crossbar (I) to
the other Upright Base (B) with the remaining four
M10 x 81mm Bolts (C), the Support Plates (D), and
the four M10 Nylon Locknuts (E).
5
I
E
B
D
C
E
D
C
6. Press the Bushings (J) into the ends of the Weight
Adapter (K) as shown. Slide the Weight Adapter onto
the Weight Tube (L) and secure it by pushing the
Detent Pin (M) into the weight tube as shown.
6
K
L
M
J
2
1. If you own the 831.150760 (WEIDER PRO 900),
follow the steps below to install the olympic
expansion kit.
1
E
B
Detach the Crossbar (A) from one of the Upright
Bases (B) by removing the four M10 x 81mm Bolts
(C), the Support Plates (D), and the four M10 Nylon
Locknuts (E). Lay the Upright Base on its side to
keep it from falling.
A
D
2. Detach the welded bracket on the Frame (F) from the
Crossbar (A) by removing the two M10 x 81mm Bolts
(G) and the two M10 Nylon Locknuts (H).
E
D
C
C
2
B
F
Note: It may be helpful to have a second person
hold the remaining Upright Base (B) to keep it
from falling.
G
H
3. Detach the Crossbar (A) from the other Upright Base
(B) by removing the remaining M10 x 81mm Bolts
(C), Support Plates (D) and M10 Nylon Locknuts (E).
3
A
E
D
E
C
Attach the Olympic Crossbar (I) to the Upright Base
(B) with four M10 x 81mm Bolts (C), two Support
Plates (D), and four M10 Nylon Locknuts (E).
B
A
C
Store the standard Crossbar (A) in a safe place.
D
I
4. Attach the welded bracket on the Frame (F) to the
Olympic Crossbar (I) with two M10 x 81mm Bolts (G)
and two M10 Nylon Locknuts (H).
4
F
G
H
3
I
5. Attach the other side of the Olympic Crossbar (I) to
the other Upright Base (B) with the remaining four
M10 x 81mm Bolts (C), the Support Plates (D), and
the four M10 Nylon Locknuts (E).
5
E
B
I
D
6. Press the Bushings (J) into the ends of the Weight
Adapter (K) as shown. Slide the Weight Adapter
onto the Weight Tube (L) and secure it by pushing
the Detent Pin (M) into the Weight Tube as shown.
E
D
C
C
6
Note: The Weight Adapter (K) can also be used
on the lat tower.
L
K
M
J
Limited Warranty
For 90 days from the date of purchase, if failure occurs due to defect in material or workmanship in this
SEARS WEIGHT BENCH ACCESSORY, contact the nearest SEARS Service Center throughout the
United States and SEARS will repair or replace the WEIGHT BENCH ACCESSORY, free of charge.
This warranty does not apply when the WEIGHT BENCH ACCESSORY is used commercially or for rental
purposes.
This warranty gives you specific legal rights, and you may also have other rights which vary from state to
state.
SEARS, ROEBUCK AND CO., DEPT. 817WA, HOFFMAN ESTATES, IL 60179
Part No. 163204 R0100A
Printed in China © 2000 Sears, Roebuck and Co.