1
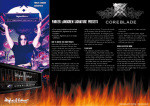
Item #: V35CMP
Assembly Instructions
For our most current instructions, to request missing, lost or broken parts, or for any other Customer
Service issues, please visit our website at www.walkeredison.com or call us at 877-207-5906.
Revised 11/2010
Parts List
Hardware List
Carefully lay glass top (1) upside down on a soft surface. Screw short rods (B) into the metal plates of glass
top (1).
Screw cylinders (6) onto short rods (B).
Screw long rods (A) into cylinders (6).
Snap decorative rings (C) onto cylinders (6).
Carefully lay glass shelf (2) in place using long rods (A) as guides. Place decorative rings (C) over long rods
(A).
Screw cylinders (5) onto long rods (A). Note that cylinders (5) will fit snuggly inside the decorative rings
placed in the previous step.
Screw long rods (A) into cylinders (5).
Snap decorative rings (C) onto cylinders (5).
Carefully lay glass shelf (2) in place using long rods (A) as guides. Place decorative rings (C) over long rods
(A).
Screw cylinders (3) onto long rods (A). Note that cylinders (3) will fit snuggly inside the decorative rings
placed in the previous step.
Screw long rods (A) into cylinders (3).
Snap decorative rings (C) onto cylinders (3).
Carefully lay glass shelf (2) in place using long rods (A) as guides. Place decorative rings (C) over long rods
(A).
Screw cylinders (4) onto long rods (A). Note that cylinders (4) will fit snuggly inside the decorative rings
placed in the previous step.
Screw long rods (A) into cylinders (4).
Snap decorative rings (C) onto cylinders (4).
Carefully lay glass shelf (2) in place using long rods (A) as guides. Place decorative rings (C) over long rods
(A).
Screw cylinders (7) onto long rods (A). Note that cylinders (7) will fit snuggly inside the decorative rings
placed in the previous step.
Insert caps (D) into cylinders (7). Note that caps (D) may come pre-inserted into cylinders (7).